But what about ordinary people who raise people and do not work in various institutions directly related to children of preschool and primary school age? Modeling from plasticine has a beneficial effect on the development of children's intelligence, and also awakens additional neural connections in the part of the brain responsible for creativity.
Scientists have also noted the positive effect of modeling on fine and medium motor skills of the limbs. There is nothing complicated in modeling from plasticine, but you should purchase all the necessary materials in advance and follow a few simple rules so that the creative process proceeds safely and brings pleasure to the participants.
For work you will need
What you need for sculpting:
- Oilcloth. It will protect the work surface from plasticine and damage that tools can cause.
- Plastic stand. It would be a shame if the figurine your child made gets damaged when you start tearing it off the work surface. It’s better to sculpt on a ready-made stand right away!
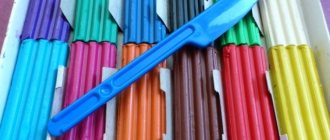
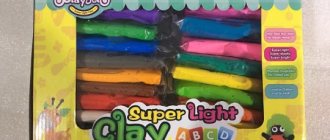
- Plasticine.
Choose plasticine that has many colors, because your child’s imagination is limitless!
- Bowl of soapy water. If you frequently wet your hands in soapy water, the plasticine will not stick to your fingers and leave characteristic marks on them.
- Matches. Thanks to matches, you can create complex structures from plasticine. If you use them as a “skeleton” of a planned creature or object.
- Plastic tools for sculpture.
- Various jewelry for decorating sculptures.
Step-by-step job description
Modeling a dragon from plasticine requires additional preparation, which will ensure comfort during work and help avoid unfortunate moments or breakages of the newly created figure.
Step by step process:
- Lay the oilcloth on a table or other flat and hard surface.
- Place a stand on it.
- Prepare plasticine and all the above-described accessories.
- Pour warm water into a bowl in advance and add soap to it.
When working with plasticine, the child should wear arm sleeves and an apron.
- Prepare an apron and towel.
- Divide the workspace into two halves - the actual work area and the part where you will store materials and tools.
- Get started with the creative process!
Ready! Now you can get to work.
Paper wings
Paper and cardboard are common resources for creating this accessory. They are easy to use and low cost. However, this is a rather long process. It is necessary to cut out a lot of details that will eventually look like natural feathers.
Required Items
- Cardboard.
- White paper.
- A printer.
- Elastic band.
- Glue gun.
- Pencil.
- Scissors.
Progress
First you need to make a base. It is made of cardboard, onto which feathers will then be attached. The outline of the base need not be drawn; in any case, it will be carefully disguised with the help of feathers on the edge. An elastic band should be attached to the base.
Then you need to make feather blanks. For convenience, they can be printed. It is better to glue the feathers from the bottom of the base, otherwise the glue would not be noticeable even in layers.
Feathers should be glued to the top, the bottom can be curled with scissors.
How to mold a good dragon from plasticine?
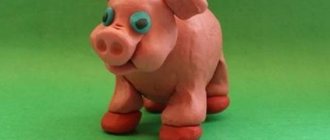
All children learn about dragons from fairy tales, but not all representatives of this species are described as evil in literature. There are many amazing stories where the main characters are kind and cute dragons. Surely a child will be interested in creating one of these with his own hands.
Modeling step by step:
- Take plasticine and roll two balls of different sizes. Then press them together and slightly press the top ball into the bottom one. The result was the head of the future dragon.
- Next, use plasticine of a different color to make small ears, a nose and the circumference of the nostrils.
- The dragon's eyes can be drawn on paper in advance and cut out, or made from scrap materials.
- Next, start working on the torso. Make a small “sausage”, one end of which turns into a smooth cone, and the other extends into a thin tube.
- Next, from plasticine of the same color from which the eyes and nose are already sculpted, cut small strips and attach them to the dragon’s belly, one under the other. Press each of them a little with your finger to create an “armor effect”.
- Connect the head and torso.
- Next, sculpt the legs, spine and wings of the cute dragon.
- Put it all together.
Congratulations! Your Dragon is ready!
How to make a dragon from plasticine?
- To sculpt a dragon we will need:
- green as the main color;
- scarlet and yellow;
stack and skewer.
Roll two balls.
- From a large ball we make the body, tail and neck of the dragon.
- We make a furrow from the neck to the tail, apply notches.
- We make the wings of a fire-breathing creature, they are triangular with yellow membrane threads.
- We make a head from a small blank, sculpt the legs and assemble the dragon.
- List item
- I will create the scales and decorate them.
Everyone loves dragons: children and adults of all ages, boys and girls!
Dragons are drawn, cut out of paper, and, of course, sculpted from plasticine.
I want to share a diagram for sculpting a black dragon
It’s easy to sculpt his figure - he sits, so the craft will be quite stable.
Toothpicks will help to neatly and tightly fasten all the parts together.
we only need black or any other dark colored plasticine and a small piece of yellow plasticine for the eyes.
The photo diagram presented below will help you make a beautiful and funny dragon from plasticine.
It is important here to smooth all the parts very well so that their surface is perfectly flat and smooth.
creative success and inspiration!
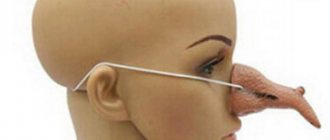
I couldn’t find a step-by-step image of how to sculpt it. But I would like to add visual examples. I really liked this pink dragon. I don’t think it will be very difficult to mold it from good quality plasticine, and the colors can be different.
Here are some more beautiful dragons
We sculpt a dragon step by step from plasticine. We will need plasticine of different colors - yellow, orange and malachite. The colors can be changed and the dragon will turn out brighter and more intimidating. Let's look at the diagram step by step, how to sculpt a dragon from plasticine
In order to make a dragon from plasticine, you must complete the following steps:
Here you can watch a video master class showing the sculpting of a dragon:
The best way to correctly understand exactly how a dragon is made is from the video.
The dragon is not a symbol of next year, but these fantastic animals for us have been exciting the minds of people for thousands of years, attracting attention to themselves.
1
Making a dragon from plasticine is not at all difficult. Below are step-by-step photographs showing how quickly and easily you can mold a cute dragon from plasticine.
So, first prepare everything you need for modeling:
Next, take green plasticine and roll the head so that it looks like this:
Make eyes from yellow plasticine and teeth from white plasticine. Design it as shown in the picture:
Make an elongated body:
Next, make wings, claws, and flames from the mouth out of cardboard. This can also be done from plasticine, but from cardboard it turns out more neatly and interestingly. In general, in the end you should get something like this:
Modeling from plasticine brings great pleasure to children, especially if their parents help them with this. I propose to consider two options for sculpting a dragon: a cartoon one (from the cartoon quot; school of monstersquot;) and from Russian folk tales (Gorynych).
This photo shows the step-by-step sculpting of the Gorynych dragon.
But this photo shows a dragon from the cartoon quot; school of monstersquot;.
Let's make a dragon from plasticine:
First stage. We take plasticine and roll a ball out of it, you can determine the size of the ball yourself, the larger, the bigger the dragon;
Second phase. We make four legs and attach them to our ball, as shown in the photo.
Third stage. Making the dragon's tail. We sculpt a figure similar to a cylinder. We make it of different thicknesses (thicker at one end, thinner at the other) and attach it to the main figure.
Fourth stage. We sculpt the neck of the dragon.
Fifth stage. We make wings for a dragon, you can make any size, both large and small.
Sixth stage. We make spikes on his back, in the form of small cones.
Seventh stage. Make eyes from matches or paint. And you color it and get a dragon:
info-4all.ru
How to make the dragon Toothless from plasticine
Toothless is a legendary dragon, a popular character from the cartoon How to Train Your Dragon. Surely your child will be delighted to learn that you are ready to help him create this extremely cute hero.
The modeling of Toothless also occurs in several stages:
- Form a smooth cone from black plasticine. It will become the body of the future dragon.
- Next, sculpt the legs and attach them to the cone. Please note that the dragon figure is sitting and not standing.
- Detail the head by creating indentations for the eyes, and fill them with yellow plasticine, gluing small black pupils on top.
- Sculpt the dragon's second legs and ears and attach them. Then fashion forehead spikes and use a special stack to make indentations on the tips of the paws. Fill them with white plasticine. The toes are ready.
- Make wings and tail, secure and decorate them.
- Ready! Congratulate yourself on successfully completing your work!
Let's sculpt a dragon
Below is a master class on how to make different models of dragons step by step.
Simple, stylistic models that do not require precise detailing and perfect resemblance to winged monsters are suitable for beginners and children.
To work you will need:
- plasticine in blue, green, orange, white, black and red;
- stacks;
- toothpicks;
- modeling board.
The instructions are very simple: you need to make each part of the dragon's body separately, and then connect everything together. All elements are made from balls and sausages.
What elements need to be done:
- Head - two blue balls - large and small;
- Body - draw out the ball, make a cone;
- Paws - four identical balls are pulled out, bent and processed with a stack (fingers are made);
- Dorsal Spikes - An orange sausage is flattened and stacked in a zigzag motion;
- Wings - droplets are made from green balls, the edges are trimmed to form triangles, and processed with a stack;
- The tongue and eyes are red, black and white balls from which cakes are made.
All parts of the body are connected to each other with toothpicks, the spines and wings are smoothed out on the back, the eyes are assembled, and the tongue is glued.
The next model requires more time and patience.
To do this you will need plasticine (green, black, white, yellow, orange and red), stacks, toothpicks, and a modeling board.
How to sculpt:
- Roll a small green ball (head blank);
Related article: DIY headphone stand
- Roll a smaller ball and give it a rectangular shape, attach it to the ball (head), make two notches - the nostrils, and a cut at the bottom - the mouth (you should get a muzzle);
- Make two rings from thin orange sausages and place them in the nostrils, make eyes from white and black plasticine cakes;
- Roll green plasticine into a large cone or drop;
- Roll a sausage out of orange plasticine and cut it into pieces of different sizes;
- Attach the sausages to the cone as shown in the photo (you should get a grooved belly);
- Connect the head to the body using a toothpick;
- Roll two identical green balls and eight small orange ones;
- Pull the green balls into drops, crush them and process them with a stack to make fingers, glue the orange balls (claws);
- Attach the legs to the body, smooth them out;
- Make the hind legs from flattened balls and droplets and attach them to the body;
- Roll up an orange sausage, cover it with yellow plasticine and cut into small pieces in stacks;
- Form triangles from the pieces (spikes on the back), and roll a cone-shaped sausage (tail) from green plasticine;
- Attach the tail and decorate the dragon with spikes from head to tail, attach triangular orange ears;
- To make the wings: roll out two pieces of red plasticine and cut a zigzag on one side of each piece, stack it, and then attach the wings to the back of the dragon.
To make a dragon “like a real one”, with large wings and fire, you will need the following materials:
- green, yellow and red plasticine;
- toothpicks;
- stacks.
Progress:
- roll two balls from green plasticine - small and large;
- We form a body from a large ball - stretch the large tail and small neck upward;
- we process the back with a stack so that we get spikes;
- roll out the red ball and form it into triangular wings extended upward;
- roll a thin sausage out of yellow plasticine and make membranes on the wings;
- from a small ball we make an oblong head, glue on narrow red eyes;
- roll up green sausages, bend them and glue them to the head in the form of horns;
- We form “ears” from two red droplets, process them with a stack and glue them to the head;
- roll out four green balls, press, stretch and bend them so that you get legs (the front ones are longer than the back ones);
- attach the head using a toothpick, smooth the paws, make a flame from red and yellow plasticine, attach to the head using a toothpick;
- we process the body with a ballpoint pen or a stack to make scales.
Related article: DIY crocheted bolster pillows. Photos and diagrams
Many people are probably interested in how to make Toothless from the cartoon How to Train Your Dragon. This is a black dragon loved by many children and adults - a kind cartoon character who eats fish.
A simple model can be made using black, yellow, white and gray plasticine, toothpicks and stacks.
Progress:
- Roll out of black plasticine a large cone for the body and two small ones for the hind legs;
- Roll out an oval, stretch it out a little at the bottom to form a muzzle, make a stack of two notches for the eyes;
- Connect the head to the body using a toothpick, glue the cone legs on the sides, slightly bending them;
- Make two cakes from yellow plasticine and fill the recesses with them;
- Roll several small black balls and form them into horns, ears, spikes and pupils;
- Glue the elements to the head, add white highlights to the eyes;
- Roll two black cones and make longitudinal indentations in front of the body;
- Glue the cone paws into the recesses and process all the paws with a stack (make indentations for the claws);
- Roll small white cones (12 pieces) and glue them into the recesses on the paws;
- Make a stack of wings from two black droplets;
- Roll into a cone-shaped sausage, wrap it in an arc and glue a scallop at the end;
- Assemble the entire figure using toothpicks: attach the wings and tail, make a fish tail from gray plasticine and attach it to the face.
You can watch the master classes in more detail via video.
How to make a fire-breathing dragon from “Shrek” with wings from plasticine?
“Shrek” is a cult cartoon, and all its fans remember the donkey’s wife, the fire-breathing dragon. Both adults and children are delighted with this character.
This step-by-step tutorial will show you how to make a dragon from Shrek out of plasticine:
- By analogy with the first case, start by creating a head, sculpting a smooth cone slightly flattened on both sides.
- Start decorating your head. Make a comb, cut out the eye sockets with a plastic stack and fashion a smug smile.
- Fill the eyes with yellow plasticine and place the black dots of the pupils in the center.
- The body of the cartoon dragon is more like the body of a caterpillar. Fashion an oblong cocoon, narrowed on both sides.
- Carefully create the hind and front legs from plasticine. Attach them to your body. Place the front paws crosswise, one on top of the other.
- Attach a base of white plasticine to the neck for the future collar.
- Make spikes from white plasticine for the collar.
- Next, draw a stack of stripes-folds on the dragon’s belly.
- All that remains is to make the claws and attach the pre-made wings.
- Ready!
Plasticine modeling of a green dragon
The mythical creatures dragons are so incomprehensible and mysterious to us. What should they be? Nobody knows, because in reality they do not exist, only our imagination can draw them. But we still saw dragons, albeit virtual, non-living ones, in cartoons, in fantastic fairy tales, in computer games, in the form of toys.
We clearly imagine their image. This will help us create a figurine of a mythical creature with our own hands. We will make this from plasticine according to the tips given here. We will work with green and yellow plasticine, the most suitable pair for us.
The detailed tutorial provided here is designed for primary school age children who can easily complete many small details.
Now let's move on to the most important thing - a detailed description of everything you need for sculpting, as well as step-by-step instructions.
To realize this fantastic plasticine idea you will need:
- Green and yellow plasticine;
- Plastic running eyes or white and black plasticine for sculpting them;
- Match.
Prepare the planned plasticine bars for work. You can take a yellow or orange related shade. We will not go into extremely detailed detail, we will complete all the details using the simplest method, see how exactly.
Let's move on to sculpting. The initial stage is to create all the parts of the figure; for this we will need a lot of green mass, and we will complement the appearance with yellow. Although dragons do not exist, we still traditionally want to show their parts that are quite understandable to us: the torso, head and paws.
However, the body will smoothly transition into the tail and will be covered with small scales, there will be horns on the head, and the paws will be awkward with three fingers. In general, we are waiting for the sculpting of an unusual craft. Make the fragments shown in the photo and move on to the next stage.
Make the head unusual, flattened, like a lizard or snake. Using your fingertips or a special round tool, press indentations for the eyes. Stick on white round cakes and make nostrils - miniature red rings. Simply cut out the mouth in a stack and stick on two white fangs for greater convincing.
Glue the pupils onto the large eyes. Take the body and make several yellow thin sticks.
Yellow sticks are needed to create a ribbed belly. Glue a whole row of sticks across it - make a lattice from the neck to the tail. Since the body gradually narrows and turns into a tail, the length of the sticks should be gradually reduced. You can glue the famous arrow onto the sharp tip to make the dragon figurine truly branded.
Connect the head with the green carrot body. You must first insert a match, otherwise, when the plasticine hardens, the head will simply fall off. Pull a piece of yellow plasticine into a thin sausage. Stick on the back. Be sure to start from the frontal part and end at the outermost point on the tail. Use a stack to make cuts in the form of scales. Make blanks for the paws from green cakes with three yellow finger balls.
Glue the legs, lean the entire figure on them and on the tail, connect the arms to the body.
You will also need wings. They should look like bat wings, but we will make them from the same green and yellow plasticine.
The plasticine dragon is just a fantasy, but it turned out funny, the figurine looks like a figurine bought in a store.
How to make a toothless
How to make a Godzilla dragon from plasticine?
Godzilla is an iconic destructive lizard who came into popular culture from Japanese horror stories. Even the smallest children know almost everything about it and are probably eager to make a legendary monster!
Working on a Godzilla figurine requires a little more effort and perseverance, since the character himself is more serious and complex, but the result can exceed all expectations!
How to blind:
- Traditionally, work on a lizard’s body should begin by fashioning an oblong cocoon, one end of which should be narrowed and elongated as much as possible, and the other should be turned into a smoothly curved muzzle.
- Next, sculpt the large and massive legs of the lizard and attach them to the body.
- The figure should stand slightly leaning forward. Watch its position in space. This will help you secure your legs properly.
- Start detailing the head. Cut the nose into two equal parts and straighten them slightly, turning them into an open mouth.
- Cut out several teeth from white plasticine and insert them evenly into Godzilla's mouth. Some of the fangs can be made to protrude or made from yellow plasticine to make the monster's mouth more realistic.
- Next, detail the eyes by filling them with white plasticine, making the pupils of the monster.
The brow ridges should be done more carefully than on other dragons, since Godzilla is a character whose facial expressions are responsible for a lot. The eyes themselves should be made a little narrow. Combined with a grin, this will give the dragon's face a frightening expression.
- Take a sharp stick and dark plasticine and stick thin stripes on the tail at regular intervals. Then cut through the monster's toes.
- Pay attention to the folds and wrinkles on the lizard's body. Using a rounded stack, draw a pattern on the skin of your legs. The pattern on the back of the monster deserves special attention. It should be similar to the relief pattern that crocodiles and alligators wear on their backs.
- Next, cut out many sharp teeth from blue plasticine and gradually fasten them in two rows on the back and tail of the lizard. Making a dragon from plasticine is quite simple if you know its anatomy. Draw folds under each of the spikes to make the sculpture more realistic.
- Apply a thin layer of white plasticine to some of the spines to highlight the irregularities of the dragon's body.
How to make a dragon
The basic rules are simple:
- Knead the material until completely soft. It should become as flexible as possible.
- Follow the sequence of work.
- Smooth out the joints of the elements.
- Decorate the finished figurine after complete production. Choose a light decor so as not to overload the figure.
Coat the product with colored or clear nail polish or clay polish only after preliminary drying. Soft plasticine dries within 10–12 hours, and then it can be varnished without the risk of disturbing the smoothness of the forms.
From plasticine - good Dragon
Let's look at how to make a good dragon from plasticine step by step:
- roll two balls for the head from soft material, make them of different sizes;
- fasten the blanks, give them an oval shape, stretch them, giving the outline of the muzzle;
- complete the head with strips of nostrils, pierce the holes of the nostrils under them;
- make big colored eyes;
- if desired, attach a soft comb to your head;
- Roll the body and tail out of colored plasticine: the body will be oval, extend the tail and neck from both sides;
- fasten the neck to the head with matches, decorate the tail with colored spikes;
- make the paws out of four small balls, rolling them into sausages;
- from two triangular plates you will get wings - fix them on the sides of the body.
Choose the color of the Dragon yourself; it can be a multi-colored figurine made up of pieces of plastic material.
From plasticine - the dragon Toothless
You will need pieces of black, yellow, white and gray shades. Make a dragon more convenient from light plasticine in this way:
- Roll a large cone out of a black piece - this is the body. The two small cones are the hind legs.
- An oval made of black material is the muzzle. Pull the workpiece out a little at the bottom, and use a stack to pin the holes for the eyes.
- Attach the head to the body with a toothpick, fix the paws on the sides.
- Roll sausages out of two balls of yellow material, fill the eye sockets with them, attach two white balls on top - these will be highlights on the eyes.
- In front of the body, mark a couple of longitudinal grooves, prepare two sausages made of black material - these are the front legs. Insert them into the recesses.
- Create horns, ears, spikes from small black circles and stick them on the body.
- Roll twelve small cones from a white piece and secure them to the paws.
- Stick out the wings in the shape of drops. Form the tail from a thin sausage, folded into an arc at the end. Create ridge spikes on top: pull out the plasticine a little with your fingers.
The finished plasticine figurine for children must stand for a while to harden. Then it can be coated with colorless varnish for durability.
Fantasy
Well, now you know how to make a dragon from plasticine! Follow all instructions correctly, but remember that the child’s imagination is most important.
How to make a dragon from plasticine depends on the imagination of children and adults - improvise as you wish!
It will be very cool if an enthusiastic kid adds some original elements he himself invented to each of the dragon figures. Instructions are provided for those who want to accurately sculpt figurines of their favorite characters!
Article design: Natalie Podolskaya