There are many different mandala weaving techniques. Most often, eight-pointed (eight-pointed) amulets are created by connecting basic four-pointed squares. The mandalas themselves can be either very small in size (the base is toothpicks) or huge, more than 1.5 meters, but this is for masters of their craft.
So, now we will conduct a short master class on creating a simple mandala, so that it becomes clear what such an amulet is.
Photo of the result:
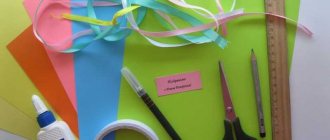
We will need:
1) Two small sticks. You can even take toothpicks or pencils, the main thing is that the sticks are the same size and length.
2) Wool or cotton threads. A variety of colors is welcome, but for the first time 3-4 balls will be enough.
3) Scissors.
Begin:
First we take two sticks and tie a knot on them with thread. Let's start wrapping.
Separate the sticks to form an even cross.
We begin to wrap along one diagonal, then along the second. We wrap it tightly and fix the even position of the sticks, one perpendicular to the other.
We wrap the sticks one by one with the same thread, about one or two turns of the thread. It turns out to be a rhombus or a square, depending on how you turn it.
We cut off the thread, leaving a small margin, and from this stock we make a knot.
We take the next thread and tie it with a knot to one of the sticks, start wrapping it as before, not forgetting to wrap the knots so that they are not visible.
- You can take a few more different colors, but the pattern of weaving them into the mandala, described in the previous paragraph, does not change.
- At the end we also tie a knot, but on the inside of the mandala.
- We cut off the ends on the knots, and the mandala is ready!
But this was a master class on weaving a four-pointed mandala - the simplest one. There are many more types of such amulets; the eight-rayed mandala, where you need to connect two four-rayed ones together, is more common.
- And now we will look at ways to weave threads into the base of an eight-ray mandala; there can be a great variety of them.
1. Rays. This is the name of the pattern, the essence of which is to braid each stick through two. That is, we tie a thread to any stick, first pass the thread under the next stick - this time. Then again under the next stick and the third we wrap it twice.
This continues until the owner of the future mandala considers it necessary to finish.
What's good about this pattern? When two square mandalas are connected into an eight-pointed mandala in this way, a symmetrical star is formed on the back side, and the outside of the product will look more voluminous.
More often used for the central part of the mandala:
2. Belt. The simplest pattern. Its essence lies in braiding each stick in a row. Most often used for the so-called mandala frame, in order to better process the edges.
Edges processed using the belt technique:
Based on the belt:
3. Square. The idea is to weave through one stick. It is used in the same way as the previous ones, on octagonal products.
Mandala woven entirely on the basis of a square:
These three methods are the main ones when weaving a mandala. With their help, beautiful amulets, amulets and simply beautiful jewelry are created - mandalas.
- Consider a video on this topic:
- How to choose colors for a mandala:
We all know that there are a great variety of different colors. How can you not get lost in all this luxurious splendor of colors and create a color scheme for your amulet that you will like and will not put so much pressure on your eyes with its diversity?
The first secret is a linear diagram. Find a picture of a color wheel on the Internet and select the color you like. Use your eyes to see which color is directly opposite the chosen one. These will be the first and second colors!
The second secret is the triad. If you need three colors that are in harmony with each other, then use the triad scheme. Take colors of the same saturation, arranged in a triangle on the color wheel.
The third secret is a double linear circuit. The point is to take either the doubled and intersecting first secret, or look for colors based on an even square and diamond.
The fourth secret is cold + warm. The point is to mix warm colors with cool ones. For every three warm colors there is one cool color and vice versa.
The fifth secret is black and white. You can also use the contrast of black and white if you are unpretentious in the color of your decoration.
Weaving video tip:
They also belong to mandalas, although they have a slightly different effect on a person. But it can be even easier to make than some types of mandalas.
Conclusion
Now you know how to make the process of creating a magical amulet easier and you have received good tips on weaving it. I hope you no longer have to rack your brains and come up with more suitable patterns, regret choosing the wrong color scheme, or try to refresh your memory of weaving methods.
Source: https://webdiana.ru/dom-i-semya/rukodelie/2938-pletenie-mandaly-master-klass.html
Indian mandala
This type of weaving is not as easy as the previous one, but the result is more interesting. For it you will need 4 sticks (it is advisable to use a larger version rather than toothpicks), scissors and 7 colors of yarn. An Indian mandala can be made from threads according to the following scheme:
- A cross is made from 2 sticks, for which they are tied together in the middle and then unfolded perpendicular to each other.
- The base is secured by wrapping its middle diagonally in one direction and the other several times.
- Each stick is wrapped in turn with a thread, for which it is wound from the top, wrapped around one end of the frame and transferred through the top to the other. The result should be a square pattern. This should be continued until the size of the middle suits the master.
- The thread is cut with a small margin and tied on the wrong side on any of the sticks.
- Take yarn of a different color, tie it to either side, after which weaving continues according to the same principle. In this case, you need to wrap the knot of the previous thread. It is necessary to weave tightly, otherwise the finished mandala will sag.
- Now you need to connect the second pair of sticks and weave the same rhombus in its center as on the first cross. This part of the frame will be the wrong side, so when forming a square on it, you should not be overzealous with the color scheme. The main thing is that the pattern matches the size of the one made on the first pair of sticks.
- Both parts of the frame need to be connected. A new thread is tied to either side of the first cross, after which the second pair of sticks is placed under the bottom of the first so that the rays of its pattern are between the ends of the upper one. The result should be an octagon of threads.
- The tied thread is lowered to the third closest end of the frame and wrapped around it. Next, you need to wrap the yarn around each third side, holding the mandala tightly. Using the same principle, the amulet needs to be braided with 2-3 more flowers.
- Next, a “belt” is made. To do this, take a different shade and start sequentially wrapping all sides of the base. Thread colors should be changed periodically.
- You need to take yarn of a new shade and tie it on the side of the top cross. After this, you need to pass one stick and wrap the next one, passing the thread under the lower end. Then the same pattern is repeated on the second pair of sticks. The thread is tied to any lower cross and wrapped through one side. It is better to repeat the pattern several times on both parts of the frame, using different colors.
The product is completed by weaving a “belt”, for which the yarn is tied to any of the sticks and sequentially braided around each end. This should be continued until the frame is finished, alternating shades. Then the thread is cut and a strong knot is tied on the wrong side.
Weaving a mandala with your own hands from threads: magic threads to self-knowledge
You can achieve your goal in different ways, the main thing is not to sit still with your hands folded. In any case, you will have to make decisions, act and take responsibility. And in your free time, pay attention to weaving a mandala from threads . Keep your beautiful hands busy with such creativity - you will get closer to your dream faster if you tune in correctly to the process, because thoughts are material.
What is a woven mandala?
Mandalas were born in Eastern culture as a magical symbol that helps achieve desires and protect against negative energy. Initially, they were created on sand, but now it is customary to transfer images to paper or weave them from threads.
It is believed that the symbolic pattern, combined with guided meditation and visualization of desire, helps achieve the goal . In addition, this item can become an original element of room decor and bring a lot of pleasure and creative expression in the process of its making.
Interesting! Eastern teachings say that the mandala is a model of the universe. It has all the elements and natural elements. This is a strong amulet for a person. Contemplation of magnificent patterns sets you up for a positive train of thought and allows you to grow spiritually .
How to weave a mandala from threads?
For weaving you will need:
- Four wooden sticks. The diameter of the finished product depends on the length. For convenience, a depression is made exactly in the middle of one of the sticks. By combining the centers, a reliable design in the form of a cross is obtained;
- Colored wool threads. Natural material is more convenient to use because it does not slip;
- Scissors;
- Glue.
Choosing the color of threads for a woven mandala
The colors that are chosen for the threads matter:
1. Yellow and orange protect against evil and negativity, improve physical and emotional well-being; 2. Green has a positive effect on material wealth, professional growth and health; 3.
Blue promotes calm and relaxation; 4. Blue has a beneficial effect on thought processes; 5. Red charges with confidence and strength, fights loss of strength; 6. White increases intellectual abilities; 7.
Purple reveals creativity and intuition;
Mandala weaving pattern
Braided mandala made from yarn and wooden sticks (you can use barbecue sticks or disposable chopsticks) starting from the center and working your way around:
Technique for weaving mandalas from toothpicks
The word "mandala" is a classical Indian word meaning "circle". It represents wholeness, a cosmic diagram that reminds us of our relationship to the infinite.
When used in crafts, Mandala designs include layers of circles, and the number of layers depends on your preference.
Color meaning
In the classic version, a mandala is created with sand over the course of a week, a month or several months. In shape it is a fractal, that is, a closed figure, the parts of which are similar to the whole picture. To make a mandala with your own hands, which will become an effective amulet, you need to know what shades to choose for it. Each color has its own meaning:
- Yellow or orange - protects against witchcraft, black magic, the evil eye and negative influences. A mandala of such shades gives positive energy and improves health.
- Blue - clears thoughts, improves brain function, relieves the creature from obsessive thoughts and fears.
Blue - protects against damage and slander, and can give the owner of the mandala peace and tranquility.- Green - has a good effect on financial status, as well as heart health. An amulet of this color helps to achieve career success, and in combination with a blue tone it stabilizes the emotional state.
- Purple - serves as protection from evil and dangers, and also develops intuition, gives inspiration and helps to reveal creative potential.
- Red - strengthens willpower, gives self-confidence and drives away depression. This color also symbolizes passion and love, therefore it helps lonely people find a soul mate and return old feelings to partners who have been in a relationship for a long time.
- White - increases the level of intelligence, improves memory.
When weaving a talisman, it is better to combine several shades. For example, for a love mandala, a combination of red, yellow, blue and purple threads is needed, and the color of passion should predominate. To attract money, it is better to use different tones of green, as well as blue and white yarn. An amulet for making wishes come true should be woven from white, purple, red and orange threads.
Mandala weaving for beginners: patterns, master class. +Video
The mandala has the ability to protect against negativity and brings good luck and happiness. The wicker mandala looks beautiful and will decorate any interior; it can be hung as a decoration on the wall in any room. Weaving a mandala is a very simple activity and almost anyone can master it. For beginners, we will tell you how to weave a mandala with your own hands step by step.
Weaving a mandala is also a calming activity that will help you take your mind off the hustle and bustle and enjoy creativity.
Mandala weaving for beginners
The basis of a woven mandala is four sticks. The simplest option is regular wooden toothpicks. But the mandala on the toothpicks is very small in diameter. If you want to make a larger mandala, use skewers, knitting needles and other long sticks.
The best threads for weaving are woolen threads. Unlike synthetic threads, woolen threads do not slip and are pleasant to work with.
The center of each stick should be marked. Two sticks are tied clearly in the center. The angle of the sticks connected to each other should be exactly 90 degrees.
A similar procedure is also repeated with the second pair of sticks. After this, the two “crosses” are evenly aligned with each other and connected to each other in the middle. As a result, you should have a frame of 8 rays.
Now you can start weaving. You need to choose a weaving pattern for yourself in advance in order to follow it in detail. Only an experienced professional can create a pattern on his own so that it is beautiful and neat (weaving patterns are presented below).
Master class on mandala weaving for beginners step by step
Here we will tell you how to weave a simple and beautiful mandala for yourself. We will make it from toothpicks and woolen threads.
For this we need:
- Toothpicks or 4 thin, even sticks. Their length will determine the diameter of the mandala.
- Colored threads.
- Scissors.
- Some free time.
- Good mood;)
Step by step weaving of a mandala:
Step 1
Take threads of the same color and two toothpicks. We measure the middle of the toothpicks and place them on top of each other so that we get a cross. We connect them with a knot so as to fix the thread.
Step #2
Next, we begin to wrap a thread around each side of the toothpick, throwing it to the next side. Having finished with one color of thread, tie it to a stick and cut it. We tie the next thread and also continue to wrap them through each side.
Step #3
By tying a thread of a different color and braiding it according to the same principle, we get a diamond in the form of a frame of a different color. Next, we take two more toothpicks and weave another diamond using the same technology. It can be any color. Ours is yellow. This is what I get.
Step #4
Next, we tie a thread of a different color to one side of the toothpick of any diamond. Place one diamond on top of another.
Step #5
A simple and detailed master class on weaving Mandalas
We will try to make a DECORATIVE eight-rayed Indian mandala from wool and wooden sticks. Stock up on the necessary things: balls of thread, four sticks (I took sticks 25 cm long and 6 mm in diameter), scissors. We won't need anything else.
When you finish weaving with the second color, secure the thread. The simplest thing is to tie it with the rest of the ponytail with a double knot. However, complex mandalas, for example, figurative or healing ones, are generally woven with just one knot - and that one at the end. And not a drop of glue!
Tie the next color to the stick and start weaving with it.
From the inside out it will look like this. After finishing the dark green, I wove a few more rows of light green. You can use as many colors as you like.
We have a rosette ready - the most difficult thing in the whole mandala. Now let's move on to the relaxed part of the weave - the squares. The squares weave, almost like rays, only THROUGH ONE stick.
It turns out that we are weaving a square either on the upper cross or on the lower one, as at the very beginning. Tie a thread of a new color to one of the sticks of the bottom square and start weaving through one stick.
Having finished the color, secure the thread with a knot.
Weave a square of exactly the same width, but on the top cross. You can choose a different color.
We are starting to get such a beautiful flower.
Let's add a couple more squares of a different color. I decided to go with purple, but you can add more colors.
Now let's weave the rays again for a change. They are made in the same way using two sticks, as in the beginning in a socket.
Add as many more flowers as you see fit, but be sure to leave at least one quarter of the sticks to weave onto them for the final element of the mandala—the belt.
The reverse side of the mandala.
Let's start weaving the belt. We tie a thread to any stick and begin to weave the sticks sequentially in a circle. This is perhaps the simplest of the mandala patterns.
Once you finish one color, move on to the next. After a few rows of light green, I added one row of blue and finished off the waistband with dark green.
Well, the very last securing pattern. We were left with unbraided ends of the sticks about a centimeter long. Tie a thread to one of the sticks, which will be the final color chord in the mandala.
This will be a kind of belt in one row. Throw the thread onto the next stick and wrap it to the end, to the top, and then wrap it again to the bottom and throw the thread further.
- Having gone around the circle completely and wrapped the ends of the sticks, tie a thread with a tail of the same color and make a loop from the tails.
Source: www.liveinternet.ru
Source: https://cpykami.ru/prostoj-i-podrobnyj-master-klass-po-pleteniyu-mandaly/
We make a mandala from threads in the form of a Slavic amulet for needlewomen “Makosh”
A thread mandala is an ancient Slavic amulet, known in Russia under the traditional name “ God's Eye ”. From time immemorial, they have been used by different peoples of our planet for protection from evil forces, as well as to attract happiness, love and harmony into the lives of all households. You can read more about what a mandala is article . A talisman created from threads and wooden sticks in a harmonious state of soul certainly has good, beneficial power, and if it is born in a state of inspiration, it becomes truly Special. This is how “ Makosh ” turned out. The image of this mandala came to me largely thanks to the traditional embroidery pattern, symbolizing the ancient Goddess of earth and rain, harvest, spinning, weaving, patroness of crafts , women and, finally, the Goddess of fate . It seems to me that this “Eye of God” will be a good talisman of happiness if you want to let it into your life.
So, the necessary materials for weaving this Slavic amulet:
- threads (black, white, red and pink in different shades, the colors of the skeins can be seen in the picture). I use wool, cotton, silk, iris and floss threads;
- 5 wooden sticks (4 wooden barbecue skewers 30cm long and 1 skewer 20cm long);
- lace, a skein of white thread;
- embroidery needle;
- wire cutters;
- scissors;
- paraffin candle in a metal stand, instant glue;
- matches or lighter.
- Take two wooden sticks in your hands and place them together. Wrap the red thread tightly around the sticks in the very middle several times. 3-4 girths will be enough. A small tail will remain sticking out, but don’t worry - it will disappear under the threads during the weaving process. Turn the sticks at an angle of 90 degrees to each other. You should end up with a cross.
2. Secure both sticks by wrapping the second diagonal about 5-7 times, and then the first a couple more times. When laying the threads diagonally, try to press them tightly together. Make sure to maintain a right angle between the sticks. Check that the cross is strong enough and that the sticks do not wobble on their own.
Now start braiding each of the sticks in a circle in succession. In this case, the cross of sticks will move clockwise, and the thread will move counterclockwise. If you are left-handed, you will find it easier to weave in the opposite direction. Place the thread on top of one of the sticks, make a full turn around the stick, and when the thread is on top again, throw it over the second (adjacent) stick, placing the thread on top again.
Tip: Wrap each of the sticks sequentially, and when you reach the remaining tail, pull it a little and put it under the braid. In the future, you will need to do the same with each of the tails, wrapping them with thread. In this way, you additionally secure the thread and make the reverse side of the mandala neat.
3. Continue to sequentially wrap the thread around the stick and throw it over the next one until you have made several full circles. Determine the number of full circles according to your taste. When you think you have made enough full circles, cut the thread, leaving a small tail. With this tail, tie the stick with which you started weaving with a regular single knot.
Take a white thread and tie it with a single knot to any stick, but you can also to the same one you started with last time. Continue weaving with white thread for another 2-3 circles, and then cut the thread and tie another knot with the remaining tail. After this, make 2 more circles with black thread (I used iris thread) and secure it.
4. Make a second square mandala the same size as the first on the second pair of sticks. The first square will be the front side of the mandala, and the second will be on the back and will be almost invisible on the finished product. My bottom square is burgundy.
Tip: Pre-cut the sharp ends of the wooden sticks using wire cutters. You can file them a little, making them smoother, or give the ends a rounded shape.
Next, you need to secure both squares together. To do this, place both blanks crosswise and tie a white thread to one of the sticks of the lower square. Start braiding the thread around every third stick. That is, the thread needs to be passed under the sticks, through two to a third.
5. Grab the third stick and go back under the mandala to the next third stick. Repeat these steps until you have made a full circle, returning to the place where you started weaving. Make sure that the thread is tight enough and that both squares are fairly firmly fixed to each other. On the wrong side you should have an eight-pointed star.
6. As you weave, tighten the thread so that all the sticks are in the required planes and the mandala itself does not warp. Make as many circles as you like with the thread, then cut it and make a simple single knot with the remaining tail. I completed 6 laps.
At the next stage, weave the “ray” element. To do this, tie a black thread to one of the sticks, pass it under the mandala and braid the opposite side of the same skewer. It turns out that you will have to skip three sticks and grab the fourth. Continue weaving further in a circle, wrapping the thread around the same stick with which you started this element. I wove 2 rows. For symmetry, make the same rays on each of the wooden skewers.
7. Weave rays of the following colors on all sticks: ruby, red and white of different lengths. Next, we will weave squares. They weave in exactly the same way as at the very beginning. Find the bottom square of the mandala and tie a white thread to one of the sticks. This time you need to braid the sticks through one another. After a full circle, you will see a square or diamond, depending on how symmetrical the previous drawing was. Make as many circles as you wish and then secure the thread. I wove 3 rows.
Weave a white square of the same thickness on the top cross. The principle of weaving is the same: tie a thread to one of the sticks of the upper square of the core, pass it under the mandala through one stick and wrap it around the next stick through the top - and so on in a full circle. Braid alternately the lower and then the upper square with threads of different shades of red and pink. I used red thread for the bottom square and pink for the top square. You will get such a beautiful drawing:
8. After the squares, weave small rays of bright red color (I used silk threads) on all the sticks. Next is the simplest element of the mandala – the belt. Tie a white thread with a single knot to any of the sticks and begin to weave each stick sequentially in a circle. Do 4 circles. Afterwards, weave the star with threads of pink, coral and white colors. The next stage is squares of gradient shades.
9. Make a simple embroidery at the crosshairs of the red squares with white threads as shown in the figure. To do this, braid the crosshairs with thread about 5 times, and then secure the thread with a double knot. Afterwards, weave a white star and small rays on all the sticks with black threads.
10. An unusual element of this mandala is “wings”. To weave them, tie a white thread to the bottom right stick and stretch it to the middle right stick, braid this stick and then braid the next one - the upper right stick. The next stage is a consistent return to the lower right stick, while weaving around the middle one. Make 3 rows of white thread and secure it to the top right stick. I note that on the reverse side of the mandala you will have 2 rows of white threads forming the “wings” element.
11. In the same way, first on one side of the mandala, and then on the other, weave the same rows of “wings” with coral, pink, red and burgundy threads. At the very end of weaving, when you realize that you are going to make the last circle with a dark burgundy thread, trim the protruding ends of the threads with scissors, but do not cut the thread. Wrap the stick with thread several times, passing it to the top, and then back down, then throw the thread onto the adjacent stick and do the same. Do the same with the third stick. Then, cut the thread and use the remaining tail to make a double knot on this stick. Using wire cutters, a knife or regular garden pruning shears, carefully cut off the excess length of the ends of the sticks.
Determine which side of the mandala you will face up and which side will face down. Then, to the bottom stick, closer to its end, tie a small stick with red thread and weave a small square, as you did for the core of the mandala.
12. Tie another small stick a little higher, closer to the end of the black ray, and secure it with a red thread. After this, braid the entire vertical stick-axis with the same thread, and then braid 3 sides of the lower square. Return again to the top stick, braid the vertical axis and pull the thread again to the square.
13. Make another circle with red thread, and then white, black, burgundy, red, coral and white. Since the short top stick has ended, it is necessary to secure the thread.
14. Decorate the resulting figure with a white-pink-red tassel and lace. Then, on the top vertical stick of the mandala, weave a small rhombus. To make a diamond rather than a square, simply make a double braid of thread on the sides of the square every second circle.
15. Make a couple more circles on the same square, first with white, then with thin black thread, and attach a small white-red-pink-coral brush on top. I decided not to cut the ends of the stick, but to attach the lace to them. I attached a small piece of it with regular white sewing thread.
The last detail of the mandala is white embroidery. Make 4 stitches on pink threads in the very middle of the “wings” of the mandala, as well as 2 small white embroideries on burgundy threads.
Cut off the remaining ends of the threads with scissors, cut off the excess parts of the wooden sticks with pliers, and apply glue on the places of the embroidery knots if you are not sure of their strength. Make a loop on the back of the mandala so you can hang it on the wall. Dip the ends of the mandala into melted candle wax so that the threads do not slip off the sticks.
16. Mandala “Makosh” is ready! This is what the front and back sides look like.
If you have any questions, I will be very glad to answer them. I hope you enjoyed this master class and brought joy from creating a magical amulet. I would be very grateful if you click the “Like” button.
Thank you for attention!
Anna Kingfisher.
DIY mandala made of threads with wishes, money, love, for children
Mandala is a magical symbol. It can be drawn, or it can be woven from threads. For this you only need a frame of wooden skewers and woolen threads.
DIY mandala made of threads: meaning
Mandala is a magical drawing born in the East. He is revered by Buddhists and Hindus for his ability to help people. Mandala allows you to achieve certain desires , goals and aspirations through meditation and concentration.
A real mandala is created with sand over a period of a week, a month or several months. Modern man has come up with the idea of creating a mandala image by drawing on paper, painting on stones and wood, weaving macrame, embroidering, and thread weaving. The last method is the most interesting.
A mandala that you yourself weave from multi-colored threads will become your personal amulet. Depending on the meaning of the mandala, choose the one that will bring you what you want as close as possible and make your dreams come true. The hobby of drawing such images will help eliminate any emotional problems, improve your memory, improve your health and even open up a new world for you.
Weaving a mandala on your own will allow you to “charge” the ball with your positive energy, which will “give” you harmony and understanding of the world around you every time.
In translation, “mandala” is a circle or circle. This translation is characteristic of the form of the image. A mandala made of threads also meets this condition.
Weaving it is not difficult, but you should familiarize yourself in detail with the step-by-step technique in advance.
Wicker mandala
Mandala weaving:
- The basis of a wicker mandala is four sticks . For this you will need ordinary wooden toothpicks. It is worth knowing that the mandala on toothpicks is small in diameter. If you want to make the mandala larger, use skewers or knitting needles.
- The best threads for weaving are woolen threads. Unlike synthetic threads, woolen threads do not slip and are pleasant and easy to work with. • The center of each stick should be marked. Two sticks are tied clearly in the center. The angle of the sticks connected to each other should be exactly 90 degrees. • A similar procedure is also repeated with the second pair of sticks. After this, the two “crosses” are combined into a “snowflake” and connected to each other. As a result, you should have a frame of 8 rays. • Now you can start weaving. You need to choose a weaving pattern for yourself in advance in order to follow it in detail. Only an experienced professional can create a pattern on his own so that it is beautiful and neat (weaving patterns are presented below).