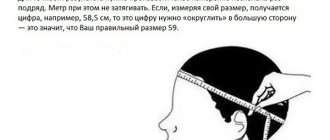
Types of mating
Using a set of yarn and a couple of knitting needles, you can create beautiful, unique items. These can be hats, scarves and cardigans, and much more. Things knitted with your own hands are better than those made in a factory: while knitting, a person puts his soul and patience. To create things, the following patterns and patterns are used:
- different laces;
- pearl;
- many ornaments;
- I'm horning;
- English gum and others.
Elongated loops with knitting needles, a master class on how to create them can be found on the Internet, is just one of the many patterns used.
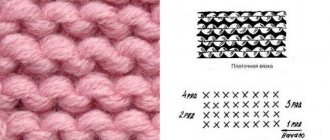
Pattern Description:
For knitting, you can cast on any number of loops. The height of the rapport consists of 2 rows.
- FIRST ROW: all stitches are knit;
- SECOND ROW: ATTENTION, do this:
1). We insert the right knitting needle into the loop, as for knitting a front loop behind the front wall. Now you have your right needle in the loop and resting on the index finger of your right hand.
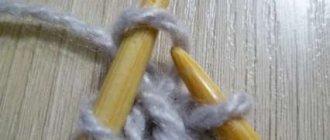
2). With our right hand, we throw the working thread over this knitting needle and index finger and wrap it around the knitting needle and index finger 3-4 times clockwise (see photo).
- Note: make 3 turns - you get a “bush of fur” of 2 turns, respectively, 4 turns - a “bush” of 3 turns.
3).Now there are several turns of the working thread on the knitting needle - carefully pull all the turns into the loop into which the knitting needle is inserted, and remove your index finger from the skein, holding the turns with your right hand. Thus, on the right knitting needle we have a loop not of one thread, as usual, but of several threads. Yes, and try to make the turns not very tightly, so that it is easier to pull out your finger.
We knit the next loop with a regular knit stitch behind the front wall.
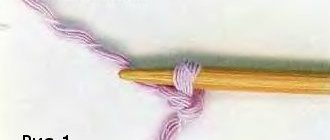
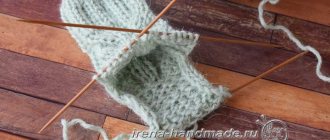
And so we alternate until the end of the row: we knit one loop with turns, the next loop is just a knit stitch. This is what the loops on a knitting needle look like during operation:
- THIRD ROW: fasten the loops of the previous row, or, more simply, knit all the loops. In this case, we knit the loops formed in the previous row of turns, picking up all the turns at once. You can lightly pull the bush of coils with the fingers of your right hand to secure it even more.
Before knitting this row, the loops on the knitting needle look like this:
And after knitting this row - like this:
Next we knit, alternating the 2nd and 3rd rows. But in the 2nd row, you need to alternate loops with and without turns in a checkerboard pattern in relation to the previous even rows.
Note: When knitting the 2nd row, variations are possible. If you want to get fur with a longer “pile”, you can make turns around two fingers of your left hand - the index and middle. And if you want to get a denser, “stuffed” fur, then you can make turns for the “bushes” of fur in each loop, and not through one. It all depends on your taste, desire and amount of yarn you have.
At first, it may seem to you that knitting this way is difficult, troublesome and time-consuming. But over time, you will get better at it and you will even like this activity.
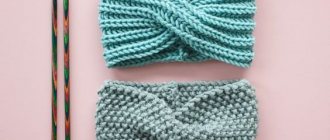
And finally, a collage of photos about options for using knitted fur in finished products:
I wish you good luck and creative inspiration. Arinika was with you, see you again!
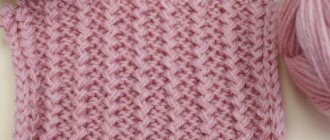
The openwork pattern with elongated loops looks very colorful. It is voluminous, but at the same time light and breathable. They can dilute any monotonous facial surface in a skirt, dress, blouse. Or use it as the main pattern for knitting a full-fledged product, such as a shawl, stole and any decorative items. It will always look fresh and sophisticated.
The pattern of an openwork pattern with elongated loops is very simple. The main thing is to understand the principle of knitting.
We have prepared for you a description of the knitting pattern with elongated loops. It is short and succinct. To understand it, no additional conventions are needed. All you have to do is pick up your knitting needles and start knitting.
Throwing method
To create a pattern using this method, on the front side after each loop you need to make two free sketches .
At this time, all yarn overs are dropped from the back side. The length of these loops depends on their number. Then, using the right knitting needle, pull out a long loop and move it to the left one. Then, using the pattern, you need to knit a regular pattern. After this, the pattern with elongated loops will be ready. Using knitting needles, you need to complete a couple more rows. In order for the ornament to look complete, just knitting a few more centimeters is enough.
Then each stitch is knitted using the same pattern. The result will be a beautiful piece with a transparent ornament. Thanks to yarn overs, elongated loops can be combined with other patterns. This technique will look great with a tight or slightly textured knit.
Two ways of knitting
This type of loop is usually performed not in every row, but every other row. This is necessary to ensure that all elongated loops are located on only one side of the work.
The density (frequency) of the loops, and therefore the “thickness of the fur,” depends on how they are made - in each loop of the row or through one.
Two methods of knitting a pattern are described below; you can choose the more convenient one for each.
Method one
1 row and all odd (wrong sides): edge, all loops purl, edge. 2nd row and all even (right sides) edge, all loops are elongated, edge.
Repeat the required number of rows 1 and 2.
Extended loop (Ɣ): insert the knitting needle into the knit stitch as for knitting and pull the double thread 2.5 cm, wrap it around the main thread “from yourself”. After supporting it with your finger, knit the loop as a regular knit stitch.
Method two
Cast on an even number of stitches.
1st row (wrong side) edge, all loops purl, edge. 2nd row (front side) edge, repeat: 1 extended, 1 front, repeat repeats, edge. 3rd row: edge stitch, purl all stitches, edge stitches. 4th row: edge, repeat: 1 front, 1 extended, repeat repeats, edge.
Related article: DIY mobile with butterflies: master class with photos
Repeat rows 1-4.
Since the description of the action does not always provide enough information to understand the process, the video will add clarity:
In addition to the “fur” effect, various patterns are created using elongated loops, giving the products airiness, fluffiness and delicacy. The master class presented below will help demonstrate how the use of slipped stitches in knitting literally transforms such an ordinary pattern as the well-known “elastic band”.
Openwork pattern and crossing method
Using the first method, the loops can be knitted in a group. To begin with, on the front side you need to make a cast after each loop, while on the back they need to be lowered. Next, you need to pull out 5 loops on the right needle one by one. They are transferred to the knitting needle, which is located on the left side, and tied using a purl loop, after which one yarn over must be passed through them.
The result is a small curve. Following this, the same actions are carried out, only with the left knitting needle. A yarn over is made that will pass through them. It is necessary to ensure that the number of elongated loops and yarn overs coincides on both the front and back sides. The end result is rounded elongated loops with knitting needles. This pattern is simple and very similar to broomstick crochet.
The second method will help you make an original drawing . To do this, on the front side after each loop you need to make three yarn overs. Then you need to slip eight loops onto an additional needle from the wrong side. Once this is done, the yarn overs are lowered and the loops are pulled out. They are divided into two groups, of which four are transferred to the left knitting needle, while the others remain on the additional one.
At the moment of mating they are passed through. Using the left knitting needle, knit the back side of the product. Then the loops remaining on the additional knitting needle are knitted using the crossing method.
As a result, you will get an ornament with elongated loops. Then, using knitting needles, several rows are knitted in the same way. You also need to ensure that the number of loops is equal to the number of crossed loops in the group.
Pattern “Elongated knit stitches on purl stitch”
Hi all!
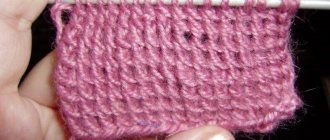
Pattern “Elongated knit stitches on purl stitch.”
A beautiful pattern, quite voluminous, moderately elastic. In addition, the technique is very easy, even a beginner knitter can handle it.
Perfect for knitting cardigans, sweaters, jumpers, etc. Can be used as an elastic band. I like this pattern because you can choose the width of the pattern (from 2, 3, 4, 5 or more loops)
- So, let's sit back and get to work!
- The pattern report consists of 5 rows wide and 2
rows high - For a sample pattern, cast on a number of loops that are a multiple of 5
+
4
loops for symmetry +
2
edge loops
1 row (front side)
- chrome
*
Purl 4, knit 1.
with two turns behind the front wall *
4 purl, chrome.
Loop with two turns
also called
a loop with two crochets.
See
note
on how to knit a loop with two turns.
Row 2 (wrong side)
- chrome * K4, remove 1 loop unknitted, thread before work * K4, chrome.
Next, the pattern is repeated from row 1
1 row (front side)
- chrome
*
Purl 4, knit 1.
with two turns behind the front wall *
4 purl, chrome.
Row 2 (wrong side)
- chrome * K4, remove 1 loop unknitted, thread before work * K4, chrome.
NOTE:
How to knit a loop with two turns (yarn overs). The knitting needle is inserted into the loop, the working thread is wrapped around it twice and then pulled into the loop. It turns out to be a double loop.
in the next row the double loops are removed without knitting, the double turn is straightened and long elongated loops are obtained
Let's do a few more reports
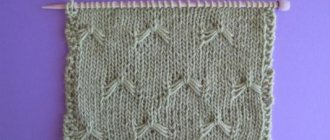
- This is what the pattern looks like from the front side
- ► Subscribe to my Yandex Zen channel, many more interesting ideas await you, and also leave your reviews and put your fingers up
???? - Knit with me, have fun, and easy stitches for you!
- See also the Category “Elastic band with knitting needles” (all types of elastic bands)
- See also the Category “Knitting Patterns”
Report of a pattern of 5 loops in width Report of a pattern of 4 loops in width
This is what the pattern looks like from the reverse side
- ► Subscribe to my Yandex Zen channel, many more interesting ideas await you, and also leave your reviews and put your fingers up
???? - Knit with me, have fun, and easy stitches for you!
- See also the Category “Elastic band with knitting needles” (all types of elastic bands)
- See also the Category “Knitting Patterns”
Source: https://zen.yandex.ru/media/id/5c273936753ad200a98be633/5c98c7e461fcd200b27e4d76
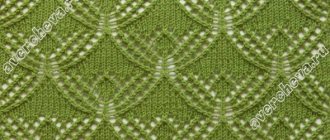
Wavy lines and spikelets
To achieve a wavy pattern, you need to alternate pieces with elongated loops . Depending on whether the yarn overs decrease or increase, the length of these loops will increase or decrease. Part of the ornament should consist of the same number of elongated loops.
You need to alternate these loops not only through the purl row, but also through the front row. Depending on how many loops are in the repeat, the height and length of the waves will fluctuate. To create wave loops, you need to knit the front side, after which 6 loops are knitted on the back side using a wave pattern. The next 6 are done using regular knitting, and the remaining 6 are done again with a wave. Then three rows are knitted in the usual way. On the 6th row you need to make 6 simple ones, and 6 in the middle - wavy ones.
If you knit both sides using a crossed yarn over, you will get a spikelet. While working, this pattern seems simple. You need to follow the scheme:
- First, in the first and third rows, two purl loops are knitted, then three knit stitches and again two purl loops.
- The second and fourth rows are formed using regular knitting.
- Two purl loops are placed in the fifth row.
- Four rows later, before the second knit stitch, a loop is pulled out and placed on the right knitting needle.
- After this, you need to make 3 more facial loops, then pull the loop again.
- Next, create two purl stitches.
- On the sixth row, the elongated loops are retaken.
- On the seventh row, one purl is made, through which the front one is knitted. Next, one elongated and front loop is again formed, which is connected to the third front one.
- Then again there are 2 purls and, finally, the eighth row follows with regular knitting.
In addition, by knitting elongated loops, you can make knitted fur that will look like a pattern.
This hobby helps you take your mind off your home routine for a while and just relax. It can help relieve stress and improve your mood. At this time, the fingers warm up, which helps improve blood circulation. People who knit develop their powers of observation, attention and visual memory.
Master class for beginners
You can knit elongated loops with knitting needles from any type of yarn, but needlewomen advise giving preference to threads with wool in the composition, as this adds the desired fluffiness. The process will require yarn, knitting needles, scissors .
First, the required number of links is selected, several rows are made using the scarf technique. The instructions for performing “extended loops with knitting needles” and the master class for beginners are simple, but require step-by-step work.- In the sixth purl row, the first loop is removed without knitting, and to create an elongated loop, you need to wind the threads two turns around your finger.
- The right knitting needle is inserted into the loop on the left, two edges of the thread are picked up and two loops are knitted on the front side at once.
- The resulting loop must be placed on the left knitting needle, having previously been knitted on the front side. A long loop is bound to tighten a little.
- Repeat knitting until the end of the row. If you then cut the resulting loops with scissors, the product will be decorated with a beautiful fringe.
In order to create knitted fur during the process, you need to knit a line with elongated loops through 3-4 rows of stockinette stitch, but do not tighten the thread too much so that the loops look neat and even. The length can be adjusted depending on the number of turns per finger. The more wraps with working thread, the longer the length will be.
A good option is to perform this technique together with an openwork pattern. As for the fringe, it can be used not only to decorate the edges of the product, but also to decorate the entire canvas. If you combine elongated loops and tight knitting in one work, you will get a beautiful openwork duet.
Rings with elongated loops
Although the scheme is considered universal, most often its elements are used in the process of creating an autumn sweater or warm jumper. Threads are selected with acrylic so that the product is sufficiently elastic and, despite the presence of loose loops, holds its shape well.
- The number of stitches cast on for the pattern should be divided by five; in addition, two edge elements are used. To complete the sample, needlewomen advise casting on 27 loops. This will be enough to see the pattern and decide on its use in the elements of the product.
- The first three rows are simple and are knitted only with the facial technique.
- The fourth row begins with a knit stitch and three yarn overs. Continue knitting in this way until the end of the row.
- In the fifth line, five loops are pulled out in a row using yarn overs. Long loops are transferred to the left knitting needle and knitted. To do this, the right knitting needle is inserted into the base of all five loops, of which one knit stitch is made. The loops from the left knitting needle are not dropped, but a yarn over is made. Repeat the motif until there are five stitches on the right needle.
- After this, the knitted needles are dropped from the left loop, the process is repeated until the end of the row. In order for the elongated knitting stitch with knitting needles to be the same size as the rest of the stitches, measure the thread by winding it around your finger. If a long element does not work out, then it is better to lower the loop or start the process again.
- The next couple of rows are worked with knit stitches.
- The eighth line duplicates the process of the fourth row. Knitting will continue with repetition of elements.
The result should be smooth round rings with long loops that resemble lambs on the sea. This is a delicate and light pattern that can be used both for creating clothing and for making decorative interior elements.
"Sea foam"
The technique is suitable for decorating jackets, shawls and even hats. In rapport you need to cast on ten loops and six additional ones. The first rows are knitted with knit stitches .
- In the third row, six links are knitted behind the front wall of the warp thread, a pair of yarn overs, a knit yarn over and three yarn overs. After this, a knit stitch and four yarn overs are performed, then a knit stitch and three yarn overs again, a loop and a pair of yarn overs, and again three pairs of loops behind the front wall. The motive must be repeated until the end.
- The fourth and eighth rows are knitted with dropped yarn overs, and the fifth and sixth lines are made with knit stitches.
- The seventh row begins with a knit stitch and a pair of yarn overs, after which a link and three yarn overs, a loop and four yarn overs are knitted. Then the number of yarn overs is reduced. A loop and three yarn overs, a knit stitch and a pair of yarn overs, and six knit stitches are knitted. Repeat the motif to the edge of the line. You need to finish the rapport with a knit loop.
- Rows are duplicated from the first to the eighth. Thanks to the long links, novice needlewomen can make a voluminous item in a short period of time and decorate a homogeneous dense fabric with lush fringe.
To create contrast, you can use a variety of shades of yarn or create transitions using different thread densities. For elongated loops, you can use wool threads, and for knitting the main rows, thinner yarn is suitable. This will add volume and splendor to the finished work.
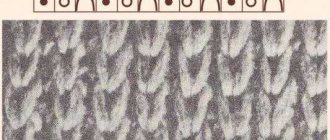
Making a fur pattern
Knitting patterns for elongated stitch patterns are simple, but require an even tension on the thread and an equal amount of wrapping around the finger so that all stitches are the same size. The pattern is one-sided and is performed only on the front side, leaving purl loops on the other side. Thanks to this, there is no discomfort during wearing and products made using this technique do not lose their appearance and knitting density even after a long period of use.
- The first row is the wrong side, hence the loops of this type. This is done so that in the next line there is something to attach the elongated loops to. If knitting continues on the finished part of the product, then you can immediately proceed to making the “fur” elements.
- In the next row, the first part will always be an edge piece and must be removed. After this, the knit stitch is knitted, which must be pulled out, but not thrown off the left knitting needle. Next, the working thread is picked up with your finger and brought to the front side.
- The remaining link on the left knitting needle must be knitted behind the front wall. As a result, two elongated elements are obtained from one base, and a loop is formed between them.
- These loops are returned to the left needle again and knitted together on the front side. Thanks to a good tightening of the thread, the first loop will not unravel. Next you need to follow the finished example.
- To control the density of the pattern, you can increase the number of regular loops between the stretched ones, thus creating the desired space of a regular fabric. If you need to make a voluminous thing, then the number of loops between the elongated parts should not be large, a couple of loops are enough.
pattern with elongated loops on knitting needles
To become a knitting pro, you need to learn how to perform simple elements, including casting on stitches, knitting patterns and, of course, lowering and stretching elements. From our article you can find out what elongated and deflated loops are and how to perform them for a novice master.
Contents of the material
How to knit elongated loops with knitting needles: master class and diagram
Knitted clothes are not only practical and warm things, but also fashionable. Fashion designers from all over the world create special lines of clothing made on knitting needles. Anyone can learn how to knit fashionable raglans. To do this, you just need to know the basics. With our recommendations, you will quickly master the popular trend - how to knit dropped stitches.
- You need to cast on loops with a crochet. The height of the final product will depend on their quantity. You can see this only after the structure is completely dissolved.
- After the first row with double crochet is completed. You need to lower the resulting cut, constantly pulling the product. Thus, the resulting yarn over will be at the bottom.
There are many other ways, let's look at the procedure.
- As in the previous version, you need to cast on a row with a double crochet and transfer the resulting units to the purl row. The only condition is not to knit loops.
- They need to be lowered solely by the number of rows collected. Using the pattern of the future product, as well as its length, you can make this calculation.
- You can lower them by adding and subtracting them. But it is worth noting that in this option the integrity may be violated. Therefore, it is recommended to knit them on both sides of the unraveling loop and tightly cross each other in order to secure the edges.
Lowering the units can be done in conjunction with the knitting method of knitting the pattern.
Pattern with elongated knitting needles: master class
A pattern with elongated knitting needles can be made using the rain technique. It looks beautiful and impressive on the front side. The pattern can be located along the entire length of the product, for example, on a knitted hat. But in order to do it, you will also need to perform calculations of the lowered loops. To do this, the typed row is calculated and then lowered according to the standard scheme.
The rain pattern can be made from any material. Some masters knit stoles based on silk material. And others prefer to add luxurious fur. In the classic version, the pattern is knitted only from wool. Before you start knitting, you should listen to the recommendations of experienced knitters.
- You must always remember that for the first time the pattern is best done in the form of a cut. And only after a successful attempt, start knitting in a common fabric.
- Do not forget to calculate each unit of knitted fabric. And also carry out calculations according to the pattern diagram.
- You can knit a scarf or any other long item using this method. But not with knitting needles, but using a special hook. It can be purchased in the craft department.
Knitting elongated loops with knitting needles: knitting master class
Knitting is not an easy hobby, but also a focus on the result of getting a warm and durable thing, but a real art. Anyone can learn it. Moreover, knitting a hat or a long scarf with your own hands is a trend today.
Despite the fact that store windows offer us original models of beautiful and chic machine-knitted sweaters, beautiful dresses and much more. Nowadays, worn, washed, damaged products are in fashion. And of course, knitted items with dropped loops became at the peak of popularity.
We also recommend reading:
In the past, this was a defect that the knitter had to correct using a special hook. But in our time, this is more likely not a defect, but a necessity that needs to be specially planned in order to get a beautiful and fashionable model.
When knitting with lowered units, you can get two types of patterns at the output: a vertical and a horizontal track. These are just the main options; in fact, there are many more.
In order to get a vertical pattern, you need to knit a loop to the top of the part, and then lower it down. At the same time, it is worth paying attention that when the product is unraveled, the result will be an openwork path.
If you need to make a horizontal pattern then you will need to follow these guidelines.
- The first row needs to be knitted with a yarn over. The first row must contain more units than all subsequent ones.
- The second row is knitted in the same way, but with yarn overs. The base is pulled tight after lowering.
The pattern is then knitted according to the basic pattern. For example, knit, purl and crossing their groups. There are other light designs with lowered designs. In order to start knitting them, you just need to decide where exactly you need to remove the yarn overs and knit the wrong side.
Long loops with knitting needles: diagram and description
Long loops can be made with knitting needles if you have some skills. This element is used in various clothing options.
- You can get them by subtracting one from the broach and lowering it.
- On each of the rows you need to lower several units so that the structure does not lose its integrity. The structure must be strengthened in the direction from left to right. And then cross the elements into a single group.
In order to pull them out correctly, you will need to practice making special calculations of descents, yarn overs and numbers between them. It’s also worth unraveling the pattern that you knitted in order to determine the amount of yarn. By measuring it, you can see the real result. When working with dropped loops, it is imperative to know the size of the product in advance in order to calculate the yarn.
How to knit elongated loops with knitting needles?
We offer a simple version of knitting using this technique.
First, the knitting needles need to be cast on a certain number of stitches. Knit five rows of stockinette stitch.
Secondly, in the purl row you need to remove one single crochet. In order to get an elongated loop, you need to make two turns of thread clockwise on your finger.
Thirdly, you need to insert a loop on the left needle into the right needle. Picking up the initial segment and the ending segment to the elongated one.
Fourthly, a knit stitch is knitted.
Fifthly, the double loop is thrown onto the left knitting needle.
Sixth, the facial one is performed again, and the long one is tightened.
Seventh, there is a repetition until the end of the row.
Thus, you get a small section of elongated loops.
Attention, TODAY only!
1igolka.com