Good preparation for an event is an opportunity to both celebrate the holiday and spend it as interesting as possible. I also want everyone, family and guests, to get the most out of their time. This is exactly what I can help you with! If you are collecting collections of my articles, then you already have postcards and cards ready for Easter. All this can serve as a gift and room decoration. We actively occupied the kids: we learned Easter poems with them or prepared crafts together for kindergarten. Of course, there was some creative inspiration! Here you will find up-to-date coloring pages on the theme of Easter and holiday applications, drawings from which you can make cool greeting cards. Let's talk about creativity. I have the coolest collection of works for you.
By the way, if you have kids who don’t know who Jesus Christ is, I recommend an article in which I gave an example of a story about him that children can understand.
DIY craft for Easter 2021 - the most interesting thing
To make an interesting craft, you don’t need to invent anything special! You can also prepare a very interesting composition using improvised materials. For example, in this craft, a linoleum pipe was used, the height of which is 3 cm, the diameter is 8.5 cm (but you can also take reels of adhesive tape, with a height of 2 to 6 cm). We will wrap the pipe with satin ribbon (width 0.6 cm).
1. Apply glue or double-sided tape to one side of the pipe. Glue the edge of the tape onto the tape.
2. We begin to wrap the pipe with tape, making the layers overlap.
3. Glue the lace to the base, wrapping it around so that the uneven layer of lace protrudes slightly. We glue the edges and cut them off.
4. Glue flowers onto the lace. We glue the flowers inside the base as well.
We select flowers and base according to color. You can, as decoration, glue ladybugs, butterflies and dragonflies to the base.
5. A stand is needed for stability. You can use the lid of a sippy cup for drawing as a stand.
6. To form a nest, cut a small piece of sisal and fluff it. Then we roll it into a ball.
7. Lightly stretch the lump of mesh fibers to form a nest. Glue it onto the stand.
8. On top of the stand, on the hole, glue a piece of felt to match the color of the grass nest. We also glue the grass to the side of the stand. We cut off the protruding blades of grass to make the craft neat.
9. And at the bottom of the stand we glue a picture with flowers. You can also just use cardboard.
10. Glue flowers onto the grass.
11. Glue the round base onto the stand. Glue the chicken in the nest.
Author
By the way, you can also make chicken yourself. To do this, you will need to glue 2 yellow pom-poms.
DIY Easter bunny from a napkin
I think that you are aware that such a cute little animal as a rabbit or bunny is one of the symbols of Easter. So why not create it from available materials, for example, an ordinary terry napkin. By the way, there are a lot of ideas on this topic on my website.
Prepare everything you need for work:
Then place the napkin in front of you and twist it into a rope in this way. Secure the middle with threads.
And then turn the product over to the opposite side.
And voila, crumple it in half.
A couple more touches and hand movements:
And you will see an animal that resembles a bunny.
Give him eyes and a tail.
And needlewomen can still sew carrots quite well.
Crafts for Easter for a school competition
I will show you 3 works to choose from that are done according to the same principle. But from different materials.
We start all three works with the following:
- inflate the balloon;
- we tie the tip (or, as the name correctly sounds: putku);
- draw an asymmetrical ellipse in the shape of an egg on the side of the ball;
- Apply glue to the entire surface of the ball, except for the ellipse, and spread it with a brush.
Pasta. Glue it, literally sprinkle the ball with small star-shaped pasta. We make at least two such “pasta” layers.
Each time, lubricate the ball with glue and glue the pasta. Let it dry thoroughly, if necessary, glue in pasta where it is empty.
We burst the ball and carefully separate it from the frame. We take it out.
Branch cuts. Glue them onto the ball, starting with gluing the ellipse.
We try to glue them tightly to each other. Apply glue to the holes between the branches.
We pierce it again and carefully remove the ball.
Looks very nice, at least ready to sell!
Birch bark. Before gluing it to the ball, you need to tear the bark into pieces and soak in water. Then she will become more pliable. We wet the wet bark with napkins. Glue it to the ball with an overlap, starting from the ellipse.
We coat the birch bark with glue along the “seams”.
After we take out the ball, we coat it with glue and “eggs” in the middle. If necessary, glue more birch bark.
This is the kind of beauty that comes from natural materials.
Author
And we end in the same way in all cases:
- dry the craft well, it may take 3-4 days for this;
- knead the ball near the ellipse, try how it lags behind;
- untie the putku;
- carefully blow the air out of the balloon;
- remove the ball.
We complement any of the models with chicken and other decor. Author of wonderful works.
Step-by-step instructions for Easter crafts for kindergarten
An openwork basket decorated in a festive spirit will look interesting. And it’s very easy to make, even for kids. They will even be interested in working with threads or painting crafts.
1. Unwind the threads. Fill them with glue. We wrap threads around a well-inflated balloon.
2. When the composition dries, deflate the balloon and take it out.
3. Wrap the ball of thread with construction tape. We do this along the entire circumference. And across, half a circle.
4. Cut out those parts that are between the tape. This creates the basis for the basket.
We will still need the cut out parts. In the meantime, cut them in half and cut off two corners.
Glue yarn along the edge of the top of the basket and handle.
5. We glue those parts with yarn too. Which we still have after molding the basket. Using a sponge, apply green paint diluted in water to these parts. We glue together 4 parts from the “scraps”. Glue at the cut corners. And then we glue the two blanks together on the side where the second corner is cut.
6. Paint the basket light green in the same way. We paint the edging of the basket with white paint.
7. Glue the basket onto the resulting flower-shaped blank.
8. Decorate the basket with flowers and ribbons.
Inside such a basket you can place a bunny, eggs and Easter cake.
Author
Decorating Easter eggs
There are many ways to decorate eggs in an unusual way for Easter with your own hands. They are boiled in onion skins, painted with artificial and natural dyes, painted with patterns, and pasted over with pictures.
Bright colors and colorful decorations make simple eggs into beautiful decorations. The easiest way is to use traditional dyeing methods using natural dyes.
The classic red color is obtained after coloring in onion skins.
But the possibilities of nature are not limited to this. Cabbage and tea, nettle and turmeric, beets and carrots, grapes and coffee are all natural dyes that can be used to color eggs.
Agree, such a variety of colors will look great even without additional decorations.
Especially if you choose original stands for colored eggs.
But you can go further and decorate the crafts with your own hands.
One of the easiest ways is to decorate eggs with a marker.
There are absolutely no limits to your imagination here. You can draw on both uncolored eggs and multi-colored ones.
Interesting ways to color crafts for Easter with your own hands step by step in the video:
Even more options in the material: Traditional and unusual ways of coloring Easter eggs.
Beautiful Easter crafts for the competition (hare)
Well, what about without a bunny? We will make the most elegant bunnies with colorful “fur coats” and in the shape of an egg.
A pattern will help us with this.
1. Trace the pattern from the wrong side of the light fabric. Please note that seam allowances are required.
2. Cut out 2 blanks.
3. Cut out the ears (take into account the seam allowance). 2 ear parts are made of colored fabric, 2 are made of white.
4. Sew the details: the bunny’s body and ears.
5. We fold the bunny’s body seam to seam. Secure with a pin.
6. Draw a line cutting off the side corners. And along this line we sew the workpiece.
But some section of the workpiece needs to be unstitched so that the workpiece can be filled.
7. Cut out the stitched blanks. Iron it.
We turn out the details. Life hack from the author of the master class: it’s easier to turn inside out using a cocktail straw and a sushi stick.
8. Turn inside out and straighten the parts. Iron them with an iron.
9. Stuff the bunny’s body with stuffing. They stuffed it a little and then spread it inside with a stick and compacted it.
10. Sew up the opening to turn it inside out.
11. We bend the edges of the ears inward, bend them in half, sew them up and sew them to the base.
12. Cut out a 4 by 4 cm square from white fabric. fold it in four. Cut out a circle. Sew along the edge of the circle and tighten the thread.
Fill the blank with cotton wool. Sew the edges. This is a ponytail. We sew it to the bunny.
13. Use French pins to mark where the eyes will be. Under the eyes we draw a triangle-nose.
The bunny's face: nose, eyes, mouth, can be embroidered.
Or you can draw with a black felt-tip pen. We take out the pins. We put two dots with paint - eyes.
Author
A very beautiful and simple craft. By the way, this is an excellent pincushion. You can give it to your mother, grandmother or teacher for Easter.
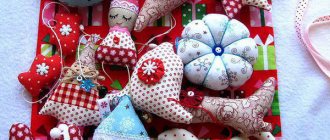
Easter crafts made from felt
In general, felt toys have become in demand not only among children, but also among adults, because sewing such a gift is always easier than taking any other material; felt in this regard is an unpretentious material that is easy to work with because it does not crumble. And even beginners can make patterns.
I had a separate article on this topic, if you are interested in this type of activity, you will find a lot of useful information from it, I am sure it will be useful to you.
In this post I will show you finished products. How do you like this family?
But, I still want to show you one master class that may be useful to you someday.
We will need:
- felt
- scissors
- needle and thread
- buttons and rhinestones
- glue
- cotton wool or padding polyester
- lace
- vinyl magnet
Stages of work:
1. Draw a sample egg, or you can print it out on a printer.
2. Then attach the stencil to the felt and outline with a pencil. Cut out the resulting parts with scissors; you need to make two eggs.
3. Then take and cut the template into three parts, as shown in this picture.
4. Place the center on the green felt and trace it, then cut it out.
5. Sew this green decoration onto the egg.
6. Sew and decorate, one might say decorate with lace or some other decor. It looks amazing right away.
7. Then draw the letters with a pencil and embroider the inscription, you can probably guess what it is, of course ХВ.
8. Then sew on buttons, sequins, or you can take beads for scrapbooking, basically whatever you have.
9. Go through the edges with a seam, but you can also put padding polyester or cotton wool inside, and then proceed to the next step.
10. Take Moment glue and glue a vinyl magnet, this will be a gift for you or your friends on the refrigerator.
Of course you can do it on sticks.
And also in the form of a pendant or keychain.
In general, such beauty will not leave anyone indifferent, that’s for sure.
Easy and quick paper crafts
And again, 3 ideas for you to choose from!
Dyed egg
1. On an A4 sheet of paper, draw an asymmetrical ellipse in the shape of an egg. We cut out the blanks.
2. Fold the workpiece in half. We make deep cuts without cutting to the edge. The distance between the strips is 1.5 cm.
3. Cut 9-10 strips of different colors, 1 cm wide, from colored paper.
4. Weave between the cuts based on the strip. We weave it like this: alternate above the cut and below it. We weave the second strip in the reverse order: under the cut strip, above it. So we will get a checkerboard pattern.
5. Glue the edges of the strips. We cut off the protruding strips.
6. We cut the green strip so that there are squares left, like everywhere else.
7. Cut out the yellow parts for the top and bottom of the sheet.
Author
8. You can glue it on the back with a white egg.
Krashenki
- Draw eggs on a piece of paper.
- We paint them like paints.
- Cut it out.
Author
Rabbit
1. Cut out 3 rectangles 8.5 by 11 cm from a sheet of paper; circle, 4 cm in diameter and “ears”).
2. Fold the rectangle along the long side like an accordion.
3. Fold the accordion in half and glue the sides together. We do the same with all rectangles.
4. Glue all 3 accordions together.
5. Unfold the workpiece and glue the side parts of this circle.
6. Draw a rabbit’s face on the mug. Use a pink marker to color the inside of the ears.
8. Glue the rabbit's head into the center of the circle. We bend the ears to the middle. Insert it into the fold of the circle and glue it.
Author
Simple and interesting work!
Here is another beautiful craft for kids. We make a cone out of paper, glue on the ears and draw a muzzle.
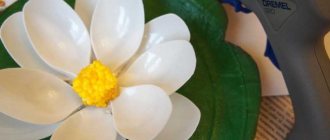
Another cool egg is made from plastic spoons. They can be planted in a pot and decorated beautifully.
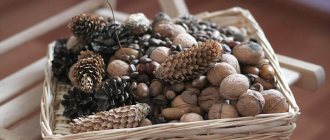
A few more ideas for your collection.
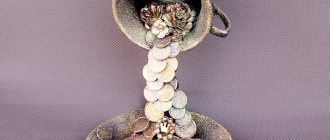
Master class using improvised materials Easter tree at home
I want to tell you right away that you can make such a craft quite quickly if you use these step-by-step instructions.
In fact, the work will be quite creative and your children will also not be able to resist this task.
Just don’t forget to wash the eggs well with water and soda. For 1 liter of water, take 2 tablespoons of baking soda.
Use a toothpick for piercing and acrylic paints for coloring.
Decoupage, I hope you understood how to do it from our last lesson.
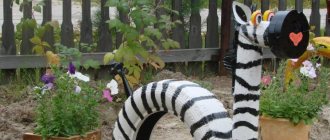
And this is the magical tree you will get in the end. Perhaps it will be like this.
Or you would prefer to make and decorate it in other ways.
In any case, it looks impressive and captivates the eye.
For the little ones, this invention is also suitable so that it is completely safe for everyone.
Patterns and master class on how to make an Easter chicken from felt
This chicken can be used for Easter decoration, or placed on the table with Easter eggs. I really like the work of this master.
Print out the pattern. With its help we will cut out all the details.
And when we sew them, we will have a very cool craft.
- Between the two main parts we put a beak, a comb, and earrings. We sew them on. We sew the entire workpiece.
2. Glue the chicken’s eyes and wings. We decorate the neck with braid and buttons.
3. Glue a bow and a button to the ponytail. Glue tape to the bottom.
4. Fill the head and tail of the chicken with filler. It turns out to be a very elegant chicken.
Author
The collection again turned out to be diverse, for children of different ages and interests. The last preparatory work is the most interesting. Another idea is a basket for candies or Easter eggs.
I think your friends will be grateful if you share with them the ideas from this article or the entire article (you can leave the link on your social networks).
I also recommend subscribing to my Instagram and YouTube channel.