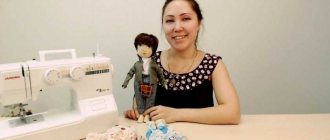
Every girl had her favorite toys as a child. A special place was usually given to dolls. They made houses for them, sewed various outfits, and created accessories.
Making crafts for dolls with your own hands allows you not only to save on toys, but also to develop creative thinking. To make doll furniture, clothes and accessories you will need available materials that can be found in any home and a little imagination.
What is suitable for crafts?
Depending on the desired result, there are many ways to make mini furniture and accessories. You can use a variety of available tools that everyone can find at home:
- Old CDs.
- Carton boxes.
- Foam sponges and more.
If the upcoming work requires a large number of details, it is better to create a sketch or drawing of the future work in advance.
Crafts for Barbie
The Barbie doll differs from others in that she is a very kind and sympathetic girl. She has many friends, loves the color pink, has a big house and has different talents.
First you need to decide what temperament the doll will have and what its goals in life are. She can be a ballerina, a traveler, a housewife, a doctor, and so on.
Then you need to come up with clothes, furniture and accessories suitable for this profession.
If the doll is a future traveler, then she will need an umbrella, comfortable clothes, a backpack or a suitcase. These items are easy to make yourself. You can make a suitcase out of cardboard, for clothes you need thick fabric, and for an umbrella, take the one that is sold with a cocktail.
Beads, sparkles or stickers are suitable for decoration.
Manufacturing of accessories
If you have the desire and a little skill in needlework, you can create many beautiful and original things for a doll. Not only clothing items, but also dishes, furniture, and jewelry are easily made from simple materials accessible to everyone
Doll bag
To decorate any doll and make it stand out from others, you can add a cat-shaped handbag to its outfit. Polymer clay is ideal for its production. The craft turns out beautiful and your daughter will definitely like it. To create it we will need the following materials and tools:
- polymer clay of different colors (green, gray, black, white, pink);
- a small knife for working with clay;
- toothpick;
- stick for rolling out polymer clay;
- chain and connecting rings.
Master class on making a handbag:
Take some gray polymer clay and roll it into a flat ellipse. Trim the edges to get the most correct shape possible.- We make small triangles from clay of the same color and attach them to an oval base.
- Using a toothpick, apply strokes where the triangles are attached to the base. This creates the effect of ears sewn to the bag with thread.
- Now we move on to green polymer clay. Roll out oval eyes from two small pieces and attach them to the original ellipse.
- From black clay we make the pupils of the future purse cat. We attach them to the green ovals.
- We make eye highlights from white clay. We place them on the pupil and the green oval.
- Using two small gray balls and one pink ball, we make the nose of the selected animal.
- Using pink clay we make the cheeks, and using white clay we make the lips.
- We pass a gray strip one centimeter long through the connecting ring. Fold it in half and cut off the excess pieces.
- We do the same with the other ring.
- We attach the resulting parts to the sides of the bag.
- Using a toothpick, draw a clasp and padlock.
- We process the edges of the product with a thin strip of black clay.
- Place the product in a preheated oven and bake at low temperature.
- After cooling, thread the chain through the rings.
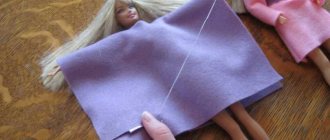
DIY clothes for Barbie
In addition to pink, Barbie loves turquoise and purple shades. To create a dress you will need knitted fabric, satin ribbon for straps, threads, beads, Velcro, a needle, a thimble, pins, old soap and a measuring tape.
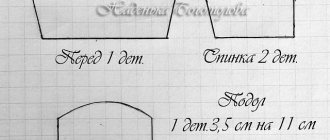
- First you need to take measurements from the doll: chest and waist circumference and measure the length of the skirt.
- Make a pattern of two rectangles. One from the chest to the waist, the second from the waist to the knees.
- On the wrong side, use soap or chalk to mark the seam allowances, approximately 0.5 cm.
- Cut out rectangles.
- Place the bodice on the doll from the wrong side, mark the darts with pins and stitch.
- From the wrong side, assemble the dome of the skirt with pins.
- Sew the top and bottom together.
- Sew Velcro on the back.
- Measure the satin ribbon straps and sew them on.
You can add a satin belt to the dress or decorate it with beads.
For walks and cool weather, you can sew a jacket. To do this you will need dark knitted fabric for the jacket, pink fabric for finishing, threads, chalk or soap, and a pattern.
- The pattern can be easily found on the Internet.
- Place the fabric right side inward. It is better to place the back on the fold so as not to make unnecessary seams.
- Trace the pattern twice: once along the contour, the second time with a seam allowance of 0.5 cm.
- Cut out the sleeves, hood, back and shelves.
- Baste two shelves and the back along the shoulder seam, sew, and zigzag the edges.
- Fold the cuff in half and place it under the bottom of the sleeve with the folded edge, sweep and stitch.
- Sew off the hood and finish it with a zigzag.
- Baste the hood from the center to the edge and stitch it.
- Turn the jacket inside out and stitch the seam from the cuffs to the bottom of the front and back.
- Sew ribbons to the hood.
Below on our website https://dnevnikmastera.ru we offer you to see examples of patterns and photos of finished clothes.
Cute things for comfort
There is freedom here for those who know how to hold a hook or knitting needles in their hands.
So, from smooth yarn of medium thickness, round, oval or square rugs can be easily and quickly knitted in single crochets. Lovers of openwork patterns will create bedspreads, tablecloths, shawls and stoles from thin cotton. We cannot ignore such an important point as pets for dolls. You can make kittens, puppies, and small birds from wool with your own hands. This is where felting comes to the rescue. And the wet felting technique produces felt boots, berets and bags for larger dolls. Similar accessories will complete the look of a rag tilde.
Textiles for a dollhouse
Owners of a sewing machine, showing patience and accuracy, will acquire a set of linen for a doll's crib. The easiest way is with a sheet: a rectangle of the appropriate size is cut on four sides. To make a pillow and blanket, perform the following sequence of actions (for example, let’s define the blanket as a 10*10 cm square):
- A rectangle with sides of 12*22 cm is marked on the fabric, taking into account allowances.
- The cut piece is folded in half widthwise. The side opposite the fold is stitched, 1 cm away from the edge.
- Having aligned the fold line and the laid seam, iron it out.
- Sew the remaining two cuts, also retreating 1 cm from the edge and securing the stitching at the beginning and at the end.
- In the corners, allowances are carefully cut off at an angle of 45° close to the stitching.
- The central seam is ripped out by 3-5 cm. The blanket is turned inside out and ironed.
- A square of padding polyester or holofiber is placed inside, and the seam is closed with hidden stitches.
If desired, the blanket is decorated with embroidery, appliqués, rhinestones or lace. Pillows are sewn using the same principle, only they need to be filled more heavily.
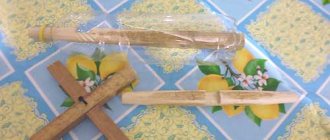
Happy playhouse owners spend a lot of time searching for the necessary doll accessories. You can make, for example, curtains with your own hands. For a simple version, use a piece of wide, at least 6-8 cm, lace; it is better to choose it with a scalloped edge. You will also need a wooden skewer or a round ice cream stick, as well as self-hardening clay - this will be useful for making knobs for the cornice.
Depending on the width of the window, one or two curtains are cut out. The sections are folded twice and a stitch is laid. Wrap the top edge of the lace around the skewer, determine the size of the drawstring and sew it. Determine the size of the cornice, cut the skewer to the required length, and insert it into the drawstring.
Two balls are sculpted from plastic or clay, and with the right skills, something more intricate. The knobs are carefully placed on the edges of the skewer so as not to disturb the shape. When the clay hardens, the cornice can be attached to the window.
Hats and bags
But such a truly limitless area as accessories and decorations for dolls is not limited to “nails” alone. You can make shoes, combs, and much more. For small baby dolls, it’s easy to make a handbag out of felt.
You will need a sheet of hard felt 2 mm thick, beads and rhinestones for decoration. Two circles with a diameter of 2 to 5 cm are cut out of the main material. Beads strung on a fishing line, a chain of air loops or a “braid” woven from a waxed cord are used as a belt.
The parts of the future bag are coated with glue, the ends of the belt are placed between them and pressed with something weighty, for example a book or paperweight. When the glue has set, apply a decorative stitch along the edge of the bag using any hand stitch or decorate it to your liking.
Any doll's wardrobe will not be considered complete if there is not a single hat in it. So, an original cylinder can be made from satin ribbons. To work you will need:
- thin cardboard or sheet of whatman paper;
- satin ribbon 1 cm wide in two contrasting colors;
- wide ribbon;
- small artificial flowers and beautiful braid for decoration;
- a clip or thin hat elastic;
- scissors, lighter;
- heat gun or Moment glue;
- compass, ruler and pencil.
Prepare a cardboard base: a circle with a hole (the margins of the future cylinder), a circle for the bottom and a rectangle with a valve (crown). A ribbon of the same color is cut into pieces corresponding to the length of the rectangle, with a small margin. Long satin strips are fixed to the valve. Ribbons of the second color are passed between the first ones in a checkerboard pattern.
The edges of the resulting canvas are folded inside out and glued. The rectangle is rolled into a cylinder and secured in this position. While the glue hardens, make the bottom: cut out a circle slightly larger than the cardboard base from a satin ribbon. The edge is singed, a running stitch is laid, the bottom is inserted inside, the thread is pulled together and secured.
The fields are carefully wrapped with a narrow tape and assembly begins: the bottom is glued to one end of the cylinder, the other is connected to the fields. The joints are masked with tape.
All that remains is to decorate the hat with a bouquet or a brooch with a feather. To keep the cylinder firmly on the doll’s head, a hat elastic band matching the hair color or a small clip is glued to the inside of it.
Creating accessories for dolls and other toys is a huge field of activity. And if you involve children in this, several hours of joint creativity are guaranteed. Such activities will develop in children the taste and skills of manual labor, which will benefit not only girls, but also boys.
Accessories for Barbie
Decor and crafts for Barbie dolls can be made from scrap materials. For example, create a set of jewelry. It requires beads, beads, fishing line, copper wire, pins and wire cutters.
- Place three beads on the fishing line, from largest to smallest, and secure with a knot.
- Take a small cardboard circle, glue beads along the contour, and a bead in the center.
- Glue the pin. There should be a semicircle above the circle. This is the bow of the decoration, and at the bottom there is a loop for hanging.
- Connect the pendant to the circle.
- Using this principle, make a second product.
It is better to make the necklace without a clasp, because the clasps are large enough for dolls. For it you will need beads and a Hungarian elastic band. Using the same principle, you can make a bracelet. Such crafts are also suitable for Barbie double double dolls.
Paper crafts: master classes on making
Using thick paper or cardboard allows you to make various toy objects. To understand what can be made from paper for dolls, just carefully examine the household items available in the room.
Fridge
For a doll refrigerator, you can use tea boxes, glue and colored paper. The craft is very simple to do:
- On the long side of the box you need to make a cut so that you get a door.
- Using cardboard, glue the shelves inside the box.
- Cover the blank with white paper or paint it with gouache.
- Make handles from matches or cotton swabs and glue them to the door.
If desired, you can make shelves on the refrigerator door and cover the craft with foil.
Refrigerator for a doll
Computer
To make a laptop for a doll, just print out a diagram on a color printer. Glue all the components together and the homemade product is ready. To make a gadget yourself, you need:
- Prepare 6 sheets of thick cardboard.
- Glue 2 sheets together to create the bottom of the computer.
- Glue the drawn keyboard onto a sheet of cardboard.
- The cover and monitor are made of two sheets of cardboard glued together.
- It is necessary to glue strips of thin cardboard as fastening so that the computer lid can be closed.
- Glue some image onto the monitor.
You might be interested in this: Crochet a doll's blouse - description of the work process
The computer for the Barbie doll is ready. If desired, you can make connectors on the sides and decorate the lid with a brand name.
Plate
For a gas stove you will need a rectangular box; you can make such a blank yourself. Having prepared the boxes, you must perform the following steps:
- Cut a door on the front of the box.
- Make a shelf inside the box. Cover the walls and shelf with foil.
- Glue a strip of cardboard to the back wall of the next product so that the upper part protrudes by 5-6 cm.
- Using foil, cut out burners for the worktop.
- Toggle switches for control can be made from plasticine or cotton swabs.
Paint the finished product with white gouache and install it in the doll's kitchen.
Gas stove
Important. Using this simple method, you can mount kitchen furniture. The main condition is to keep the size small and the materials safe for children.
Paper dolls and accessories
Paper dolls can be a good component of exciting play. Here everything is limited either by your imagination, or on the Internet you can find a large number of samples of dolls of various shapes, hair and eye colors.
Clothes for paper dolls are very easy to make. A variety of ideas can be found on the Internet, magazines or books. Rectangular grips are used for fastening to clothing.
To work you need paper, scissors, glue, colored pencils, markers or pens. The paper doll needs to be placed on a sheet and traced along the outline. It is important to outline the shoulders, waist, hips, as well as those parts on which the outfit will be “put on”.
Collecting a doll for school
Every student knows what things they need to take with them to school, so even a month before the start of the school year, everyone is trying to make huge purchases of the necessary school supplies. We will do an equally important task - we will prepare school supplies for dolls with our own hands.
If your child is a fan of the now popular toys, then you are probably familiar with Monster High dolls. This is a whole line of dolls - children of the most famous monsters and monsters in history. All their offspring have gathered together and are now studying at Monster High.
It is for these toys that today a huge number of additional parts, accessories, furniture, wardrobe items, etc. are created. And fans invent and make a lot of things for them on their own and with their own hands.
So, what can you do for Monster High students using school supplies:
- first of all, the doll will need a briefcase or backpack - it can be made, in fact, like a standard backpack in a sporty or casual style and with straps, or it can be made in the form of a serious and stylish leather briefcase with a handle, which is carried in the hand;
- for studying you will also need notebooks and books - it is better to make more notebooks so that you have them in stock, and make books that you want your doll to study with, that is, based on the necessary subjects;
- further, a diary is a very necessary thing;
- do not forget about all kinds of stationery - pens of different colors, a simple pencil and colored pencils, a sharpener, an eraser, a ruler, scissors, glue and other school supplies - everything that has enough patience and imagination;
- if your Monster High doll likes to draw, you can make an easel and a paint palette for her;
- for particularly advanced monsters you will need a laptop or at least a laptop;
- if you plan to make an entire classroom at Monster High, you will need a blackboard, desks with chairs, and other school furniture - racks or shelves, a teacher’s desk, bookcases, etc.
Believe me, making such things is not at all difficult, moreover, it is also not expensive, since you can make it from anything, using any waste materials to make crafts. Let's try?
Furniture for dolls
Matchboxes, scraps of fabric, leather, wooden and plywood blanks are suitable for furniture.
Bedroom
For a bedroom set you will need a cardboard box, foil, colored paper, glue, scissors. First, you can make a dressing table.
- You need to cut the cardboard box to the height of the table.
- Take a piece of foil equal to the width of the workpiece. This is the future mirror.
- Cut out leg space on the front. You can cover the box with self-adhesive wood-look wallpaper or paper.
- Glue the foil onto a piece of cardboard and connect the mirror and tabletop.
- Draw drawers. You can glue handles made of beads.
Dresser
For the chest of drawers you will need matchboxes, cardboard, colored napkins, and beads for pens.
- You need to connect the matchboxes so that the “boxes” move forward.
- Paste over the workpiece.
- Make a table top out of cardboard.
- Connect the parts together, glue the handles.
Sofa
For the sofa you will need wooden blocks, dense material that imitates upholstery (suede, velvet), liquid nails, and cotton wool.
- You need to cover the armrests with material and secure them with glue.
- Next, you need to put pieces of cotton wool under the seat upholstery and also cover it with material.
- Connect the seat, back and armrests.
You can sew pillows from leftover fabric and knit or crochet rugs.
Homemade toy furniture
To add some variety to your daughter's play with the doll, you can make simple pieces of furniture and furnish the toy house with them. The easiest way to make a chair is from furniture accessories.
Doll chair
To create it we will need the following tools and materials:
- scraps of fabric and padding polyester;
- lace;
- newspaper sheet or small cardboard;
- glue;
- scotch;
- juice or milk packaging;
- sewing machine.
During the manufacturing process we perform the following actions:
- Let's take a juice bag as the basis for the future chair. The dimensions of the product will depend on its size.
- We cut out rectangles of the same size from a sheet of cardboard, newspaper and fabric.
- We put them in one pile and roll them up. Make sure that the top layer is always cardboard.
- We take a padding polyester and cut out a rectangle of a size that will completely wrap our base and the made armrests. We seal the joints with tape.
- We take pieces of fabric and cover the base of the chair with it. We fasten the joints with glue.
- We use a sewing machine to make covers for the armrests. We gather the ends onto a thread and tighten them.
- For decoration we will use lace, which we sew to the seat with invisible stitches.
- From thick cardboard we cut out two rectangles according to the size of the back of the chair.
- We glue them together and wrap them with fabric in the same way as the base.
- We attach the back to the chair with glue, and sew the armrests to the seat.
Fabric doll products
For beginners, there are many different lessons and explanations, calculations, so as not to make mistakes in cutting. Otherwise, the thing may turn out to be either very large or very small.
You also need to focus on small details and decor to make the item look realistic.
Doll jewelry: how to make beads, earrings, and other accessories
Before figuring out how to make jewelry for dolls, you need to decide on the type of craft. Small products require careful handling. To make doll jewelry, you need to prepare materials such as thin wire, beads, fishing line, polymer clay, and pliers.
Earrings
Ideas for earrings for dolls can be varied. To get an original decoration, you need to perform the following algorithm of actions:
- Using thin wire, string 5 beads of the same size. Connect with a ring.
- Place another bead on the wire and place it in the center of the circle so that you get a flower.
- Glue the flower to the pin holder.
The second earring is made in the same way. Care should be taken to ensure that the child does not get injured by the sharp edge of the earrings. The pin can be replaced with a thick wire that is threaded into the doll's ear.
Material for making earrings
Important! If you don’t want to make earrings, you can use pins with different colored heads.
Another option for earrings is to use chains of different lengths. Old chains or those made of thin wire can be used. To make earrings, you must follow these steps:
- Using a pin and glue gun, glue chains of different lengths to the holder.
- At the end of each chain, glue matching beads.
- Repeat the procedure with another earring.
Beads
The beads are strung on an elastic band. The ends of the elastic are glued together with glue. To make a more massive decoration, you should trim a strip of fabric with rhinestones. The decoration can be secured at the back with a small clasp or ribbon.
Making beads
Crown
DIY doll things can be made using a plastic bottle and lace. For the crown you need:
- Measure the circumference of the doll's head.
- Decide what height the crown will be.
- Cut a strip from a plastic bottle and cover it with lace.
- Glue the ends of the strip together with a glue gun.
- Decorate with beads or rhinestones.
You may be interested in this: Christmas reindeer - crochet a toy
To make a crown, materials such as wire and beads, polymer clay or paper can be used.