It is unlikely that there will be a home owner who does not have a key fob for a bunch of keys. An ancient belief says that without such a handy accessory, you can not only lose your keys, but also your home. Such handy little things can be purchased at the store or made yourself. There are many different ideas for these purposes. In addition to keys, you can decorate backpacks and pencil cases with the familiar pendant.
Before you begin to bring your idea to life, you need to determine the material from which the product will consist. There are many options on how to make a keychain with your own hands. Can be made for personal use or as an original gift to loved ones or acquaintances. The base will be different items: leftover leather, a set of yarn, polymer clay, wood, champagne corks. All this is easy to find in the household.
From fabric
You will need:
- Bright color material.
- Peltex is a special fabric that is glued with a heated iron.
- Small scissors.
- Reliable, unbreakable tape.
For the front surface, catchy colors are selected, and for the back surface, a material contrasting in shade is selected. They are all ironed from the inside. The copy intended for the “face” is subject to sealing with Peltex, for which it is glued with an iron to the back side. The iron is left for a few seconds. 2 round parts are cut out of the fabric - for the front and back sides.
To obtain even parts, you can resort to using templates. The front side of the product is decorated. The most original way is your own initials or the first letter of your name. The circles must be sewn together. At the final stage, a loop is made. A strong ribbon is folded and threaded in a circle. Such a simple thing looks elegant and original.
Personalized decoration
In our master class we will make an interesting keychain with a name from beads. Making such an original accessory with your own hands is not difficult.
What you will need there:
- lace made of lavsan;
- metal pendant;
- beads made of various materials;
- beads with the necessary letters;
- metal caps, which are used for beads;
- metal pins;
- rings for connection.
For this keychain, purchase beads in turquoise and black colors, as well as silver ones with letters.
We take a lavsan cord 25 cm long and string beads onto it so that on the edge of the name beads there is an equal number of black and turquoise beads. Don't forget that next to each bead there should be a cap towards it. Now you need to take the pendant and put it on the keychain in this way - fold the end of the lace twice and pass the middle part through the loop of the pendant. And then pull the tip of the lace through the resulting loop and tighten. We hide the remaining mylar cord in beads, and then cut off what is unnecessary. The photo below shows how this can be done.
Related article: DIY hairpin with pearls
Afterwards, we move on to attaching the ring, which will be the basis of the accessory. Place beads with caps on the tip of the lavsan cord in the same order, connecting them with pendants. Afterwards, we pull a cord with beads into the loop from the wing and tighten it into a couple of knots. Now we push the end through the beads and cut off the excess. And now our phone keychain is ready! You can post the name of who this accessory will belong to.
Leather keychain
Since ancient times, craftsmen chose leather to create handicrafts, the excess of which was always left over when sewing clothes. A handmade leather keychain will be no worse than one bought in a store. Its production will not take much time, and the ready-made accessory for keys will be a useful and unique addition. To make it, you don’t need any special skill, just a little patience, perseverance and creativity.
Materials
You will need:
- A small piece of leather.
- Batting for filling.
- Small sized scissors.
- Needle and thread.
- Pencil for transferring the sample.
- Metal ring.
Progress
First of all, you need to come up with a form. For the fair sex, due to their sensitivity and gentle nature, a heart would be the ideal solution. To implement this idea, fabric of any tone is suitable. For men interested in technology, the contours of the car displayed on the material will be most suitable.
You can implement your idea in different ways, guided by the degree of creativity and creativity. You can go in 2 ways: initially redraw the template onto the sheet or transfer the image directly without first making a sketch. Different types of leather are suitable - natural and artificial.
You need to cut out 2 different parts, which are carefully connected with stitches. An additional cut strip for the ring is sewn to the side forming the keychain. Folded in half, it is lowered into the mold. If done correctly, the loop should be visible. Please note that both forms are not completely stitched. To add volume, batting is placed inside the figurine, after which the sides are fastened with a seam. The final touch is to thread the ring onto the loop.
How to make a plastic keychain in the oven
To make your own badges for a backpack or jeans, as well as original and stylish jewelry for everyday wear, you will need ordinary disposable plastic tableware of any shape (for example, packaging for cakes, cookies and other sweets, food storage containers, empty bottles, etc. .).
To beautifully decorate a backpack, jacket, bag or outerwear, you can make keychains in different styles, depending on the desired image: romantic, free, rebellious, etc. Please note that to make plastic keychains in the oven at home, it is advisable to choose the most transparent products with a flat and smooth surface.
Tools and materials
For home “experiments” with plastic, you will need to prepare a basic set of tools in advance:
- scissors or stationery knife;
- hole punch to make holes;
- colored markers for drawing;
- brushes with acrylic paints.
Additionally, it is recommended to purchase metal chains, on which you can then hang your own masterpieces made from plastic blanks.
As a future ornament, you can use any ready-made template with an interesting design. This could be an image on paper or even a photo on your phone. All you have to do is make a plastic blank of the required size, attach it to the “object” of copying and trace the drawing.
To copy and trace the outline of images, it is best to use special permanent markers of various colors that do not erase. Don't forget to make holes with a hole punch for the rope or chain.
Please note that the pictures that will be used as a stencil must be large, since the size of keychains, badges and other homemade plastic decorations after “cooking” will decrease by at least three times.
What plastic is needed
To make a badge from a plastic container beautiful and original, and most importantly of high quality, you need to use only smooth surfaces; corrugated ones will not work for this purpose. And, of course, the packaging must be transparent.
If you don’t have a suitable container at hand, use ordinary plastic bottles to make keychains. By the way, to quickly and securely glue pins for badges, use hot melt adhesive.
The better to color
As already written above, to color blank badges cut out from a template or stencil of the required size, it is best to use not ordinary school markers, but permanent markers that cannot be erased with a simple finger movement. Whereas finished keychains can be painted with acrylic paints or nail polish.
Temperature and baking time
One of the important stages of making keychains with your own hands from plastic is their obligatory “baking” in the microwave. After all the models of badges and keychains are ready, simply transfer them to a baking sheet, which must first be covered with parchment, and send the baking sheet to simmer in the oven or microwave oven.
The baking temperature should be about 150-160 degrees, and the “cooking” time should be no more than 2-3 minutes. If you overexpose the badges, they will become brittle and quickly become unusable. After baking, plastic decorations look very presentable and original. As you can see, there is absolutely nothing difficult about how to make a plastic keychain at home.
In the form of a brush
An alternative method that is absolutely simple to implement and does not require any effort:
- A wide strip of skin is cut off.
- Using scissors, cuts are made so that 1 cm remains to the edge.
- Collapse.
- Features fringe and a spiral wire top.
- Putting on the ring.
This cute, tassel-shaped item can now be used to keep keys to your home, work or car.
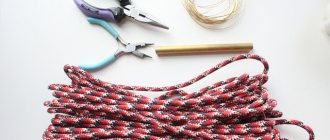
Materials for keychains
Almost any item can serve as the basis for keychains. For example it could be:
- An old leather jacket, or, to be more precise, the leather itself;
- Yarn set;
- Polymer clay;
- Wood, cartridge;
- Champagne cork.
Read also: Number of bamboo according to Feng Shui
From this we can conclude that materials for keychains are 100% available in anyone’s home.
From beads
A handmade keychain made from beads is the most common among those who like to craft. You will need to purchase:
- Beads of various sizes.
- Leather lace.
- Ring.
The process looks like this:
- The end of the lace is tied into a knot.
- Beads are strung on it one by one - combinations are made according to size, color or in a chaotic order. The preferred location is the same material on the same line: wood, glass or metal.
- After threading the last bead, you need to tie a knot again.
- The rest of the lace is passed through the ring.
- For aesthetics, remove excess skin with scissors.
Only after this the process can be considered completed. It is not forbidden to replace the lace with thin wire or fishing line, on which you can also place multi-colored large or small buttons. The thread must be finished with beads.
DIY KEYCHAINS - THE BEST IDEAS!
FELT KEYCHAINS WITH YOUR HANDS
Many needlewomen love to use felt in their work. After all, in fact, it is very easy to sew any, even the smallest, details from it! And making your own felt keychains is a very painstaking job with a lot of small elements!
KEY RINGS FROM FELT WITH YOUR HANDS PATTERNS
We have prepared several pattern options for you to make your work as easy as possible!