Published 06/03/2018 · Comments: 0 · Views:
Perhaps butterflies are the most popular, bright and vibrant insects that are always pleasant to meet. You can admire them, admire them, watch their gentle fluttering.
Butterfly decorations are equally popular. Unusual things that attract attention always look fresh, fashionable and make your hair easier to style. From an ordinary satin ribbon of a beautiful color, you can make beautiful models of butterflies with your own hands.
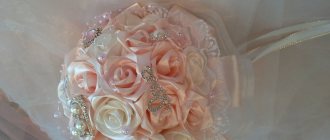
This master class presents another version of pink tenderness.
Insects with beautiful wings will not flutter, but will look good on a girl’s hairstyle. Pink color has no competitors when it comes to hair clips designed for young beauties.
The range, of course, can be diversified with white, sparkling crystal of rich red color and even silver brocade. The kanzashi butterfly hairpins offered here look very elegant, so you can safely consider them holiday decorations.
As in many cases, the basis of the proposed products are petals of different shapes, which are easy to model according to the instructions below. Let's look at how to do this.
For one lovely butterfly we will need:
- 4 pieces of white tape - 5*5 cm;
- 6 pieces of pink satin ribbon;
- 2 pieces of silver brocade - 2.5 * 2.5 cm;
- 9 pieces of white satin ribbon - 2.5 * 2.5 cm;
- 9 pieces of pink satin ribbon - 2.5*2.5 cm;
- clamp - 5.5 cm;
- felt base of white or pink color with a diameter of 3.5 cm (plate for gluing the clip to the structure of petals);
- the center is an oval pink color with rhinestones (an expressive butterfly decoration);
- one double-sided white stamen (small antennae).
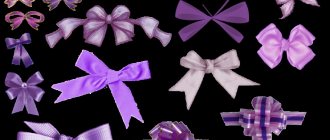
Kanzashi butterflies: 3 ways to make butterflies from satin ribbons
It's spring outside. The trees turned green, the flowers bloomed, the butterflies began to swirl... Why don’t we try to create the same beauty?:)
Materials and tools for creating kanzashi butterflies
- satin ribbon (different colors and different widths)
- fishing line
- beads, beads, sequins
- glue "Moment or gun glue"
- candle or soldering iron
- scissors
- ruler
- pencil
- needle
- thread or monofilament
- tweezers
Master class No. 1: Kanzashi butterfly made from ribbon of the same color
To create such a butterfly, we will need two squares of satin ribbon (here 5x5 cm), beads, sequins, a small piece of fishing line:
Lubricate a piece of tape with glue and, folding it in half, glue it together. Make sure the edges match:
Fold the resulting triangle in half and bend the tip, as shown in the photo:
Glue the curved end. We also fold the second piece of tape.
Front and back view
It turns out that the bent edge is, as it were, raised in the middle. We cut out small indentations at the fold.
And burn the edge, making it slightly wavy.
We do the same for the second wing.
We attach a small bead or seed bead to the fishing line using glue. We string larger beads and fix them with glue.
Antennae for a butterfly can be made according to the master class “How to make stamens for kanzashi flowers”
We cover a piece of cardboard with fabric and glue beads on a fishing line on top. This will be the body of our butterfly.
- Glue the wings of a butterfly to the body, with the curved edge up.
- We decorate the wings of the Kanzashi butterfly with beads or sequins.
Master class No. 2: Kanzashi butterfly made from ribbons of two colors
For such a butterfly we will need a red satin ribbon (5x5 cm - 4 pcs), a yellow ribbon (5x5 cm - 4 pcs), fishing line, beads. The tools are the same.
We fold two wings using the “Narrow Kanzashi Petal” master class. Fold the ribbon twice and place the triangles on top of each other.
Next, we assemble the other two wings using the “Round Kanzashi Petal” master class. We put yellow petals into red petals. And as a result, we will get 2 narrow and 2 round wings.
- We assemble the body of the butterfly in the same way as described above (in master class No. 1).
- Glue narrow petals with round ones:
- We glue the wings together, and glue the body of beads on top.
- This is the butterfly we got.
Master class No. 3: Kanzashi butterfly made from ribbons of three colors
- To make such a butterfly we will need ribbons of three colors, beads and fishing line:
- We cut the ribbon burgundy (5x5 cm - 4 pcs), yellow (5x5 cm - 4 pcs), red (4x4 cm - 4 pcs), yellow 2.5x2.5 cm - 2 pcs).
- We make two wings from burgundy ribbon using the master class “Narrow Kanzashi Petal”
- We fold the yellow and red triangles, place them on top of each other and fasten them with a needle.
- We wrap the side corners of the red ribbon to the bottom edge.
- Next, we assemble the other two wings using the “Round Kanzashi Petal” master class.
- Glue the resulting round petals into narrow burgundy petals.
- Place the burgundy, yellow and red triangles on top of each other and fasten them with a needle.
- And in the same way, wrapping them towards the middle, we make two round petals.
- From small yellow pieces we make one narrow and one round petal.
These are the petals we got. They will become the wings of our butterfly.
- We collect it onto a thread or monofilament and tie it together.
Dragonfly for hairpin
This master class tells how you can make a dragonfly decorating a hairpin with your own hands.
We need the following accessories:
- matching ribbon color;
- matches or lighter;
- metal hairpin;
- beads;
- glue gun
Master class (mk) kanzashi begins with cutting the ribbon into squares. You need to make rounded petals from a white ribbon. Then, we bend the square element obliquely. Fold the corners into the inside of the workpiece. Now we connect the resulting figure at the bend. Trim excess edges with scissors. We scorch the place from which you cut the material with fire. After all the manipulations done, you should have wings from which the dragonfly will be made. You will need four of these things.
So that we can attach wings, the dragonfly must have a body, which we will make with our own hands. To do this you will need a pointed petal. Take a square and fold it in half several times. We remove the extra corner and pour fire over the candles. As a result, we got the first part for the body that the dragonfly will have. You need to make three elements using the same principle. Using a glue gun, we connect them together. View the photo gallery showing the correct actions. First of all, we attach the finished wings to a metal clip. We will glue pointed elements on top, forming the body for the dragonfly. The final and final touch is to decorate the kanzashi craft with beads. For a visual example, watch the current video.
The photo shows what a wonderful dragonfly you should get.
Read
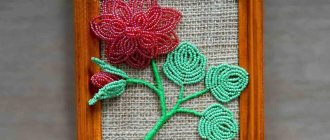
Kanzashi style in the interior - making paintings from ribbons
Master class on a butterfly made of satin ribbons
One of the most popular decorations in the kanzashi style is a butterfly made of satin ribbons. Today’s master class will be dedicated to them. I'll show you three easy ways to make simple and beautiful butterflies of different sizes that can be applied to different bases.
Kanzashi butterflies made of satin ribbons
To make a butterfly from satin ribbons using the kanzashi technique, we will need the following materials:
From pieces of tape 5x5 cm we will make a double round petal with a fold. Fold the pieces diagonally, the bottom one slightly higher than the top one.
We fold the petals along the floors and make two folds on both sides.
We cut and melt the edge of the petal.
We make two such petals for one butterfly.
Now we will make the upper wings for the butterfly. We will make them from a two-layer sharp petal.
Glue a sharp petal made from a piece of 2.5x2.5 cm into the resulting wings.
Let's make the middle (body) for the butterfly. Let's make a narrow and long sharp petal and solder the base with fire.
Turn the petal inside out and glue the stamens, which imitate the antennae of a butterfly.
We glue the made butterfly parts to the middle and decorate it with a cabochon or rhinestones. Our butterflies from kanzashi petals are ready, all that remains is to “plant” them on the base.
Fabric butterflies
So, to make butterflies from fabric we will need.
From a piece of fabric 10x10 cm we make a round petal in a fold, but we will make it offset one to the right, the other to the left, so that we get butterfly wings.
Fold the segment diagonally
Fold it in half and shift the piece a little.
We make 2 folds, we try to make them as high as possible, on the other side we make two folds, but as low as possible, this way you get a butterfly wing that first rises to the top, then drops down.
Front side of the wing.
The wrong side of a butterfly wing.
We make 2 petals from fabric directed one to the left, the other to the right.
So now we need to make the lower wings of the butterfly. Let's take three segments, the largest 10x10 cm, then reduce them a little. Fold the pieces diagonally and overlap them.
We make a triple round kanzashi petal, moving the second and third segments slightly towards the base of the petal so that there is free space between them.
We melt the base of the petal and glue it together.
This is what the petal looks like from the reverse side.
Now we will make two thin wings for the butterfly from long round petals. We melt the base of the petals and while it is hot, slightly bend one petal to the left and the other to the right.
We glue the resulting parts of the butterfly together and make the body of the butterfly from a sharp inverted petal, to which we glue the stamens (antennae).
We glue the wings of the butterfly together and glue the body with antennae on top. The body can be decorated with beads or rhinestones.
So we made butterflies from fabric, you can choose the base yourself.
The next master class is devoted to how to make large butterflies from fabric.
To create such a butterfly we will need:
- Synthetic fabric
- Stamens
- Half beads
- Rhinestones for decoration.
From a piece of fabric 14 cm long, we will make a petal.
To do this, drop a drop of glue at the top center.
Next, fold the edges of the fabric overlapping and let the glue set a little.
We bend the workpiece in half and make 2 folds on each side.
Until the glue dries, bend the tip on one wing to the left, on the other wing to the right.
From a square 11x11 cm we make a sharp petal.
We glue a triple round petal into it (its implementation is shown above) with a sealed tip.
Embroider with ribbons
Embroidery using ribbons has come to us since ancient times, from France. The ladies there loved everything beautiful and therefore sought to decorate themselves. And for this they began to make embroidery from ribbons everywhere: on their clothes, underwear, hats. And this idea took root so much that it found its way into our corners.
Now modern fashionistas and needlewomen are also passionate about this type of art. Embroidery using ribbons, and especially butterflies, always fascinates with its beauty and tenderness. Therefore, in this master class it is proposed to embroider a butterfly using satin ribbons.
What do we need to make such a butterfly:
- embroidery hoop;
- fabric for embroidery - you can take chintz;
- satin ribbons of two colors, width up to 5 mm;
- black threads;
- thin needle;
- gypsy needle.
We place the chintz fabric in a hoop. Take a ribbon of the chosen color and thread it through the eye of a gypsy needle. Using a pencil, you need to draw a butterfly on the material that we will embroider. Now let's start doing the embroidery. The needle needs to be brought out to the front side, as shown in the photo below.
We begin to fill the wing of our insect, making large stitches, and always return to the base.
After the wing is filled, we fix the ribbon on the wrong side and move on to a different color. Now you need to embroider the edges of the wing with small and neat stitches.
Be sure to follow the drawing, the length of the stitches can be adjusted independently, it all depends on what kind of butterfly is applied to the canvas.
When the upper part of the wing is finished, tie a thread on the wrong side so that the front side is beautiful.
Article on the topic: Tying the neckline with knitting needles: master class and schemes for working on the edges of the product with photos and videos
Now we need to embroider the body of the butterfly. To do this, take a black thread and a thin needle. Following the drawing, we embroider the antennae with neat stitches. After the antennae, the same stitches need to be used to sew the edging of the butterfly’s body. When this work is done, fill the body with satin stitch embroidery.
Such a butterfly can be inserted into an interesting frame and hung on the wall; in addition, it can decorate tablecloths and home towels. The sizes of this product may vary, as well as colors. It is important to use your imagination when executing a creative plan. After all, many even make money from this.
Of course, such a butterfly is not suitable for a boy. But you can embroider something interesting using ribbons, for example, on a child’s towel, a dressing gown, or decorate the curtains in your son’s room. Of course, the colors should then be darker so that the child does not become embarrassed.
Simple butterfly made from 5mm ribbon
Svetlana September 23, 2016
Simple satin ribbon butterfly
I made this butterfly in 15 minutes - a simple and effective decoration. It can be placed on a brooch, and in my case I glued the beauty to a hair clip.
To work you will need:
- a piece of satin or grosgrain ribbon, 0.5 cm thick - 90 cm;
- pencil with ruler;
- needle and thread to match the ribbon;
- beads 8 mm - 3 pcs.;
- beads 5 mm - 2 pcs.;
- small beads - 4 pcs.;
- a piece of copper wire - 10-20 cm;
- base for a brooch or hairpin;
- hot glue or Moment Crystal glue.
How to make a butterfly from thin satin or grosgrain ribbons:
Marking the satin ribbon
- On the satin ribbon we retreat 2 mm from the flame-treated edge and place a dot. Then we sequentially mark points at 7 cm, 4.5 cm, 7.5 cm, 5.5 cm, 6.5 cm, 3.5 cm, 5.5 cm, 5 cm, 5 cm, 5.5 cm, 3 .5 cm, 6.5 cm, 5.5 cm, 7.5 cm, 4.5 cm, 7 cm.
Thread the ribbon onto the needle
- We thread the ribbon onto the needle at the marked points so that the ribbon does not twist, but folds (alternating a puncture from the face and a puncture from the inside).
Straightening the loops
- We sequentially straighten the resulting loops, forming butterfly wings. Try to place the loops at equal angles. We secure the position of the tape with a double stitch.
Stringing small beads
- We string two 5mm beads onto a piece of wire, put 5cm between them, and bend the ends.
Twirling the mustache
- Gently twist the wire, forming identical butterfly antennae.
Butterfly body
- To prevent a large bead from slipping, we put a bead on each end of the wire, combine the wires together and string 3 large beads on them. Now we bifurcate the ends again and again put one limiter bead on each. We again pass the remaining wire through 3 large body beads and pull it out completely, as far as the limiter beads will allow. We cut off the excess wire under the base of the head. The butterfly body is ready.
Butterfly clip
- Sew the body to the wings. To do this, place a needle and thread in the middle part of the wings at the top, lay the thread between the first and second large beads and return it to the same puncture on the other side of the body. Next time we bring the needle out in the middle 8 mm below the first point, lay the thread between the second and third beads and return the needle to the same puncture on the other side. We fasten the thread on the wrong side.
The reverse side of the hairpin
- Now you can attach the decoration to the hairpin, first with thread and then with glue. The glue may simply fall off and the thread may fray.
Shared master class
Anastasia Kononenko
Source: https://hobby-mk.ru/babochka-iz-atlasnoj-lenty/
Ladybug made from ribbons
Today we will look at a detailed master class on making a ladybug from satin ribbons. This ladybug can be glued either to a children's hoop or to a hairpin. Such an unusual accessory will perfectly complement any outfit of your little princess, and at the same time will look very unusual and quite original. Handmade jewelry is considered quite valuable and unique in the modern world.
What do we take for this creation:• Red satin ribbon 5 cm wide, two meters;• Black satin ribbon 5 cm wide, about 0.5 meters;• Lighter;• Sharp scissors;• Ruler;• Pencil;• Tweezers;• Glue gun;• Thick cardboard for the base, a small piece.
So let's get started. We take a red satin ribbon and measure out equal squares measuring 5 by 5 cm. We should get 38-40 of them. We’ve cut it, now we take a lighter and trim the edges on each square so that the ribbon does not unravel.
We get ready-made red blanks for the petals.
Now we take a black satin ribbon and cut it into squares, also 5 by 5 cm, approximately 12-13 pieces.
We also take a lighter and process the edges. We get black blanks for the petals.
Take one red square and fold it diagonally.
Then fold it diagonally a second time. And also for the third time.
Now we take tweezers, insert the petal into it, and squeeze it. Using sharp scissors, cut the petal obliquely, as in the photo below.
Use a lighter to carefully process the petal sections.
We unfold it carefully and straighten it, we get this red petal
We also make a black petal in the same way as the red one. Fold diagonally once.
Then we also insert the second and third into tweezers and cut off the edges. In black petals, the cuts can be made a little larger, and accordingly the petals will be a little smaller than red ones.
We burn the cuts with a lighter and straighten the petal.
This is how we make all the petals from red and black squares. Cut out an oval from red pearlescent cardboard. We cut off one side at the top, this will be the cow's head.
Making the head of a ladybug. I made it from cotton pads in several layers, and then covered it and trimmed it with black tape. You can also use a button or a ready-made half-bead. Glue the head with a glue gun. Now we take the petals and glue some of them together in pairs, you can even glue three petals together. Now we spread the petals evenly and glue them to the cardboard base with a gun.
In each row we gradually add one petal. As you work, it becomes clear how many petals you need to add. Place black petals in the center. So we completely glue all the petals and form a ladybug. All that remains is to glue either a clip-clip or a hoop and the ladybug is ready. If desired, you can add a few green petals as a base, if you allow it to match the color of the outfit. Thanks everyone and good luck!
How to make a simple kanzashi butterfly? :
Nowadays it is very fashionable to create various accessories for clothes, hair, and interiors with your own hands. One of the simplest and at the same time beautiful elements for decorating a hairstyle is the kanzashi butterfly. Even a novice needlewoman can do it.
Materials and tools
The kanzashi butterfly is made from satin ribbons or fabric, which can be carefully cut into squares and the edges melted under the influence of temperature. Silk and organza are suitable. It's easier to use tape. Usually they take a width of 4 to 6 cm. It is difficult to fold elements from a smaller strip. You will definitely need tweezers.
So, in order for you to get a beautiful kanzashi butterfly, you will need the following:
- Satin ribbon (one or several different shades) or fabric.
- Sharp scissors.
- Candle, lighter or soldering iron.
- Tweezers.
- Thread with a needle or glue.
- Decor for making the body (beads, seed beads, wire or fishing line).
There is nothing unusual. In principle, you can do without a soldering iron or tweezers, and melt the edges carefully over a gas stove.
One-color kanzashi butterfly: master class
During the manufacturing process, the two simplest methods of folding elements will be used: with a sharp edge and a rounded one. If you show your imagination, you can even create many butterfly options based on this:
- Both pairs of wings are made of sharp single-layer “petals”.
- Same with rounded elements.
- The upper wings are sharp, the lower ones are rounded (all single).
- Any combinations with double, triple “petals”.
You see how different the Kanzashi butterfly can be. The master class will help you create these amazing decorations with your own hands. The work steps will be as follows:
- Take a satin ribbon, for example 5x5 cm, and cut 4 squares from it (one for each wing). For doubles, two respectively.
- Carefully melt the raw, frayed edges with a soldering iron or over a flame.
- Make two sharp petals for the top wings of the butterfly. To do this, fold the original square in half, then the resulting triangle in half again, and again again. Connect the layers of the part together with a soldering iron or melt the contact point over a flame. You can sew it with thread or use glue. Choose a convenient method. To work with flames, you should use tweezers. Make the second sharp part in the same way.
- Make two rounded petals. To do this, fold the remaining pair of squares (separately) as follows: first in half, then press the corners located at the base of the resulting isosceles triangle to the top, then bend the corners back at the created square. Secure the element layers over a flame or other method.
- Connect the sharp and rounded wings together. Do the same with the second pair of parts.
- Make a body, head and antennae using fishing line or wire, beads, beads.
- Glue the parts together. For strength, you can use a small cardboard backing covered with the same tape on the reverse side.
The simplest butterfly is ready. You can make each wing double, then the original number of squares will increase.
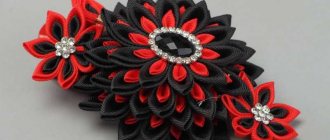
Multicolor butterfly made of kanzashi satin ribbons
Use a combination of shades at your discretion. The manufacturing technology will remain the same. Minor differences are as follows:
- For example, for spicy wings, cut two red and two pink squares. For round ones, you can take a similar combination.
- Before the last folding operation, in both cases you place two differently colored prepared elements on top of each other. You are already working with a two-layer part. Solder all layers of tape together.
Otherwise there is no difference. You can even create three-color elements (from three layers of blanks). In this case, for the internal ones it is better to use a smaller tape or move the parts relative to each other, and then trim the resulting wing.
Where to use the created decor
So, you have got very beautiful butterflies in the kanzashi style. Where to apply them? From the made jewelry you can make the following:
- Magnets.
- Decor for curtains.
- Accessories for hair, clothes, bags.
- Glue on artificial flowers, jewelry box, photo album, photo frame or mirror.
In a word, use it as your imagination tells you.
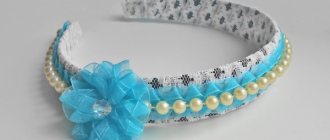
How to make hair jewelry
A butterfly made from kanzashi ribbons is perfect for an elastic band, hairpin, hairpin or headband. Initially, this technique was used specifically to create hairstyle decor.
To make such an accessory, you will need a base, such as a hairpin. Glue the completed butterfly onto a cardboard base covered with satin ribbon, if this was not done during the assembly process.
Good day!
If you master the amazing kanzashi technique, then for sure this handicraft will become your favorite hobby. It’s also a great way to make a gift for yourself or one of your relatives, or surprise your friends with the fruits of your golden hands’ creativity. It is traditionally believed that flowers and floral patterns can be modeled using satin and silk ribbons. But Kanzashi’s creativity has long gone beyond this topic. In skillful hands, small petals turn into birds, animals and insects. This is exactly the option shown in this lesson. Here we tell you how to make a ladybug from red and black petals, as well as using additional accessories.
This summer and cheerful product will be a wonderful hairpin or decoration for a hair band or dress for a little girl. But this does not exhaust the possible uses. For example, such a bright element can decorate a curtain or curtain in the house, the central part of a vase or flower pot, and so on; there will definitely be a place in the interior. Don't pass up the idea of making a ladybug with your own hands. This beautiful product will definitely come in handy and your loved ones will love it.
You can also read how to make a ladybug from paper or plasticine.
To make a bright ladybug in the form of a hair clip you will need:
- 40 square blanks of red ribbon – 2.5*2.5 cm;
- 13 square blanks of black ribbon – 2.5*2.5 cm;
- 8 rectangular blanks of green ribbon – 2.5*10 cm;
- 1 rectangular piece of black tape – 2.5*3 cm (for the insect’s head);
- 1 rectangular blank of red ribbon – 5*5.5 cm;
- 2 rectangular pieces of pink ribbon – 1.2*3.5 cm (for a flirty bow);
- double-sided black stamen - 1 piece (for antennae);
- black half beads with a diameter of 0.6 cm - 6 pieces (for spots on the back);
- white half beads with a diameter of 0.8 cm - 2 pieces (for the eyes of the sun);
- white half-bead, flower-shaped, 0.9 cm in diameter – 1 piece (in the middle of the bow);
- felt green lawn with a diameter of 4 cm - 1 piece;
- metal clip 7.5 cm long.
Popular articles Surprise boxes: description, tips for making and decorating
Kanzashi ladybug - step-by-step diagram:
The main colors of satin fittings are red, black and green. Prepare red and black squares with sides of 2.5 cm in the specified quantity, as well as green rectangles, based on the list.
Use tweezers to make simple round petals using red and black squares. The step-by-step modeling scheme is shown in the photo. The operations are as follows: you need to bend the square once diagonally, then close all three corners in the resulting triangle, solder the corners, rounding the outer corner. The components should look like droplets.
Prepare 40 red and 13 black petals.
Glue some of the petals together in pairs, as shown in the photo in the form of birds (connecting the sharp corners). Attach two red double blanks to one black petal on both sides. This will be the beginning of the back of the insect.
Next, glue the petals together in a row, single and double, expanding and lengthening the back.
There should be a black stripe in the center, with red details on the sides.
The reverse sloppy side will need to be hidden; an oval of red ribbon will do for this.
Prepare a red oval to mask the lower part, a black piece for the head, white half-beads and a double-sided stamen.
Model green sharp leaves for the lawn on which the ladybug will sit. Bend the rectangles of green satin and separate them with a soldering iron, separating the two triangles.
From the resulting green parts, select those that look like beveled cones. These cups will become leaves.
Model a ladybug from the prepared parts.
At the bottom, glue the red base, black head and stamen-antennae. Glue pearlescent eyes on top.
Glue all the green leaves together in a circle to simulate a lawn. Glue the beetle on top.
The back of the hairpin will be green.
Glue the clip onto the felt circle here.
Glue a flirty pink bow with a flower in the middle onto the insect's head.
Glue the black half-beads at the very end onto the back using tweezers.
A beautiful summer kanzashi accessory in the shape of a ladybug is ready.
The sunny bug looks very cute and will make the simplest hairstyle look elegant.
Kanzashi butterfly for boys made from ribbons: master class with photos and video in photos
What you will need:
We make a pattern from paper and cut it out. Then we apply it to the fabric, trace it and cut along the line with scissors. Let's move on to creating our tie.
You need to take a large piece and place it face down, then make a centimeter fold on each side. After, we need to turn the resulting product into a horizontal position, and from the middle we bend the butterfly towards the center. It should look like in the photo. Next, we need to secure what we have received with pins, and now we are stitching. We do the same actions with the second piece of fabric.
In order to give the shape and fix it, you need to fold the two blanks together and fasten them in the middle. Now we need to make a ribbon for the neck. To do this, take a long piece of paper and bend the ends of the ribbon and iron it. Now you need to sew the ribbon and attach the clasp to it.
Now all we have to do is attach the strip to the moth using a jumper, and our tie is ready. This butterfly is very easy to make, especially when using satin ribbons.
The second stage is to decorate the tie in the kanzashi style.
We will need:
We need to cut four squares from each fabric. Now we take two squares from different fabrics and make narrow petals from them - each square must be folded in half into a corner, and so on four times. You can cut off the excess, press it with your finger. In the same way we make the rounded parts of our decoration and the body.
After that, all we have to do is connect everything. To do this, you will need to insert small parts into large ones and glue them together so that you get a butterfly. When the wings are glued, we glue the body on top of them. Now we attach our decorative part with glue to the tie itself. And here we have our kanzashi style butterfly.
Using the kanzashi technique, you can achieve interesting variations of this product, because an ordinary bow tie will not surprise anyone, and if you add interesting decorative nuances to the image, you get a very original accessory.
After all, it is those things that stand out that make the image unique and complete; the main thing is not to overdo it. This is especially true for jewelry for boys, where you need to maintain certain tones in the wardrobe and in the image itself as a whole.
Video on the topic of the article
Source: https://yastroyu.ru/obzor/18917-babochka-kanzashi-dlya-malchikov-iz-lent-master-klass-s-foto-i-video.html