Home » Bracelets » How to weave kumihimo - step by step lesson
Bracelets
Irina Vyshivaikina 06/21/2019
2
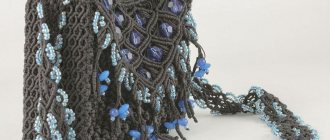
All girls love to wear unusual hand jewelry, but creating them is an equally pleasant pleasure, especially when they are ethnic products with their own history and meaning.
Kumihimo is a Japanese braiding technique, and the Japanese know a lot about exquisite jewelry. When weaving threads, beautiful patterns are obtained that can be made on special machines. In our article we will look in detail at the basics of kumihimo weaving technology for beginners and the necessary tools.
History of formation and types of laces
This technique was originally used to weave samurai belts and sword belts. But this was in ancient times; kumihimo weaving reached its peak of popularity in the 20th century during the hippie era. Nowadays you can find football fans wearing multi-colored kumihimo scarves.
Japan is officially considered the homeland, but some scientists are trying to prove guesses about the origin of kumihimo in Scandinavia. In 550, Buddhist rituals took place in specific decorations. At first they were woven from leather and thick threads, and only then machines came to the aid of the craftsmen.
Variety of patterns
Kumihimo baubles can be created in completely unusual ways; there are no limits to the imagination of needlewomen.
There are several main varieties:
- light chain;
- weaving on a machine;
- fish tail;
- wide product.
Looking at the kumihimo bracelets made by specialists, you can see how diverse the kumihimo technique is.
Color palette
The colored threads on the wrist have a special meaning. It is believed that some give strength and protect owners.
Let's take a closer look at each color:
- red is the color of energy, fire, courage and balance. This shade is a strong talisman against the evil eye;
- pink is the color of tenderness and love. Lovers with this shade feel calm and peaceful;
- orange is the color of energy and fullness of perception of life. This color shows a positive attitude towards new acquaintances and communication;
- yellow is the color of creativity and vitality. This shade helps in achieving goals;
- green – personifies the power of nature. The green thread cleanses the soul of evil and negativity;
- blue – gives an inspiring mood. This is one of the calmest colors;
- white is a symbol of absolute purity. This is a sign of the right path;
- gray - in a pure shade this color carries negative energy, but if it is close to silver, it is equated to healing;
- black is considered a negative color, but means a position of power in society.
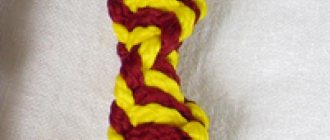
Kumihimo cord made of 8 threads. Square.
I continue the theme of kumihimo cords woven on a marudai loom, which began in my first MK. In general, I’m telling you how to weave another kumihimo cord, this time from 8 threads. This cord is called square because its cross-section is exactly square. So, we will need 8 threads - 4 threads of one color, 4 of another. I was weaving for a specific project, so I had white and burgundy threads. I wove it from the floss of my native PNK named after Kirov - from a skein I cut 4 skeins 135 cm long. From threads of this length I got a cord 89 cm long.
As before, instead of bobbins I used plastic bobbins for floss, weighted with a bolt and washers. Next, we unwind 20-25 cm of thread from each bobbin, fold them into a bunch...
and at the end we tie 2 knots at a distance of about 1 cm from each other.
We insert the hook from our central weight into the resulting loop between the knots (for me, several large paper clips and a plumb line serve as the weight):
Now we fill this entire structure into the marudai. I will not dwell on this process in detail - I will refer you to the previous MK. As a result, we sort our threads in pairs - 2 burgundy in the north and south, and 2 white in the west and east. This is our starting position.
Let me remind you that we do not rotate the machine; we always stand on the south side. Let's start weaving. First we swap the threads from the south and north. To do this, we simultaneously take the southern threads and transfer them between the two northern threads:
Let me remind you that when weaving we use threads, not spools. With both hands at the same time:
Now we have 4 threads in the north - the former southern ones in the center, and the northern ones along the edges.
Now we take the extreme northern threads at the same time and move them to the south.
Next, we repeat the same operation for the eastern and western threads. We take 2 eastern threads at the same time and transfer them between the western ones:
All white threads lie in the west - the former eastern ones are in the middle, the western ones are at the edges.
Now we simultaneously move the 2 extreme western threads to the east:
The weaving cycle is completed. We repeat this algorithm the required number of times. So - first we swap the southern and northern threads (make sure that they do not twist - the left thread is always on the left, the right thread is always on the right!) - from south to north to the middle, then from north to south. And then we do the same with the eastern and western threads (again, the threads do not twist - the upper one is always on top, the lower one is always on the bottom) - from east to west to the middle, then from west to east. This is what we get after several weaving cycles:
We continue this psychedelic activity of weaving, and we find that our weight is already resting on the base of the marudai:
We stop and fix the weaving point with a stick:
We remove the weight and carefully roll up the finished part of the cord under the mirror:
And using a thread loop, we again attach our weight to the rolled cord:
The cargo is in limbo again and we can continue our work:
We weave further until we discover that the threads on our spools have somehow imperceptibly ended, and the spools themselves rest against the edge of the mirror:
We remove the weight and pull our cord under the mirror. In this case, our coils will already lie in disarray on the mirror itself:
And we tie a knot at the end of the woven cord.
Let's shape the ends and admire the work:
Ready! I needed 2 laces, and I decided to weave the second one, changing the initial position of the colored threads:
And then everything is the same. The result is a lace with a different pattern:
And for comparison, 2 laces side by side.
You can experiment with threads, colors and their original placement to create interesting cords. And I have already inserted my cords into the finished product, which I will show a little later. If something is unclear, ask!
Muradai machine
The most popular technique for weaving Japanese baubles. Translated, this word means “round stand.” For the first time such a machine came into use in 1575. A less popular machine is Takadai. Typically, such machines have 32 compartments - this is the starting point in kumihimo arithmetic.
Photo source: https://knittochka.ru/wp-content/uploads/11-480.jpg
Basic elements of muraday:
- stand;
- a surface called kagami;
- omori weights;
- separation stick;
- hook;
- retainers.
In the picture, this machine looks much simpler than its description. But its simplicity does not affect the cost. Muradai is quite expensive. But the best part is that you can do it yourself.
Main stages:
- Print out a picture of the surface of the machine.
- Glue onto cardboard.
- Make cuts in the marked places.
- You can repeat arithmetic powers of two.
This is a very versatile record. The square in this case is a less practical figure; only flat bracelets can be created on it. But we would like to note that the original machines have no divisions, so you can use as many threads as you like, but this makes the work more difficult for beginners.
LiveInternetLiveInternet
Kumihimo is the Japanese art of lace weaving. Initially, such laces were used by women to tie up kimonos, and samurai hung their swords on them. Many years later, hippies began to use the same technique to weave bracelets on their wrists or ropes to weave into their hair; this was considered a necessary attribute. We can follow in their footsteps and also learn how to weave such decorations.
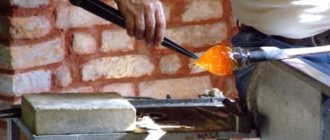
Necessary materials and knowledge for weaving in this technique First of all, you should know that to weave laces in this technique you need a machine. Professional machines look like this: Kumihimo is the Japanese art of lace weaving. Initially, such laces were used by women to tie up kimonos, and samurai hung their swords on them. Many years later, hippies began to use the same technique to weave bracelets on their wrists or ropes to weave into their hair; this was considered a necessary attribute. We can follow in their footsteps and also learn how to weave such decorations. Necessary materials and knowledge for weaving in this technique First of all, you should know that to weave laces in this technique you need a machine.
Professional machine and machine for weaving flat laces
Of course, such machines tie the needlewoman to one place and it is no longer possible to take the needlework with her, so they came up with mini-versions for practicing kumihimo. They come in round and square:
And this one is for weaving round, voluminous products
And lastly, you can weave from completely different threads, but most often they use “Floss” and “Iris”, but in general it all depends on your personal preferences. This lesson will describe in detail how to weave kumihimo for beginners.
Creating a machine for working on your own First of all, you need to make a machine for weaving, well, or buy it. To make the machine, you can take hard cardboard, foam plastic, plywood or any other material that will be both light and strong enough not to bend. We cut out a circle of 12-15 cm from a suitable material. After this, you need to cut a hole with a diameter of 3-5 cm in the middle. The finished part of the lace will go down into this hole. After this, mark the machine into 32 equal parts. Make cuts along the marked lines down 1-2 cm. The machine is ready.
Basic patterns for weaving lace
To get started, you need to choose the colors for the product and the pattern according to which you will weave. In the art of kumihimo, weaving patterns can be created independently, delving into the principle of the appearance of the pattern during work, or with the help of special programs. But there are also several standard schemes. 1) Scheme of a square kumihimo Using it, flat laces are created. There are 8 threads used here, 4 of one color and 4 of another. When weaving according to this pattern, it is better to take thicker threads.
2) Scheme of flat kumihimo Here everything is the same as with the previous scheme.
3) “Braided” pattern In this case, you get a round lace. For a lace according to this pattern, you will need 16 threads, 4 threads of the same color, that is, this lace uses threads of four colors.
4) “Flower” pattern For this, 16 threads are also used, but the separation of colors is slightly different. 9 threads are the main color, 6 are the color from which the patterns will be formed, and one for the core of the patterns.
5) “Snake” pattern It requires 16 threads: 8 threads of one, 4 of another and 4 of a third shade.
6) “Hearts” pattern This also uses 16 threads, divided into two colors. 13 threads for the background and 3 for the pattern.
7) Pattern “Diamonds” Again 16 threads. 12 of them are one color, and 4 are another.
Step-by-step instructions for working with this technique
Now that the machine is made and we have sorted out the main types of weaving, you can start working. In this lesson you will learn in detail how to weave kumihimo for beginners, and, guided by this knowledge, you will be able to weave more complex patterns.
In this lesson, we suggest weaving a kumihimo lace using the following pattern:
You can use the same thread colors or ones you like. First, let's make the markings on the machine. Take the loom and use a black marker or felt-tip pen to write the letter “S” where you start weaving. Now you need to divide the circle into equal parts, sectors. Each of them has 2 divisions, between them there should be the same number of divisions. As a result, we get 8 sectors.
Let's start weaving the lace. Take 16 threads of suitable colors. Each color must be present in two threads, that is, 8 colors. To measure correctly, add the length of your wrist circumference to the length of the ties you need, and add 15-20 cm of reserve to this. In this case, we take 8 threads 100 cm long and fold them in half, make a loop, securing it with any thread, as shown in the photo.
Now lower the threads into the slot of the machine, loop down, and secure the threads, as shown in the diagram. There should be two divisions between them. Pay attention to whether the threads are well tensioned, otherwise the lace will not be very strong, and the pattern will suffer.
We start weaving from the sector where the letter S is drawn. Take the right thread (dark blue) and move it down to the opposite sector, securing it on the side of the white thread.
Next, from the same lower sector, take the thread that is on the left (blue), move it to the upper sector and fasten it to the left of the only thread there (blue). Turn the machine counterclockwise so that the letter S is on the left. Continue to do the same as with the previous sector.
That's all. The lace is woven exactly according to this pattern until the end. When the length of the cord becomes what you need, the threads are removed from the loom and immediately secured with a knot.
For those who do not quite understand the principle of operation, or simply prefer to learn more visually, here is a video.
These wonderful Japanese cords can be made with your own hands in just a couple of hours. Weaving Kumihimo requires a lot of concentration on the disc. Take breaks to give your eyes a rest!
https://webdiana.ru/dom-i-semya/rukodelie/
DIY kumihimo disc
A modern muradai loom is a circle for weaving kumihimo, it is mobile and lightweight, so it is so easy to take it with you on a trip. The main difference from the main machine is only that the kumihimo circle can create a bracelet from a limited number of threads (no more than 16).
Simple creation algorithm:
- measure 5 cm on cardboard (for a circle diameter of 10 cm);
- draw a circle and cut it out;
- make a hole in the center of the circle (about 1 cm);
- leave marks along the entire contour, each mark should be exactly opposite the other (up to 32 marks);
- make cuts along the marks (about 5 mm);
- create a pattern every two cuts;
- on the other side draw the same triangles. The patterns can be seen in the photo.
Video master class Kumihimo flat weaving
Some craftsmen who cannot buy a marudai machine make it themselves from plywood and timber: four legs on the base, on top of them is a round mirror table with a hole in the center. It is into this hole that the finished cord goes. But, we repeat, the same thing can be done on a piece of cardboard, although it will not be so authentic and meditative (the original marudai instrument pleases with the sophistication of its finishing and details). You can buy a special disk or square: its price in specialized stores is only about 300 rubles.
Materials
You have already familiarized yourself with the manufacture of a portable disk. This required very simple materials:
- compass;
- scissors;
- cardboard, plywood or plastic.
To make the bracelet itself you will also need some material.
There will be no problems with the choice; you can use anything that has a thread-like shape:
- yarn of different densities;
- floss threads folded several times (combinations of different colors look interesting);
- narrow braid;
- ribbon;
- leather cord.
Weaving combinations
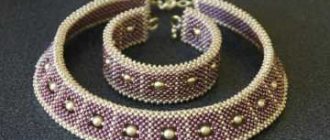
Round
Weaving on a kumihimo circle or square creates a beautiful round bracelet. It is suitable for both gift and everyday decoration.
You will need 16 threads in four colors. Below is a diagram of a round kumihimo:
Square
For this technique it is better to use thick threads. Following the diagram below, you will get a flat square bracelet:
Flat
Weaving flat kumihimo bracelets is very similar to the previous technique. Kumihimo for beginners is best to start with a small number of threads. After you gain experience, you can safely follow the kumihimo pattern, which has 32 threads.
The picture shows a diagram of a do-it-yourself kumihimo bracelet; if something is not clear, you can see the detailed kumihimo MK.
Where to begin
To delve into the process itself, let's look at one example of weaving. Whatever color you choose, first you need to decide what scheme you will work with. Usually, if you learn the very principle of weaving, you can come up with patterns using different colors.
How does this happen on the mini version of the Marudai machine? First you need to mark where the start will be and place it on top. In the notches we fix a bundle of 16 threads, 2.5 times longer than the desired length of the finished cord. We place the beam node in the middle of the circle. At the start, we fasten 2 threads in adjacent notches, then alternate through 2 empty notches. Further steps are shown in the photo:
As you can see, everything is quite simple, but this is only one type of pattern; its pattern varies depending on the number and arrangement of colors on the circle itself.
There are special applications of the program where you just need to select the colors of the threads, and it shows what kind of pattern you will get. But with sufficient visual imagination, you can calculate everything yourself.
Clue. To create diagonal lines in a spiral, place threads of the same color parallel to each other.
The marudai machine is mastered by more “involved” craftsmen who are constantly passionate about this activity - weaving ropes. Creativity requires only careful distribution, monotonously repeating movements in a circle. As you work, it becomes clear how the threads fit on top of each other and how they will combine the desired pattern. Working on a universal machine does not complicate a person’s posture, and he can easily relax in this way, weaving thread by thread to his favorite music and movies.
The large machine is also convenient for viewing the resulting work. The hole in the top circle is spacious and allows you to weave both round and flat cords. An important role is played by weights on the threads, which pull the product back and allow the final product to be smooth and beautiful.
Related article: Monastic beadwork for beginners: patterns with video
The most resourceful craftsmen use improvised means, a stool with a hole.
Ways to braid ends
Tourniquet
A knitted rope at the ends of the bauble is an excellent option to neatly complete the decoration:
- twist each end of the bauble in one direction;
- connect the two ends together;
- twist in the opposite direction;
- make a knot.
Pigtail
This is a very beautiful way, follow the diagram:
- divide the threads into three bundles;
- braid a regular braid;
- secure with a knot.
Make it into a loop with a button
This method is more complicated than the previous ones, but it is more convenient:
- take threads in proportions of 10:1 to the main pattern;
- fold the threads in half and weave knots;
- wrap one thread around the bundle;
- create a loop and secure it;
- sew a button to the other end of the bauble.
[Total votes: 1 Average: 5/5]
Irina Vyshivaikina
Professional skills: Clothing designer; Artist
Brief biography and personal achievements: “I am inspired by the things that are around us.” Since childhood, I was interested in art and crafts, so I decided to devote my life to it. She received a higher education in design and released a collection of designer jewelry made from simple materials that can be found at home from any needlewoman. Afterwards, I decided to conduct master classes on creating similar accessories for everyone. She became a blogger and the author of the website domigolki.ru.