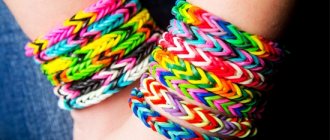
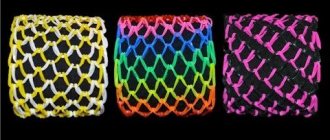
At the moment, jewelry that is not purchased in a store, but made with one’s own hands, has become fashionable. These include original crafts made from rubber bands. Creating elegant, exclusive items has long become an interesting and exciting activity. The material intended for the manufacture of such jewelry has a number of significant advantages. Namely:
- moisture resistance;
- does not require specialized care.
Work execution technology
The elastic band is put on one of the horns, twisted in a figure eight, the second loop of which is located on the other protrusion.
Then you need to put on the second elastic band without twisting. Using a crochet hook, one of the edges of the bottom elastic is removed and pulled up. Do the same with the second edge.
Put the next elastic band on top of the previous one, you don’t need to twist it either, and then pull off the bottom elastic band, as described earlier.
Such an amount of material is used to obtain a chain of the desired length. Once it is achieved, all that remains is to fasten the clasp, and you can show off the ring of rubber bands made on the slingshot to your friends.
Ring made from Rainbow Loom rubber bands on the machine
To weave a beautiful ring with your own hands, you will need a professional three-row machine. Take 5 rubber bands and put them on the columns of the middle row (one rubber band connects two columns). After this, another elastic band is put on so that it captures not two, but three columns. From the edge of the last elastic band, count the third column and place two more elastic bands perpendicularly on the nearby ones. Add more elastic bands to create a square around the last elastic band. Place five more elastic bands from the square to the left, which will grab two adjacent posts.
Next we will work with a square of rubber bands. Place one elastic band in the center for all three rows. After this, put on elastic bands from two corners, so that they also capture three posts.
Weaving rings from rubber bands video
Start weaving on the right side. Hook the bottom elastic band and throw it over the post. Do this not only to the square, but along it too. Now free one middle column in the square. Throw the bottom elastic bands around the square around the perimeter through the posts and go out onto five elastic bands on the left side. Now you need to put a hook on the outer elastic band. After this, you can completely remove all the rubber bands from the machine. The ring is ready!
Using the machine
An equally original decoration can be obtained using a special weaving machine. Before work you need to acquire the following materials:
- machine;
- crochet;
- 6 blue elastic bands;
- 3 green rubber bands;
- 3 purple.
These colors were chosen for ease of explanation of the stages of work.
Step-by-step instruction
The first step is to secure the purple elastic band to the 6 posts of the machine, and then twist it around each of them.
- A blue elastic band is put on along one of the diagonals, and a second one, also blue, is put on along the other.
- You need to place another blue elastic band on the central posts, and put the purple ones on top of the blue ones in the same way. Then comes the turn of green rubber bands.
- At the next stage, the purple elastic band is put on in the same way as described at the very beginning.
- Then you need to select any column, use a hook to hook the purple elastic band at the bottom, and throw it into the inside of the rubber band ring. You must do this with all the columns.
- Next action: use a crochet hook to pick up the purple elastic band located on the central post and throw it to the opposite one. The remaining rubber bands are attached in a similar way.
- Next, you need to thread the hook under the purple elastic band and do not touch the blue, green and second blue one. Then a loop is made and tightened.
- Under the purple rubber bands, a new one with the same color is passed. It forms a loop that needs to be tightened.
- At the last stage, you need to remove the purple elastic bands, and then those that remain.
Before putting on a rubber band ring made on a machine, the petals are straightened - and the decoration is ready.
As stated above, the colors shown are for illustrative purposes only. Each needlewoman can choose rubber bands of the desired color variation to create a truly exclusive decoration.
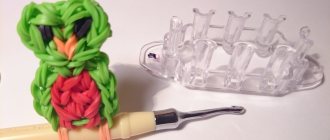
How to weave a ring from rubber bands in the shape of a Spider
This ring is most convenient to weave on a mini-loom, but if such a machine is not available, the ring can be made on a regular loom using two posts. In this lesson we will use a lilac elastic band to make it more clear how to correctly position the parts during the weaving process.
The finished ring of rubber bands must be the same color, so use plain rubber bands in your weaving, in our case, black ones. The time required to make this cute ring is 5-6 minutes.
Weaving progress: Preparatory part We create the legs of the spider We form the head of the spider Watch the video of how to weave a ring How to weave a ring from rubber bands in the shape of a Spider and the necessary tools and materials:
- mini machine;
- hook;
- scissors;
- black elastic bands;
- one lilac rubber band for better clarity.
- Preparatory part.
We put a lilac elastic band on the left column. We screw the black elastic band four turns onto the right side and lower it lower. We wind the second black elastic band around both posts in two turns and lower it down.
Putting your finger on top of the columns so that the top turns do not fly off, we use a hook to grab all the elastic bands on the right side and throw them inward between the columns.
- Create the legs of the spider.
We put the machine aside for a while and take two black rubber bands.
We arrange them so as to create a small oval inside.
Grab the end of the right elastic band from the inside.
And pull it out with a loop.
We tighten the resulting knot and put aside, temporarily, the first pair of legs.
Take the next two elastic bands, pull out the loop again and tighten the knot. This will be the second pair of spider legs.
Let's prepare another pair in the same way. Total - three pairs of spider legs.
Then we lower the black elastic band on the posts all the way down, and we put the first pair of spider legs with one ring on the right post, the second on the left.
Then we lower these rings down behind the shoulders of the columns.
In the same way we throw on the second and third “leg” pairs.
We take another elastic band and wrap it around the posts in two turns.
On the right side we grab the first elastic band with two turns.
And we throw it over the outside into the center between the posts.
We lift the lilac top and place it exactly in the center.
Now we hook the pair in the middle, which is located on the left side of the mini-loom, and throw it inside.
Holding the lilac rubber band with your fingers, grab the black loops on the right and throw them onto the left post.
The left column now has a bottom pair and a top pair of black rubber bands.
We grab the bottom two with a hook and throw them into the center.
We place the machine on its side and use scissors to cut the lower elastic bands in half. On the one side
...and on the other as shown in the photo.
We hook the remaining top pair of elastic bands
...and remove everything from the machine.
Be careful not to let the loop fall off the hook!
- We form the head of the spider.
The part that is now on the hook will form the spider's head. Pulling out the loops, tighten the knot tighter.
Then we remove the hook.
Now you can put a ring of rubber bands on your finger (the lilac rubber band is the base) and straighten the resulting spider.
- Watch the video of how a ring is woven