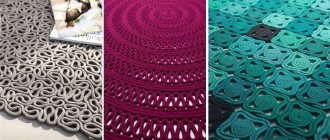
Colored paper rug: woven
This activity on weaving strips of paper teaches a child to work with scissors, helps develop creative imagination, eye, attention, aesthetic taste, and independence. And also in the process, fine motor skills of the hands develop and responsibility for one’s work is developed.
A paper mat can be offered to children 6-7 years old.
Before starting classes, adults should prepare and make a model on which the child will rely.
For the rug you will need:
- Colored paper
- Scissors
- Glue
- Ruler
- Pencil
How to make a woven rug from colored paper:
1. As the basis of the mat, take an A5 sheet of paper. We need to make slits in this sheet. You can do this by eye. And in order to get a more even product, draw lines at the same distance under the ruler.
2. Fold the sheet in half and make slits with scissors along the marked lines.
3. Cut strips of the same width of a different color from the rug.
4. And we will pass the yellow stripes through the slots in a checkerboard pattern.
5. To prevent the edges from sticking out, secure them with glue.
6. The colored paper mat is ready. And you will probably succeed!
7. It can be made in different sizes and colors.
8. This weaving technique can be used to make not only rugs. For example, a bookmark. And here you can learn how to make a bookmark from cardboard using a different technique.
Weaving colors and patterns may vary.
Children of senior school age can be asked to make a whole picture using the paper weaving technique. For example, a tree and a hedgehog in the forest or multi-story buildings with windows. Stretched stripes will imitate windows. Or you can weave a larger carpet using a more complex pattern.
do-by-hands.ru
Rules for making rugs
All rugs made from old things with your own hands must be safe for humans. The surface should not contain sharp protrusions or cutting edges that could injure the foot. For the bathroom, all mats are equipped with a non-slip base (for example, a silicone plate that provides strong adhesion to the floor).
This approach reduces the risk of injury from a fall. The best option is a mat that can be washed and periodically treated with an antiseptic solution.
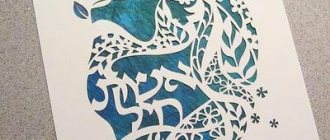
Christmas tree made of colored paper: children's applique
A wicker Christmas tree made of colored paper is a beautiful children's applique that can be timed to coincide with the New Year holidays. The Christmas tree turns out bright and does not need additional decorations. But if they wish, children can also dress it up with colorful homemade toys: paper balls, stars, sequins, etc.
For work you will need the following materials:
- The paper is green and, in contrast, the paper is a bright light green shade. Also beautiful combinations are green and yellow, green and blue;
- Yellow paper or cardboard for the star. By the way, you can make not a flat, but a three-dimensional star;
- Brown cardboard or paper for the trunk;
- Cardboard of any color on which the applique will be glued;
- White paper for snowflakes;
- Glue stick, electrical tape or narrow tape, a simple pencil, scissors, a puncher.
Christmas tree made from colored paper step by step
For work, you can use a sheet of green paper of standard A4 size, or half of it, but then the Christmas tree will be small. You also need to cut strips of light green paper, the length of which is equal to or slightly longer than the length of green paper. Width – 1-1.5 cm. You will need a small piece of brown cardboard for the trunk. It would be a good idea to prepare the star in advance.
A green sheet of paper needs to be folded in half lengthwise. And on the fold side, make many cuts with a width similar to light green stripes. The cut should not reach the opposite side of the paper slightly. You can leave an area of about 2 cm.
Then we open the green paper and insert a light green strip into the slits so that it passes, alternating, either from below the green cut, or from above.
The next strip needs to be braided the same way, but if the first one was on top of the green cut at the very beginning, the second light green strip should begin its journey from the bottom of the light green strip.
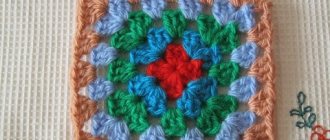
By this alternation you will get such a beautiful wicker rug.
You need to turn it towards you with its back and glue an adhesive plaster or narrow tape, making a large triangle - a herringbone. Once the triangle is cut, the adhesive plaster will hold the tree together.
Trim the tree along the outer edges of the duct tape.
Turn it right side up and, using a glue stick, glue the ends of the light green stripes along all three edges of the Christmas tree.
Glue the trunk and star to the tree.
Then glue it to the colored cardboard of the desired shade. Decorate with snowflakes. The Christmas tree made from colored paper is ready.
Also see how to make a beautiful Christmas tree from paper loops.
An original Christmas tree made from palms.
tratatuk.ru
Woven rugs and paper bookmarks
How to make woven rugs and bookmarks from strips of paper. Step-by-step master class with photos.
Weaving from strips of paper
A rug woven by a child from strips of paper with his own hands can serve as a beautiful background for a postcard, panel or applique. In the process of work, important skills and abilities are developed, fine motor skills are trained.
Children make such rugs from strips of paper in kindergarten and elementary school during technology lessons. In addition to colored paper from children's art kits, you can use waste material for weaving: old magazines, leftover wallpaper, etc.
In addition to the rug, from strips of paper in the same way you can weave bookmarks for books, pictures-panels with a certain pattern or image similar to pixel drawings and patterns for cross stitch (more about this in the article “Woven pictures and rugs from paper strips”) , and you can also decorate the main elements of appliques with this weaving method.
Rug made from strips of paper
The size of the mat and the width of the paper strips can be chosen as desired. But be sure to take into account the age and capabilities of the children who will weave the rug. It will be easier for preschoolers to do this craft if the stripes are wide enough, about 2 - 3 cm. This means that the rug should be larger - the size of an entire sheet of colored paper or half of it. Children of primary school age will be able to weave from strips 1 - 2 cm wide. My daughter and I made a rug from strips 1 cm wide, so a description of weaving a rug will be given for strips of this size.
How to weave a rug from strips of paper. Flat straight weave
- The base of the mat can be a square or rectangular sheet of paper. It needs to be folded in half.
- Draw a line 1 cm from the edge opposite the fold. This is necessary to ensure that all cuts are located at the same distance from the edge.
- Make marks on this line at a distance of 1 cm from each other.
- Make marks on the fold at a distance of 1 cm from each other.
- Connect the corresponding marks and make cuts along them.
- Expand the base.
- From colored paper of one or more colors, cut out strips 1 cm wide and the same length as the length of the base.
- Weave the strips into the base in a checkerboard pattern.
- Glue the ends of the strips to the base.
The cuts can be not only straight (they can go at an angle, zigzag, or be wavy) and not necessarily at the same distance from each other.
Paper strip bookmark
The bookmark is woven in exactly the same way as the rug, only on a rectangular base. The size of the base and the number of strips are optional.
How to weave a bookmark from strips of paper
- Cut the base out of paper - a rectangle 16 x 5.5 cm.
- Bend the base in half lengthwise.
- Draw a line at a distance of 1.7 cm from the fold.
- Make marks on this line at a distance of 1 cm from each other.
- Make marks on the fold at a distance of 1 cm from each other.
- Connect the marks and make cuts along them (straight or at an angle).
- Expand the base.
- Cut strips of 16 x 1 cm from colored paper of one or more colors.
- Weave the strips into the base in a checkerboard pattern.
- Glue the ends of the strips to the base.
If you used thick double-sided paper for the bookmark, the bookmark is ready. If not, then glue a paper or cardboard rectangle of the same size as the base to the back side. Or make two bookmarks in this way and glue them together with the right sides facing out.
I suggest looking at other articles about bookmarks.
© Yulia Sherstyuk, https://moreidey.ru
All the best! If the article was useful to you, please help the development of the site by sharing a link to it on social networks.
Posting site materials (images and text) on other resources without the written permission of the author is prohibited and punishable by law.
moreidey.ru
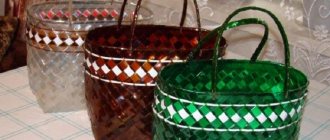
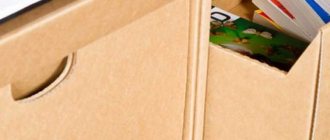
Small basket
Small baskets can be used to store small items and will help tidy up your home. Or create a small composition with flowers that will decorate the interior.
A master class will help you create such a craft. To make a basket you will need:
- Sheet of cardboard;
- Corrugated paper;
- Compass;
- Scissors;
- Matches;
- Glue gun.
Corrugated paper has advantages and disadvantages. Its main good quality is its plasticity; it stretches very easily. But the disadvantage is that it fades over time. Plus, the bright paper will definitely stain your fingers as you work. So take care of protecting your hands by applying a special cream or wearing gloves.
To begin, cut the paper into long strips, about two centimeters wide. Carefully, so as not to tear it, twist the strips with your fingers. The process is similar to spinning threads.
Related article: Origami paper flower: step-by-step instructions for beginners
Cardboard is used for the bottom of this craft, and matches are used for the supporting pegs on which weaving is done. Draw two circles with a radius of 4 and 5 cm on the cardboard. The bottom template is ready.
Cut in a wide circle. In the distance between the large and small circles, you need to strengthen the matches by first puncturing small holes at a distance of 1 cm. If you made wide holes, additionally place the matches on hot glue for strength. It should look like this.
Tie the prepared “threads” of corrugated paper into a knot and place it on the first match post. Start braiding the basket, circling the columns with a braid. Any type of weaving can be used.
To finish the product you need to hide the tails inside the weave. Use a crochet hook. Pull the thread through the top few rows, cut and glue with a glue gun.
Do not use PVA glue for this work, as the paper is very thin and will simply fall apart from the liquid glue.
Make a pen by weaving paper strings into a pigtail. Also hide the tails inside and glue them. The basket is ready! You can decorate it with flowers as in the photo.
How to make a wicker rug from strips of colored paper - a master class from Children's Site!
Braided rug made from strips of colored paper
Remember those woven rugs made of colored paper?
The craft is simple, but very effective! Rugs can be made in any shape you like, combining different colors! Now I’ll tell you how to make a wicker rug from strips of paper.
We need:
- Double-sided colored cardboard or paper of different colors. A cardboard mat will be denser and stronger.
- Simple pencil;
- Ruler;
- Scissors;
- Glue.
How to weave a paper rug:
Choose the main color of cardboard and cut out the base for the rug from it. It can be of different shapes: round, oval, square, rectangular, heart-shaped; you can make wicker fruits - apples, pears and plums, houses... The main thing is to choose a shape that is not too intricate: for example, it will be quite difficult to make a wicker blot or a star.
Having cut out the workpiece, we clearly mark it using a ruler and pencil into longitudinal strips - vertically, 1 cm wide.
Now we will make cuts along the intended strips, without cutting to the end by about 1.5 cm, so that the workpiece remains intact.
Next, we need to cut strips of the same width from cardboard of a different color - 1 cm.
And now - the most exciting part! We take one strip at a time and weave it with the workpiece, according to the same principle as a loom weaves fabric. Longitudinal stripes are intertwined with transverse ones in a checkerboard pattern. We trim the edges of the strips and secure them with a drop of glue.
We weave the entire rug in this way. And when it is ready, you can attach a loop on the back side. Woven paper rugs of various shapes and colors will make wonderful New Year's decorations for the Christmas tree, or decor for another holiday - Valentine's Day or March 6th!
And just like that, children will enjoy weaving rugs from paper - it’s interesting, and in addition, it develops perseverance, artistic taste and fine motor skills (this is a note for parents)