What you need to know to master the kanzashi technique
Beginners need to know several principles of operation and style. The kanzashi technique for beginners looks something like this. There are a lot of varieties of kanzashi flowers, you can make the simplest ones, and then move on to larger ones, or immediately try to take on something more complex, but you still need to know a few simple principles and rules.
Do-it-yourself kanzashi technique is an excellent solution to spend time usefully and interestingly. It's especially nice to give a gift to a loved one. After all, a work of art made with your own hands is always a pleasure to give. And it’s nice for a loved one to receive a handmade gift.
Material for kanzashi technique
First of all, you need to purchase kanzashi to make the product - these are ribbons. But, as it seems at first glance, this is not all the necessary material. You will also need scissors to cut the ribbons. A ruler to measure the required length. A needle is also on the list of necessities. In addition, you will need threads that match the color of the tape.
In order to seal the ends of the tape and give them smooth and round ends, you need a lighter and tweezers. When the work is done, glue is needed. To hide the connections in the middle, you need buttons or beads.
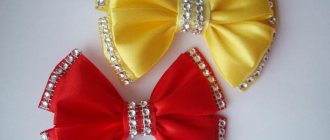
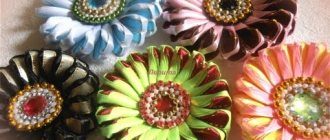
Bright brooch
You will need: red satin ribbon 5 cm wide, black satin ribbon 4 cm wide, decorative ribbon 3 cm wide, brooch base, scissors, glue gun, monofilament, needle, decorative elements - chains, beads...
Master Class
- Prepare a piece of red ribbon 20 cm long.
- Apply glue to the center of the back side and fold the edges of the tape towards the middle.
- Prepare a piece of black ribbon 20 cm long and place the red blank on it in the center.
- Apply glue to the center of the red ribbon and fold the edges of the black ribbon over.
- Repeat steps 1-4 to create another blank.
- Prepare a piece of black ribbon 16 cm long, apply glue to the center of the wrong side and fold the edges of the ribbon towards the middle.
- Prepare a piece of red decorative ribbon 16 cm long and place a black blank on it in the center.
- Apply glue to the center of the black tape and fold the edges of the decorative tape, then glue the decoration to the center of the blank.
- Glue 2 identical blanks together with an X and glue the third blank horizontally.
- Glue the base for the brooch from the wrong side in the center.
- Decorate the brooch to your taste by gluing various decorative elements.
The bright brooch made from ribbons is ready!
Tips for performing the kanzashi technique
You can use fabric for training kanzashi petals. Silk bends and takes shape better than satin, but wallpaper makes stunning pieces.
For the first parts, it is better to choose dark fabrics, because light ones can darken when fired. If the technique consists of sharp petals, it is better to bend everything in one direction to preserve the effect of a living flower.
The best thickness of satin ribbon is thick. Kanzashi made from ribbon, the technique of which is very simple and interesting, is liked by both children and adults. Do not cut ribbons with a knife or dull scissors.
Note!
DIY gifts for February 23rd - a large selection of ideas for creating unusual gifts for Defender of the Fatherland Day
What to give a 2-year-old boy - a list of the best options for an interesting and useful gift (120 photo ideas)
- Papier-mâché - TOP 120 photo reviews of original products. Detailed instructions for beginners on creating beautiful crafts
In this case, the edges will be uneven, which will make the craft not very neat. It is necessary to melt the edges only with fire, since heating on a stove or other method is dangerous.
Spicy green leaves
To decorate the decoration you need not only flower preparations, but also leaves. They can be made from green or another shade of satin ribbon measuring, for example, 2.5x10 cm. To do this, you need to perform a sequence of actions in accordance with the type of part.
The first type is to fold the rectangle in half and use a soldering iron to cut the workpiece exactly diagonally. Two parts are formed - one is quadrangular, and the other is like a little bag. Both are used for decoration. You can decorate unopened buds with bags.
The second type is leaves with carved edges made from quadrangular blanks. They need to be cut on one side into a dome shape. Melt the top part with a flame and stretch the fabric so that it becomes deformed. Gather the lower part with a fold to make the part voluminous.
This is how the main types of kanzashi petals are made from satin ribbons and other fabrics. Individual parts and compositions for jewelry are made from them.
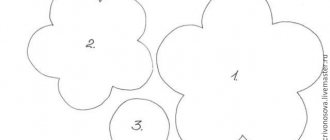
Flower with round petals in kanzashi style
First you need to cut out six identical 5 cm squares on both sides. After this, fold each square in half. Having expanded the square, you can see a triangle in the center, the corners of which are folded. You need to sew a triangle with thread, but in the future you don’t have to do this.
Then you need to turn the petal out so that the stitched ends are in the middle. We cut off the bottom of the petal horizontally and solder both ends together. The technology for one petal is ready.
In total you need 6 identical petals or more depending on the chosen flower. When all the petals are ready, you should glue them in the middle and add a bead or button. Thus, a flower of six petals is obtained.
Round shape of kanzashi petal
Round kanzashi petals are considered the most popular in traditional needlework of this direction. Their rounded appearance allows you to make hairpins and headbands with flowers of peonies, poppies and other beautiful flowers. When creating a multi-tiered composition, a round kanzashi petal is best suited.
The master class (mk) begins with cutting satin ribbons and folding them into an equilateral triangle. In the middle of the workpiece, the sides are assembled, directed towards the corner, which is located below. When you get the folds, you need to pull the corners back. The edges should be equal and fit tightly to each other. The ends are trimmed with scissors. Burn the edges and glue them together with your own hands. On the wrong side, place a small drop of transparent glue. Some new types of rounded petals can be seen in the presented photos.
The square is bent diagonally in half. The edges must be folded inward, as the photo shows. Turn the petal over and on the reverse side, fold the edges towards the middle. Then, we wrap it in half along the line. We trim the edges and process with fire. If you try to bend the petal to the other side, you will get a completely different round element.
We make a two-color petal in a similar way. Fold two squares of different colors diagonally and connect them together. Use a pin to secure. The smaller square remains unchanged, and the edge of the other piece is folded inward. Fold it in half lengthwise. Trim the edges and burn with a lighter.
Petals consisting of different colors look more interesting. They are used to form large brooches with one flower. You can allow yourself to play with the color scheme as you please. This is the beauty of such products. The video demonstrates how to make common types of petals from ribbons step by step.
Read
Several options for creating dahlias from ribbons
Where and how to use kanzashi style flowers
Often women dream of making original flowers using the kanzashi technique for their hair. This is the ideal solution - make a hair clip and a small beautiful kanzashi flower to pin to your hair.
You can also make a flower on an elastic band. The hairstyle will have some zest and a completely unusual look. A hair flower can be made specifically to match the hair color or, on the contrary, the complete opposite.
Products with several different flowers of different types will look original.
Base for kanzashi to hair
As a rule, women want to hide large hairpins and leave only a flower on their hair, so they attach them to hairpins. If there is only one flower, it can be glued into hairpins, for example, for bangs.
When the composition includes one or more flowers, it is better to attach the flowers to the comb. Since the comb is more stable, it will withstand many flowers on the hair and maintain a natural look.
Note!
- Kinusaiga technique - TOP-140 photos of the best ways to create crafts using the Kinusaiga technique with your own hands + instructions for beginners
Do-it-yourself passe-partout - a master class with step-by-step do-it-yourself schemes. Making tips + photos of the best examples
Decoupage with napkins: TOP-150 photos of ways to decorate with napkins. Simple instructions for beginners at home
Kanzashi flowers also look great on a hair hoop, especially if they are located along the entire hoop from small to large.
Exclusive options for kanzashi hairpins
To ensure that a woman’s hairstyle is impeccable and maintains volume for a long time, a kanzashi flower is attached to a hairpin. Hairpins are less noticeable on the hair and are better able to maintain the volume of the hair on the head.
In order to simply secure bangs or a few strands of hair, use hairpins. And on a hairpin, a bright butterfly with several beads, or a pointed dragonfly with an elongated shape looks perfect.
You can also attach beads or small sparkles to the product. You can attach several flowers of different shapes to the reverse side of the comb. On the hair, the comb will look from the front side, and the flowers from the back. You get a two-in-one effect.
Many female representatives prefer to create a decoration for themselves using the kanzashi technique for their necks, attaching small flowers to chains or beads and adding a couple of butterflies. This makes a beautiful DIY necklace.
You can also glue flowers onto the braid, so that the side that lies on the body is soft. For example, add a small piece of fabric from the back. If a woman likes pearl beads, then it is better to add a kanzashi flower in light shades, for example, soft pink or bluish.
Another piece of jewelry for women is earrings. The flowers are very small, and the earrings, on the contrary, are long. You can also add some flowers with round petals to the earrings.
Brooch-flower
You will need: yellow, blue and pink grosgrain ribbons, scissors, lighter, glue gun, thread, brooch clasp, needle, rhinestones.
Master Class
- Prepare 8 pieces of ribbon of each color: yellow – 5 cm long, blue – 6 cm, pink – 7 cm.
- Fire the edges of the ribbons.
- Prepare a thread and a needle and thread the pink, then blue and yellow ribbon.
- Form a teardrop-shaped petal by folding the pieces of ribbon one by one, as shown in the image.
- Make 7 more petals in the same way.
- Sew the first and last petal.
- Glue the rhinestone to the center of the flower.
- Attach the clasp to a piece of ribbon, then glue it to the back of the flower.
The flower brooch made from grosgrain ribbon is ready! I recommend watching this video!
Brooch made of grosgrain ribbons, Master class / Brooch of grosgrain ribbon, Tutorial
Flowers using kanzashi technique for boxes
The box is made very easily and quickly. You can make a box from the simplest and closest materials. For example, you can use a small box, glue a couple of sides and press the lid to them. The box is ready and can be decorated with flowers in the kanzashi style.
The best option is to draw multi-colored patterns and glue a kanzashi flower to the lid. In the same way, glue several identical colors on the sides and add some beads or seed beads. The box will take on a completely different look and will only become more beautiful.
If you don’t have a box on hand, you can use any jar with a lid. In the same order, you need to decorate the jar with glass paints and carefully glue kanzashi flowers. It is advisable to glue a small flower to the lid, because the lid from under the jar will have to be unscrewed.
Round centers for kanzashi decorations
Original centers for kanzashi are obtained by using rhinestones in a metal frame with a half-bead. I needed the following materials:
- half bead with a diameter of 2 cm,
- rhinestones in a metal frame with 4 holes,
- beads,
- felt and tools.
Glue the half bead to the felt and sew rhinestones around it. Decorate the upper part with beads. To do this, insert the needle into the bottom hole of the rhinestone (under the felt) so that it comes out from the top.
Let's collect 2 beads and thread the needle into the hole of the adjacent rhinestone. We sew the felt and insert the needle again from the bottom up in the next rhinestone. We string 2 beads and sew them on, inserting the needle into the first rhinestone. In this way we sew the beads until the circle is closed. Sew the entire row in a circle to make it even.
Now we will sew beads on the sides of the rhinestones, as if framing them. All that remains is to cut off the felt base and the middle is ready.
Kanzasha flowers for wedding decor
Brides want to fill their bouquet with something unusual and lovely. As a rule, flowers for a wedding bouquet are chosen white or pink.
But often the choice falls on bright flowers in the kanzashi style. Among the kanzashi flowers, you can attach ribbons or large beads on a thin silver wire.
Flowers using the kanzashi technique are attached to the base in the middle and glued completely, without missing a space. The perfect wedding bouquet is original and very unusual.
Brooch made of satin ribbons
You will need: green satin ribbon 2.5 cm wide, yellow satin ribbon 0.5 cm wide, regular and curly scissors, thread with a needle, a piece of felt, a pin, beads.
Master Class
- Prepare 20 pieces of green ribbon 8 cm long and a square of felt for the base of the brooch.
- Fold a piece of ribbon in half and sew it at a diagonal angle to the felt. Thus, sew all the pieces to the felt in a circle, overlapping each other.
- Cut out a small circle of felt with curly scissors and attach it to the back of the workpiece.
- Prepare 20 pieces of yellow tape, 5 cm long.
- Cover the inner circle with yellow pieces in the same way as the outer one.
- Sew beads into the center of the brooch.
- Attach a pin on the back side.
The satin ribbon brooch is ready!
Various crafts made from kanzashi flowers
There are a lot of ideas for decorating with kanzashi flowers. Crafts using the kanzashi technique will go with almost anything. It is possible to attach original flowers to any craft or painting.
You can make entire paintings on canvas using the kanzashi technique. Various decorative swans or cockerels, as well as all animals, can be collected and made in the kanzashi style.
For the upcoming holiday, if you wish, you can make a beautiful card for your loved ones with flowers from kanzashi and beads. And for the New Year, a cute Christmas tree made from green kanzashi.
In the same way you can make eggs using the kanzashi technique. In order to transform the room, you can add a decorative bird for kanzashi curtains. You can create as many decorative products from kanzashi and imagination as you like.
Photos of the kanzashi technique can be viewed on any handicraft website. On the Internet you can see in detail how various products are made. Don't just start with a difficult task. It is important to understand the features of the technology and the stages of work. All this will ultimately bring great satisfaction.