- >
- Made from natural material
#4-5_years
#Instructions
#Natural_material
#Early development
Another craft made from shells. This example can demonstrate how imagination works. Correctly placed shells create the image of a turtle.
Goals for making crafts:
- Continue to introduce children to the possibilities of using cardium shells and Black Sea scallops;
- consolidate the ability to schematically depict the sequence of making a toy;
- strengthen skills in working with glue and shells;
- cultivate a sense of satisfaction from working with this natural material;
- promote mutual assistance and goodwill.
DIY turtle made from pine cones and tires with photos and videos
In many countries of the world, the turtle has always been revered and praised, some consider it a symbol of femininity, the Indians believed that our entire world rests on its mighty back, the Chinese believe, to this day, that it symbolizes longevity, wisdom, well-being, prosperity and can protect from misfortunes. And is it possible to ignore all these legends? We invite you to make a wonderful symbol - a turtle with your own hands, to protect your home and garden.
There are many options for making this souvenir, and we will try to cover the most popular and interesting of them.
Soft pillow
For every needlewoman who knows how to crochet, it will not be difficult to knit a turtle pillow. Such a cute little thing will fit perfectly into your interior and will serve not only a decorative role.
We will need:
- leftover yarn;
- hook No. 2 or No. 3;
- fabric for the cover;
- filler.
Making a pillow. Using the fabric pattern, we make hexagons, sew them together and stuff them with filling.
Let's start knitting the shell, for this we need to knit the hexagons according to pattern 1 and sew them to our shell-case.
In order to tie the head, you need to dial 4 air. loops and tie them with 8 single crochets. We continue according to the same pattern, not forgetting to make increases in every 4th row. The head size should be approximately 6-7 cm.
We knit the tail and paws according to the same principle and stuff them with filler. Using buttons or other suitable material, we make eyes and assemble our parts together.
Our Tortilla Turtle is ready.
Garden decoration
If you want to transform your garden with something fun and inexpensive, we offer a master class on making a turtle from tires.
We will need:
- 2 tires;
- knife;
- empty bottle.
We do everything according to the photo:
Such a turtle can be used not only as a decorative element, but also as an original flower bed.
Felt turtle
Another very interesting option for a felt souvenir. Such a souvenir can be decorated as a refrigerator magnet, a charming brooch for a handbag, or simply left as is, in the form of a toy.
The size of this turtle can be varied as you wish, if you have enough material, you can increase it several times. Let's look at a small example.
We will need:
- pattern;
- felt of different colors, 2 mm each;
- scissors;
- beads for decoration;
- glue "Moment";
- filler.
First of all, you need to draw a pattern and cut out the parts according to it.
From felt, cut into thin strips, you need to roll up spirals and pin them together with a pin to hold them.
In the future, we carefully sew them together.
Using a needle we collect our shell.
We embroider the gaps with beads.
We fill our shell with filler and sew it to the base.
On the underside of the belly we glue pieces of felt in the form of fins to make our turtle seem more voluminous, and we sew the belly together.
Our turtle is ready.
In fact, there are a lot of materials from which you can make a turtle, the main thing is to use your imagination. We bring to your attention some more interesting ideas with photos.
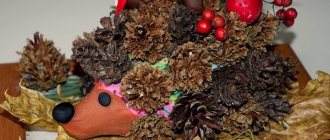
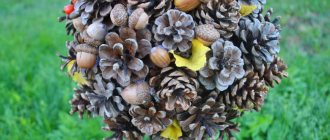
- A wonderful craft made from pine cones. This craft will be very interesting to do with children.
- A turtle made from rubber bands is a new type of art that has already conquered the whole world with its originality and simplicity of execution.
- You can make an original decoration or brooch from polymer clay.
- A plaster turtle will be a stunning decoration for your garden. Of course, you will have to work hard, but the result is worth it.
- An interesting toy for a child can be made from plastic bottles; they can be filled with candies or coins, which will ring and rustle during the game.
- and if you are a fan of bead weaving, then there are wonderful patterns for you to make a charming turtle.
Video on the topic of the article
Children's craft “Turtle from a cone”
To make this craft we will need: 1 pine cone (more precisely, half a cone) and plasticine.
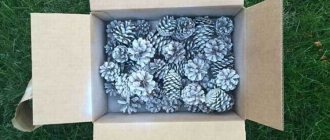
Making a turtle from a cone is quite simple, but at the first stage - preparing the cone - the child will need the help of adults. For the turtle shell, only the wide part of the cone is needed, so we will cut off the upper scales of the cone and the core with a knife or scissors. By the way, if you collect cones in the spring, you can often find ready-made shells for our turtle - during the winter nature will do the most difficult part of the work for us.
When the shell is ready, the children get to work: they need to roll out of plasticine (we took gray) a sausage about 5 cm long, slightly widened at one end. We attach its narrow end to the shell - this will be the turtle’s head.
Then from plasticine of the same color we make two long sausages - the legs of the turtle and one thin and short one - this will be the tail. The length of a long sausage should be a couple of centimeters greater than the diameter of the cone - the shell. We cross the sausage legs over each other and lightly press the resulting cross in the middle.
We place the shell-bump on top, and attach the tail to the back. Our turtle is almost ready. Add two plasticine rounds - the eyes of the turtle. The mouth can be drawn with a toothpick or a stick.
Our children's craft “Turtle from a Pine Cone” is ready! She can take her place in the fun zoo, which we talked about in the article Simple crafts from pine cones
Apreleva Olga
especially for the site 3-years.ru
| Pine cone swan - children's crafts |
| Today we invite you and your child to make another craft - a swan from a pine cone. For work we will need a pine cone, plasticine and cotton wool. |
| Tricks and secrets when working with pine cones |
| To make crafts from cones, sometimes you need a cone of a certain shape. And if there is no suitable cone, you can change the shape of another cone. How to do it? |
| Simple crafts from pine cones |
| Cones are great for sharing creativity with kids. Today, together with the children, we will make some simple crafts from pine cones. |
| New Year's crafts from pine cones |
| Pine and fir cones are a wonderful material for children's crafts, which can be used all year round - because the cones are perfectly stored. We offer several interesting master classes on making New Year's crafts from pine cones. |
| DIY chestnut crafts |
| Chestnut fruits are beautiful and pleasant to the touch, and therefore it is a pleasure to work with them! And crafts made from this wonderful natural material will be a wonderful gift for relatives and friends from a child. |
| Autumn crafts: leaf applications |
| Making applications from autumn leaves is simple and very exciting. To make our crafts, we will need sheets of paper (the basis of the applique), glue, a little plasticine and, of course, leaves of various trees. |