Trimming from corrugated paper: templates, diagrams
Paper gives immense scope for creativity. They draw on it, fold it, making unusual crafts. You are already familiar with many of them, but not everyone knows about trimming. This crafting technique is quite simple: pieces of paper are rolled up and glued or attached to a base. The result is voluminous and airy compositions.
This handicraft comes in several types:
- Outline. When curled pieces of paper are used to frame a drawing along a previously drawn contour. This technique is sometimes used in conjunction with scrapbooking.
Let's look at a simple example so that you understand how to work in this technique.
To make such a violet, take:
Redraw the presented image onto light cardboard. From corrugated paper you need to cut squares with a side of 1 cm.
- Using one of these tools, press a small piece of paper in the center and wrap it around the stick.
If you wish, you can draw only the outlines of the plant, then the work will be completed faster. If, on the contrary, you want to prolong the pleasure of creativity, then cut out the same squares from light paper, twist them, fill in the background, or proceed to the next work. See how napkin trimming is done.
To make this work, take:
Cut strips 1 cm wide from napkins and chop them into squares with the same side.
Draw the outline of a tree on a white piece of cardboard. Apply glue to a small area so that it does not have time to dry.
At this time, take a square from a napkin, screw it onto the tip of a trimming stick, and glue it to the smeared outline. Then glue another one and others.
Take napkins of different colors to make the tree bright and cheerful. Fill the entire crown, sketch the trunk with brown gouache.
Since you made the foliage of the tree from elements of different colors, make the picture frame from napkins of the same color.
Use blue napkins to create a background. Elements for this are also created using the trimming technique.
You will get a wonderful picture that will surprise and delight everyone who sees it.
Using this technique, children and adults can do many other amazing projects using either flat or contour cutting.
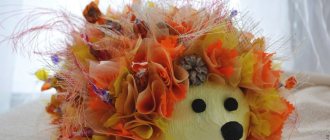
For this, corrugated paper in yellow, orange, lilac, green, white and blue was used.
Trimming will also help create such flowering cacti. For these crafts take:
- well sharpened pencil;
Let the child make three blanks from plasticine. The large oval one will turn into a cactus, the small round one will become a flower, and the square one will become a pot for an artificial plant. Cut triangles from green corrugated paper, and from yellow paper - shapes of the same type, but only with an acute angle. You need to cut petals from lilac paper.
Insert a toothpick into the cactus and the other end into the pot. Attach the flower base to the cactus. Fill his body with beautiful voluminous blanks. To do this, place a pencil in the center of the paper triangle, wrap it around the rod, and stick it into the plasticine base.
To decorate a flower, you need to make 1-2 such petals, then fill its middle with triangular blanks made of orange paper.
Look how the pot is decorated. It needs to be wrapped in a strip of colored cardboard or wrapping paper and tied with ribbon.
A cactus made using corrugated paper cutting has been created.
Look at the process of making another work using volumetric techniques. It will help your child develop creative thinking, fine motor skills, and imagination. Children show interest in working with paper, as a result of which such wonderful models appear.
Cut paper into small squares. Place the blanks of each color in separate containers. If the child is not very small, let him draw an apple on half a sheet of album paper. If he cannot do this on his own, adults will help.
- Useful article: Evening habits that prevent you from losing weight - 13 bad habits
- How to lose 20 kg - real reviews on Guarchibao
Coating small areas with glue, let him attach the squares here to make a fabulous rejuvenating apple.
You can draw a twig or glue a thin strip of brown paper instead.
Prepare with your children:
The work begins with drawing a Christmas tree on a sheet of paper. You can use a template for this. Cut squares from green paper, as well as from sheets of other colors.
You can give your mother or grandmother a souvenir scarf. They will certainly be happy, especially since their beloved child did such a job.
To make a scarf, you need to take:
If the gift is made by March 8, then have dad or grandpa transfer the pattern template onto cardboard. You will need a triangular part of the base. To do this, draw a square on cardboard, then cut it diagonally.
Starting with small areas, have your child fill in the design with squares of different colors. You will need a lot of them. If your child doesn't have the patience to turn the crosscuts, help him with this so as not to reduce his interest in the work.
For the craft, take:
- colored paper, cut into squares with a side of 2 cm;
It is convenient for children to glue using a brush or taking a glue stick. Provide them with these materials and help them cut paper into squares.
You can take your favorite mushroom and leaf templates from the Internet or use the ones presented. You can draw them yourself on thick cardboard and cut them out.
The most painstaking work is cutting out squares and forming twisted blanks. To create the desired shape, place a square of paper on your left index finger. Hold it with your thumb. Place a pencil in the center of the workpiece and twist it.
To make mushrooms, line the stem with white ends and the cap with brown, yellow or red.
The trimming technique will also help you make them. Such children's paintings turn out to be very cute and touching; they will remain for a long time and will decorate any corner of the house.
Having cut them, you need to start gluing. In this case, it is most advisable to fill the space on the left side. First, cover the rainbow with multi-colored stripes, then make grass around it, and glue green trims. Also decorate the sky on this side, filling it with twisted blue squares. Leave some space for the clouds; glue the white blanks here.
Also on the left side, start gluing brown parts in the form of reeds, make the chickens yellow, and lay out the lake blue.
On a sheet of whatman paper you need to draw a viola with a pencil or transfer another image here. Then each of the guys will fill the flower with twisted trims of a certain color.
If you draw well, draw the future art on cardboard with a pencil; if not, then just redraw it. A good template is embroidery patterns. They are transferred to a sheet and decorated with rolled paper pieces of a certain color.
Finally, look at how to make a New Year's garland, which can also be created using the trimming technique.
For it, on whatman paper or white cardboard, draw the letters of the future inscription and cut them out. Now each one needs to be framed first with white trim, and red ones glued inside.
https://youtu.be/TpuL_hXGs2khttps://youtu.be/7Pu5MI4RWiU
_
mishanya-g.ru
Application of corrugated paper
Corrugated paper and PVA glue are commercially available and can be purchased for crafts to be made for school. You need to make such crafts with your own hands on the eve of such holidays as:
New Year;- Christmas;
- February 23;
- March 8;
- May holidays.
It’s important to know what the napkin craft technique is called before you start. Rolling paper using a stick is called trimming.
There are several methods for trimming:
- volumetric;
- contour;
- flat layer;
- multilayer.
Each method of doing work has its own characteristics and a specific end result.
To make a corrugated craft you need:
- corrugated paper of various colors;
- PVA glue;
- White paper;
- ballpoint pen refill.
process description and original ideas
Contrary to its name, trimming has nothing to do with processing the ends of any object. This design technique, often used to decorate postcards and paintings, is related to appliqués, but unlike the latter, it is aimed at creating volume. The intricacies of trimming are very easy to master, so this activity is ideal for leisure activities with young children.
Trimming: what is it?
The main attractiveness of paintings created using the cutting technique lies in their certain airiness and lightness, which is achieved through the use of corrugated paper - thinner and more transparent than ordinary colored paper. And also due to the technology of cutting and fixing it. Unlike other methods of working with paper, in trimming the accuracy of cutting out parts does not play a role: on the contrary, the more uneven the edges are, the more attractive the finished picture will be, since it will have an individual relief. True, some rules still need to be followed so as not to step over the line between deliberate negligence, which adds liveliness, and unattractive, carelessly performed work.
To realize the idea conceived using the cutting technique, in addition to the picture, you need to stock up on colored corrugated paper, which is cut into small elements of square, triangular or round shape, 1.5-2 cm in width and length. In this case, as already mentioned, the edges can be made not only smooth, but also zigzag, wavy, etc. The main thing is not to unnecessarily increase the size of the parts. If the picture is large, you can make 3*3 cm squares, but no more than that. The smaller they are, the more of them there will be in a certain area, as a result of which the filled form will look more holistic.
The paper is fixed to the glue using a thin long object: it can be a pencil or a match: the area of its end should be small, and at the same time it will be inconvenient to use a thin needle. The match is placed exactly in the center of the paper element, after which its edges rise, clasping the match, and curl slightly along it. Then the paper is pressed against the side edges of the match with your fingers to strengthen the resulting paper shape, and the element is seated in the chosen place using glue. Finally, it is pressed down in the same center where the match stood for 5-7 seconds. According to this algorithm, each paper blank is glued, and the larger the area that needs to be filled, the longer it takes to work with the product, since the elements are placed end-to-end to each other, with maximum density. When examining the finished section, the joints of the parts should not be noticeable: visually, a craft made with high quality using the cutting technique always resembles an expensive fluffy carpet.
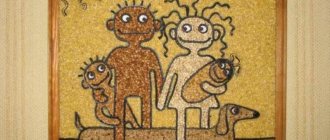
Those who are just trying their hand at this method of decorating products with paper are recommended to start with simple “paintings”, practicing not only the step of twisting and fixing parts, but also transitions and color combinations. For example, lay out a rainbow, trying to make the stretch as soft as possible, which is achieved by selecting a large number of shades of paper and smoothly blending elements into each other. If you want to try experimenting with shape, building flexible lines, start with simple geometric shapes and their connections: first fill the circle, making it as even as possible, then connect it with an oval - you get the head and torso of a person. Then you can begin to deform the usual details: concave several lines of the triangle so that you get a butterfly wing, or stretch out its base in places and round the top, getting a barely open tulip bud.
Corrugated paper cutting technique: description
- The basic principles of trimming as a technique were discussed above, but it is worth understanding that trimming does not always involve filling a certain area. For example, there is a contour trimming technique, the name of which speaks for itself: fluffy paper twists frame the selected shape around the perimeter, and the center can either remain empty or be decorated using other techniques - quilling, scrapbooking, etc. Contour trimming also looks interesting on crafts made in monochrome or when using only 1 color different from the background color. The drawn outline of the design is simply duplicated with rolled paper to match, and not always completely - perhaps only in areas where you want to add volume.
- Planar trimming is a classic for paintings and postcards, which was already discussed above. This is a traditional filling of any shape on a plane, and with the combination of all the shapes of the pattern, an even terry carpet of rolled paper is obtained. Due to the small size of the paper elements, all lines, contours and boundaries of the drawing are preserved, and the picture does not lose clarity and ideas.
- There is also a technique for volumetric trimming: the operating algorithm is similar to the algorithm for planar trimming, but paper twists are used to tightly cover a volumetric figure - a box, a figurine, etc. In addition to the fact that in this way you can give new life to an old thing, such a design idea allows you to create figures on a simple base from cardboard, plaster, clay, etc., “revitalizing” them not with a brush and paints, but through paper decoration. Here, the degree of twisting, the angle of inclination when fixing and the size of the paper parts often vary depending on what kind of shape needs to be put into paper. Moreover, the elements are not always attached with glue: for example, the plasticine base will independently hold the paper pieces, without additional means.
- The last option, which should be considered a subtype of any of the previous techniques rather than a separate method, is layer trimming. It involves gluing rolled paper blanks into each other, while simultaneously varying their size and density, which allows you to achieve very soft color transitions or realistic volume on a plane. All this affects the overall perception of the craft: the same green grass in the picture will look livelier and more natural if in shading areas it is made in a dark green shade, and in areas where the sun’s rays fall - in light green. You can use layered trimming for both contour and other techniques.
Trimming corrugated paper: pictures and ideas
On the Internet and magazines dedicated to needlework, you can find a lot of different pictures that will serve as the basis for planar or contour trimming, but sometimes you want something special, your own. If you have basic skills in working with graphic editors, you can draw the desired sketch on a graphics tablet, print it in a certain size and design it using the trimming technique. Or you can do the same thing in Photoshop using brushes that represent a variety of elements - from basic geometric shapes to full-fledged details of nature, clothing, silhouettes, etc. You can also outline the contours of the future painting by hand, using a pencil - it will not rub and mark as much as a pen, especially at the moment of contact with glue. It is not necessary to make complex drawings: it is enough to simply indicate the shapes that will be filled in, or the contours that need to be duplicated.
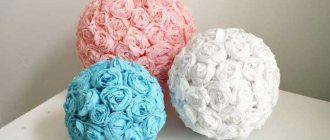
If in other techniques - quilling, etc. - even simple elements looked quite impressive, then in trimming, paintings that have at least 4-5 details look much more interesting. Even if it is a simple sun, clouds, a house, an apple tree nearby and a wooden fence, then this is already a finished product, which, after filling it with paper rolls, becomes voluminous and alive, and also carries a holistic idea. A single flower, decorated using trimming technology, will look no worse only if a volumetric technique is used on the originally constructed frame of this flower. But even here, bonsai and topiary are much more attractive: artificial flower trees. By the way, using the volumetric trimming technique you can even create a bridal bouquet from “artificial flowers” or decorate a wedding table.
Creating corrugated paper is a great idea for an evening at home with the kids or even alone. Crafts made using this technology are distinguished by their special tactile softness and visual grace, and by combining several techniques at once you can get unusual, but very attractive paintings and sculptures.
lucky-girl.ru
corrugated paper cutting technique
The 3D appliqué technique (this method of making 3D paintings on paper is also called trimming) is one of the most popular types of paper crafts. The operating technique is very simple. Such applications can be performed even by young children under the guidance of a kindergarten teacher. On the Internet you can find a variety of master classes teaching this appliqué technique.
Contents of the material
Corrugated paper paintings: where to start
Despite the relative simplicity of this technique of working with paper, here, as in any other type of needlework, there are some subtleties. In order to clearly see the work process in detail, it is recommended that you first watch the video of the master class or personally attend a training master class. Of course, no one will suggest that novice creators immediately take on products of the highest class of complexity. Beginners usually start with floral motifs, such as cactus or poppies. The easiest way is to make a cactus.
To perform any work using the trimming technique (cactus, other flowers, landscapes) you will need:
- Colored corrugated paper. You can buy it at a craft store, or you can also corrugate the paper yourself.
- Cardboard for making a template. The color of the cardboard can be any, the main thing is that the background is in harmony with the picture. For example, a cactus will look spectacular on a yellow background, and a chamomile on a blue one. You can come up with a color scheme yourself, or you can spy on it in a master class.
- Trimmer. You can buy it at a craft store or replace it with a sharpened ballpoint pen cap.
- Glue and scissors. Since the trimming technique is a special type of appliqué, you can’t do without these tools.
Technique for cutting corrugated paper: master class
In order to master the technique of working with corrugated paper as best as possible, you just need a little attention and patience. And soon the novice master will turn into an experienced specialist and will be able to give master classes to those who want to master this art. Using the cutting technique, compositions with plant motifs look very impressive: cacti, daisies, poppies, it all depends on the author’s imagination.
Having decided on the color of the main parts of the work and the background color, you need to prepare blanks for work. The trimming technique initially involves working with small parts, so it requires patience and perseverance. But the result will meet all expectations!
To make the blanks, you need to cut corrugated paper in the form of identical squares. Then you need to arrange squares of different colors into piles and start actually trimming. Before this, it is recommended to watch a master class to master the art of working with a trimmer.
If you decide to make a chamomile, poppy or cactus, trimming is the process of twisting the blanks into small tight tubes, which then need to be evenly distributed over the finished template and glued, filling the drawn outline. The result should be a three-dimensional picture. It can be a whole picture or a single cactus made of corrugated paper, the main thing is that the work is done carefully, and then the effect is guaranteed.
Trimming from corrugated paper: pictures
In order to make a multi-color composition from corrugated paper, you need to clearly think through the color scheme. It is best for beginning craftswomen to sketch a preliminary sketch with colored pencils or felt-tip pens. Attention: the more colors and shades of corrugated paper are used in the work, the more labor-intensive the execution will be. But the picture will also look impressive. Nevertheless, paintings made from two to four colors also look very picturesque, the main thing is to choose the right subject. Attention: if the picture is multi-colored, it is recommended to make the frame monochromatic, and vice versa.
We also recommend reading:
Volumetric trimming: practical recommendations
To make your work easy and the result to meet your expectations, you must consider the following practical recommendations:
- Before starting work, you need to lay out everything you need on the table, and arrange paper blanks of different colors into several piles: a separate pile for each color.
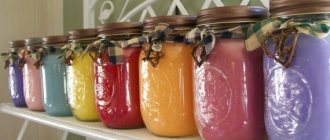
- Instead of colored corrugated paper, you can take multi-layer napkins of different colors or even toilet paper, it all depends on the color scheme of the composition. You can also take velvet or glossy paper, this will allow you to experiment with texture.
- It is better for beginning needlewomen to take ready-made work templates; they are presented in abundance on the Internet and specialized literature. Experienced craftswomen and those who draw well can draw a sketch themselves and then transfer it to cardboard.
- During work, you should be careful and under no circumstances allow drops of glue to remain on the finished work. Working with traces of glue looks messy, and it is almost impossible to remove these traces. In order to apply glue to the template and workpiece, it is recommended to use a thin brush.
Making three-dimensional paintings using the trimming technique is a very interesting hobby. Also, this type of leisure activity is of great interest for children and teenagers, since making paper crafts and, in particular, cutting, develops imagination and fine motor skills of the fingers. Ready-made paper paintings will serve as a wonderful gift and decorate any interior. The main thing is a little patience, and everything will work out.
Attention, TODAY only!
1igolka.com
As a gift for mom
The craft will be appropriate on the eve of the women's holiday. Flowers made by trimming will appeal to mom, grandma, and a friend in kindergarten.
The following will be useful at work:
- colored napkins;
- green corrugated paper;
- wooden skewers;
- hard plasticine;
- PVA glue.
Corrugated paper is cut into strips. Wooden skewers are wrapped in the resulting strips. The ends of the strips are fixed with glue.
A ball is formed from plasticine of any color and placed on a stick.
Squares and circles of different sizes are cut out from colored napkins. Only squares are prepared from green napkins.
Using the end of a skewer, the petals are twisted from the blanks. Without removing the skewer, the part is stuck into a plasticine ball. All other petals are inserted into plasticine next to the first. In this case, they should be located close to each other and occupy only the upper half of the plasticine base.
When the flower head is decorated, you should frame the flower with green napkins. Trimming is carried out along the contour of the colored petals.
The visible part of the plasticine is wrapped in a green napkin.
Related article: How to make a plaster mask or face cast
Flower leaves are created from corrugated paper by trimming. They are attached to the stem with glue.
The flower is ready.
In this way you can create a whole bouquet and please your beloved mother.
Picture of a goat. Corrugated paper cutting
There are so many wonderful techniques for making various paper crafts: quilling, origami, Iris folding, volumetric decoupage, and this is not the entire list.
Today I would like to suggest creating a beautiful picture using the cutting technique on paper. This is another wonderful technique that allows you to create magnificent works that amaze with their beauty and originality.
Kids can easily be entrusted with rolling up the paper and gluing it to the picture. For the New Year, an excellent option would be to create a picture using the cutting technique from corrugated paper. This will be a cute goat, which is a symbol of the coming 2015.
We will need the following materials:
- Corrugated (crepe) paper in white, brown, black, pink, yellow, red and blue
- toothpick or ballpoint pen
- scissors
- PVA glue
- template picture with a goat
Picture of a goat. Trimming from corrugated paper - master class with photos:
Before we get started, let’s print or copy the goat.
We will transfer it to white cardboard or cardboard of any other color at your discretion.
Cut the corrugated paper into squares with sides 1 cm by 1 cm.
Apply a thick layer of PVA glue to the picture.
Take one white square and place a toothpick on it.
Fold the square in half, lightly pinch it with your fingers and roll it around the toothpick.
Glue the resulting curls onto the picture.
We cover the entire body of the goat.
Next, we cover the legs with white curls and the hooves with black ones.
We cover the goat's udder with pink twisted squares.
We cover the ribbon on the goat's neck with red twisted squares, and the bell with yellow ones.
We cover the muzzle with the main white color, and the eyes, nose and mouth with black.
We fill the horns with brown twisted squares.
When we have completely filled all parts of the goat with twisted colored squares, we can start trimming the butterfly. Let's make her body yellow, and her wings multi-colored and bright.
We use pink twisted squares to create a cute swirl under the butterfly. We use scissors to trim the excessively protruding edges of the paper so as not to spoil the main appearance.
So our tender and fluffy picture of a goat is ready. Cutting corrugated paper will give you a lot of positive emotions. Enjoy your time with such a wonderful creative process.
do-by-hands.ru
We study a step-by-step master class on cutting from napkins
To work you will need:
- Napkins in yellow, orange and green colors
- Black corrugated paper
- Cardboard
- Scissors
- Plasticine
- Toothpick or pen refill
- PVA glue
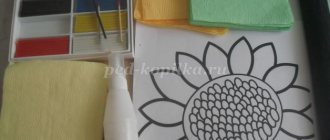
- Sunflower drawing
Stages of making the “Sunflower” composition using the planar trimming method.
Squares of 15x15 mm are cut from colored napkins. A drawing of a sunflower, which can be found on the Internet and simply printed or drawn by yourself, is glued to thick cardboard with PVA glue. Plasticine is molded onto each petal one at a time.
The pen rod is taken in the right hand, the yellow paper square in the left hand, after which the rod makes circular movements, twisting the paper into a tube. The resulting end-tube, without being removed from the rod, is attached to the plasticine petal. After which the rod is removed.
Each seed is coated with glue in turn, and a trim made of black corrugated paper is immediately fixed onto the fresh glue. This is done so that the glue does not dry out if, for example, it is immediately applied to the entire surface of the seeds. Using green napkins, using the same principle of fastening, the space around the sunflower is gradually filled, forming a background.
Once there is no free space left in the drawing, the finished composition can be placed in a frame.
That's all, the “Sunflower” composition using the flat-cut technique can be installed or hung in a prominent place.
Trimming technique: numbers, postcards, topiary.
Today I will reveal to you one of the simplest and at the same time original and unique decoration techniques - trimming.
It sounds, of course, rude, but in practice the result will amaze you and those around you. You can do trimming with children over 5 years old. Nowadays it’s fashionable to create figures and art objects for holidays with your own hands, make original photo props for photo sessions, decorate the room yourself, the described technique will come in handy everywhere. We will need: - Corrugated or thin colored paper; - Scissors; - PVA glue or "Dragon" for art objects; - Old markers or pens according to the number of assistants; - Semi-cardboard or cardboard for the base; - For topiary, alabaster and a disposable glass;
Preparing the base. First of all, we decide what we will make. For a large number you will need an old box (for example, from under a TV). We draw a number pattern on it (in our case “2”) and cut it out. If we are talking about a postcard. We take half-cardboard, draw a pattern that we will decorate with trimming (in our case, the number “8”). For topiary, take a ball from a children's dry pool or cut out a shape, such as a heart, from cardboard. You will need two such foundations. Glue them together by first inserting a stick-stem between the forms. Then place the stem in a glass and fill it with alabaster diluted to the consistency of thick sour cream. Wait for it to harden. If the surface will be decorated with different colors, then mark in advance where to use which color, and separate the border. Stripes, like on a two-piece or a heart, like on topiary, there is no limit to imagination. What to do with paper? Cut colored paper into squares. The size depends on the size of the structure, for figures we take squares 5*5cm, for topiary 2*2cm, but not less than 1*1cm. Trimming technique. Take a felt-tip pen and a piece of paper. We wrap the top of the rod with a paper square and, holding it with our fingers, dip it in glue. Then press it tightly to the base, wait a few seconds and remove the rod. The square should remain glued and fluffed up like a flower.
If you use paper that is too thick, it will not be saturated enough for gluing. We repeat all the steps, and glue the next piece close to the previous one, slightly moving the ends of the “flower”. Glue the edges of three-dimensional figures with a separate row of squares so that the joints of the glued bases are not visible.
Painstaking work. Of course, the larger the figure, the longer you will have to sweat. It is very important to note and tell you, dear handicraftsmen, that objects made using this technique cannot be crushed, because... the paper will lose its fluffiness. But you will keep and remember a bright, original painting or craft created together with your children for a long time. In addition, it is easy to restore if necessary, simply by replacing damaged fragments.
sdelaysam-svoimirukami.ru
How to learn napkin cutting for children in step-by-step tutorials
Let's consider lesson No. 1: creating a flat pattern from napkins using the trimming method
Before you start working on a craft, you need to stock up on some necessary materials, most of which can be found in almost everyone’s home. So, for trimming you will need:
- multi-colored napkins;
- scissors;
- toothpick, match or other thin stick;
- PVA glue;
- paper.
The painting will be applied to a previously prepared contour drawing. You can choose one of the diagrams below, find another one on the Internet, or take a leaf from a children's coloring book. The drawing can be absolutely anything: from flowers and animals to fairy-tale scenes.
The colors of the napkins should match the design. When painting elements of nature, it is better to use napkins of several shades of the same color to give the painting a more natural look. For example, a yellow flower can be made with a transition from white to bright yellow along the entire length of the petals.
When all the materials have been collected and are at hand, you can begin making the craft.
Working with napkins can be done in two ways:
- Before starting work, cut all the napkins into strips and then into small squares with a side of 1 centimeter.
- Tear off small pieces from a whole napkin while working.
Both methods have their advantages. With the first method, you won’t need to spend extra time tearing off each next piece, but with the second, the process of creating a craft looks cleaner, since small pieces of napkins do not fly apart with careless movements.
Getting started involves tracing all the contours of the diagram with glue. After this is done, you need to glue pieces of napkins made using the rolling paper technique to the lines: the end of the match is placed in the center of the piece of napkin and twists it tightly around itself. The resulting lump-tubes, without removing them from the match, should be applied to the area greased with glue so that they do not fall off and remain on the paper.
All further work consists of repeating the above action many times: you just need to take pieces of napkins of the desired color and glue them to the drawing. The background can be decorated with white napkins.
The picture using the cutting technique is ready! The work can be hung on the wall or refrigerator so that it pleases the eye and reminds you of the time spent with your child doing a pleasant activity.
Master class, Trimming | Country of Masters
My trimmed trees and small MK...
Bonsai, topiary, Christmas tree, Master class
5809
| wood using trimming technique MASTER CLASS Bonsai, topiary, Christmas tree, Master class 3350 | Master class on mesh trimming (... Master Class 1651 | Tree made of ribbons, MK. Bonsai, topiary, Christmas tree, Master class 1540 | |
| Manufacturing technology of EUROPEAN... Bonsai, topiary, Christmas tree, Master class 1525 | Magic eggshells and what you can... Master class, Craft, product 1329 | Trimming Teamwork, Master class 1243 | Organza trims and one of the ways... Bonsai, topiary, Christmas tree, Master class 1187 |
| “Wooden roses” and how I... Bonsai, topiary, Christmas tree, Master class 1069 | For various holidays in 1 hour Master class, Craft, product 1010 | Orange tree mini MK Bonsai, topiary, Christmas tree, Master class 998 | My topiaries. Bonsai, topiary, Christmas tree, Master class 991 |
| A quick way to make crosscuts from ribbons Master Class 826 | Vanilla roses in chocolate (mini MK) Bonsai, topiary, Christmas tree, Master class 665 | Tree of pink and yellow roses...MK Bonsai, topiary, Christmas tree, Master class, Craft, product 544 | Postcard for May 9 MK Master class, Postcard 509 |
| Unconventional work with paper… Master class, Teaching experience, Early development 497 | No. 1 / Ball with roses of 3 colors... different... Master class, Craft, product 472 | Chandelier made of napkins and threads. Trimming... Interior, Master class, Craft, product 427 | Twin pink trees Bonsai, topiary, Christmas tree, Master class 390 |
| MK on a tree in a shoe Master class, Craft, product 386 | Cockerel with chicks. Toy, Master class 377 | Improving the production of trims Bonsai, topiary, Christmas tree, Master class 370 | Everyone is cutting (video) Video, Master class 354 |
stranamasterov.ru
Master class “Cutting”
Galina Kromskaya
Master class “Cutting”
«Trimming
»
method of working with corrugated paper, paper napkins.
Objectives: to introduce the technique of cutting corrugated paper and creating crafts on the surface of cardboard or foam plastic. (flat facing )
History of trimming Applique was born a long time ago. It appeared as a way to decorate clothes and shoes, household utensils and tools, and the interior of your home. Perhaps the first impetus for the appearance of appliqué was the need to sew skins for clothing, and the first stitch told a person that they could not only connect parts of clothing, but also decorate it. Later they began to use pieces of leather, fur, felt of other shades and colors to decorate clothes. Parts cut from these materials began to be attached to clothing. This is how the application appeared. What does this word mean? Translated from Latin, appliqué means application; it is a visual technique based on cutting, applying details to the background, and attaching it to it using various glues and threads. Trimming is an unusual type of appliqué, one of the methods of productive activity - a technique for making three-dimensional paper crafts (the art of paper rolling)
.
Today I will teach you how to make crafts from corrugated paper and cardboard (ceiling tiles)
. These crafts can be used for gifts, creating works for any holiday, for a birthday child, club work, and much more.
I need multi-colored corrugated paper, a piece of ceiling tile or cardboard, an empty rod, a simple pencil, and PVA glue.
We cut the corrugated paper into 1x1 cm squares. Place a rod end up in the middle of the paper square and tightly twist the paper around the rod (rolling the paper with your fingers)
- the motor skills of the fingers work - it turns out to be a tube -
a crosscut . the resulting trim from the rod, lightly pierce it according to the pattern into the foam, and pull out the rod, but the trim remains . If we are working with cardboard, then we coat the design with PVA glue and glue the trim onto the glue .
the next trim tightly with the previous one, and so on according to the drawing, so that there is no gap left. The works turn out to be voluminous and beautiful.
the trimming work with me . trims from the prepared corrugated paper and use a rod and plant them according to the design, the result is a voluminous work.
Next, you can make a background for the painting and frame it.
"Seven-flowered flower"
"MAY 9 - Victory Day"
"Cherry"
I hope that you liked the cutting and you will use it in your work with children, including in circle time
Applications made of corrugated paper and cardboard based on photo and video lessons
Many people are in love with a wonderful technique - appliqué. With its help, beautiful and cute designs for cards, albums, gifts, wonderful paintings and collective crafts in kindergarten are created.
If you are one of the applique lovers, remember about corrugated paper - it gives even more scope for creativity. It comes in different qualities and types, you need to try which one suits you best. Don’t forget about the possibility of making applications from corrugated cardboard.
Working with corrugated paper
The advantages of corrugation are that it additionally stretches, twists, and generally can take on different shapes that are not typical for other paper materials.
Firstly, the ductility. By gathering a piece or, conversely, stretching it, you can give it a different shape: Secondly, it easily crumples into a ball or oval, making it easy to make flowers from corrugated paper: Thirdly, no one has canceled the cut-out applique, which preschoolers really like and are very useful for motor development. Fourthly, paper strips can easily be twisted into all sorts of bows and spirals, which certainly increases the possibilities of designing your work. Fifthly, volume is achieved by giving a square or shapeless piece of corrugated paper a certain shape - for example, a circle.
And finally - various harnesses as separate elements.
Application "Flower with a butterfly"
Little ones quickly grasp new things, so you need to start doing appliqué as early as possible, in the younger group of kindergarten. We offer a master class to study this topic for beginners and kids. Application on the theme “Flower with a butterfly”.
Video: Panel using trimming
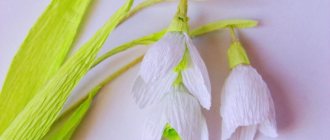
Applique Lilac using cutting technique
Trimming is an interesting solution, both for drawings and for three-dimensional figures. You will need a pre-prepared template. If you don't have artistic ability, you can always copy the image from a coloring book or print it out.
Follow the step-by-step instructions for a detailed overview of the work:
- Cut the lilac corrugated colored paper first into strips, then into squares of the same size:
- Now the trimming itself: take a pencil and place one of the squares on its end, lower the edges and make twisting movements. When removed, you should get a blank that looks like a vase. Apply glue to the place where you will glue the resulting element. Glue using a wooden stick or the same pencil.
- Fill the whole picture with these flowers.
- The lilac is filled with flowers – let’s start with the leaves:
- As a finishing touch, you can paint the background with contrasting paint:
Volumetric Roses made of corrugated paper
Step-by-step photo master class
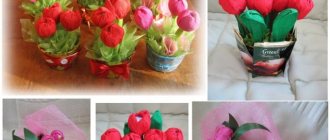
In the older group, kids can congratulate their mothers on March 8th using corrugated material - roses will look gorgeous! Description step by step in a simple MK for children of senior preschool age:
- You need petals for a rose - round the top corners of a square, and stretch this top to the sides and shape it to make a petal. It's the same with leaves. The stem needs a tube.
- Glue the petals one by one, and secure at the end with a thread and a needle:
- Wrap a long green strip around the stem and glue on leaves and sepals. Glue it.
Video tutorial on applique Rose from corrugated paper
Corrugated paper mimosa applique
Mimosas will require foam balls, so such small pieces should not be offered to younger children. In the preparatory group, girls and boys can already work with polystyrene foam without fear. We make only leaves from corrugated paper. Here's how mimosa itself is made:
Corrugated paper carnations
Step-by-step photo master class
These are not all the ideas for corrugated design. Delicate carnations will be relevant by May 9 for gifts to veterans. See instructions with step-by-step signed photos:
- Width – at least 7 cm. Pull to the sides.
- Cut one long edge with pattern scissors:
- Fold in half or accordion-style several times, and then cut in several places.
- Glue it to the skewer, gradually pulling the edge with your hands.
- Wrap the resulting carnation with thread at the bottom to secure it.
Using the already familiar method, we process the stem and straighten the carnations so that they turn out more alive.