- June 11, 2019
- Needlework
- Kolesnikova Alexandra
Kids simply love backpacks: you can feel like an adult and carry your favorite toy and bottle of juice yourself. However, mothers do not necessarily have to buy their baby a backpack in the store - they are often more expensive than adult models.
It is much more interesting to sew a children's backpack with your own hands, and the future owner will be happy to help the mother.
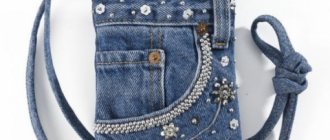
Backpack made from old jeans
Even an inexperienced needlewoman can sew such a model of a backpack-bag. Choosing old jeans as a base is not only practical, but also interesting: they already have decorative stitches and pockets that you can use. The size of the finished backpack will depend on the width of the jeans leg.
You can show your imagination and decorate the backpack with the initial letter of the baby’s name, bright appliqués or fabric flowers. The main thing is that such a thing is unique and the child will be happy to wear it.
How to sew a backpack with pockets
You will need old unwanted jeans, about 4 meters of bright cord and two strips of finishing fabric of a suitable color. Here is a step-by-step description of how to sew a children's backpack with your own hands:
- You need to cut off the legs of the jeans, carefully rip them open and steam them.
- Align both fabrics so that the seam is exactly in the center. Cut two blanks from them (length 32 cm, width 35 cm).
- Remove two pockets from the jeans along with rivets and 4 belt loops.
- Place the pockets on the front of the backpack (you can choose them the same size or sew large and small). Sew the pockets to the base.
- At the bottom of the backpack for the straps, sew two belt loops on each side. Or leave holes at the bottom of the backpack through which you can then pass the cord.
- From a strip of finishing fabric of a suitable color, cut out two strips 37 cm long and 15 cm wide. Trim the edges, fold the strips in half and stitch them to the top of the backpack. Thread a cord through them and secure its ends into the loops at the bottom of the backpack.
These children's backpacks are suitable for both girls and boys. By the way, you can use not only old jeans for sewing; any bright, thick fabric will do.
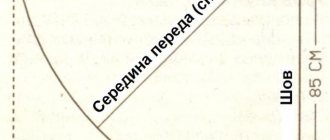
Children's backpack for the little ones: pattern and DIY sewing master class
We would like to invite you to sew an interesting version of a children’s backpack with your own hands. Carefully follow the advice of the master class, which will show you step by step how to sew a backpack with your own hands. There is also a pattern for a children's backpack, which will make all the work more understandable and easier.
In this option, a blue main fabric is used, from which a piece measuring 72x31 cm should be cut, as well as the bottom of the backpack, which will have the shape of a rectangle with rounded corners. For the bottom, you should cut a rectangle measuring 25x11 cm. For the handle on top of the backpack, you need a piece 23 cm long and 2.5 cm wide. The backpack will also have an internal pocket, for which we cut out a rectangle measuring 10x20 cm.
The backpack pattern contains flap and strap parts that are cut from the lining fabric.
The second part used has a small polka dot pattern, from which we cut out straps, a handle, a strap for an internal pocket measuring 20x6 cm, as well as a strap for the backpack itself 72x6 cm. Do not forget that the seam allowances will be 1 cm.
Our backpack is enlivened by a cheerful applique, for which you will need a glue web. We take green fabric as a basis and, using cobwebs, glue on the so-called “mounds”, which will be yellow and dotted with polka dots.
All details of the applique should be cut out together using green fabric, and then using a spider web we fix everything onto the product from the bottom side. Then each contour should be sewn with a zigzag seam.
In the same spirit, you should apply the helicopter appliqué, as well as the sun on the backpack flap. All small details on appliqués can be done with special fabric paint.
The inner lining of the backpack has a pocket with a strap. Please note that the pocket should be gathered a little and then sewn.
Related article: Gauze fabric: composition, properties, care
The final size of the pocket is 15 cm. An elastic band is inserted into the bar itself, after which we sew it across the pocket and sew on its bottom.
All that remains is to connect all the parts together, for which the lining part must be inserted into the middle of the main one. A strap is sewn into the top of the backpack, followed by a small loop.
First you need to sew a flap that will contain the loop, handle and strap of the backpack.
Please note that all parts must be reinforced with dublerin.
We combine everything into a single product and the backpack is ready!
The best posts
- DIY paper smeshariki with diagrams and videos
- How to make a balcony in an apartment yourself
- Like in The Simpsons: stylization of home design like in the animated series "The Simpsons"
- Black facades in the kitchen: how to care?
- Moroccan plaster - exotic in wall decoration
- Wallpaper for children's rooms
- How to make an arch in an apartment: stages of work
- Kitchen window design: choosing curtains, decorating the window sill
Backpack with flap
This type of children's backpack will be a little more difficult to sew, but the result will please both mother and baby. You will need:
- Basic dense fabric. A bright design - cars, butterflies or hearts - will look very good. Or you can sew a plain backpack and decorate it with a bright flap.
- Cotton fabric for lining a backpack.
- Synthetic padding for fabric compaction.
- Sling for straps, approximately 2 meters.
- Accessories: 35 cm elastic bands (or cord for tying), 4 fasteners for backpack straps, magnetic clasp.
Cut out the details of the backpack according to the pattern. Compact them by sewing them with padding polyester. For a better result, you can first iron the part and the seal with a hot iron through gauze.
To form the straps: cut two strips 65 cm long from the sling and fasten to each with a constriction fastener. Then cut two pieces of sling 9 cm long, also insert fasteners and fold in half. Carefully sew short straps to the bottom of the backpack. Connect the long and short straps and check if the length is adjustable. Sew the ends of the straps to the top of the main piece.
Backpack for baby
We sewed a small backpack for a baby with the whole family as a birthday gift for a 2-year-old girl. A little background... why a backpack?
When our baby was about two years old, I realized that he really liked to take all sorts of bags and bags with him on walks and put toys, scoops, buckets, and molds in them. That’s when I started thinking, why not sew a small backpack and teach it to order from childhood.
The children's backpack itself is my improvisation; when I started sewing, I had no idea what I would succeed in the end. The only thing I wanted was to make a backpack in the shape of a bunny, because our little friend was born in the year of the Hare)))
I needed:
– main fabric – red lining raincoat fabric (quilted with synthetic padding). From it we cut out the base of the backpack, two rectangles (dimensions 21x21 cm) + bottom + upper part of the backpack for tying the lace + lower part of the hare's face;
– artificial fur fabric of pink color of a hare’s muzzle. The muzzle itself serves as the “lid” of the backpack;
– light drape fabric in pink shades for paws;
– a little padding polyester for stuffing the muzzle and paws;
– fleece fabric in burgundy tones for the ears;
– a red cord 70-80 cm long with a lock so that you can tighten the top of the backpack;
– straps (you can buy them ready-made), but I made them myself, so I bought a black sling 5 mm wide and clamps;
– bias tape for finishing the inside of the backpack (about 1.5-2 meters);
– the necessary attributes for the hare’s face are purchased eyes and nose, homemade teeth (more on this later) and dark blue or black thick threads for the mustache.
I sewed most of the backpack on a sewing machine, but there was also a lot of small, painstaking handwork. The sewing process itself took me about 3 hours)))
But first things first. Here is an example of my pattern, you can simply print it out and cut it out. But let me clarify once again that the backpack is for a 2-year-old child. The size is quite small, but at the same time it is roomy.
We cut out everything first.
1 – backpack cover
2 – bottom
3 – upper legs
4 – lower legs of a hare
We sew the ears and turn them inside out.
We sew the paws. Turn it inside out. I specially cut out the paws longer, so that later I could adjust their length. We lightly stuff the paws with padding polyester to give them volume. My paws and I turned out to be two colors - pale and dark pink, like a bunny wearing gloves and socks!
We mark on the main fabric the places where the paws will be sewn; I pre-fixed them. Then we sew off the two side seams. Turn it inside out.
We sew the oval bottom, but first we sew part of the straps with rings onto the “back” part of the backpack. How to make the straps correctly, how to thread the sling through the clamps so that you can adjust the length of the strap, I spied in the finished backpack)))
Then we sew the bottom itself and turn it inside out.
We finish the top of the backpack. To do this, we sew a strip 7-8 cm wide and 42 cm long along the front side. Don't forget to sew in the top of the straps first.
Turn it right side out and stitch it. Insert the cord with the lock. Here's the front and back view.
I covered the internal seams (side seams and the place where the bottom was sewn) with bias tape in order to hide all the seams.
The backpack is almost ready, the most interesting and creative part remains - the hare's face, which will be the lid of the backpack. The rest of the work is almost all done by hand.
I deliberately made the lower part of the muzzle longer by 6-7 cm.
We outline the places where the eyes and nose will be. They are purchased, especially for soft toys, with latches on the reverse side.
We sew on the mustache, tying a knot at the end of each “antennae”. Now about the teeth! When I approached my husband with the question: “What should I use to make teeth for a hare?”, he immediately suggested the option of a shampoo bottle. The material is quite dense, he cut it out and made holes for sewing. In my opinion, they turned out to be quite plausible “rabbit” teeth)))
We sew the parts of the muzzle together, turn it inside out and lightly stuff it with padding poly for volume.
Sew on the ears.
Now we bend the lower long part and sew it with a blind stitch. This is what the finished “lid” of the backpack looks like.
Now all that remains is to sew it to the backpack itself. You can additionally sew on Velcro for fastening.
And here is the backpack for the baby!!!
And it was difficult to catch my son, who was trying on a backpack and running around the apartment with it on his shoulders!!! I hope that you will like our gift!)))
Best regards, admin Kotya! I will be happy to answer your questions in the comments! Clicking on advertising will help the site survive in these difficult times. Thank you for understanding!
Share link:
- Click to share on Twitter (Opens in new window)
- Click here to share content on Facebook. (Opens in a new window)
- Click to share on WhatsApp (Opens in new window)
- Click to share on LinkedIn (Opens in new window)
- Click to share on Pinterest (Opens in new window)
- Click to share on Skype (Opens in new window)
- Send this to a friend (Opens in new window)
- Click to print (Opens in new window)
Liked this:
Like
Similar
Valve and assembly
To sew the parts of a children's backpack with your own hands, you will need patience:
- Fold the main piece in half and stitch from the wrong side. Turn the seam so that it is in the middle and sew along the bottom of the backpack. Sew the corners at equal distances and trim off the excess.
- Attach the handle: cut a strip 18 cm long from the sling and sew its ends to the top of the part, between the straps.
- Sew the two valve parts together on the reverse side. Turn it inside out, iron it and make a decorative stitch approximately 7 mm from the edge. Attach the top of the magnetic button.
- Place the flap on the back of the backpack with right sides facing each other and sew them together.
- Cut out the lining pieces and sew them together, leaving a small hole at the bottom.
- Place the main piece and the lining with their upper parts facing each other and stitch them. Turn the backpack inside out through the hole left in the lining, attach the second piece of the magnetic button and sew it up.
- Along the top edge, make two parallel lines at a distance of 1-2 cm from each other. Insert the elastic and sew the ends together. Or insert a cord to tie it.
- The backpack is ready. This is how you can easily sew a stylish children’s backpack with your own hands.
Simple children's backpack
From this article you will learn how to sew a simple children's backpack with your own hands. We have prepared step-by-step instructions with photos and useful sewing tips for you. It’s unlikely that it will take you more than an hour to create a backpack – the process is quite clear and visual. Even a novice craftsman will learn this lesson: to sew this simple backpack, you don’t need to bother with constructing complex patterns and making calculations.
The resulting accessory can be useful not only for children, but also for athletes. If you take material that is not too “childish”, then you will get an excellent shoe bag. If you wish, you can sew a backpack from nylon plain fabric - it is more difficult to work with, but the accessory will be indistinguishable from the factory in appearance.
We will need:
- thick fabric for exterior decoration;
- material for interior decoration;
- bright rope (at least two meters);
- strong threads for sewing;
- any decor (optional).
If you have not previously sewn similar backpacks with your own hands, we recommend choosing natural fabric, as it is much easier to work with. Denim fabric is very comfortable to work with. If possible, sew at least the lining part of the backpack from it. For rope, you can use colored cord, which can often be found in skeins.
The size of the pattern depends on the desired size of the backpack. We need to cut two large pieces of fabric, one bottom piece, and also a thin strip for sewing in the rope at the top. All patterns must match in width, which is 2-3 cm smaller than the backpack itself. We make the blanks in double volume, since we also need to make the lining part.
We sew the main part of the craft by folding the fabric in half. Make an indentation from the edges of about 2 cm. Cut off the corners from the fabric (as shown in the photo).
We hem the edges of the bottom part of the backpack - it is needed to seal and cover the lace, which is passed through the holes in the main part of the accessory. Fold the main piece of fabric in half and sew the bottom part into the backpack.
We take the narrow tape that we prepared for lining the top of the backpack. We bend it along the edges towards the center, and then fold it in half and iron it. We sew the tape along the folded parts along the entire top strip of the backpack.
We pass one rope through the front and the second through the back of the backpack.
We sew the lower part where we placed a narrower strip of fabric (from the inside of the craft). The end of the rope will be hidden.
Ready! Such a backpack can be sewn from one fabric by simply cutting out a rectangular blank and then folding the edges, as shown in the photographs in this master class. But if you do not hide the edges of the rope in the bottom part, your accessory will not look very neat and well made.
Try sewing a children's backpack with your own hands from three parts so that it looks great and lasts a long time. Choose a beautiful design or pattern - then your child will definitely appreciate this thing.
We recommend watching: fashionable backpacks - video master classes
4+
Backpacks with animals
If you show your imagination, based on this simple model you can sew very interesting backpacks with pictures or animal faces on the flap. The easiest thing would be to make an applique from multi-colored pieces of felt. So, you can please your baby with a backpack with a Teddy bear, a car or voluminous flowers.
The task is much more serious - to cut out a valve in the shape of a cheerful animal with eyes, a muzzle and paws. In this case, each detail, except the muzzle, is cut out in duplicate. The parts of the legs and ears need to be sewn together from the wrong side, then turned out and sewn along the edge with a decorative seam.
Then place all the parts of the animal in their places and stitch them together. Of course, you will have to try a little, but these children's backpacks for girls and boys look very funny.
How to choose fabric and accessories
To sew a children's backpack, it is better to choose natural fabric that is durable and resistant to stains. After all, kids don’t always handle their things carefully, so the backpack will need to be washed and cleaned.
When deciding what and how to sew a children's backpack, you should choose fabric made from linen, cotton, tapestry materials or denim.
You should not save on accessories by buying plastic fasteners, clamps or fasteners. It is difficult for kids to handle the fasteners carefully and a new backpack can quickly become unusable. It is better to choose high-quality metal fittings; they are a little heavier, but will serve better.
DIY children's backpack made from jeans
For now, I’ll digress a little and want to share my sadness. A couple of days ago, my daughter and I went to the playground, of course, with a new small children’s backpack, and took with us a doll with a doll’s stroller. Upon arrival, we sat on the rocker while it was free and rolled quietly. More precisely, I rocked Violetta and recited poems to her. She loves it with us.
I turn back and see how two girls grabbed our stroller, threw the doll out of there and pulled it, each in their own direction. At the same time, the mothers of these children sit on the bench and smile sweetly, saying, whose child will be stronger. By the time I got the Vette off the swing, they just broke it. One mother took the child and simply left, the second began to mutter under her breath that apparently she was no longer whole.
I don’t know where I got so much strength from to restrain myself and not hit these mothers in the head with this stroller.
We left the site without showing off our children's backpack made from jeans.
And now I continue the topic of how to sew a backpack from jeans.