For those who like to collect models of cars, airplanes or military equipment, the art of origami will come in handy. All kinds of combinations and techniques for connecting origami modules allow you to create real works of art from paper. Paper sculptures made using modular technology are distinguished by their realism and sophistication. The volume in the figures is achieved through a multi-tiered connection of modules. And today we would like to share a master class on how to make an origami tank: the scheme is quite simple, suitable for children’s creativity. Boys will be especially interested in assembling this model.
To get started, we invite you to watch video lessons that explain in detail all the intricacies of working with paper modules, and also have diagrams for assembling simple toys that can be made even with small children:
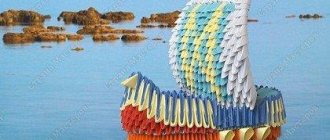
There are a lot of tank models. For example, you can make a T-34 tank like this.
This toy requires a higher level of origami skill. Therefore, we prepared a slightly simpler tank model for our master class, so that there would be no difficulties when working with a child. Today we will be assembling this battle tank:
Assembling the figure
When all the triangles are assembled, we move on to creating the tank. We start with the wheels. For the first wheel, we alternate the arrangement of white and blue modules 6 times and close the workpiece into a ring. The second and third row will consist of 12 white modules. The resulting workpiece must be turned out. In the 4th row we attach another 10 white modules.
And we do the 5th row similarly to the previous one. The first wheel is ready.
We repeat the sequence of actions for 5 more wheels.
Now we move on to the formation of the tank tracks. In total, 1 caterpillar consists of 32 rows of modules. The sequence of addition and order of colors is as follows: in each unpaired row there should be 5 blue modules, in each paired row there should be 4 white ones.
The caterpillar needs to be given an oval shape.
After both tracks are made, we must place 3 wheels inside. Then we connect the track blank to fix the wheels.
We fold the side part of the tank turret according to the track folding pattern. The number of rows is 19. To make a hole for the barrel, several modules must be removed from this blank. The barrel consists of a 9-fold repetition of the sequence: 2 blue modules, in the next row - 1 blue, 1 white, 1 blue. Now carefully glue the barrel into the tank turret.
After this, we move on to creating another wheel that will be mounted on top of the tower. To do this, for the first row we collect 20 modules alternating white and blue. There are also 20 white modules in the second and third rows. We turn the resulting workpiece inside out and install it on top of the tower.
Now we need to prepare the base for the tank. To do this you will need blue paper, a piece of foam and a marker cap. From polystyrene foam you need to cut a block with dimensions: 7.5 × 3 cm. After that, cover it with paper and insert a felt-tip pen cap into the center.
Making the finishing touches. We connect 6 rows according to the scheme: 5 modules, 4 modules, 5 models, etc. You need to make two such blanks. These parts must be glued to the front and back of the previously prepared foam base. We install a tower with a barrel on top of the cap. To firmly fix the parts, modular origami allows the use of glue.
And in the meantime, our origami IS-7 tank is ready:
Follow our instructions very carefully to avoid mistakes in your work. Treat your children to an original activity to develop attention and motor skills.
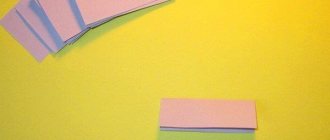
To assemble the tank we will need:
- sheets of green paper;
- stationery knife (or scissors).
Instructions for the manufacture and assembly of the product
In total, 1688 green modules need to be made for the craft.
Let's start assembling the product from the tower. To do this, you need to connect the modules in triplets (15 in total), and then close them in a circle.
The total number of modules in a row is 30.
Carefully turn the resulting workpiece inside out. We lightly press on the corners that were on top and lower them down and inward. We will lift the corners that were at the bottom up.
Rows 3-8 - 30 modules each.
There are also 30 modules in the 9th row, but they need to be inserted with the short side out.
The tank turret is ready.
Assembly of caterpillars.
We begin assembling the caterpillar with triplets (25 in total), which we close in a circle. There are a total of 50 modules in a row.
Rows 1-5 - 50 modules.
In the sixth row, we reduce the number of modules by 4. We reduce them opposite each other in the places where the track bends. There are a total of 46 modules in row 6.
Row 7 - 46 modules, short side out.
The second caterpillar is made according to the same scheme.
You need to insert 3 wheels inside the caterpillar. The total number of wheels for two tracks is 6.
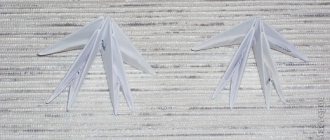
Making a wheel.
There are 10 modules in each row. In total you need to collect 7 rows.
The caterpillar is ready.
Connecting part for tracks.
The part is made quite simply according to the following scheme: we alternate 5 and 4 modules in a row.
In total you need to collect 34 rows.
The ends of the workpiece need to be slightly bent.
We insert the part between the two tracks.
Before attaching the tank turret to the tracks, you need to make a cannon. It is made in the same way as a connecting part, only you need to alternate 2 and 1 module in a row.
We attach the cannon to the tower.
And we attach the entire structure to the tracks.
Our tank is ready.
How to make an origami paper tank step by step
After reading our article, you will learn how to make a tank out of paper, but first you need to know that this type of paper craft can be made in several ways. One of the design methods is more suitable for beginners, while the rest are a little complicated, but they are quite possible to do.
For convenience, instructions for origami from a paper tank in the video:
The most common version of paper tanks, even a beginner can make it, although the name sounds very serious. At first glance, many beginners will find it difficult to carry out the work, but by studying our material on how to make a tank out of paper, you can see that in reality everything is very simple. The main thing is to choose the right material, tool and strictly adhere to the manufacturing procedure.
manufacturing instructions :: SYL.ru
The joint activities of adults and children should be aimed at fulfilling educational, educational and developmental tasks. Origami classes are an excellent option for a creative pastime both within the walls of a preschool educational institution and with your family.
Origami art
Paper modeling is an interesting and uncomplicated activity that allows you to create wonderful products in a short period of time, even without experience or skills. Origami is an ancient art originating from Japan. Despite the fact that paper was invented in China, it was the Japanese who were the first to learn how to fold it into simple figures.
Among adults there are many lovers and connoisseurs of the art of paper plastic art. And children can begin to instill an interest in origami from the age of 3-4, by making crafts together. The adult performs the basic actions, and the child, for example, connects the corners, irons the seams, and straightens the finished craft. At an older age, the child is already able to put together figures independently. This not only promotes the development of fine motor skills, but also has a positive effect on the development of logical thinking and creative activity.
Origami "tank"
You can make a myriad of different figures out of paper. These could be flowers, animals, transport, birds, etc. Some of the most popular are cranes, tulips and roses, frogs and bunnies, etc. If we talk about transport, planes, ships and tanks are most often stored here.
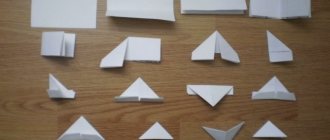
An origami “tank” can be made from paper in several different ways. From the simplest to the most complex - using a large number of modules, matchboxes and a perfume bottle. It is, of course, better to start learning with the simplest model. Making it will take no more than 10 minutes of time, a rectangular sheet of white or colored paper and a little patience and diligence, and then you will have a wonderful origami tank. The folding diagram of the simplest tank is shown below.
Instructions for making an origami tank of medium complexity: body
To do this, you will need 15-20 minutes of time, a sheet of white or colored A4 paper (preferably thick, otherwise the figure will not look voluminous), scissors, a glue stick, and a ruler.
You need to start by making the case.
You need to fold a sheet of paper lengthwise and cut it into two equal parts. Fold each of the halves again, but now across, that is, along the short side. We will leave one of the preparations without attention for now. We bend the corner of the second one so that the top and side sides are aligned. We bend the resulting corner towards the middle. Let's check whether the seams are smoothed out well, straighten the workpiece and make a straight fold through the central point of intersection of the diagonals. Now you need to bend the fold line inward and fold the triangle. We bend both of its corners one by one towards the top.
Thus, we get a rhombus, the side vertices of which should be folded so that they “look” at each other, that is, towards the middle.
Then our workpiece needs to be straightened and, following the same algorithm, we get a rhombus on the other side.
Next, to continue working on the origami “tank” product, we will need a ruler. We need to use it to mark a line that will serve as a place for bending the workpiece inward and will pass through the corners of the rhombuses. Do the same steps on the other side.
We turn our product over and draw a transverse line in the middle. Then we bend both edges so that the corners of the diamonds meet in this line. Moreover, the rhombus with curved vertices should be above the second similar figure, the free corners of which must be inserted under the sides of the first rhombus. Next, you need to gently press so that the workpiece folds into an envelope.
Each of the vertices of the four corners of the resulting figure should be bent inward so that the triangles inside have a side 1 cm long. Again, turn the future origami tank over and open the bent triangles lengthwise. Fold the outer side in half.
This is the final stage of manufacturing the tank hull. Now all we have to do is bend the folded parts and set the workpiece aside.
Instructions for making an origami tank of medium complexity: turret and barrel
An origami tank, like a real one, must have a barrel. Its production boils down to rolling the remaining piece of paper into a tube and then fixing it with glue. The third part of the resulting trunk must be flattened.
We will start making the turret by taking the second piece and folding it first lengthwise, and then bending the resulting halves in half again towards the center line. Let's turn the product over.
Fold the right corner so that the top side aligns with the side. We unfold the workpiece and make a straight fold line through the intersection point of the diagonals. We put the edges inside, forming a triangle. We bend its free corners down towards the center. On the other side we do the same, except for the last step.
We bend the corners to one side and fold the workpiece with the edge towards the middle. We do the same with the second edge. We straighten the corners. Now we connect the ends of the workpiece so that we get a ring. In this case, the large triangle should be located above the small one. This is necessary to tuck the edges of the folded figure under the plane of the second figure. Now press down so that the triangles are completely aligned. We bend the ends sticking out on the sides upward.
Product assembly
An origami “tank” made of paper can be assembled quickly and without much effort. If all the parts are folded correctly, this process takes literally 2-3 minutes.
First, let’s open the junction of the triangles in the turret blank and insert the barrel with the flattened side into the resulting pocket. Next, turn the workpiece over and bend the pockets on the back side. We need to carefully insert the folded triangles of the body into them.
This is the final stage of manufacturing this paper plastic product. Our tank is ready! But there is no limit to perfection. The desire to learn new things, patience and accuracy will help you achieve even greater success in the art of modeling. Then you can learn how to fold complex crafts using the “modular origami” technique.
A tank made using this method resembles a real one and is a true masterpiece that can become a wonderful decoration for the interior of a child’s room or a wonderful gift for Defender of the Fatherland Day.
www.syl.ru
Rotating tower
To make an origami tank as close to the real thing as possible, you can make it with a rotating turret.
Creation algorithm:
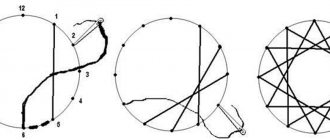
- You need to cut out a black square of paper with sides of 6 centimeters.
- The corners of the square are gathered towards the middle, the workpiece is folded in half. The corners are gathered at the bottom.
- The workpiece is turned over, the upper corner is bent towards the top.
- Then we turn it over again, the remaining corners are bent towards the middle.
- The lower right corner is inserted into the resulting pocket.
- The workpiece is turned over again, the corners of all internal pockets are turned outward.
- We do the same on the other side, after which the protruding upper corner is bent down.
Origami is a very exciting activity, with its help you can make various crafts. Today's article described the detailed manufacture of various types of tanks, which does not pose much of a problem for the average person.
In addition, a craft in the style of a tank will be an ideal gift for your child on his birthday or a man on February 23rd. You can find a large number of different designs and models of tanks on the Internet.
https://youtu.be/5qkWIXifdKUhttps://youtu.be/bb6qX-G0Cqs
_