What is an amigurumi ring
There are many knitting techniques, the most popular technique coming from Japan is amigurumi (small animals created using a crochet hook). Such products have spherical or cylindrical parts that are sewn together and stuffed with soft filler. The design of each individual piece of the toy begins with an amigurumi ring (Japanese loop) - a composition of a sliding loop and several single crochets, thanks to which there will be no unwanted holes in the product (as in the manufacture of napkins), allowing the stuffing to peek out.
- 5 Effective Home Remedies for High Cholesterol
- 9 Early Signs You Have Rheumatoid Arthritis
- Sanatoriums and holiday homes in the Moscow region for military pensioners - living conditions and benefits
Step-by-step instructions and patterns for crocheting an amigurumi ring
Any novice needlewoman can learn how to make these toys. The circuits for such products are primitive. To learn how to knit an amigurumi ring correctly, read the step-by-step instructions and practice a little. Before starting work, prepare all the necessary tools and materials:
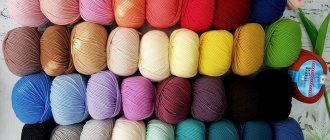
- Yarn. Beginners are recommended to choose threads of any color of medium thickness (cotton, acrylic). Too thin or textured threads or wool yarn can spoil or bend the knitted fragment.
- Crochet hook. Select the size of this tool 1-2 smaller than indicated on the yarn, then the product will be dense. The tip of the hook should not be too sharp or round, and its cutout should not be small.
There are two main ways of knitting a Japanese loop, which differ in the number of turns of the thread - one turn or two. The option you choose depends on the texture and thickness of the yarn taken, the size of the hook, and the purpose of the future product. The step-by-step master classes described below will discuss both methods, their advantages and disadvantages.
Master class on knitting a simple ring in one turn
The first method is easier to learn, but to completely simplify the lesson, choose thicker yarn and a suitable hook for it. Execution steps:
- With your right hand, make one turn of thread around your left index finger. Leave the end of the thread long and at first fix it between the little and ring fingers (so that the ring does not slip off).
- Insert the hook into the ring, hook it on the working thread (the one that comes from the skein) and drag it in front of the “sliding loop”. As a result, a loop forms on your hook.
- Re-hook the working thread, pull it through the resulting loop and tighten. The result should be a loop, which is considered the first column in the Japanese ring.
- Again, insert the tool into the “sliding loop”, hook the working thread and pull it through the ring. 2 air loops came out.
- Next, pull the working thread through both of these loops to form a single crochet (sc).
- Continue making the required number of sc (at least 6 single crochets).
- Remove the ring from your finger, pull the tail of the thread, tightening the “sliding loop”. The result is an arc.
- Connect the first column with the last one. The initial row of the Japanese ring is ready.
- Ammonia for nail fungus
- Why is buckwheat stored in the first place?
- Classic meat salad recipe
There are many advantages to creating this element using the one-turn method - it knits quickly and is easily tightened without effort. The disadvantages of this method include the following points:
- it is not suitable for knitting on thin threads;
- If you frequently wash the finished product, such a Japanese loop may become loose or unravel.
How to make a double ring using the amigurumi technique
The second method is more labor-intensive and requires more practical training. Thin and medium-thick yarn is suitable for this work. The step-by-step instructions are as follows:
- Pull a sufficient amount of yarn from the ball and wrap the end twice around your left index finger. If you chose thick threads, wrap the “sliding loop” around two fingers (index and middle).
- Insert the hook under both threads and grab a loop from the working thread.
- Make one chain stitch and work single crochets into a double slip stitch, as many as you need. If you are just learning, you need to dial 6 sc. When you start making toys, use patterns that indicate the required number of sc.
- Next, lightly pull the thread on the free tail. Notice the thread that is “moving.”
- Release the tail, take this thread, and lightly pull it outward until the ring narrows. Make sure that the columns do not unravel.
- There is one more part of the ring left - a loop sticking up. To get rid of it, slowly pull the thread by the tail.
- When the ring is completely closed, connect the first sc to the last.
- The first row is ready, then do the second, third, etc.
The disadvantages of this method include only the somewhat labor-intensive procedure for performing a “sliding loop”. The positive properties are:
- you can use thin yarn;
- Regardless of the manipulations performed with the finished product (washing, stretching), its center will never unravel.
The easiest way
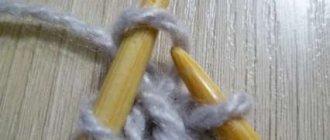
Let's take a closer look at knitting a simple ring. A master class with step-by-step photos and descriptions will help you do this.
Thick acrylic threads are best suited for knitting. The hook is selected according to the thickness of the thread. If during knitting the fabric is not dense, then the hook should be chosen smaller.
The first thing to do is to form a loop. The tip should be left long, about 3-4 cm.
Article on the topic: Cotton - composition, properties, use and care of the material
Pass the hook through this loop and grab the working thread.
Pull the thread through the loop.
We fasten the resulting loop.
Now we pass the hook through the loop and grab the working thread.
Now we have two loops on the hook. We pass the hook through them and grab the working thread.
It turns out to be a single crochet. In the same way, you will need to make as many columns as indicated in the diagram. As a rule, the base of the ring is made of 6 loops.
We knit each new loop into the main large loop.
Then we take the tip of the thread left at the beginning and pull it. Thus we narrow our ring.
Pass the hook through the first loop and make a connecting post.
A simple amigurumi ring is ready. Now you can start knitting a beautiful toy.
Video tutorials for beginners on knitting amigurumi rings
The technique of creating a Japanese loop cannot be called complicated, but you will have to do some practice to get a small, neat ring. Often, knitting a toy or other product begins from the head, where the Japanese “sliding loop” is located on the top of the head (the most considered place). All the nuances, secrets, and methods of how to properly knit an amigurumi ring from threads and elastic bands are described in the detailed video instructions below. Take advantage of them.
Crochet amigurumi rings
How to knit a magic amigurumi ring correctly
How to weave a magic ring in amigurumi style from rubber bands
What finger toys can be knitted?
For such educational theater, it is recommended to choose fairy tales that are familiar to children from childhood. It is also better to select and come up with stories with a simple plot, so that it is easier to act out with finger toys. Or play popular animated series, for example, “Luntik” or “Smeshariki”.
The most popular fairy tales are:
- "Teremok";
- "Masha and the Bear";
- “Zainka’s hut”;
- "Chicken Ryaba";
- "Turnip";
- "Kolobok" and others.
You might be interested in How to crochet a hedgehog toy - knitting pattern
Therefore, in the collections of finger toys you can see the following characters:
- Bear. To knit it, yarn in shades of brown, yellow and orange is used. You can complement his image with a pot of honey.
- Fox. The heroine of most Russian folk tales. It requires orange and other light shades of yarn. A distinctive feature of this toy is its elongated muzzle and beautiful tail. Some needlewomen knit a sundress for the fox.
- Wolf. It is knitted from gray yarn, which can be replaced with dark blue. You will also need light threads. The wolf, like the fox, has an elongated muzzle, but not a pointed one. He also has a tail, but it is not made as noticeable as the red-haired beauty. You can complement the image of a wolf with a suit.
- Bunny. Popular fairy tale hero. Usually gray, light, white threads are chosen for knitting. The main feature of this character is its long ears.
- Dolls, girls, grandmothers, grandfathers. Also popular fairy tale characters. To create them you will need more multi-colored threads, because when knitting them a lot of attention is paid to clothing.
Important! A common feature of all finger toys is that they do not have feet, because one edge is left unsewn. Some craftswomen still complement the figures with this detail, only making them small and neat.
Fairy tale "Kolobok"
Also, to stage some fairy tales you will need:
- Kolobok. The simplest toy that is knitted according to the amigurumi principle.
- Mouse. The main thing when creating a crocheted finger mouse is to make round ears.
- Cat. Its main distinguishing features are triangle-shaped ears, a tail and long mustache.
- Dog. The muzzle of this toy is made slightly elongated, as are the ears.
- Piglet. The peculiarity of this doll is the presence of a snout and a curling tail.
Additional items for acting out the scene can also be tied together. But then the products should be stuffed with filler so that they come out voluminous and hold their shape better. Then you will get a real soft knitted theater, which is more interesting for a child than a paper one.
Important! If paper was chosen as the main material, the product will not be as durable and will not be suitable as a toy for small children.
Knitted Smeshariki