The origins of knitting
One of the oldest types of needlework, with which people were familiar even before our era, is knitting. Its existence in Ancient Rome and Greece is evidenced by fragments of knitted items that miraculously survived to this day. In some tombs there are wall narratives describing people wearing knitted items.
Gradually, knitting moved to the East, where it miraculously survived until the 9th century. There it practically did not undergo metamorphosis and was considered ritual. Knitting was done exclusively by men, most of whom were monks.
When Europeans began sending crusaders to all corners of the world, they returned not only with victories, but also with new knowledge. This is how knitting came to Europe. It especially attracted women, who saw in it not only practicality, but also aesthetic qualities. Since then, society ladies have put a lot of time into developing new designs and patterns. They have achieved great heights in this craft. A little later, the peasants were able to comprehend art. For a long time, threads were unavailable to them, the production of which required a lot of resources. The material began to be sold freely after the mechanization of its production processes.
Around the same time, another tool appeared - a crochet hook. Almost nothing is known about its origin. It created a real sensation because it allowed the creation of intricate openwork. They were used to make the finest lace, which brought great income to the poor and was even a kind of government order.
Article on the topic: Chunky knit sweater with braids: patterns for a children's version
Modern fashion involves a combination of practicality and beauty. These are the qualities that knitted items have that are annually featured in the shows of famous couturiers.
Varieties of pattern
English knitting was once called the “Fisherman” pattern, because it was used by the wives of sailors. They created thick and warm sweaters, hats, and scarves that reliably protected their beloved husbands when working on the open sea.
There are several types of patterns that evolved from the main one. Small modifications made for ease of knitting did not affect the quality of the elastic.
Simple 1X1 elastic band. The pattern is formed by alternating knit and purl stitches in the first row, and yarn overs and dropped stitches in subsequent rows. Embossed stripes obtained by knitting are perfect for scarves, snoods, hats and various types of sweaters.
Simplified elastic band (false). A variation of a pattern that is visually indistinguishable from classic knitting. The technology consists of alternating a certain number of knit and purl stitches.
Two-color English knitting. The formation of an unusual pattern occurs by knitting each row twice. First with one shade of yarn, then with another.
English knitting 2×2. This pattern is designed for knitting in the round; the fabric is denser and more voluminous.
Faceted gum (Polish). This lush double-sided pattern looks great on children's things, blankets, and decorative pillows. When knitting, yarn overs are not used, only alternating knit and purl stitches in a certain sequence.
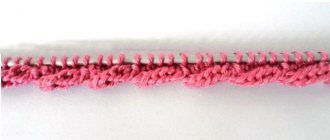
Rubber band in English
This knitting method has a number of advantages. Finished products are able to hold their shape for a long time and are very elastic. This type of elastic has a raised rib, which is often folded into a braid. This method is often used to knit sportswear, hats and scarves. Things knitted in this way turn out very warm and soft.
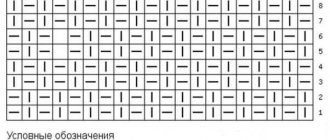
Knitting pattern
An odd number of loops is often used for it. The outer loops are knitted as usual. The scheme is like this:
- The first stitch will be a knit stitch. Then follows an air loop, which is otherwise called a yarn over. The next loop is simply removed. At the end of the row there should be only a knit stitch.
- The second row begins with a yarn over, after which a purl loop is knitted, and the front loop is simply removed along with the yarn over.
- Next, proceed to the third row. The front loops are knitted together with the chain stitch, and a new loop is thrown onto the purl loops and removed without knitting.
Two-color English rib knitting looks very attractive and is often used for knitting hats and scarves. Most often, circular knitting needles and yarn in contrasting shades are used. When knitting a two-color elastic band with knitting needles in the round, adhere to the following pattern:
- Knitting begins with a knit stitch, then yarn over and slip off the next stitch.
- Starting from the second row, attach a thread of a different shade and knit it into the edge loop. After that, the purl loop is removed, and the front loop is knitted together with a colored thread.
- The third row is knitted in only one shade. Knitting begins with two purl loops, followed by a yarn over. Then everything repeats itself.
- The series begins with a different shade. First, yarn over, then remove the loop and knit two loops as one purl.
- The number of loops must be even. Moreover, it is advisable to make the outer loops in a dark shade.
Subsequently, the rows are repeated. The essence of knitting with contrasting threads is that the yarn over is carried out with a contrasting thread , and the other loops with the main color. Horizontal two-color elastic band is knitted very simply. Every two rows simply change the color of the yarn. A vertical elastic band looks more attractive.
To knit an English rib on circular knitting needles, cast on an even number of stitches. Next, proceed as follows:
- They start with a knit stitch, after which they throw on an air loop, and remove the next one without knitting.
- The second row begins with a reverse yarn over, then remove the front one and make one purl one.
- The third row is repeated like the first.
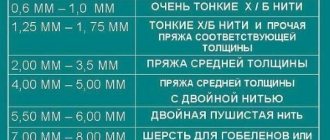
For this type of knitting, any thick knitting needles starting from the third number are suitable.
This pattern can also be knitted using the 2*2 pattern. To do this, select a quantity that will be freely divisible by 4. The edge is also included in this number.
- Start the first row with two knit stitches, and then make a loop. The next yarn over is removed and repeated again. Everything repeats itself from the beginning.
- The second row begins with a double crochet, then the loop is removed. Repeat the yarn over and slip stitch. Only then do two knit stitches be knitted simultaneously with the loop containing the yarn over.
Subsequently, all rows are repeated. Using English knitting you can knit a great sweater or a two-color winter scarf.
Making a Sweater
Craftsmen advise using any fluffy thread for this purpose.
Angora or Lydia yarn are perfect. A diagram of the drawing is drawn on a piece of paper, after which they begin to work. To begin with, it is advisable to knit a small braid in order to have an idea of the future sweater using English elastic knitting needles. The pattern for knitting a sweater with an elastic band is as follows. For the back of a women's sweater, 124 loops are cast on, which will be distributed as follows: two edge loops, knitted on the wrong side, followed by 17 elastic loops and 3 purl loops. Then repeat 17 English stitches and 3 purl stitches 5 more times. Finish the row with two edge stitches.
After a few rows we will draw the drawing itself. Subsequent rows are knitted in such a way that the braids close on the front loop. Approximately 5 cm of the braid will be knitted evenly without crossings. The cross contains 9 loops, and is usually performed on the front side.
For the sleeves of the jumper, cast on 83 loops and knit as follows: after the edge, knit 15 loops with an elastic band, then purl 3. Next, 21 loops are knitted with a pigtail. After three purls, repeat the braid and then knit again 15 loops with an elastic band. The entire row ends with an edge. After 20 rows, the braids are overlapped. Then the parts should be sewn together to create different stripes.
Thus, you get a cute pullover with an English elastic band. A men's sweater and raglan are knitted in the same way.
Process from A to Z
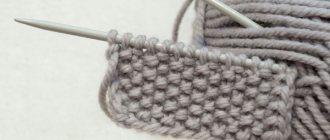
Let's look at the process of knitting a classic English rib in a detailed master class with photos. The following scheme is used for work:
It also describes the techniques used in the knitting process. To get started, cast on an odd number of stitches.
It is better to make the cast-on edge thicker, but for knitting a sample you can use a regular set of loops.
Thanks to the thicker edge, your design will not move around. Cast on 20 loops of the main fabric plus 1 edge stitch on the knitting needles. The edge (edge) loop is always removed without knitting; it forms even sides of the fabric. Regardless of the pattern chosen, the last stitch of the row is always purled.
Related article: Shawl collar with knitting needles: master class with photos and videos
On the first row, remove the edge loop. The next loop is already beginning to form a pattern. It needs to be knitted behind the front wall of the front. Yarn over towards you and lower the next stitch without knitting. Next, alternate the described sequence until the end of the row. You can see the process in the photo.
Turn the fabric and start knitting the second row. Remove the edge loop. Next, you have a knit stitch and yarn over on your knitting needles, knit them together. Remove the loop, yarn over and knit two stitches again. Continue the rapport to the end of the row.
Subsequent rows are knitted in exactly the same way. The fabric will not immediately show you its beauty; only after knitting 5-7 centimeters, you will be able to see the pattern.
When making decreases, it is important that the pattern does not shift. To do this, decreasing on the right, remove the first loop, knit 2 and 3 together. Pull the removed loop through them. When decreasing on the left, you can simply knit three stitches.
When casting off the loops, note that their number has increased by 2 relative to the cast-on row. To compensate for the size of the edge, slip off the first stitch. The pattern involves knitting two loops and then yarn over. To close, just knit two knit stitches together. Now the number of loops is equal and you can close the row in the most usual way.
English rib knitting in the round
Please pay attention! When moving from row to row where the marker hangs, it is better to tighten the loops after knitting so that the elastic in this place does not have traces of “transition”.
Master Class:
Knitting pattern in the round:
Rapport of English elastic in a circle: 2 rows; 2 loops.
Cast on a number of stitches that is a multiple of 2 + 1 stitches to correctly join the first and last stitches of the initial row.
Preparatory row after cast-on (knitted once): yarn over FROM YOURSELF; the loop is removed - the thread is BEFORE the loop; 1 person (behind the front wall).
- 1 ROW (and all even rows): a pair (not knitted in the previous row, a loop + yarn over) is knitted together purl; yarn over FROM YOURSELF; persons removed - the thread is BEHIND the front one.
- ROW 2 (and all odd rows): yarn over FROM YOURSELF; purl removed - the thread is BEFORE the purl; the pair (not knitted loop + yarn over) is knitted together. behind the front wall.
Next, alternate the first and second rows.
Tips for beginners
Just a few tips for beginning needlewomen will help you properly care for items knitted with English elastic.
- If you choose this pattern, keep in mind that it will require a larger amount of yarn. It is convenient for novice craftsmen to use special programs that will help calculate the required amount of yarn depending on the pattern and thread parameters.
- Pick up the thick edge. Close the loops with double thread. This technique will protect your canvas from moving.
- Remember that English elastic is not used for finishing necklines and sleeves, because it will certainly stretch and ruin your product.
- Make the fabric for scarves and hats a little narrower; it loses its shape quite quickly.
- You can preserve a beautiful pattern by caring for it properly. Dry the washed item horizontally and never iron it.
Related article: Crochet bags. Knitting patterns
How to knit correctly
Before you start knitting the simplest things, we recommend that you work out step-by-step, with photos, knitting patterns for the main types of English elastic.
How to knit a classic English rib
Report:
- 1st front row: slip edge stitch, purl 1, knit 1.
- Purl row 2: slip edge stitch, slip 1 purl and knit.
- 3rd row: knit 1, knit 1, slip 1 double crochet without knitting.
Knit the remaining rows according to the 3 row pattern.
How to knit a false English rib
Report:
- 1st front row : slip edge stitch, knit 1, knit 1, purl 1, purl 1.
- Purl row 2: slip edge stitch, purl 1, purl 1, knit 1, knit 1, purl 1**, pattern between ** must be repeated until all stitches in row are completed.
Repeat knitting two rows alternately.
How to knit an English rib with two colors of yarn
To knit with this type of elastic, you will need two skeins of thread that are contrasting in color.
Report:
- 1st row (1st yarn shade): K1, yarn over, slip 1 stitch.
- Purl row 2 (2nd yarn shade): yarn over, slip 1 stitch, knit 1 stitch (knit with the first row yarn over).
- 3rd front row (1st shade of yarn): start knitting from the opposite end of the knitting needle - 1 purl (knit a yarn over with a loop), yarn over, remove 1 loop.
- 4th purl row (2nd shade of yarn): yarn over, slip 1 stitch, purl 1 (knit yarn over with loop).
- 5th front row (1st shade of yarn): start knitting from the opposite end of the knitting needle - 1 knit (knit a yarn over with a loop), yarn over, remove 1 loop.
We repeat the knitting pattern, starting from row 2.
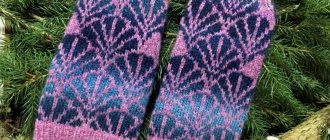
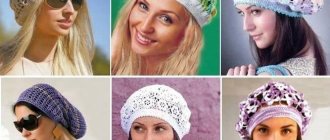
Examples of products knitted with English elastic
We offer you a selection of ideas for knitting various things with an English rib.
This voluminous “Tacori” hat can be knitted from merino wool or cashmere using classic English rib knitting.
To determine how many loops you will need, you need to:
- Using a measuring tape, measure the circumference of your head from the frontal part to the back of your head.
- Knit a small sample using purchased yarn.
- Measure 1 centimeter of the sample with a ruler and count the number of loops.
- Multiply the result obtained by the length of the head circumference, which will tell you the required number of loops.
- Using English elastic, you can knit a set of a hat with a lapel and a scarf by making a striped pattern horizontally, alternating the colors of the yarn. If you are planning a children's product, you can decorate your hat and scarf with pom-poms made from the same yarn.
- A very fashionable set of a snood and a beanie hat can be knitted with an English rib from two shades of wool or acrylic yarn. To make the male version of this set, use one shade of yarn.
- This voluminous snood is knitted in the round with English elastic. To do this, use special knitting needles with fishing line no thinner than number 5 and thick wool yarn so that the knitting is loose.
- The photo shows an example of a sweater knitted with English elastic. In order to knit such a product, you first need to take all the necessary measurements. After knitting a small sample from your chosen yarn, calculate the number of stitches for each piece of the sweater. When all parts of the product are connected, they need to be sewn and the neck decorated with an elastic band. You can come up with the idea for such a sweater yourself or find a ready-made pattern on the Internet.
- Using knitting in the round, you can knit a simple mini skirt with a mock ribbing. To do this, you will need to measure your waist and hips with a measuring tape.
- Using thick yarn and thick knitting needles, you can knit a very fashionable cardigan with patch pockets. To do this, you will need to make simple patterns according to the measurements that you take.
Let's use another tool
If you don’t know how to knit, but want to get a beautiful elastic band, you can use a crochet hook. The pattern, which will be discussed below, is called false elastic, although in appearance it is very similar to knitting, it is worth remembering that crocheted fabric has practically no stretch. Another difference in the pattern is that it is horizontal. The work is performed according to the following knitting pattern:
It shows that the fabric is formed by knitting embossed columns. They are obtained by inserting the hook behind the front or back wall of the loop.
The first row of the fabric is knitted with regular double crochets. Then, knitting is performed according to the pattern by alternating a pair of convex and a pair of concave columns. In the next row, concave ones are knitted above the convex ones and vice versa.