Knitting a front loop behind the front wall
Knitting a front loop behind the front wall
Pulling the front loop behind the front wall
How to crochet knitted items
Half double crochet connection
Dense knitted parts are connected. The seam is simple: the parts are folded with their front sides facing each other and tied with half-crochet stitches.
The working thread passes through the edge loops.
Single crochet connection
Suitable for elastic and openwork knitting. The edge loops of the parts are tied with single crochets.
The seam is made with thread to match the knitting.
Single crochet connection with an air loop
This seam is used to combine openwork and elastic fabrics and elastic bands.
The seam is made with a thread of the main color.
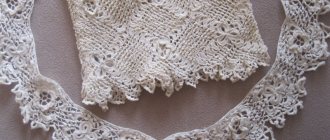
Zigzag connection
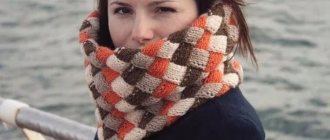
Often used to connect motifs. The seam is made on the front side, the canvases are placed side by side, and the hook alternately grabs the edge loops of one fabric or the other.
With this type of connection, the seam is not tight, it looks interesting both on one side and on the back. It is performed both with a thread of the main color and a contrasting one.
We hope everything worked out for you. Share your result with us and leave comments.
Your Kryuchkom.ru!
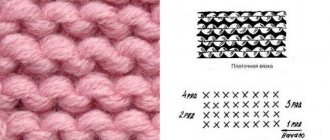
Crossed knit loop
In the crossed loop the walls are arranged crosswise. Essentially, a crossed knit stitch is created when we knit a knit stitch behind the front wall. However, in a pattern, to achieve greater texture, sometimes you need to get a crossed loop even before knitting it on a knitting needle. To do this, insert the knitting needle into the knitting stitch, remove the loop from the knitting needle, and then return it to the knitting needle, turning it so that the back wall of the loop becomes the front wall, and the front wall becomes the back wall.
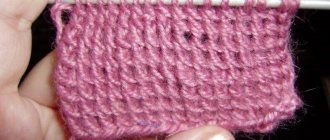
As you can see in the photo, the walls of the loop are crossed. And then such a crossed loop can be knitted with a front loop behind the front wall. As a result, the walls of the loop intersect once again. and in knitted fabric this gives a clearer pattern.
The photo shows a sample for comparison. The upper part of the sample is knitted with crossed knit loops on the front wall, and on the wrong side with crossed purl loops.
Purl two stitches together. Master Class.
The “2 stitches together” technique is quite often used, for example, when narrowing the fabric or when working with openwork patterns. In order for the pattern to come out smooth and neat, you should carefully monitor the tilt of the 2 stitches along with the tilt to the right.
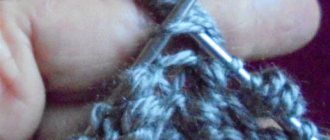
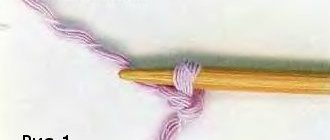
After casting on the loops with knitting needles, we place our yarn in front and introduce the right sp. from the inside out the first, and then the second loop with l. sp. (see designation in photo below):
Now we need to grab the working thread clockwise and pull the loop through both loops at once:
We discard the newly formed pet. on the right sp. and we knitted 2 stitches together to the right. 2 p. together with a tilt to the left.
In this case, the yarn is located behind the fabric. After casting on the loops, we make the right sp. from the front side to the inside of the first stitch. with l. sp., remove it like an edging - without knitting.
Then. next stitch on l. sp. knitted like a front one.
Now we pull the stitch we received through the one we removed.
So we knitted two stitches. together: on the right back. one pet., on the canvas the second pet. will go under the first one, the first one will be on top of the second one with a tilt to the left.
Remove the loop on right sp. and knit further according to the proposed pattern or description.
Crossed purl stitch
We insert the knitting needle into the loop from right to left.
Remove the loop on the right needle.
We return the stitch to the knitting needle so that the back wall of the loop becomes the front, and the front wall becomes the back.
We knit a purl loop behind the front wall.
As a result, we get a knitted purl loop, the walls of which are criss-crossed.
How to sew knitted items with a needle
Closed loop seams
Horizontal seam
Performed with a needle from the front side of the knitting. The needle is threaded alternately into the lower fabric, then into the upper one, grabbing the topmost facial loops from right to left. The parts are placed symmetrically one above the other on a flat surface.
Seam from the wrong side.
Vertical seam along the reverse surface
Used to create a continuous pattern. To connect the elements, we skip the edge loop and insert the needle into the broach.
They are located vertically above each other. The seam is made from bottom to top.
This connection looks neat on the front side of the product.
The connection of fabric from purl loops is used when knitting sweaters with braids, which are knitted against the background of purl loops.
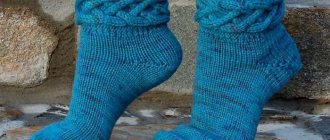
Mattress seam
The mattress or vertical knitted seam is made from the bottom up. The canvases are placed side by side, the edge loops must match. Sew the fabric on the front side. The seam is tightly fixed until the thread completely disappears in the knitting. This seam is used to connect parts knitted with stockinette stitch. Use the needle to grab the side thread located perpendicular to the edge loop.
We grab the same loop of another fabric.
To sew parts together, it is better to use the thread of the part itself so that the bottom edge of the knitting is neat. When stitching, only the loops following the edge are captured.
The connection is hidden from the outside.
There is a seam on the wrong side. The connection is suitable for thick yarn, voluminous and dense knitting. When joining items made from fine yarn, an invisible seam is often used.
Open loop seams
Loop-to-loop seam
An invisible or hidden horizontal seam is suitable for fabrics with open loops. The knitted seam is used to sew together the front surface. The density of the seam should match the density of the main knit. The seam is made on the front side. Use a needle to grab the bottom loop, from the inside up, grab the two top loops.
Return the needle to the first bottom loop and immediately grab the second bottom loop.
We pull the needle into the second upper loop, pulling the thread through the third, return the needle to the second lower loop.
Sew from right to left. On the wrong side of the product, the seam is also invisible, so it can also be used to connect purl loops.
The seam is made with matching thread.
Kettel seam
Most often used for stitching the neckline. A seam is used to connect two fabrics, one with open loops and the other with closed ones. Factory knitted items are connected using a kettel stitch. For stitching, we place the fabric with open loops on top.
From the bottom up, with a needle from the edge loop, we grab the first loop from the wrong side, bring the needle into the second loop, and insert it into the first.
Next, we bring the needle into the third, insert it into the second, and bring it out into the fourth.
Pull the needle out through one loop.
We count only open loops.
The kettel stitch is made with matching thread.
Methods of knitting facial fabric
- This is what regular knitting looks like with knit stitches behind the back wall, and on the other hand with purl stitches behind the front wall. Knitting knit stitches in this way is quick and easy to do.
2. This is what knitting looks like with knit stitches behind the front wall, and on the other side with purl stitches behind the back wall.
To compare the first two methods, a knitting sample is given below.
Comparison of knitting with the first and second methods
3. This is what knitting looks like with knit stitches behind the back wall, and on the other side with purl stitches behind the back wall.
Knitting with knit and purl loops behind the back wall
4. Knit with knit stitches behind the front wall, and on the other side with purl loops behind the front wall. This method is not much different in appearance from the 3rd method indicated above. However, knitted fabric looks more textured.
Knitting with knit and purl loops behind the front wall
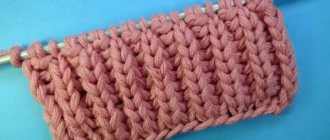
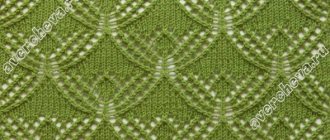
5. This is what knitting looks like with knit stitches behind the front wall, and on the other side with crossed purl stitches behind the front wall. The knit stitches turn out beautiful and lie in even rows.
Knitting with knit stitches and crossed purl loops behind the front wall
6. Knit with crossed knit stitches on the front wall and crossed purl loops on the front wall.
Knitting with crossed knit stitches and crossed purl loops behind the front wall
"Grandma's" method of typing. Master Class.
How does this method differ from the “classic” one? It is faster and easier to use, but is not at all suitable for knitting openwork and relief patterns. It is more suitable for the “background”, on the basis of which a three-dimensional pattern will be made. Thus, our canvas will be denser and neater. So, after casting on, we remove the first of the loops as an edge loop and place the yarn in front, as in the first case. Then we enter pr. sp. in the next paragraph on the left from top to bottom. Carefully pull out the stitches. ave. sp. up, and the working thread with the index finger of your left hand down so that it is to the left of the loop. We grab the working yarn with a straight knitting needle, moving it from top to bottom and away from us, and pull it through the loop, moving it away from us. Drop the knitted loop from the left needle.