Bright crochet baby blanket for beginners
For work we will need:
- yarn (ours consists of 100% acrylic, 170 grams per 288 meters), two skeins of light green, white and yellow colors;
- hook No. 5.
The knitting density is 11.5 cm per zigzag.
Finished product size: 82 x 153 centimeters.
Master Class
Using a light green thread, we cast on 80 chain stitches and then knit according to the diagram below.
1 p.: 1 s. without n. in the 2nd century. p. from hook, 1 p. without n. in the next V. p., skip the next one. V. p., 11 p. without n. in the next 11th century p., 2 p. without n. in the next V. p., 11 p. without n. in the next 11th century p., * skip the next word. 2nd century p., 11 p. without n. in the next 11th century p., 3 p. without n. in the next V. p., 11 p. without n. in the next 11th century p.*, repeat from * to *, end like this: skip the next word. V. p., 1 p. without n. in the next 2nd century etc., turn the work around. If everything is done correctly, we will get 7 zigzags.
2-5 pp.: 1 c. p., 1 p. without n. in the first column, skip the next column, after which we knit only the back segments of the loops, 11 s. without n. in the next 11th century p., 3 p. without n. in the next column, 11 p. without n. in the next 11th century p., * skip the next word. 2 art., 11 p. without n. in the next 11th century p., 3 p. without n. in the next art., 11 p. without n. in the next 11th century p.*, from * to *, finish, skipping the next column. We knit loops for both segments: 1 s. without n. in the next 2 s., turn the work.
We do not cut off the lime thread. From the wrong side, we attach white yarn using a connecting stitch into the first loop of the last row.
6-10 pp.: With white thread we repeat the 2nd row five times.
We do not cut off the white thread. We attach the yellow yarn from the front side and knit the 2nd row again five times.
We continue to work with light green thread.
Important! Continue repeating row 2, changing thread every 5 rows. Knit 110 rows and finish knitting with light green thread. As a result, there should be 7 stripes of white and yellow and 8 of light green.
16-20 pp.: With light green thread we knit 2 rows x 5 times.
21-25 pp.: same with white thread.
26-30 pp.: yellow thread.
31-35 pp.: light green thread.
36-110 rubles: repeat 21-35 rubles. 5 more times. All that remains is to fasten the thread and the crocheted baby blanket is ready!
Crochet for newborns: patterns and detailed instructions
View > Home / Knitting for children, Hats, Panama hats, Sweatshirts, sweaters, Rug, blanket, Patterns for children
26 Sep 2021 Category: Knitting for children, Hats, panama hats, Sweatshirts, sweaters, Rug, blanket, Patterns for children
your feedback
Is your family expecting a baby? It's no secret that every mother wants her newborn to have the best. High-quality clothing and accessories are the first thing that future parents think about. Undoubtedly, everything a baby needs can be easily bought in children's stores, but we strive to ensure that the baby is dressed in truly exclusive things! By the way, organizing a unique wardrobe for a newborn is not at all difficult, and you can do it yourself! To do this, you just need to know the basics of crochet, and also have enough time to bring all the most original ideas to life.
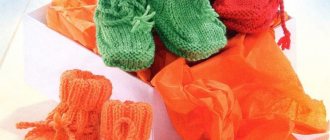
The most interesting thing is that you can crochet almost all clothes for your baby - from simple socks and booties to elegant suits and fluffy dresses. The main advantage of such hand-made creations is that they are one-of-a-kind, because each needlewoman brings her own additions during the knitting process, thanks to which we can say with a 100% guarantee that no identical items, even crocheted according to the same pattern, will slip off the hook. comes out.
Today we present to the attention of needlewomen a bright selection of knitting for newborns, starting with a soft blanket for discharge, ending with a magical jumper for baptism and other appearances.
Before you start, we recommend that you carefully approach the choice of yarn for knitting children's clothes. The golden rule is to choose a yarn that is pleasant to the touch and, most importantly, hypoallergenic from the “Baby” or “Children’s” series, avoiding cheap but attractively bright threads.
As usual, we provide detailed instructions for knitting each model, supported by photographs of finished products, pattern diagrams and a detailed step-by-step description of the knitting process.
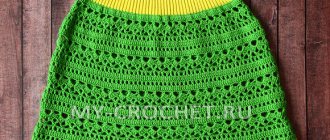
Unusually bright plaid envelope for discharge
The first thing the baby will need is an envelope for discharge from the maternity hospital. In order not to buy the same type, and, at the same time, not always comfortable blankets made of synthetic materials, you can knit a soft, natural blanket with your own hands.
At the same time, even expectant mothers who have barely heard of crochet needlework can make such beauty. Minimal knowledge of crocheting techniques will help you knit such a cozy blanket envelope in a day or two at most, which will not only serve as the first carrying of the baby, but will also keep him warm in the future as a blanket in a crib or stroller.
Schematically, the knitting of the blanket looks like this:
Pattern:
We strongly advise you to transfer the above patterns onto paper, making them life-size. This will make knitting a blanket easier, because you can make decreases and additions as you go, adjusting the knitted fabric to the size of the pattern. To do this, you just need to check the knitting by applying it to the pattern.
To knit an envelope blanket you will need 500-700 grams of wool yarn (if the envelope is winter) or 300-400 grams of mercerized cotton (for a thin summer blanket). Hook No. 1.5 or No. 3.
Patterns used in knitting:
- Single crochet stitches (hereinafter referred to as single crochet stitches): We knit in turning rows - we start each row with 1 chain stitch (hereinafter referred to as VP stitch), which replaces the first stitch. b/n, and we finish with one connecting column (hereinafter referred to as SS), we tie it into the VP.
- “Crawfish step”: Knitted from left to right using single stitches. Pattern on three loops: knit in straight and reverse rows according to the pattern diagram provided above. We start with a loop before the rapport, which is constantly repeated, and end with loops after the rapport. Rows No. 2-5 are repeated until the blanket is knitted to the desired length.
Steps to complete the work.
Back of the envelope
We cast on a base chain of 62 VP + 1 VP (hereinafter read as an aerial lifting loop), knit according to the pattern, making additions/decreases according to the original size of the pattern. The total height of the knitted fabric should be approximately 90 cm from the first row. We finish the work with the help of CC.
Front of the envelope
We cast on a base chain of 62 VP + 1 VP (hereinafter read as an aerial lifting loop), knit according to the pattern, making additions/decreases according to the original size of the pattern. As soon as the canvas reaches 55 cm in height, we finish the work with CC.
Assembling the envelope
We moisten both parts with starch solution, iron them, and then sew the side seams. We first tie all the free edges of the product with a row of non-woven posts, then with a “crawfish step”. A cozy envelope for a newborn is ready!
In order to learn step by step how to knit baby blankets for discharge, we suggest watching useful video tutorials from talented crochet craftswomen:
Openwork cap for son and daughter
An important item of clothing for a baby is a thin hat - a cap, which protects the baby's tiny head from cold and wind. As a rule, caps are made from cotton fabric - they are simple in appearance and are suitable exclusively for home use. If a new mother wants to dress her child in an original headdress, she cannot do without a hook and her favorite yarn. With their help, you can knit an exclusive cap in a matter of hours that will attract the attention of everyone around you.
For mothers who are new to crocheting, we suggest trying to knit such a snow-white cap, which can be finished with an openwork border in either sky blue or soft pink.
Cap knitting pattern:
For the cap you will need white acrylic yarn of medium thickness (for hook No. 3) - approximately 50 grams, as well as toffee yarn in blue or pink tones for hook No. 1-1.5.
Knitting steps
We start by knitting the back of the head in a circle.
Using white yarn, we cast on a base chain of 6 VPs and close it into a ring using a SS.
Row No. 1: 3 runways + 15 s/n columns in a ring formed by a chain of runways, the end of the row is SS.
Row No. 2: 3 runways + 1 column of s/n in the first runway, then repeat the following repeat 14 times: 2 columns of s/n in the next row. column s/n PR from the hook (hereinafter read as “previous row”). We finish SS.
Row No. 3: 3 runways + 1 column of s/n in the first runway + 1 column of s/n in the next. column s/n PR from the hook, then repeat the rapport 14 times: 2 columns s/n in the next. s/n PR + 1 column s/n next. s/n PR from the hook. We finish SS.
Row No. 4: 3 runways + 1 column s/n in the first runway + 2 columns s/n in the next. 2 columns s/n PR, then repeat the rapport 14 times: 2 columns s/n in the next. column s/n PR + 2 columns s/n next. 2 columns s/n PR. We finish the row with SS. We do not cut the thread.
The side part is knitted in straight and reverse rows.
Row No. 5: 4 VP (3 VP + 1 VP), then repeat the following repeat 25 times: 1 column of s/n in the second column of s/n PR from the hook + 1 VP.
We knit the subsequent rows in s/n columns according to the knitting pattern for the side part, up to the 11th row inclusive. SS, cut the thread.
Cap binding.
Row No. 1: using blue or pink “Iris” yarn and a hook No. 1.5, we knit columns of non-crystalline columns into columns of s/n of the fourth row of the back of the cap. We knit in straight and reverse rows.
Row No. 2: 6 runways (3 runways + 3 VP) + 1 column of s/n in the first runway + 3 VP + 1 column of s/n in the third column of s/n PR from the hook + 3 VP. Next, we repeat the rapport 16 times: 1 column s/n in the third column b/n PR from the hook + 3 VP + 1 column s/n in the same column s/n PR + 3 VP + 1 column b/n in the third column b /n PR from the hook + 3 VP.
We continue to knit rows No. 3-4 according to this binding pattern.
We knit ties.
Using a white thread, we assemble a chain of VPs of the desired length. We sew them to the cap. Starch the finished product to give it the correct shape and iron it.
Video on knitting a cap for a newborn:
Knitted clothes for newborns
There are countless variations on the theme of crocheted clothes for newborns. Many mothers try to knit truly exclusive wardrobe items for their babies. Christening clothes are especially in demand - dresses, jumpers and entire elegant suits.
We suggest taking the “simple” route and trying to knit a snow-white jumper with short sleeves, which can be used for christenings and as an everyday outfit.
For size 62 (for a newborn) you will need approximately 150 grams of white yarn (cotton + acrylic), a hook No. 4 and buttons for decoration. The jumper is knitted with a simple pattern - single stitches and s/n stitches.
Product pattern:
Work progress.
The jumper is knitted in one piece, starting from the neckline.
Row No. 1: cast on a base chain of 40 VPs, knit in single stitches.
Row No. 2: go to the main pattern (s/n columns), and double each loop (except those on the sides) (knit two loops each), respectively, you need to get 78 loops.
Row No. 3-4 is knitted without any additions using s/n stitches. Close all rows into a circle using SS.
Row No. 5: Double every third stitch 25 times, for a total of 103 stitches.
Row No. 6: Double every fourth stitch 25 times, getting 128 stitches.
Row No. 7: Double every seventh stitch 18 times, for a total of 146 stitches.
Having received 146 working loops, using special marker pins we divide them into parts of the product: 42 loops for the back, 31 for the right sleeve, 42 for the front, 31 for the left sleeve.
We knit the front and back using the circular method - there are 84 loops in the work.
We knit two more rows with s/n stitches without additions. On the third row we double every tenth loop from the hook 8 times, we get 92 loops in the work. We knit the fourth and fifth rows again without any increases. In the sixth row we double every ninth loop 13 times, for a total of 101 working loops. Next we knit without any additions. The total length of the jumper should be approximately 30 cm.
Let's start with the sleeves. We knit in circles, using single stitches. First, we knit all 31 loops, then we gradually decrease 9 loops, there should be 22 working loops left, which we knit with non-woven stitches for three more circular rows.
We assemble the jumper using an end seam and sew buttons on the back of the yoke. Ready!
We also provide an interesting selection of video master classes on knitting a variety of clothes for newborns:
And, finally, for even more inspiration for knitted creativity, we bring to your attention several original little things for kids that you can make with your own hands using a crochet hook!
You can knit anything for your beloved baby, and not just items of clothing. Lately, crocheted babywearing beads and comfort toys have become especially popular; they not only develop the child, but also provide him with absolute comfort even when mommy is gone for a few minutes.
Create for the joy of yourself and your children, we guarantee that your children will appreciate all your efforts!
We also recommend:
- Calculation of the amount of yarn - table for calculations
- Knitting trends 2021: patterns, materials and new things
Like? Press!
Tags:
Medium level diamond patterned baby blanket
For work we will need:
- plain yarn (100% acrylic, 198 grams per 338 meters), 2 skeins of white;
- yarn of sectional color (100% acrylic, 141 grams by 211 meters), a skein of purple, green, red, pink, blue, yellow;
- hook No. 5.
Knitting density: 2 rap. x 8 rr. = 7.5 x 7.5 cm.
Finished product size: 92.5 x 90 cm.
Knitting techniques
Camel loop: we knit half double crochets using a horizontal thread from the wrong side of the stitch of the previous row.
Connection with a double crochet: place a connecting loop on the hook, yarn over, insert the working tool into the loop and pull the thread through it, repeat twice (make a yarn over and pull it through two loops on the hook).
Joining with a single crochet: place a connecting loop on the hook and insert it into the loop, yarn over and pull it through the loop, yarn over and pull it through both loops on the hook.
Master Class
Using a purple thread we dial 130 v. p. and knit further according to the diagram.
1 p.: 2 s. s n. in the 4th century. p. from cr., skip the next. 2nd century p., 1 p. without n. in the next V. p., * skip the next word. 2nd century p., 5 s. s n. in the next V. p., skip the next one. 2nd century p., 1 p. without n. in the next V. p.,*, from * to * to the last 3 p. of the row, skip the next. 2nd century p., 3 p. s n. in the last century p., turn crochet = 160 s. s n. and 21 s. without n. We cut off the thread.
2 p.: from the wrong side we attach a green thread with. without n. in the first s. s n. row, *1 in. p., skip the next one. 2 s. with n., skip the next one. With. without n., knit with. s n. between two missing sts (s. without n. and s. with n.), 2 v. p., knit before s. with n., which was just knitted, 1 s. s n. between two missed loops (between the second s. with n. and the missed s. without n.), 1 century. p., skip 2 s. s n., 1 s. without n. in the next With. with n.*, repeat from * to *, at the end we knit 1 s. without n. in the upper c. p., turn crochet = 42 s. from n., 22 p. no n., 42 c. n., 21 arches from the 2nd century. p. Cut off the thread.
3 p.: from the front side we attach a red thread with. without n. in the first s. without n., 5 p. s n. in the 1st arch, then in each of the arches we knit (1 ch, 5 s.s.), 1 s. without n. in the last s. without n. row, turn the work = 105 s. sn., 2 s. without n. and 21st century p. Cut off the thread.
4 p.: from the wrong side we attach a thread of a new color with. s n. in the first s. without n., knit 1 s. s n. in the same point, 1st century. p., skip the next one. 2 s. s n., 1 s. without n. in the next With. from n., *1st century. p., skip the next one. 2 s. without n. 2 rows below, 1 s. s n. in the next V. p. 2 rows below, 2 in. p., knit before s. s n., which was just completed, 1 s. s n. in in. p. before two missing s. without n. 2 rows below, 1 in. p., skip 2 s. s n., 1 s. without n. in the next With. with n.*, repeat from * to * until the last 3 stitches of the row, 1 st. p., skip the next one. 2 s. sn., 2 s. s n. in the last With. without n. row, turn crochet = 44 s. from n., 21 p. without n. and 21 arches. Cut the thread again.
5 p.: from the front side we attach a new thread with. s n. in the first s. sn., 2 s. s n. in the same p., in each arch we knit (1 v. p., 5 s. n.), 1 v. p., 3 p. s n. in the last With. s n. row, turn crochet = 106 s. s n. and 21st century n. Cut off the thread.
6 p.: from the wrong side we attach a new thread with. s n. in the first s. from n., *1st century. p., prop. sl. 2 s. without n. for 2 r. below, 1 p. s n. in in. p. after missed p. for 2 p. below, 2nd century. p., knit before s. with n., which was just connected, 1 s. s n. in in. p. before the missed p. for 2 p. below, skip 2 s. s n., 1 s. without n. in the next With. from n.*, from * to * to the end of the row, turn crochet = 42 s. from n., 22 p. without n. and 21 arches. We cut off the thread.
7-82 rr.: as 3-6 rr. x 19, changing the color of the thread in each odd row.
83 rubles: repeat the 3rd row with yellow thread.
84 rubles: repeat the 4th row with green thread. We don’t cut the thread!
Border
1 cr. r.: on the front side we knit 1 st. p., half-column with n. in each stitch, in the corners we knit 3 half-dcs, a connecting stitch in the first half-dc of the circle.
2 cr. r.: 2 c. p., we knit a camel loop in a circle, while knitting 3 pieces in each corner.
3-6 cr. pp.: 2 c. p., repeat the 2nd cr. R. We cut off the thread. Rainbow crochet blanket for newborns is ready!
How to crochet a blanket for discharge?
A blanket is not only a beautiful thing, but also very practical. If you think that a blanket is only needed for checkout, you are mistaken. A blanket is convenient to cover a sleeping baby in a crib or stroller during a walk. It can also be used as a bedding, for example, during a trip to the clinic or on a visit.
Important: A light and small knitted blanket will come in handy more often than you might think. This is a practical thing, and crocheting it is very easy.
The blanket can be knitted openwork. This blanket is incredibly beautiful, but relevant in the summer. Although resourceful mothers know how to use it during the cold season. For example, tie it over a blanket if you want to show off beautiful handicraft.
There is nothing complicated about knitting a blanket. Start knitting from the center or from the edge. The advantage of knitting a blanket is that you can decide for yourself what its width and length will be.
A multi-colored blanket can be knitted from leftover yarn. Below is a knitting pattern.
Multi-colored crocheted blanket
Knitting pattern for a multi-colored blanket
- Start knitting from the center. Crochet five chain stitches and connect them.
- Knit the next row with double crochets, alternating every three to four stitches with two chain stitches.
- The third row is connecting loops.
- The main pattern begins from the next row. It consists of knitting three double crochets into one base. Every three columns alternate with two air loops.
Below is another option for a delicate snow-white blanket for discharge. This blanket is suitable for both boys and girls.
Snow-white blanket for discharge
You can knit such a blanket using this pattern.
Knitting pattern for an openwork blanket
At the end, don’t forget to tie the blanket nicely so that it has a finished, neat look. The blanket can be tied using this pattern.
Blanket tying pattern
A delicate pink blanket with hearts will look great at the discharge of a newborn girl. Then you can make the baby’s bed with such a blanket.
Openwork plaid with hearts
The main pattern is knitted according to this pattern.
Blanket knitting pattern
Knit hearts according to this pattern.
Knitting pattern
If you follow the diagram, then there should be no difficulties. After all, the advantage of crochet patterns is that everything is clear here. The main thing is to follow the plan.
Important: We advise beginners to choose simple patterns that do not have complex weaves. A beginning needlewoman can quickly master the technique of knitting double crochet or single crochet.
If you want to make the blanket warm, you can line the inside of the blanket with matching fleece. This blanket can be used as a blanket.
Crochet baby blanket made from squares
For work we will need:
- approximately 150 grams of medium-thick acrylic yarn (colors: white, aquamarine);
- satin ribbon (about 3 meters);
- hook number 3.
Knitting density: approximately 9 x 9 cm per square.
"Pico": 3 c. p., enter cr. in the 1st century. p. and knit with. without n.
We knit the motif according to pattern No. 1.
We make lace following scheme No. 2.
Master Class
We perform 35 squares according to scheme No. 1.
We knit a chain from c. p. and 1st r. white thread, and the second r. already with aquamarine colored thread. 3-4 pp. We perform it again with white thread, and 5-6 pp. – aquamarine again.
We combine the motifs as follows: 5 pieces in width and 7 pieces in length are connected on the wrong side using one row of connecting posts. If it’s more convenient for you, you can simply sew them together with a needle.
When the blanket is assembled, it should be tied around the entire edge with white lace (see diagram No. 2). Moisten the finished blanket a little and let it dry completely, after which you need to thread the satin ribbon as shown in the photo above.
Schemes with descriptions
There are many patterns for lace crocheting the edge of a product. For beginners, it is better to use the simplest options with detailed descriptions.
Experienced knitters can be guided by their own imagination. When choosing a method for edge processing, take into account general features:
- For the border, use yarn no thicker than the one from which the product is knitted. For a translucent napkin or a voluminous blanket from Alize Puffy, you need different threads.
- The patterned finish is harmoniously combined in color and style with the main fabric.
- When choosing a suitable pattern, experienced needlewomen recommend paying attention to the edge line: for the openwork pattern, curves, corners and a smooth edge are taken into account.
- For a pattern of repeats, calculate the number of loops in the first row so that the fragments of the pattern are distributed evenly and fit exactly along the entire length.
- The purpose of the item is assessed: clothes for men, women, children, as well as work, holiday and everyday clothes are processed differently.
- When the edge is decorated with openwork, the product becomes larger. While this is good for a blanket, tablecloth or stole, for clothes, increasing the size can ruin everything.
Before you start crocheting the edge with an openwork pattern, it is better to try several different descriptions. Creating a small sample will help you get comfortable with the design and understand whether it is suitable for a particular item.
Tying blankets, tablecloths, stoles, scarves
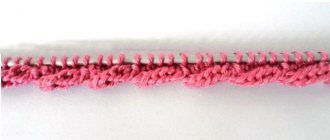
For items with right angles, such as bedspreads or handkerchiefs, various design options are suitable. These can be openwork crochet patterns: ruffles, frills, flounces, borders. Beginner knitters should look for sketches that show how to make a corner element.
Read
Greek crochet patterns. Master class on crochet hats
Descriptions most often contain various lace patterns or repeating patterns. Here are just some popular details that an openwork crochet edge can contain:
- flowers (roses, daisies, violets, various fancy options);
- foliage patterns;
- cones of lush columns;
- "pineapples";
- scallop;
- shells;
- fans.
Master class in fillet crochet flowers: roses with diagrams and descriptions.
Before starting to make the border, the item should be tied around the perimeter with single crochets in 1-2 rows, without tightening the fabric. The edge processed in this way will be more neat and even. After preliminary preparation, you can begin to openwork crochet the edge according to the diagram with the description.
If a square or rectangular craft can be decorated with a regular border, then for a tablecloth in the shape of a circle you should take a suitable description. In such a sketch, the number of loops and columns in each new row gradually increases.
Openwork neckband
The design of the neckline of clothing has its own subtleties. If you use a regular border pattern without changing anything in it, the processing will turn out untidy and will lie unevenly.
The peculiarity of processing a round neck is that the number of loops and columns should decrease slightly as you knit. The outline of the edges of square and V-shaped cutouts should demonstrate the method of forming angles - acute and 90 degrees.
Another interesting option to decorate the neckline is to knit a simple border equal to the length of the neckline. The finished frill can be attached to the edge using single crochets.
Sleeve binding
Processing sleeves with lace is relevant for clothes made with a simple pattern such as satin stitch. If a cardigan or jacket is knitted with a complex pattern, then the narrow finishing border will be lost against the background of the main pattern.
Lace frills look good not only on knitted clothes. In this way you can decorate the armholes of almost any summer dress, top or blouse. An openwork crocheted edge will help update the product if the sleeve is slightly frayed or becomes a little short, as happens with children's clothes.
To finish the edges of the armholes of a textile jacket, they are first hemmed using an overlocker or by hand. When the cut is protected from shedding, it is stitched with the threads selected for the border using a thick needle. After the sleeves are prepared, you can start knitting the pattern.
Processing the bottom of dresses, skirts, sweaters
To decorate the bottom of a dress, skirt or sweater, you do not need a special special openwork crocheting of the edges of the products with diagrams and descriptions. In this case, you can use any universal pattern:
- lace ruffles;
- patterned frills;
- lush flounces;
- wide border.
Read
Crochet fillet lace: diagrams with descriptions
The hem of a dress or skirt, decorated with several tiers of a wide border, looks especially beautiful. In this case, openwork crochet is performed using a pre-knitted fillet mesh through an equal number of rows. Each new layer of border should lie on top of the beginning of the next one.
Do not forget that the length of the product will increase by the processing height. The wider the openwork strip, the heavier it is. This means that the lace will stretch under its own weight: then the hem of the dress or skirt will become even longer.
DIY lightweight blanket for a newborn
For work we will need:
- acrylic yarn (about 200 grams) light green + 50 grams of white yarn;
- white satin ribbon, 1 centimeter wide (8 meters);
- hook No. 2.5.
Finished product size: 80 x 80 cm.
Facial relief p. from n.: s. with n., circling with. s n. lower river from the front side to the back side.
Fantasy pattern: according to diagram No. 1.
Lace: according to diagram No. 2.
Master Class
We use light green yarn to make a chain of 161 sts. p. and then continue to work according to scheme No. 1. Keep in mind that you should not cut it during knitting (it will be used in subsequent rows). The white thread must be cut after each knitted row.
Having knitted to a height of 80 centimeters, remember that the 11th row of pattern No. 1 will be knitted last.
The edges of the blanket need to be tied with light green thread and lace according to diagram No. 2 (be careful at the corners!).
The blanket needs to be moistened and allowed to dry on a flat surface, after which thread a satin ribbon into the first and second rows of lace and tie it with a bow.
We hope today's master class will help you in choosing a blanket for your baby. Happy knitting!