Needlework
05/31/2018 Anastasia Prozheva
There are several techniques for tying the edges of a product. One of them is the crochet step. When using it, the edges of the product will easily hold their shape and have a smooth, attractive appearance. It is ideal for tying scarves, armholes, necklines and pockets.
The crayfish step looks like a pigtail. It is used on products made not only with crochet, but also with knitting needles. The hint in doing knitting is already hidden in the name itself; it means stepping back. The step step should be knitted from left to right. For contrast, you can tie the product with a different thread; to do this, attach a different color to the left edge. But if this is not implied, then we knit in a crab step, leaving the fabric in its original position.
Visual knitting master class in video:
Where the technique of tying things with a crab step is applicable, features of the method
The cross step is used for edging the edges of knitted clothing (sleeves, necklines, bottoms of hats, outerwear and pants). It can be part of the decor, a fixing or connecting element of the product.
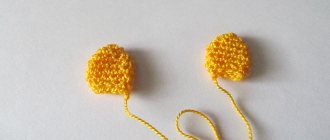
The technique allows you to make beautiful edging for home textiles: curtains, blankets and bedspreads, pillows. The same method can be used to tie decorative elements when making toys (leaves, petals, flowers, etc.).
Crocheting in the opposite direction will be unusual for beginners at first, since the technique involves tying products in the opposite direction. The edging can be done in the main color, like the entire product, or with contrasting yarn for decoration. It holds its shape well, preventing deformation of the edges of knitted items.
When making loops in reverse order, the threads cross, which visually adds volume to the edge. The open step prevents the products from stretching, even if the bottom is tied with an elastic band. For ease of piping, it is better to knit the last row of loops with regular single crochets.
The classic version of the crab step from left to right using single crochets
Crochet for beginners should learn this method. The technique is similar to simple single crochet, but it is done in the opposite direction. Start working with the last loop, located to the right of the working tool. Knit along the front side of the product into each loop of the previous row. If necessary, the thread color is changed before edging.
Edge binding algorithm:
- At the beginning of the row, make 1 PP.
- Insert the hook into the loop of the previous row on the right, pull out the thread and knit a sc.
- Next, insert the hook in the same way into the next loop on the right and knit a sc.
- Continue working sc from left to right until the end of the row.
Knitting master class
The knitting pattern is very simple, although at first it may seem awkward to do. It is designated as a cross with a wavy line on top. This master class will help you understand the main points of making the pattern.
You can start knitting from anywhere on the edge of the product. Don't forget that it is crocheted from left to right, unlike regular crochet.
The knitting technique is as follows:
- We start the pattern with a single crochet.
- Insert the hook away from you under both half-loops of the previous stitch of the edge of the product.
- Grab and pull out the thread. This way there will be two loops on the hook.
- We knit them at the same time.
- We repeat steps 2 to 4.
The master class shows a video tutorial on how to knit it more clearly.
Air loop tying method
Crocheting a crochet step for beginners using this method will be as easy as the previous one. The edging is done with the same single crochets and also from left to right, only a VP is added between each loop.
Instructions for performing the edging:
- At the beginning of the row, make 1 PP.
- Insert the hook into the loop of the previous row on the right, pull out the thread and knit a sc.
- Perform 1 VP.
- Next, insert the hook into the next loop on the right and knit a sc.
- Do 1 VP again.
- Repeat steps 4-5 until the end of the row.
Crochet step
The binding is airy and elastic. The edge of the product with such a frame looks elegant. The technique is suitable for decorating the neck of a sweater and sleeves.
Video lesson:
Kant "Rachy Step"
Crawfish edging is used for finished products of any kind - blouses, sleeve edges or pockets. There are many varieties of this type of edging of finished products; you will be shown one of the simplest. A sample of double crochets is shown, which depicts a finished knitted piece.
Next, one chain loop is knitted, then the hook is not inserted into the next loop, but through one from the front side, the working thread is pulled out, a yarn over is made, and the working thread is pulled through the same loop again. The result is a lush column consisting of four threads. You can increase the number of threads by pulling the thread through the same loop again. Moving from left to right, we quickly process the edge of any product.
Lush double-sided harness
The crab step technique is suitable for framing knitted items that should look neat from the outside and inside. The method is suitable for decorating clothes, bedspreads, pillows, and tablecloths.
Algorithm for performing the work:
- At the beginning of the row, make 1 PP.
- Yarn over the hook, insert the tool into the loop on the right, pull out the thread, make 1 more yarn over and again insert the hook into the same loop and pull out the thread. All 5 P on the instrument are knitted together. You should get a voluminous column.
- After the column, 2 VP are knitted.
- The next P is knitted according to the same pattern as described in paragraph 2.
- Next, do 2 VPs again.
- Repeat knitting according to steps 4-5 until the end of the row.
There are other options for lush columns for edging products:
| Photo | Name | Peculiarity |
| Single crochet stitches with 2 chain stitches | The knitting technique is similar to performing a lush crawfish step, only instead of 1 stitch is knitted into each loop instead of 2. Scheme:
| |
| Double crochets | Knitting algorithm:
|
Video lesson:
The fifth method of the crayfish step
This type of crawfish step is knitted from lush stitches. Having made two air loops, insert the hook into the second column of the previous row and pull the thread up. We do not knit the two resulting loops, but yarn over, after which we insert the hook again and pull out the thread. The thread is knitted through all the resulting loops.
An air loop is made again, the hook is inserted not into the next column of the row, but after one, and the same procedure is repeated with double insertion of the hook and pulling the thread through four loops at once. The movements of a not-so-complicated pattern are repeated until the end of the row. The result is a fairly massive pattern that frames the edge of the knitted item and gives it rigidity.
The pattern looks beautiful both on the front and back.
Mirror crayfish step
This edging technique differs from the usual crab step in that the edging line is crocheted from right to left, that is, as in regular crochet. When working, it is important to monitor the thread tension. If it is strong, then the edge of the product will be tight and deformed. If the thread is too loose, the edging will come out loose and will not hold its shape.
The crochet step for beginners using this technique should be done after mastering the basic tying methods. You need to have an idea of how dense the edge of the item should be in order to be able to adjust the tension of the working thread.
Knitting algorithm:
- When an item is knitted, the thread is not cut. The step step is performed from the last loop of the last row of the fabric. The loop on the hook should be pulled out a little.
- The working tool is inserted into the next loop of the row, and the thread is pulled out with a small margin.
- The hook is rotated 360° around the elongated loops.
- 2 P on the tool are knitted together. The hook is turned clockwise to the starting position.
- The entire row is performed with mirror loops, repeating steps 2-4.
The edging technique is suitable for decorating the necks of V-neck sweaters. It is also combined with Irish lace.
The mirror method can also be varied using the number of yarn overs and air loops.
Other ways to knit a pattern
The master class described above makes it clear how to knit a crab stitch in the classic way. There are many other options for tying. For example:
- Air loop. If you add it after knitting two loops at the same time, you can get a looser pattern.
- Two air loops. If you add them after knitting two loops at the same time, the knitting will be larger and more voluminous and will have the appearance of scallops - the decorative edge of the product in the form of teeth.
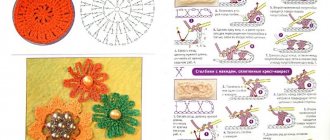
- Lush column. It is knitted through one base loop. After completing the single crochet stitch, yarn over the instrument. We insert it into the base loop on the right. Grab and pull out the thread. We repeat this operation twice, after which all the loops on the hook are knitted in one step. The lush column is fixed with one air loop.
Edge binding with beads
Beads can be used to decorate bags, cases for phones or glasses, home textiles and even knitted jewelry. It doesn’t always look appropriate on clothes: if you choose the wrong material, it will visually make the jacket or hat look childish or cheap. Such decor should be used only on those things where the beads will not interfere with their use.
When choosing beads, preference should be given to the contrasting color of the material with the yarn. Pearl, white and soft pink beads are considered universal.
Before you start tying, the beads need to be strung on a thread. To do this, measure the perimeter of the edge of the knitted item, divide it by the number of beads or the required distance between them so that the decor is located evenly along the entire edge.
If the beads need to be arranged according to the pattern, then first draw a diagram that will make knitting easier. But in this case they are strung on the nika in the reverse order.
Instructions for stringing beads on thick yarn:
- First, take a long needle with the smallest diameter and a large eye, into which a thin sewing thread folded in half is threaded (you need to choose a thread that glides well: cotton, silk).
- Yarn is threaded into the loop formed on the sewing thread.
- Next, string the beads onto a needle.
- The beads are moved from the needle onto the knitting thread.
If the knitting thread is thin, then it is immediately threaded into a needle and beads are strung.
To prevent the beads from falling apart, the yarn is placed in a container of suitable size. In the work, you should use thin and strong threads, and the diameter of the hook should be chosen small - No. 1 or No. 1.5.
The edge binding is done on the front side of the fabric, and on the edging the beads are placed behind the work. When knitting, the beads will need to be constantly moved along the thread from the hook, so as not to accidentally catch an extra element and knit it in the wrong place.
Algorithm for knitting crab step with beads in single crochets from right to left:
- After knitting the last row of the product, make 1 stitch.
- Insert a hook into the next loop of the row, tie the thread, move the bead close to two loops on the hook and knit a sc, tying the thread behind the beads.
- Next, the entire edge is knitted using a SC, arranging the beads according to a pre-designed pattern.
In the same way, beads are tied into the middle of the fabric, and clothes and textiles are decorated. Similarly, you can connect the cross step from left to right. The technique is called the English knitting method. Before making the edging, the fabric is turned with the wrong side towards itself so that the beads are located on the front side, and the hook for catching the loops is inserted from the wrong side.
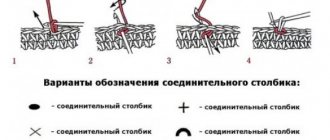
Description of work
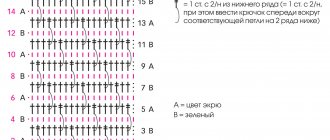
Legend:
- air loop – air loop;
- b/n – single crochet;
- pp - half loops.
It is better to prepare the fabric for tying by making a preparatory row of non-woven fabric. To begin with, a lift is made on the left edge for lifting. Then we place the hook behind the stitch of the column on the right. We take the working thread with a crochet hook and knit all the loops on the hook. That is, it fits approximately like b/n in reverse. We continue to knit according to this pattern until the end.
The front side of the canvas differs in its density and roundness from the back side.
Advice for beginners - try knitting on the example of the sample, do not knit immediately on the future product.
You can use the crab step less tightly if you do it as follows - one stitch is skipped, but all the loops on the hook are knitted.
When skipping stitches, as can be seen in the picture, the row looks stretched compared to the previous knitting description.
If you need to take a larger step, then you should add a v/p. Place the hook behind the stitch of the column on the right. We take the working thread with a crochet hook and knit all the loops on the hook. Then we add one v/p.
Related article: How to knit a beanie with stockinette stitch: master class with video
That is, they also knit the b/n back, mixed with the v/p. You can add air loops when knitting through one column.
To add volume to your knitting, you can knit a single stitch and add two single stitches.
To ensure that the sides of the product do not differ when knitting a crab step, there is another way to knit it. We also start with a high rise. Next, we add a yarn over and a hook and insert it into the stitch of the column on the right. We take the working thread, pull it out and knit all the loops. We knit in/p.
If you need to tie warm items that have a large volume, then a lush crab step will do. To perform it, you need to insert the yarn over in one place 3 times. We cast on, yarn over, insert the hook into the column on the right, then pull out the working thread, and the same thing is repeated twice. We finish knitting a lush double stitch.
The following method produces a very beautiful edge of the product. The secret is to pick up the loops of the edge knots when knitting.
With the knitted fabric and the cast-on loop on the hook, without turning the knitting, we continue it from left to right, place the hook to the right of it, and the top of the bottom single crochet, grab the thread and pull it through. With the loop knitted as described above, insert the hook into the edge knot, as indicated by the arrow in Figure b.
We take the working thread and remove it with a movement, as shown by the arrow in Figure c. With a knitted loop placed on the front side, insert the hook into the fabric, moving away from you to the wrong side (as shown in Figure d), grab the working thread. Having laid the loop on the front side of the fabric, insert the hook into the knot under the two loops, as indicated by the arrow in figure e. Grab the working thread and pull through all 3 loops on the hook. Knit to the end of the row, tying the edge of the fabric, repeating the movements described above.
Related article: Volumetric elastic band with knitting needles for a scarf: description for beginners
The long step is indispensable when knitting small elements to create an openwork fabric. They are good for tying leaves, spirals, curls and small flowers.
Jagged step
For beginners, crocheting a jagged crab step will be difficult, since it has more elements than the classical technique. The method also involves knitting from left to right. To prevent the edge from slipping, there must be an odd number of loops in the row.
Knitting algorithm:
- After knitting the last row of the main fabric, cast on 5 VP at the beginning of the binding for lifting.
- Retreat 1 P of the previous row and insert a hook into the next loop from the front side, grabbing the thread and knitting 1 RLS, thereby attaching a chain of chain loops.
- Next, perform 3 VPs.
- Again, you should retreat 1 P in the previous row and knit 1 RLS into the next loop, securing the chain from the VP.
- To the end of the row, perform steps 3-4.
- The last chain should consist of 5 VPs for symmetry.
Elastic band “A la crayfish step”
This technique is suitable for decorating the edges of knitted items and hats. The elastic is done in several rows, since the finishing edge with the 1st row knitted with this pattern will look unfinished, and the pattern will be invisible. To complete the pattern, beginners only need to know how to perform a single crochet stitch.
An example of knitting is considered without tying the main fabric (“from scratch”). If you need to continue the already finished work, you need to complete the last row with the help of RLS before starting the elastic band.
Knitting algorithm:
- First, cast on a chain of the required number of air loops and add 2 chain stitches to it for lifting.
- Turn the work over (when knitting in the round, the chain is connected without adding 2 VPs at the end), 2 VPs are retreated, and all RLS are knitted into each loop.
- Do 1 VP for lifting. To avoid unrolling the fabric, perform a classic crab step from left to right using sc, inserting the hook behind the back walls of the loops of the previous row.
- The next row is knitted from right to left, performing all sc.
- Continue knitting rows, alternating points 3 and 4.
Please note that the elastic band is horizontal. That is, its linear length will correspond to the width of the main knitted fabric. To attach the elastic to the main product, make a row of connecting posts.
You can also make a hair hoop using this technique. It will not put too much pressure on your head, but will firmly fix the strands.
Tips for using knitting techniques on different products
Crayfish step knitting techniques are not universal; not every method is suitable for tying any products:
| Knitting technique | What is it suitable for? |
| Classic knitting technique from right to left and left to right | Since the edge of the product is inelastic, the methods of the classic crayfish step are used to impart rigidity to the product. The method is suitable for edging:
The knitting method is not suitable for:
|
| Lush binding and techniques with air loops | These knitting methods are suitable for edging products, the edge of which should be moderately elastic. For example, for tightly knitted hats, decorative shawls, home textiles. |
| Jagged step | This edging technique is suitable for any product whose edge should be openwork. Knitting does not affect the elasticity of things: it remains the same as that of the main knitted fabric. |
| Rachy step in the form of an elastic band | The method is used for tying the bottom edge of outerwear and sleeves. The elastic band is moderately dense, which allows the clothes to keep their shape and not stretch while wearing. |
Beginners will be able to crochet the crab step in the classic version, and with a little experience they can knit the finishing row using a more complex technique. This pattern is a basic element in knitting, since it is with its help that most knitted items are completed.