Unusual hedgehog mittens
Handicraft shops sell a huge amount of material for making things at home yourself.
If a novice master has a minimal level of knowledge, then this is not scary. You can make a simple thing from simple patterns. Together with imagination and yarn, you can create unique and beautiful mittens. Any little one will definitely like these hedgehog mittens. They have an unusual appearance, they are cozy and soft. Products made from grass yarn look unusual and beautiful. A child who wears hedgehog mittens will stand out from the rest. This product model is very easy to knit. It is suitable for a beginner master . Mittens are knitted in 2 ways:
- Extended loops.
- Yarn "grass".
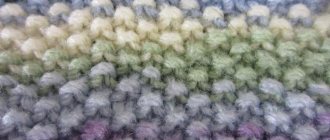
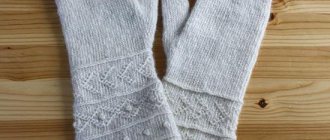
Product made from grass yarn
32 loops are cast on knitting needles. Before deciding on the quantity, you need to measure your child's wrist. The number of loops depends on the width and thickness of the thread. The main yarn is used to knit an elastic band, 7 cm thick, then move to the front side. The first part of the loops, 16 in number, is knitted with a smooth thread, and then “grass” is added. The remaining 16 loops are knitted together with it. The item is made according to the principle: the wrong side is knitted with smooth yarn, and the front side with the addition of “grass”. How the thumb hole is formed:
- First, the item is knitted in a circle of 5 or 7 cm, then a hole is formed for the thumb.
- For the right hand, 4 loops are knitted on the bottom side of the mitten with a thread that differs in color from the main product.
- One row is knitted in this way. Then they switch to the main color of the yarn.
- When 7 cm are knitted, 1 loop goes down. This method creates a corner.
- No more “grass” is needed; then the product is made without it.
Then they return to processing the hole for the thumb. A thread of a different color is removed. The loops that opened are put on the knitting needles. They are knitted 5 cm thick.
The work is closed with a corner according to the same pattern that was used for the mitten. To make the product look original and unique, you can make eyes and a nose out of beads for the hedgehog.
The ears are knitted separately and sewn to the mittens at the end of the work.
Knitted sundress for girls and women
Mittens made from elongated loops
To make hedgehog needles, it is not necessary to use “grass” yarn. Its “fur” can be made using elongated loops that are knitted or crocheted. Crochet hedgehog mittens turn out beautiful, the row of loops is clear and clearly visible. How to make a product on knitting needles with elongated loops:
- The required number of stitches is cast on the knitting needles.
- One row is knitted purlwise, then the pattern begins.
- The last loop is removed unknitted; using the right knitting needle, it is pulled through the working loop on the upper knitting needle.
- In this case, the length of the thread should be 1.5 cm.
- This loop is folded off, held with your fingers, and wrapped with working thread.
- The loop is left behind the product, then knitted with the left knitting needle.
- The mitten is knitted in this manner until the end of the row. And the next row begins with purl loops.
- The top of the product is knitted with elongated loops, and the wrong side of the mittens is knitted with stockinette stitch.
If you wish, you can crochet the hedgehog’s needles. On the mitten, knitting begins with a thread of air loops. The length of the row depends on the thickness of the child’s wrist.
When the required number of loops are knitted, the product is closed in a circle. Several rows are knitted with a double crochet. Knitting hedgehog mittens with knitting and crochet is not as difficult as it might seem.
Products are manufactured according to the following scheme:
- The crochet hook is inserted into the column from any place. The thread is pulled out, wrapped, and a long loop is left behind the product.
- 1 more loop is knitted from the column.
- You need to alternate rows with each other.
- One row is made from double crochets, and the other from elongated loops.
Other ways to knit mittens
Not everyone has the time and desire to make products that are difficult for beginners and covered with needles like a hedgehog. There is a method to make the job easier and reduce knitting time. You can knit regular mittens , which are practical and comfortable to wear. A knitted children's product will favorably distinguish a child from the mass of his peers. Mittens do not have to be made in the shape of a hedgehog. An alternative could be a mouse.
Not every woman can knit “grass” yarn with knitting needles. To use such material, you need a certain dexterity and skill. Although there are lightweight models designed for beginners, not everyone can handle them.
Before you start making a hedgehog from drawn threads or grass yarn, you can try knitting a regular mitten model . You can attach a nose and eyes to them, as well as pre-knitted ears. Thus, ordinary mittens will take the shape of a hedgehog or a mouse. There are 2 methods on how to knit mittens correctly.
Schemes and descriptions of crocheting shawls and headscarves
Two-spoke method
The first method is knitting with two knitting needles. You get 2 separate sides of the mitten, which are subsequently connected to each other with a hook. This type of knitting is the most primitive and simplest. It is used very rarely.
But if a person is a beginner and started knitting recently, this method will be the most convenient. For work, narrow knitting needles are used. The best option is model number 2.5.
Useful tips
To make a hedgehog, you do not need to take yarn that is made from pure wool. It is better to give preference to threads with the addition of acrylic fibers. Products made from such yarn retain their shape better with frequent washing. Products made from yarn with acrylic fibers can be dried on a radiator.
It is not necessary to use only brown, gray or white for knitting. Children's clothes can be bright: blue or turquoise. The yarn should be of good quality and beautiful color. If you choose a faded or nondescript shade, the mittens will turn out boring.
The yarn for making “grass” spines is taken to match the main color of the product. Stocking or sock knitting needles are used, at the ends of which there is a fishing line.
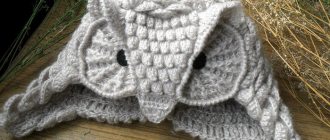
Hedgehog mittens
In winter, it is especially important to keep your hands warm and protect them from the wind. Mittens will be the best assistant for this. Today there is a very large selection of this accessory in stores. Buyers can choose from not only classic models, but also original ones in the shape of hedgehogs.
- Among the variety of winter accessories, hedgehog mittens stand out significantly. And this is not only thanks to the unusual design, but also to the numerous color options. These mittens are suitable not only for children, but also for adults.
- Such “hedgehogs” differ not only in design, but also in knitting. You can stay outside in them for a long time without freezing. They retain heat perfectly and provide comfort throughout the entire walk.
High-quality material allows you to solve the problem of one season. This winter accessory will not only not lose its relevance for several winters in a row, but will also retain its original appearance.
- Originality of design.
- Versatility of size.
- Mainly natural materials.
- An unforgettable gift for both children and adults.
- It is best to combine such an unusual accessory as hedgehog mittens with down jackets, jackets, vests, and fur ones too. But a fur coat is far from the best option for such an accessory.
To complete the look, choose a hat and scarf to match the mittens or combine accessories with the same knitting, provided that the hedgehog is knitted from wool or threads other than grass. The set can contrast in color with the main clothing.
- Despite the choice of color scheme, such an accessory will definitely not leave you unnoticed. It should be noted that it is worn not only by women and children, but also by many men who prefer originality.
Knitted mittens “Hedgehogs” | Beads, weaving patterns and bead embroidery
Mittens “Hedgehogs” will be a wonderful gift for a child.
For work we will need:
- 50 grams of yarn for the mitten itself;
- 30 grams of “Grass” yarn for knitting thorns;
- set of double needles No. 3;
- hook;
- darning needle;
- buttons for the eyes and a bead for the nose.
Using the main thread, we cast on 32 loops and knit 20 rows (approximately 5.5 cm) with a 1x1 or 2x2 elastic band.
In the 21st row we switch to knitting 16 rows. We knit in stockinette stitch.
In the 17th row, we form a hole for the thumb as follows: we knit 6 loops with a contrasting thread, and then again transfer it to the left and knit again with the main thread.
We knit 25 rows in stockinette stitch, after which we begin to decrease the loops in order to close the mitten. We do it as follows: On knitting needles one and three we knit the 1st and 2nd loop, and on knitting needles two and four we swap the last and penultimate loops and knit them together. It is necessary to change their places, otherwise later in the finished mitten there will be large holes in the seams.
When 4 loops remain, cut the thread and pull it through all the remaining loops using a hook. Then we simply hide the thread inside the mitten.
Now we knit the finger. To do this, remove the auxiliary thread. Loops are formed: six at the bottom and seven at the top. We put them on the knitting needles and add 1 loop on the right and left. We knit 17 rows in a circle with the main thread. We close the finger in the same way as we closed the mitten itself.
Let's start knitting hedgehog needles. Using the “Grass” thread, we cast on 20 loops of the first row of the upper half of the mitten. We do this using a hook. Next, we transfer the loops to the knitting needles and knit 11-12 cm in stockinette stitch. Next, without closing the loops, we sew them to the upper half of the mitten using a horizontal knitted seam. Sew the needles to the mitten from the sides.
Ears. In order to make ears, 2 air loops are connected into a ring and knitted 12 double crochets (hook).
Sew the ears to the mittens. Sew on the nose and ears.
biserinka.in.ua
Master class on knitting hedgehog mittens for children with photos and videos in photos
Master class on knitting hedgehog mittens for children with photos and video in photographs.
Things that are made with your own hands will never go out of fashion. Nowadays, the clothes that are colorful in the windows are no longer as popular as those things that you can make yourself.
After all, in markets and shops there are many things that are duplicated, so it is difficult to say that a person can express his individuality. Being monotonous and blending in with everyone is no longer the norm.
So why not do something in your own style? So, this article presents a master class on knitting hedgehog mittens. With the help of a step-by-step description, even beginners will be able to knit such charming mittens for themselves or their child.
This product will always please everyone, especially its owner. Children will be delighted when they carry a pleasant, non-prickly animal in their arms. The main thing is to be patient and have the desire to make something. Of course, it may not turn out right away the way you want, but if you follow the description and try, then over time you will be able to knit such items as a gift.
Let's start practicing
Knitting hedgehog mittens for children is not difficult, but you will have to work hard to bring joy to the child. And then you can be sure that the child will always be happy to wear such mittens, and his hands will be warm. The description is simple, and if you do everything as indicated below, you can get a good result.
These mittens are knitted with a tight knit to keep them warm. And as a result, such a product takes a little longer to knit than ordinary mittens.
The mitten is knitted like a regular one - on five knitting needles. We put 44 buttonholes on the knitting needle and add one more. Next, you need to distribute all the buttonholes onto four knitting needles. The last buttonhole should be on the first needle. Now pass the working buttonhole from the first knitting needle through the last buttonhole, while threading the first buttonhole. We do everything as indicated in the photo below.
Now lower the buttonhole through which we made the first one, the threads need to be tightened. In order to remove the formed tail on the working thread, we knit the loops of the first knitting needle in two threads, and then only in one. So we connect the loops together and get a ring.
Now we knit an elastic band up to the finger. The elastic band should be up to 11 cm, from the elastic band we knit five rows with face buttonholes. Now we make a hole for the finger.
For the finger we will only work with loops from one needle. We get 11 buttonholes, and we knit the first two buttonholes with a working thread.
After, 7 we knit with a thread of a different color, select a place for the finger and move them back. And we knit further in circles.
You will get a small piece on the mitten, marked with thread. Without paying any attention to it, we knit further until we finish knitting the mitten. In our case, we will knit up to the little finger and then begin to close our product. Divide the mitten into two parts and turn over the first two buttonholes. Then we put these two buttonholes on a working needle so that they are upside down.
original, warm, beautiful and comfortable
Almost every mother tries to ensure that her child is dressed not only well, but also beautifully. And hedgehog mittens are one of those accessories that will not only perform their direct function - to warm the baby’s hands, but will also become a little furry friend on cold winter days. How to knit them so that they turn out warm and cute, we will learn from this article.
Which is better: simplicity or invention?
Often adults are confident that if their clothes are minimalist, then their children should dress the same way. And why spend materials and money on something like that if the child will quickly grow out of it anyway? It’s better to do everything very simply, according to the most common knitting pattern, because it will turn out much faster and still warm.
And yet, many mothers are sure that even for the little ones things should be not only practical, but also interesting. After all, it’s much more interesting for a baby if there’s a baby elephant living on his blouse, a baby squirrel hiding on his trousers, and hedgehogs swarming on his mittens. All adults know that babies usually don’t like mittens. And if this accessory - hedgehog mittens - is elegant, with a cheerful little animal, then the little ones will not resist, perceiving them as a new toy.
What will we need?
To begin with, of course, we should mention the yarn. It is best that it is not the usual wool (it may seem that this is the warmest), but with the addition of acrylic fibers. By the way, it is not at all necessary to use brown, black or gray as the main color. After all, this is all knitted for kids. Therefore, the threads must be bright, and the quality must also be excellent. If you choose some dull, dull shades, then the associated accessory will not please not only the kids, but also their mothers, who worked hard for them.
To get real hedgehog mittens with knitting needles, you must not forget about the thorns. Grass yarn is perfect. In principle, you can take any color, but, as a rule, choose one that matches the main threads.
Also useful for this work are 5 double knitting needles or circular knitting needles on a fishing line. You may also need a crochet hook.
First option
Hedgehog mittens with knitting needles (a master class will now be presented to beginners) are knitted in several ways: you can choose grass yarn or knit long loops. The easiest way is to make mittens on five knitting needles using the mentioned “grass”.
To make hedgehog mittens for a child aged five to six years, the craftswoman will need 50 g of ordinary wool yarn and approximately 30 g of “grass”.
You need to cast on 32 stitches on the knitting needles (their number will depend on how thick the thread is and the size of the child’s wrist). Use wool yarn to knit six centimeters of elastic, and then switch to stockinette stitch. Half the loops (in this case there are 16) are knitted with woolen thread, and then you need to attach the “grass” and finish the remaining 16. Continue like this: the lower part of the mittens will be made of smooth yarn, and “grass” will be added to the top.
So you need to knit about five centimeters in a circle and then begin to form a hole for the thumb. For the right mitten, you need to knit the first four loops with a contrasting thread from the right needle on the bottom side. Make one row, and then continue working with the main color. After six centimeters, start lowering the loops, trying to form a corner. Now the “grass” is no longer needed, and you can continue knitting without it.
Corner, finger and muzzle
This is how hedgehog mittens are knitted. The master class shows what needs to be done next. The corner can be made like this: knit the two loops of the upper side remaining on the left knitting needle with one. On the right needle of the bottom side you need to knit the first two loops together. On the opposite side they descend in exactly the same way. When there is only one loop left on each of the knitting needles, you need to break the thread, pull them through it and tie.
But now you can return to working on the place for the thumb. To begin, remove the contrast thread. Place the loops that have opened on the knitting needles and knit about five centimeters. Now the work is ready, close it with a corner - the same as on the mitten.
When everything is ready, all that remains is to make a muzzle: small beads can be used to make eyes and a nose, and the ears can be knitted and sewn on. They are crocheted: two or three air loops are cast on, secured in a ring and about twelve to fifteen double crochets are knitted. These little ears need to be sewn on at the border between the hedgehog’s muzzle and his cute spines.
This is how a hedgehog mitten is knitted. The master class presented above clearly showed that the work is not difficult.
Another option
It is perhaps one of the simplest and most harmonious. Here the abdomen will be almost the same as that of a real hedgehog, and the spines do not need to be sewn on. And doing everything is not so difficult.
At the very beginning of the main knitting, it is necessary to introduce a thread from the grass yarn. It turns out that the back side is knitted in two threads, and the belly-palm - in one. The density will practically not vary, because the grass is quite thin.
At first, the spines may not seem very attractive. This is due to the fact that with such knitting they will get tangled in the loops. But everything is easy to fix - at the end of the work everything is corrected with a regular comb. The hedgehog mittens are ready!
fb.ru
How to knit baby mittens with knitting needles? Knitting patterns for children's mittens?
It's autumn, which means that winter is not far away. Every mother at this time makes sure that her child has everything to meet the cold season. From the chest of drawers come hats, sweaters, warm socks and, of course, mittens. If your child has already outgrown his old mittens, it’s time to knit new ones for him. For knitting we will need:
- Threads - 2 skeins
- Roll of elastic
- And, of course, knitting needles.
Knitting begins with an elastic band, i.e. from the base of our mitten. On the knitting needles, there should be three of them, cast on 48 loops at the rate of 16 loops on each knitting needle.
- We knit 4 rows, two of which are on the front side, and two on the wrong side, respectively.
- Now you can take a thread of a different color, but do not remove the previous one.
We take an elastic band and knit it with an elastic band, without breaking or removing the previous threads. You will need to knit two rows. Now you can break off the elastic and return to the second thread of a different color.
- So we alternate alternately threads of different colors and elastic until we get cuffs.
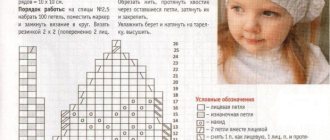
- Now let’s start knitting the ornament according to this pattern:
- Here we start knitting a finger.
They make wonderful children's mittens. The principle of knitting can also be seen in this video. Here the mittens are knitted on four needles:
Source: https://www.bolshoyvopros.ru/questions/1146080-kak-svjazat-detskie-varezhki-spicami-shemy-vjazanija-detskih-varezhek.html
Video tutorials: how to knit mittens
If you learn all the lessons we offer, you will be able to fantasize and create products of any complexity: women's gloves without fingers, with a folding top, with a false pattern, from thick yarn and embroidery. Good luck in your endeavors. Try, experiment and pamper your family with pleasant fagots.
Share with your friends!
- 31
- 10
- 10
- 51
Shared
Subscribe to our Yandex.Zen channel or Yandex.Messenger
Materials for work
Materials needed for knitting:
- One hundred grams of yarn for mittens . It is better to take yarn that contains wool. After all, we should not forget that, despite their elegance, the main purpose of mittens cannot be canceled. And this purpose is to warm our hands during the cold season. And another very important factor in choosing yarn is the ability to withstand a large number of washes. After all, all mothers know the ability of a child to puzzle his mother with laundry after every walk.
- Fifty grams of “Grass” yarn to create “thorns” . You can take this yarn to match the main one, or you can buy contrasting yarn. Just check the combination of two colors in advance so that there is no unpleasant surprise after all the work is done.
- We will also need : a set of needles No. 3, a hook, buttons for the eyes and one bead each for the nose of two hedgehogs, a special needle.
Description of work:
- We cast on about 32 loops with knitting needles of the main color. We knit twenty rows with a 2 by 2 elastic band (this will be about 5.5 cm). Next, in row 22, we will begin knitting the “knit stitch” pattern. In this way you need to knit only 16 rows.
- In the seventeenth row we begin to knit a hole that will be needed for the thumb. This should be done according to the following pattern: we knit six loops with a contrasting thread, and after that we continue knitting again on the left knitting needle and knit again with the main thread.
- We begin to knit twenty-five rows in stockinette stitch. Don’t forget to apply the mittens to the child’s hand so as not to miss a second when you need to start decreasing. When the knitting becomes much higher than the little finger, we begin to gradually decrease the mittens. To do this, on the first and third knitting needles you need to knit the first two loops together, and on the second and fourth knitting needles we will swap the last and penultimate loops and also knit them together. Be sure to swap the loops.
- If you do not do this, then in the finished mitten with knitting needles you will end up with bad holes in the seam due to poor placement of the loops.
- After only 4 loops remain, pull the hook through all these loops and finish knitting the upper part of your mitten. Let's hide the thread inside.
- Next we proceed to knitting the mitten with knitting needles. Let's remove the extra thread. We should have 7 loops on the bottom and 6 on top. Let's put them on the knitting needles again, and also add one more loop on the right and left. We knit seventeen circular rows of thread in the main color. Then we will close the thumb using the same method that was used to close the loops of the product itself.
The knitted mitten is complete. Now you just need to knit the needles of the magic hedgehog with knitting needles, do everything correctly, because of a small mistake, you can ruin the entire product. Using the “Grass” thread, cast on 20 stitches of the very first row using the back side of the product. It will be better if you take a hook for this purpose, because if you take something else, due to some features of knitting, everything may go wrong.
Then we transfer the loops to the knitting needles and knit twelve centimeters with a “knit stitch” pattern. Remember: after this, sew the loops, without closing them, to the top half of your product. This should be done using a knitted seam. Sew hedgehog spines on both sides of the mitten with grass.
How to knit mittens in the shape of a hedgehog - MK in the training video.
Ears, master class
If you want to knit mittens with ears, as in the photo, to knit the ears you need to crochet two air loops and connect them into a small ring. We crochet 20 double crochets in a circle. All. The ears for our hedgehogs are completed.
Coat for women: knitting Crochet vest or sleeveless vest, pattern Crochet knitted blouse for newborns Crochet picot, master class
All that remains is to sew the created ears to the mitten . After this we will also attach the spout.
Our work on this original knitted model of children's mittens is now complete. We are sure that knitting brought you only joyful emotions and a great mood. This interesting method can also be used to knit a sock, but due to the very purpose of the product, you need to choose a different yarn, and the threads can be left the same, called weed.