general information
Those who are just learning how to independently sew knitted items need to learn the basic instructions regarding working with parts. The finished parts of future clothing must be ironed before sewing. The shoulder seams are sewn first, then the side seams.
Stitched knitted item
Important! You cannot use a long thread when working; the optimal length is 45 centimeters.
Loop-to-loop stitch
The secret line “loop to loop” is performed by beginning craftswomen. It is simple and allows you to qualitatively connect parts of garter and other stitches. A closed knit stitch can be used to sew a pocket or other part to a finished knitted garment. The open method is also often used when assembling material.
Making a seam Loop to loop
Sew two closed edges
The invisible row for closed edges is made similarly to the technology for the face and back. The thread is brought out from the wrong side to the middle of the stitch, after which they cling to the broach of the buttonholes of the second part, and bring the needle into the middle of the front loop from top to bottom.
Important! You should not take a thick tool when working.
Sew the two open edges
To perform inconspicuous stitching, stick the needle in 2 front steps, skip the back ones. The action is repeated on the canvas along the entire length. Then the open material is turned over and the opposite side is sewn. It is important to sew without tightening the thread too much.
You might be interested in: Creating a pattern and sewing a hoodie (hoodie)
Two open edges
How to sew knitted items better
Rating: No rating
The content of the article:
At the last stage of her work, every knitter is necessarily faced with the task of sewing together parts of a knitted item. This is a very important stage of needlework, because the appearance of the finished product will depend on it. There are several methods for joining parts. It is about them that we will talk further.
How best to do this, what techniques are there?
There are many knitting and crochet patterns. But the techniques for stitching finished knitted products are much less. However, among them the following can be distinguished:
- stitching with a needle;
- crochet stitching;
- knitting.
Descriptions of different techniques
What seam to sew knitted parts with is an individual matter. However, in some cases there are certain recommendations for choosing a stitching technique. For example, it is convenient to sew hats using a needle using a weaving stitch, and sleeves using a mattress stitch. In general, a needle or a hook is used for stitching, and in rare cases, knitting needles.
How best to sew knitted parts together with a needle
Loop-to-loop stitch on open loops
In knitting patterns for beginners, this is often the method of sewing knitted parts. To do this, you need to connect the parts of your product in such a way that the remaining loops are butted together. Next, insert the needle into the first loop of the lower part, and then into the corresponding upper one and out into the next loop. Now insert the needle into the previous loop of the lower part and bring it out into the next loop.
Loop-to-loop stitch on closed loops
If you want to join closed edges, for example when knitting socks, this stitch is a good option for this:
- Press the closed edges tightly together. In this case, the outer sides of the products should be on top. Pierce the needle through half of the edge loop of the bottom garment and pull the thread through. Then insert a needle into the edge loop of the top product, and then poke it out in the middle of the upcoming loop, that is, below the closed edge. Insert a needle into the loop of the lower product under the closed cream and again, poke it out in the next loop.
- Under the closed edge, grab one wall of the last one and also one wall of the upcoming loop. After about 2-2.5 cm, tighten the thread. After pulling up, the walls of the loops will close and you will get a continuous beautiful canvas.
Mattress seam
This technology is often used to join sleeve seams or side seams. The back and front of the knitted item should be placed with the outer side up parallel to each other. Using a needle, grab the broach between the first loop and the edge loop, and pull the thread through. On the adjacent side, grab the broach lying opposite between the first and edge loops, then pull the thread through. Repeat these steps alternately: once on one side and then on the other.
- After about 2-2.5 cm, tighten the working thread so that both products are connected to each other without a visible transition.
Weaving stitch
Knitted parts of children's clothing, hats, and mittens are often sewn with a weaving stitch. Insert the needle under the edge loops. And thus you need to pass the needle into the middle of each loop that comes next. The stitches are somewhat reminiscent of a snake crawling forward. When making a seam, maintain a happy medium: do not make it too tight or too loose.
How to properly crochet knitted parts together
It’s quite neat to sew crocheted items together. For experienced needlewomen, the seam comes out as if machine-made. To achieve this quality, take the following steps:
- Place two knitted items together, with the outer side facing each other.
- Insert the hook into the first opening between the loops.
- Make a loop of thread by grabbing two parts of the item to be sewn.
- Then you need to insert the hook again, but into the next opening and then pull out the loop.
- Make one of the two resulting loops.
- Insert the hook into the next row of loops of the two parts of the products and then pull out a new loop.
- Connect the two resulting loops with one again. Continue to do this until you have completely connected both parts of the stitched product.
Video on how to beautifully sew two knitted parts with a needle
Knitting a hat with knitting needles is not too difficult a task for most needlewomen. However, the difficulty lies in how to properly sew your product. This is exactly what you will learn from this video tutorial.
Video on how to properly and accurately crochet knitted items
-Knitting for women is a useful type of needlework and a good way to relax, abstract from the bustle of the outside world. But in order for the result to be perfect, you need to have skills in working not only with knitting needles, but also with crochet. After all, it is with the help of the last tool that you often have to connect parts of a knitted product. To learn how to do this, see the video tutorial provided.
We sew knitted parts with an invisible seam
Sometimes you need to sew knitted items in such a way that it is not noticeable. For information on how to do this, see below.
How to sew knitted parts with knitting needles
From this lesson you will learn how to properly sew the details of a knitted product with knitting needles. Despite the fact that this technique is less popular compared to stitching with a needle or crochet, it is still not difficult to perform, and the result looks very beautiful and neat, as the heroine of this video will demonstrate to you.
Dear needlewomen! Share your secrets of sewing knitted items. Ask questions.
www.joxin.club
Vertical seams “Mattress seam”
The correct mattress step is made according to the same pattern as a simple knitted step. The knitted parts are placed close to each other, row by row, and be sure to use the same thread used for knitting for stitching. A hat, sleeve or other wardrobe item can be fastened with a mattress seam.
Mattress seam
On the front surface
At the end of knitting, the pieces are ironed and then laid out on the table. The needle is inserted next to the edge and first loop, and the thread is pulled through. On the opposite side, pick up the broach between the loops. Then repeat the steps alternately and tighten the thread.
On purl loops
The loop is performed in the same way. The tool pierces the space between the outer and next loop. Then they stick it between the edge and the next hole. After 3 centimeters, the thread is tightened.
Execution on the front side
For serrated edge
Knitting along a scalloped edge is more difficult, but the algorithm does not change. Using a needle, pass the thread between the edge and the next hole, and also periodically tighten it, observing intervals.
How to sew knitted items correctly and with what seam (Lessons and tutorials on KNITTING)
Category: Lessons and MK on KNITTING
Before sewing knitted fabrics, they need to be properly prepared for this. In order for the finished product to have a beautiful, presentable appearance and fit well, knitted parts need to be sewn only in the correct sequence and with a suitable knitted seam. To do this, you need to follow some rules that will be discussed in this article.
The main secrets for connecting parts:
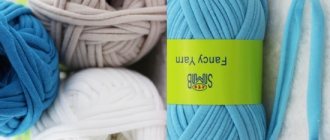
- To connect parts, it is better to use the threads from which the knitted fabric is knitted. The exception is unspun threads, decorated, in the form of a cord. In this case, sew the parts together with a flat, strong thread of a similar color. Make sure that this thread is strong and does not fade when washed.
- It is possible to competently assemble a product from parts only by observing the strict sequence of all operations. First of all, iron the finished parts and let them dry. Then baste them and try the item on to make sure it fits well.
- It is better to make seams in the following order: shoulder, side and sleeve seams. Lastly, sew the sleeves into the armholes. Finishing the product completes the work.
- Do not use too long thread when sewing. It should not be more than 45 cm. Constant friction of the thread against the fabric can cause thread breakage.
- Try to keep the thread tension even when sewing. Make sure that the seam forms a neat straight line. If the seam is horizontal, focus on the loops of one row, if vertical, use the vertical row of one loop. To help you see the seam line more clearly, run a contrasting basting thread through the desired stitches or rows.
- If the two pieces you are sewing are slightly different in length, you can eliminate this defect by lightly fitting it into the seam. The difference in length should not exceed 1.5 cm. Otherwise, one of the parts will have to be redone.
- Product details such as a golf collar or cuffs with a lapel are sewn in a special way. Half of the seam (before the fold of the part) is made on the front side, the rest - on the wrong side. As a result, the edges of the seam will be inside the part and will not be visible.
- If you have a long end left over from the cast-on edge, you can use this thread. To make a neat join along the bottom edge, use the suggested technique.
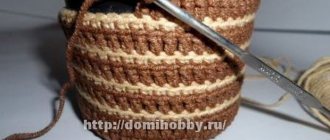
Closed-loop knit seam
Sewing the parts with a knitted seam will make it almost invisible in the product. The parts to be sewn are laid out on a flat surface; if necessary, they can be ironed. The needle is inserted behind the loop located above the closed loops on the upper fabric (Fig. 1). In the same way, insert the needle into the loop of the bottom row of the fabric. After a few centimeters, the thread is tightened (Fig. 2).
Open stitch knit stitch
The dropped loop is picked up with a needle, then the next loop is grabbed and the thread is pulled through, after which the loop is thrown off the knitting needle (Fig. 3). At the bottom of the bar, use a needle to pick up the dropped loop, and then, inserting the needle from bottom to top, grab the next loop and pull the thread through (Fig. 4).
Connection of longitudinal and transverse webs
This seam can be used to sew certain parts of the product: the back and sleeve, sleeve and front panels.
First, use a needle to pick up the loop below the closed ones and pull out the thread (Fig. 5). After this, insert the needle, pick up the broach between the edge and the next loop and pull out the thread. Repeat this sequence one by one. After a few centimeters, the thread is tightened (Fig. 6).
Vertical seam for stockinette stitch
The parts to be sewn are placed on a flat surface and, if necessary, ironed. The needle is picked up by a broach between the edge and the first loop and the thread is pulled out (Fig. 7). On the other half of the product, a needle is used to pick up the broach between the edge loop located opposite and the next one and pull the thread. Alternately repeat these steps on each of the stitched halves. After a few centimeters, the thread is tightened (Fig. 8).
Vertical seam for purl stitch
The seam for the back stitch is made according to the same principle as the seam for the front stitch. The needle is inserted into the broach between the edge and the next loop and the thread is pulled out (Fig. 9). Then insert the needle into the broach between the opposite edge loop and the next loop and pull the thread. After 3 cm, slightly tighten (Fig. 10).
Seam stitch
This stitch is popular with many knitters. It is quite simple to perform, does not tighten the product and is almost invisible. The seam must go below the row of closed loops, otherwise the closed loops will be visible on the front side. The needle and thread are inserted between the loops without damaging them. The stitch is brought back, the working thread is passed along the wrong side forward, and it is brought out in front of the previous stitch at an equal distance with it. When making a “stitch” seam, be sure to turn the product over from time to time and check how the seam looks from the front side (Fig. 11).
Chain stitch
In appearance, the chain stitch resembles a chain consisting of air loops (Fig. 12). It is often used when embroidering on knitwear, when processing the neckline, armholes and bottom of the product.
When making a chain stitch, the thread is secured to the wrong side of the fabric. The needle is brought to the front side, inserted into the hole from which the thread comes out, having previously thrown the main thread from right to left to form a large loop. Then pull the needle, holding the thread with your left hand, and tighten the loop. To perform the next stitch, the needle is inserted inside the previous one. Each link seems to come out of the other.
A prerequisite for making a chain stitch is that the stitches match each other exactly in size. Making a chain stitch on the neck of the product will help make it smoother and neater.
Having made a chain stitch, then knit or crochet new loops from the chain stitches. From the cast-on loops, continue to knit the neck (Fig. 13).
Kettel seam
Experienced knitters use a quilt stitch to sew on certain details: trims, pockets, trims. In addition, horizontal cuts in the fabric are processed with this seam or the loops of the last row are secured.
Before attaching parts of the product, they are ironed well. This makes the work easier, and the seam is smooth and neat. The edge of the piece you are going to sew with a quilt stitch should end with three or four right rows. Open loops are also carefully ironed.
In order to make a kettel stitch, the needle is inserted from the inside out into the second loop, then from above into the first and then pulled from the bottom up through the third loop. After this, the needle is inserted from top to bottom again into the second loop and pulled through the fourth from bottom to top (Fig. 14).
A neck or trim sewn with a kettel stitch retains its shape and beautiful appearance for a long time (Fig. 15).
Special seam for sewing elastic
For open elastic loops, a special stitch is suitable.
The auxiliary thread should be used to knit two additional rows. The parts need to be steamed with damp gauze.
After this, the rows from the auxiliary thread are removed.
The prepared parts are located on a horizontal plane. The needle is inserted into the first 2 loops of the lower part.
Having pulled up the thread, the needle should be inserted into 2 corresponding loops of the upper part, continuing to pull up the thread.
Having sewn one side of the elastic, close the loops on the other side. Then, having aligned both sides of the elastic, you need to insert a needle into 2 adjacent loops of the lower part. Having inserted a needle into 2 corresponding loops of the upper part, you should tighten the thread.
Source https://modnoevyazanie.ru.com/vyazanie-spicami-dlya-zhenshchin/kak-pravilno-i-kakim-shvom-sshivat-vyazanye-izdeliya/
LOOK MORE AT THIS SAME TOPIC:
zhurnal.rykodelniza.ru
Hand stitching
If the yarn requires preparation, the product is ironed and then stitched. The advantage of the seam is that it will not pull the item together. It is important to pass the thread below the closed row. The stitches lead backwards, and the thread is sure not to be damaged.
You might be interested in this: Simple patterns and rules for sewing panties for children
Important! Periodically you need to turn the part over to the reverse side to monitor the quality of the stitches.
Hand stitching
Kettel seam
A quilt stitch is used to connect the main parts of the product with pockets, trims, and trims. Before starting work, be sure to iron each component. Types of seam:
- needle;
- crochet
Kettel seam
Method one - with a needle
The part is pierced with a needle from the inside at the place of the second step. Then they stick it into the first loop and take it out through the third hole. Then they pass the needle from top to bottom into the second loop and pull it through the fourth hole from bottom to top. The advantage of the product is that it holds its shape for a long time.
Method two - crochet
A needle is not always suitable for the job. Therefore, there is a way to tie with the same seam using a hook. To do this, take a short tool, fold the parts face to face and knit them in a half-stitch.
Crochet work
Crocheting open loops
Place the parts face to face and pick up the tool in two steps. Make sure that there is 1 piece on the hook from each part of the knitted product. Then grab the same number of subsequent loops and pull them through the loops on the hook. Work this way along the entire length. The stitched row should resemble a braid.
Crocheting parts
Half double crochet connection
To make a seam, you need to fold the two parts of the product facing inward and pull the hook through them. And then remove the loop and repeat the first stage, grabbing the thread. Then pull out the eye and pull it through the loop on the tool.
Single crochet connection
Single crochet connection
The jacket can be sewn from knitted parts using single crochets. They also decorate clothes. To do this, fold the two parts inside out and knit single crochets, capturing only the edge holes of both sides. Actions are performed inside out.
Single crochet connection with an air loop
If the yarn is not flat, but thick, then this type of connection is used. The parts are folded inside out to each other, then single crochets are knitted with air loops, 1-2 loops are skipped one by one and another single crochet is knitted.
Important! This method is recommended for connecting parts whose connection must be elastic.
Making a connecting half-column
Zigzag connection
The point is that the hook grabs the edge loops of one part of the product, then the other. In this case, the joint is not very tight, it is visible from all sides. The fabric is connected with a contrasting thread, or the same color is selected.
How to sew knitted parts
If you have ever dealt with needlework, then you probably know that knitting a product beautifully is only half the battle. In order for the time spent on knitting not to be wasted, you need to learn how to sew the parts together and carefully process the seams. It is very important that the seams are smooth, moderately tight and do not deform the resulting product.
How to sew knitted parts
There are several ways to get perfect seams. Some people turn to the help of a machine, others sew the seams by hand. In this article you will see the two best ways to sew knitted parts, and you can choose from them yourself. The instructions are easy and precise, the seams are invisible on the front side and neat on the back. Checked!
Method one: crochet stitching
At first glance, the task may seem impossible. Do not be afraid! Once you figure out the little things, this method will become your favorite.
The seam is quite quick to complete, and the edge is smooth and neat. True, the seam has one drawback - it is not suitable for products with complex edges.
It is best to sew simple details with it without any reductions. Or, as an option, make decreases and increases, but at the same time move one loop away from the edge loop. In this case, everything will turn out perfect! To make things easier, you can place the edge loops on separate pins. This will make it easier to dissolve them.
Explanation
Edge loops create a kind of pigtail around the edges of the part. On one of the parts, this braid needs to be unraveled with a needle. You will see loops formed on the edge - this is the thread that needs to be used to seam the product.
Place the pieces together, wrong sides together. Insert the hook between the two loops of the part that remains unraveled, and pick up the loose edge loop. Pull this loop through the top piece, do the same with the next loop and pull it through the first.
Continue the above sequence until the end of the seam. This way you will get a pattern of edge loops of the lower part on the upper one. This seam has the added benefit that pieces sewn this way are very easy to separate. You just need to move the parts fastened together a little and pick up the seam. It will go away on its own.
Video to help.
Method two: sew with a needle
The next seam is also very comfortable. It is called a mattress. Now you will learn how to sew knitted parts with a needle.
Important tip: to make this seam, use a needle with a blunt tip. For example, an embroidery needle. It's even better to use a needle with a curved end, similar to those used to sew up balls.
The second tip is no less important: if the product is knitted from coarse, thick yarn, then it is better to take a thinner thread for the seam. This way the seam will be neat. The thread must match the color of the product.
Explanation
The needle must be inserted into the bridge between the edge and next loops. Hook up the jumper first on one part, then on the second. Continue this sequence until the end of the product. At the very end, pull the thread.
Video to help.
Please your loved ones with stylish knitted items and be sure to share the secret of convenient assembly of products with your friends.
Author of the article
Editorial “So Simple!”
This is a real creative laboratory! A team of true like-minded people, each an expert in their field, united by a common goal: to help people. We create materials that are truly worth sharing, and our beloved readers serve as a source of inexhaustible inspiration for us!
takprosto.cc
Cord connection
Sometimes needlewomen take a cord to help. For stitching, make 3 additional loops. The first loop of the right side of the product is placed on the knitting needle, and it is knitted with a loop of cord into the first knit stitch. Knit the first knit stitch on the cord. The third and first loop of the left side is knitted into the first loop with a broach.
Drawstring connection
When all parts of the future knitted product are ready, they are knitted with a needle or crochet. To do this, different types of seams are used depending on the location of the connection, the type of yarn and the desired result.
Closing the loops
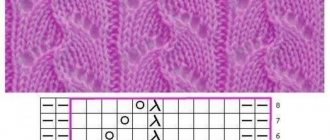
In order to have a beautiful edge in your hands at the end of knitting, you need to master the closure of loops. Let's look at closing loops in detail, in this case we will talk about closing elastic loops.
So, we have a ready-made rubber band in front of us:
Let's take 2 knitting needles and transfer our loops in this way - the front loops on one knitting needle, and the purl loops on the second knitting needle.
The working thread must be threaded into a needle. Let's move the loops closer to the end of the knitting needles. This will make it easier to remove them after stitching with thread. Now we need to remove 2 knit stitches from the knitting needle onto a needle, to do this we will insert the needle from top to bottom into the first loop, and bring the thread out from the bottom up from the 2nd loop.
The thread should not be pulled too tightly, so the work will look good and the seam will remain invisible.
Now let's move on to the second knitting needle, on which our purl loops are located. Insert the needle into the first loop.
Remove the first loop and at the same time insert the needle into the second loop.
Now, removing these two loops, carefully pass the working thread through them.
We will work with knit stitches again. And we need to connect the already removed loop with the one that is on the knitting needle. We insert the needle into the loop that has already been removed.
And then we insert it into the loop that is located on our knitting needle.
Now we pull our working thread through these two loops, without tightening it too much.
We now proceed in the same way with the loop that was removed from the knitting needle with purl loops and a loop that is still on the knitting needle.
We insert the needle into the loop from bottom to top, and remove it from the loop from top to bottom.
We move on, performing similar actions.
We imitate the bend of an elastic band
Related article: Elastic knitting: types of patterns with descriptions and videos
Gradually, correctly performing all the steps described above and guided by the photo, we will get the following result: