White tube scarf with weaves
Size: circumference approximately 70cm.
To knit a scarf we need:
- yarn containing 80% wool, 200% nylon (50g per 210m) – 200g;
- sp. circular No2.5 and No3, line length 60cm;
- sp. socks No2 and No2.5.
Patterns:
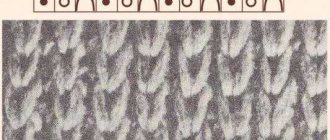
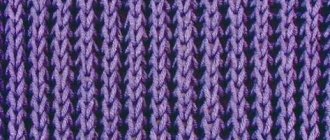
- persons stitch: when knitting in the round, all stitches in all r. persons.;
- knit according to the diagram.
Technique:
- adding 1 stitch: raise the broach between 2 stitches with a working knitting needle, in the next. R. we knit the raised stitch crossed;
- cross of 3 points to the right: remove 1 point for auxiliary. knitting needle at work, knit 2 stitches. according to the pattern - faces. or purl, loop with auxiliary. We knit the knitting needles according to the pattern - faces. or purl;
- cross of 3 points to the left: 1 point. we shoot on aux. knitting needle before work, knit 2p. according to the pattern - faces. or purl, loop with auxiliary. We knit the knitting needles according to the pattern - knit or purl.
Knitting density: knitting. Ch. knitting needles No. 3 30p. for 40 rub. will be 10cm by 10cm.
Description
We cast on with knitting needles No. 2.5 306p. and switch to circular knitting. We do 4 rubles. persons satin stitch Next you need to knit a row of bend: * 1n., 2p. in 1l. crossed * - from * to * we repeat on all points. Again we return to persons. ironing - perform 4 rubles. Let's go to sp. No3 and continue with the pattern from the diagram. Having knitted 52 cm with knitting needles, we finish making the pattern from the diagram.
Next we will knit a scarf using knitting needles No. 2.5. We do 4p. persons smooth, 1 rub. for bending (see description above). We finish 4 rubles. persons iron. Closed p. To give the tube scarf a finished and neat look, fold the edge to the inside along the openwork row and sew it on.
Wearing a funnel hat correctly
No matter how simple such a warm attribute of a knitted wardrobe may seem, you still need to learn how to wear it correctly. It all depends on your hairstyle, for example:
If you have bangs, then you should put the trumpet hat on your head, slightly pushing it over your bangs. The main thing is not to lower it too low, enough to the middle of the length of the bangs.
For those with high foreheads, you should put such a hooded collar on your head, slightly short of the hairline, the photo clearly shows this:
If your style does not involve wearing this accessory, but you want to look according to the latest fashion trends. In this case, pay attention to combinations of scarves, collars and various hats. Recently, “Beanie” hats have come into fashion; you can easily knit them yourself, and then combine them with a knitted scarf collar.
Read
Learn to knit a pullover from mohair yarn
And in conclusion: the ability to knit and use patterns correctly has long saved women who want to look fashionable and at the same time be different from others. In light of the latest design trends, a hand-knitted trumpet scarf will be an interesting find. The most important thing is that such an accessory will be able to warm you from bad weather for several seasons. Take care of your health and stay fashionable at the same time.
Openwork snood
This spectacular trumpet scarf has a conical shape that tapers at the top. This thoughtful solution ensures maximum wearing comfort.
Dimensions:
- bottom circumference – 76cm;
- top circumference – 60cm;
- height – 45cm.
We need:
- yarn, 100% alpaca (50g per 175m) – 100g;
- sp. circular No4 and No4.5 (line length 60cm) - two sets of each number.
Patterns:
- persons v.: all sts in all rows of faces.;
- openwork - see diagram.
Knitting density: 20p on lace pattern. equal to 10cm.
Description
We cast on with knitting needles No. 4.5 (we use two sets) 153 sts. Knitting in the round:
- 1st row: purl;
- 2p.: knits.;
- 3p.: purl.
From the next R. We perform the pattern of scheme M.1: we repeat the repeat (P) of the pattern 4 times, finishing 1p. persons iron. We must knit the full vertical P of pattern M.1. We have 137p in our work. We change sp. on No4 and on the loops of section M.1 we knit pattern cx. M.2. The last stitch remains the stitch stitch. We perform 4 vertical repeats cx. M.2. Next we work according to cx. M.3. The last stitch of the row is knit. satin stitch Having knitted vertical repeat cx once. M.3, we end up with 121p.
Finally, you need to knit three rows:
- 1st row: purl;
- 2p.: knits.;
- 3p.: purl.
Close stitches loosely with knit stitches.
Step-by-step DIY production
Homemade scarves have a number of obvious advantages over purchased models:
- Exact sizes taking into account the individual characteristics of the future owner.
- Possibility of choosing a model, as well as making a unique design for an accessory.
- The craftswoman acquires a unique opportunity to combine materials not only by color, but also by quality composition, and to model additional elements.
All work should be carried out in strict accordance with pre-prepared instructions. This approach will allow you to avoid possible gross mistakes. It makes more sense to use patterns or a set of patterns to prepare the component parts. In addition to the tools listed above, you may need the following:
- Scissors.
- Needles, threads.
- Sewing machine.
- Knitting needle for sewing knitted items.
You can also use decorative elements: interesting embroidery with threads, beads, beautiful beaded brooches.
Patterns for work
A special advantage of working independently is the opportunity to use ready-made patterns and templates. The size range for scarves is also freely available. However, given the individual characteristics of girls, it is better to make patterns yourself.
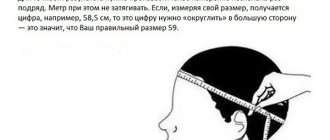
Before cutting, you should take measurements of the neck and head circumference. The initial length of the product should be equal to the circumference of the head. This approach is universal for all professional seamstresses.
If the scarf-collar model has beautiful flowing folds, the length of the fabric strip should be increased by several centimeters. For children's scarves, you can additionally leave a textile corner along the lower contour, which will subsequently cover the child's chest.
Preparing parts and assembling the product
To perform quality work, you should use the instructions on how to sew a snood from knitwear with your own hands:
- The fabric is ironed, observing all temperature requirements (some textile bases are very sensitive to aggressive ironing conditions).
- The fabric is folded in half with the front side facing inward.
- Patterns are attached on the reverse side.
- Trace the contours of the template.
- Use sharp scissors to cut out the details for the scarf.
- Hand stitches are placed along the top and bottom edges.
- Next, machine stitches are placed over the hand stitches. Hand stitches are carefully removed from the surface of the scarf.
- The product, which has acquired the shape of a channel, is turned right side out.
- Next, the needlewoman faces a rather difficult task. It requires a certain amount of dexterity and finger dexterity. The ends of the textile “tube” must be joined and sewn with line stitches. The seams are placed as carefully as possible so that the ends of the threads do not hang between the joints of the fabric strip.
If you are working on a transforming model or a model with a fur trim, assemble the fabric layers.
Tube scarf with complex pattern
We will need:
- h/w yarn (50g by 60m) – 480g;
- circular knitting needles No. 7;
- hook No.6;
- aux. sp.
Patterns:
- handkerchief Fig-k: alternating a row of faces. p. with a row of purl;
- main pattern: see diagram. Horizontal R – 33p. The diagram shows only individuals. p., knit the purls according to the pattern or as recommended. Perform vertically 1 time with 1 p. 58 rubles each, then 1 time from 3 rubles. 58 rub., then from 1 rub. 6 rubles each
Density: garter stitch 9p. for 19 rub. will be 9cm by 10cm; on the main pattern 33p. will be 24cm.
Description
We cast on with knitting needles 126 sts. and switch to circular knitting. Distribution of items: *9 items. – scarf rice; 33p. – main pattern* – repeat from * to * three times. At 2 p.m. in the central section of each of the 3 repeats, on the shawl pattern, we knit 2 stitches. in 1i. We have 123p. We repeat such decreases in 108 rubles, 112 rubles, 116 rubles, 118 rubles. We have 111p. Closed them at 120 rubles. (63cm).
Assembly
We crochet both edges of the scarf, performing 1 p. single crochet (sc) and 1p. crayfish step: sc from left to right. If desired, the top edge can be slightly adjusted.
Delicate scarf
Sizes: S/M; L/XL; XXL/XXXL. Top diameter: 80; 91; 103cm. Bottom diameter: 107; 122; 137cm. Height: 45; 53; 53cm.
We will need:
- mixed yarn (50g per 110m) – 200; 250; 250g;
- circular knitting needles No. 4, line length 60 cm.
Patterns:
- scarf pattern: alternate a row of faces. p. with a row of purl;
- according to the diagrams.
Density: face. smooth 21p. for 28 rub. equal to 10 cm by 10 cm.
Description
We start knitting from the top. Pattern patterns replace one another as the scarf is knitted. Cast on with knitting needles 169; 193; 217p. and knit 4p. handkerchief rice. Next: 2p. – сх. S.1A, 12p. – сх. C.1B repeat 13; 15; 17 times wide, 11p. – сх. S.1C. We perform the complete vertical repeat of scheme C.1 twice.
Then over the loops cx. S.1 we knit pattern cx. C.2. Having completed one vertical repeat, we get 197; 225; 253p. Let's move on to cx. S.3. We knit 1; 2; 2 vertical repeats. Next we work according to cx. C.4. It needs to be tied once. We get 225; 257; 289p. Next we knit cx. S.5. We knit two repeats vertically. We complete the work in 4 days. scarf rice. Closed P.
How to knit a snood in one turn with knitting needles
A cozy and warm tube scarf is easy to make, so knitting it will not be difficult even for those who are just starting to learn how to knit. To do this you need to be able to:
- cast on loops using any of the existing methods;
- knit knit and purl;
- read the pattern diagram, work according to the description or use a video master class;
- Carefully sew the edges of the product if it has a seam.
In addition, you need to select a model, prepare materials and tools, and calculate the loops based on the desired length or width of the future scarf.
Classic model
What you will need: 2 skeins of medium-thick blended yarn and knitting needles for knitting in the round.
Algorithm:
Calculate the number of loops using one of the suggested methods and cast them on.
Knit the fabric with a patent rib pattern until it reaches the desired length (45-50 cm).
The video will help you draw correctly
Continue knitting with 2x2 rib for another 6 cm.
Close the loops, carefully connect the edge of the product to the border of the beginning of the 2x2 elastic using a needle.
Insert the lace. The snood scarf is ready.
The product is easy to make using a ready-made pattern
Model with braids for beginners
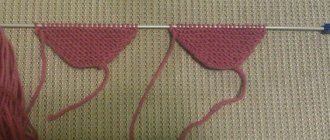
A very warm one-turn snood with braids, made of thick yarn. It is knitted in turning rows on straight needles. The product will have a seam. The braid has 12 loops, there are 3 in the photo, the number can be increased if desired.
What you will need: 3 skeins of thick yarn (90-100 m per 100 g), knitting needles with a diameter of 7-8 mm, a needle.
Work algorithm:
- Cast on a number of loops equal to the width of the product. Knit a row with knit stitches only.
- Knit the next row only with purl stitches. Start forming braids. Remove the edge *1 knit, 4 remove on an additional knitting needle in front of the fabric, 4 knit, 4 loops with an additional knit*. Repeat marked with asterisks until the end of the row.
- Purl row.
- Row of faces.
- Repeat step 4, crossing the braids (the loops that are removed are left behind the fabric to tilt in the other direction)
- Purl loops.
- Repeat the pattern until the canvas reaches the desired height.
- Sew the edges of the product with a knitted seam, as shown in the diagram.
- The product is ready.
- This knitting allows you to get a very warm item even from thin yarn.
Snood shirt-front
A very convenient model, since the snood knitted with knitting needles expands downward in one turn.
The scarf sits tightly on the shoulders and does not bulge under outerwear.
Beginning craftswomen can knit a simple model made with garter stitch using the master class:
Baktus-snood
This option is suitable for both women and men. Detailed knitting master class in video:
Practical and versatile model
A more feminine example of an accessory, knitting instructions in the master class:
Snood transformer
An interesting version of a snood, made with one-turn knitting needles, with a simple knitting pattern. It can be worn as a scarf, trumpet or transformed into a pullover bustier and skirt.
Dimensions of the finished product: width from 64 (top) to 86 (bottom), height 45 cm
The pattern of the product will allow you to easily get a warm snood
What you will need: mixed yarn of medium thickness in 3 colors (the choice of colors is individual), circular knitting needles.
The following patterns are used in the canvas:
- Classic rib
Simple alternation of purl and knit stitches - Pearl knitting.
Interesting pattern for snood of any color - Garter and stocking stitches, consisting of purl and knit rows.
The scarf pattern is a bit reminiscent of boucle
Knitting algorithm:
- Cast on 130 stitches using sectional dyed or melange thread and knit in the round with a 3 cm elastic band.
- Continue with pearl stitch according to the pattern for another 15 cm.
- Start a pattern of stripes.
- After 22 cm, start decreasing 4 stitches in every 4th row. Repeat 3 times.
- When the canvas reaches a height of 80 cm, close the loops.
- The product is ready.
Snood scarf “Adidas”
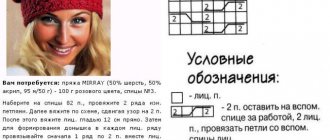
Made in stockinette stitch with embroidered or knitted logos. The actual size and number of stitches cast on is determined by the thickness of the yarn and your own preferences. Logo schemes - see below.
Volume snood
Size: 40cm by 160cm.
We need:
- yarn containing 80% wool, 20% acrylic (100g per 110m) – 440m;
- sp. No8
Density: on the main pattern 13p. for 16r. will be 10cm by 10cm.
Performing crossovers:
- cross 2p. to the right (P2P): remove 1l. for additional. sp. at work, 1p., knit the removed st.
- cross 2p. to the left (P2L): remove 1l. for extra sp. before work, 1l. for the lower segment, we knit the removed stitch with the front one for the upper segment;
Description
We dial 56p. We carry out knitting as stated: 1p. (wrong side): 1i., * 2p., 2i.* - repeat from * and to * to the three outermost sts, 2p., 1i.; 2p.: *1l., 1i., P2P, P2L, 1i., 1l.* – repeat from * to * to the end; 3p.: *1i., 1l., 1i., 2l., 1i., 1l., 1i.* – repeat from * to * to the end; 4r.: *1l., P2P, 2i., P2L, 1l.* – repeat from * to * to the end; 5p.: 2p., *4p., 4p.* – repeat from * to * to 6 outer sts, 4p., 2p.; 6r.: l.;
7r.: like 1r.; 8p.: *P2L, 1i., 2l., 1i., P2P* - repeat from * to * to the end; 9p.: *1l., 1i., 1l., 2i., 1l., 1i., 1l.* - repeat from * to * to the end; 10r.: *1i., P2L, 2l., P2P, 1i.* – repeat from * to * to the end; 11r: 2l., *4i., 4l.* – repeat from * and to * to 6 outer sts, 4i., 2l.; 12r.: l.
These 12 rubles. form a vertical repeat of the pattern. We repeat them until the snood height is 160cm. Please note that for this size, the repeat must be knitted completely. Closed p. Sew the ends of the snood.
Trumpet scarf with “Spikelets” pattern
We need:
- h/w yarn (100g per 100m) – 200g;
- knitting needles No. 10.
Density: 10p. equal to 10cm.
Description
We cast on with knitting needles 50 stitches, including 2 cr. 1 p.: 1 cr., next 2 p. we knit for the bottom slice in 1L., then from the left sp. we remove only one knitted stitch (right), the 2nd stitch remains on the left sp. Then we knit 2 stitches again. in 1l. for the lower segments (the first loop of two is the unslipped stitch from the first pair) and again we remove only one right stitch, leaving the second on the left sp. We work like this until the end of the river. After we knitted the last 2 stitches, on the left sp. 1p remains. We knit her faces.;
2 p.: 1 cr., next 2 p. knit in 1i., then remove from the left sp. only one (right) stitch, the 2nd remains on the left sp. Then we knit 2 stitches again. in 1i. (the first loop of two is an unslipped loop from the previous pair) and again we remove only 1 stitch, leaving the 2nd on the left sp. We work like this until the end of the river. We knit the last stitch purlwise. Repeat both rows until the snood height is 40cm. Closed p. and sew the snood.
Hat clamp (pipe) knitted with an elastic band
Selecting suitable threads and knitting needles:
- Yarn (wool/acrylic) 200 m/220 g.
- Knitting needles No. 5.
The knitting process is quite simple, we cast on 82 loops and then simply knit a single fabric.
The beginning of the canvas and the basis of the entire clamp is an elastic band. First 80 rub. Knit elastic band 2*2 with knitting needles. We finish the fabric with 6 rows of garter stitch, close the loops and sew.
This scarf collar should be worn with a small lapel. The main thing to remember is that the seam should be located under the chin. This way he will be invisible to others.
Read
Favorite knitted dress for cold weather