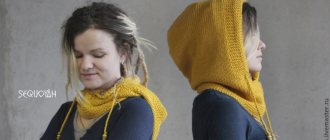
Women's knitted pullover with a hood
A light, fluffy pullover with a cozy hood in the latest fashion is knitted with a uniform pattern of simple “braids” and has a comfortable straight silhouette.
Without a doubt, this is your new favorite for the fall/winter season!
Dimensions: 36/38.40/42.44/46
YOU WILL NEED: yarn (30% mohair, 30% cotton. 25% polyamide. 15% merino wool: 250 m / 50 g) - 250 (250) 300 g blue; knitting needles No. 3.5 and 4.5.
Knit stitch (knitting needles No. 3.5): knit rows - knit stitches, purl rows - purl loops.
Double plank (knitting needles No. 3.5): knit 5 r. persons In satin stitch, starting from the purl row, knit 1 row for the fold. purl. In the purl row, knit the loops purlwise. 4 rub. persons iron.
In the next row, knit the loops on the knitting needle and the stitches of the cast-on row together in pairs. In the purl row, knit the loops purlwise.
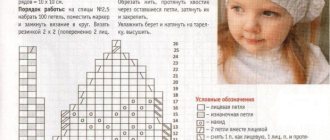
Purl stitch: front rows - purl loops, purl rows - front loops. Braid pattern (knitting needles No. 4.5): knit according to the given pattern.
The diagram shows the facial rows.
In the purl rows, knit loops according to the pattern.
Repeat in height from the 1st to the 10th row.
Knitting density: 16 p. x 24 p. = 10 x 10 cm. knitted with purl stitch: 18.5 p. x 24 r. = 10 x 10 cm. Knitted with a braid pattern.
The samples are made with knitting needles No. 4.5.
Attention: when closing the loops in the “braid” sections, first knit the loops in pairs together, then close.
Description
BACK:
On knitting needles No. 3.5, cast on 98 (108) 118 sts and perform the bottom double bar.
Switch to knitting needles No. 4.5 and continue working with the purl stitch and the “braid” pattern, while for each “braid” add 2 stitches (= a total of 8 times 2 stitches each) and distribute the loops of the patterns as follows: chrome. 0 (5) 10 p. satin stitch, repeat the braid pattern 8 times. 0 (5) 10 p. iron, chrome = 114 (124) 134 p.
After 56 (57) 58 cm from the cast-on row, close on both sides to form shoulder bevels, first 1 time in 3 stitches.. then in each next 2nd row. another 9 times for 4 sts (4 times for 4 sts and 5 times for 5 sts) 8 times for 5 sts and 1 time for 6 sts (when closing the loops in the “braid” sections, first knit the loops in pairs together, then close).
At the same time, after 62 (63) 64 cm from the cast-on row, close off the middle 26 stitches for the neckline and knit both sides separately.
To round the neckline, close from the inner edge in every 2nd r. 1 time 3 p. and 1 time 2 p. Back length = 64 (65) 66 cm.
BEFORE:
On knitting needles No. 3.5, cast on 98 (108) 118 sts and perform the bottom double bar.
Switch to knitting needles No. 4.5 and continue working with the purl stitch and the “braid” pattern, while for each “braid” add 2 stitches (= a total of 8 times 2 stitches each) and distribute the loops of the patterns as follows: ed.. 0 (5) 10 p. satin stitch, repeat the braid pattern 8 times. 0 (5) 10 p. iron, chrome = 114 (124) 134 p.
After 54 (55) 56 cm from the cast-on row, close off the middle 16 stitches for the neckline and knit both sides separately.
To round the neck, close from the inner edge in every next 2 r. 1 time 3 p.. 1 time 2 p. and 5 more times 1 p.
At the same time, after 56 (57) 58 cm from the cast-on row, close from the outer edge to form bevels, first 1 time in 3 stitches.. then in each next 2nd row. 9 more times for 4 sts (4 times for 4 sts and 5 times for 5 sts) 8 times for 5 sts and 1 time for 6 sts.
Front length = 64 (65) 66 cm.
SLEEVES:
On knitting needles No. 3.5, cast on 38 sts and perform the bottom double bar.
Switch to knitting needles No. 4.5 and continue working with the purl stitch and the “braid” pattern, while adding 1 stitch on both sides and 2 stitches for each “braid” (= 3 times 2 stitches in total).
Knit, distributing the loops of the patterns, as follows: chrome, 1 p. satin stitch, repeat the braid pattern 3 times, purl 1 stitch. iron, chrome = 46 p.
For bevels, starting from the double plank, add on both sides in each next 10th r. 8 times 1 p. and then in every 8th r. 2 more times for 1 p. (in each next 8th r. 11 times for 1 p.) alternately in every 6th and in every 8th r. 12 times 1 p.
On the added loops, knit with purl stitch = 66 (68) 70 sts.
After 45 (42) 39 cm from the cast-on row, close the loops in one row.
Knit the second sleeve in the same way.
HOOD:
On knitting needles No. 3.5, cast on 130 stitches and perform a double plank.
Switch to knitting needles No. 4.5 and continue working with purl stitch. D
For side bevels, decrease on both sides in each next 4th r. 9 times 1 p. and then in every 6th r. 4 more times 1 p. = 104 p.
After 30 cm from the cast-on row, finish the work and put the loops aside.
SWEATER WITH HOOD
A hooded sweater of a laconic design from Norwegian designer Berit Ramslsand with an openwork pattern on the sleeves.
Design by Berit Ramsand
(translation from English)
Size
XS, S, M, L, XL
Finished Product Measurements
Chest circumference 90, 95, 100, 115, 120 cm
Length 56, 58, 58, 60, 60 cm
Sleeve length 49, 50, 50, 51, 51 cm
Materials
Cream yarn (78% camel wool, 22% polyamide) 50 g -7 (8,8,9,9) skeins
Knitting needles 6 mm
Circular or double-pointed needles 6 mm for knitting sleeves
Knitting density
28 stitches = 10 cm in stockinette stitch using 3 mm needles. Check your knitting density.
Description
Back
Using 6 mm needles, cast on 72 (76, 80, 92, 96) stitches and knit in turning rows of approximately 4 (4, 4, 5, 5) cm with 2 x 2 rib (k2, p2). Continue knitting in turning rows in Pattern 1. When the work reaches approximately 56 (58, 58, 60, 60) cm (or the required length), cast off the stitches.
Before
Knit the same as the back. When work reaches 50 (51, 51, 53, 53) cm, bind off center 16 (16, 16, 18, 18) stitches to form neckline. Finish each part separately. Cast off from the side of the neckline in every second row twice with 2 loops and 1 time with 1 loop (for all sizes). 23 (24, 27, 32, 34) shoulder stitches remain. When the front is even with the back, bind off all the loops. Complete the second part of the front symmetrically.
Sleeves
Using 6mm knitting needles, cast on 32 (32, 36, 36, 36) stitches and knit in circular rows 6 (6, 6, 7, 7) cm with 2 x 2 rib. Next, knit 1 row in stockinette stitch, evenly adding stitches so that they the needles became 41 (45, 45, 47, 47). Place a round marker in the middle of the bottom of the sleeve. Continue knitting in circular rows as follows: Pattern 1 for 8 (10, 10, 11, 11) sts, Pattern 2 for the next 25 sts, Pattern 1 for 8 (10, 10, 11, 11) sts.
Work in this manner, simultaneously adding 1 stitch on each side of the marker approximately every 3 (3, 3, 3, 3) cm, until there are a total of 67 (71, 71, 73, 77) stitches in the round.
When the sleeve reaches the required length, close the loops. Knit the second sleeve in the same way.
Assembly
Sew shoulder seams.
Neckline/hood
Starting from the middle front, using 6mm needles, pick up and knit approximately 78 (78, 78,
82, 82) stitches along the neckline. Work in 5cm turning rows using 2 x 2 rib. Place a marker in the middle of the back. Continue to rib the first and last 8 stitches and work the remaining stitches in stockinette stitch. Increase 1 stitch for every 16 stitches (8 stitches on each side of marker) on first row from right side. There are 94 (94, 94, 98, 98) stitches in total.
Continue knitting in turning rows until the hood reaches approximately 29 (29, 29, 31, 31) cm from the row with more stitches. Decrease 1 stitch on both sides of marker on every other row 4 times. Divide the work into two parts along the back marker and sew them together. Sew the side seams, leaving approximately 21 (22, 22, 23, 24) cm for the armholes. Sew in the sleeves.
CHECK OUT THESE MODELS:
- T-SILHOUETTE SWEATER
- SWEATER WITH RELIEF PATTERN
- SWEATER WITH SPIRAL PATTERN
Stylish jumper for him
The diagram of the model with a hood is presented below.
To make size L you will need 700 g of thread with a wool fiber content of at least 50%, circular knitting needles with a diameter of 3.5 mm.
The fabric is knitted with the basic pattern according to the pattern and with an elastic band, knitting two knits and two purls in succession.
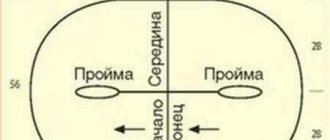
Front, back and sleeve details
Work 6 cm with an elastic band on 224 loops. Then continue working with the main pattern, following the diagram. At a height of 42 cm from the bottom, divide the loops in half into the front and back. Knit 19 cm of the back, bind off the middle 19 loops, finish each part separately, closing from the inner edge in each front row three times two loops and once one loop, until 35 loops remain on the knitting needles, and the height from the beginning of the neckline is 22 cm. Knit in front of 15 cm and bind off, central 12 loops, finish each part separately, casting off three loops in each front row three times, twice 2, 1 loops until there are 35 loops left on the knitting needles, and the knitting length is 22 cm from the neck line.
To knit a sleeve, connect the shoulder sections, cast on 112 stitches along the armhole line, knit 53 cm with the main pattern, reducing the number of loops to 44. Finish the sleeve with an elastic band measuring 6 cm. Make the second sleeve in the same way.
Volume hood
Knit on 3 cm circular knitting needles in the main pattern, casting on 112 stitches around the neck. Then, for the integrity of the rapport, add 1 loop at the beginning at the end of the row, and 2 loops in the center. Do this every 3 cm until there are 132 loops on the loops, and the length of the fabric is 32 cm. To form the hood, use the principle of knitting the toe heel. Divide the knitting into three parts, leaving 15 loops on the middle knitting needle. Knit stitches on the left and middle needles. Knit the last stitch of the middle needle and the first stitch of the right needle with one knit stitch. Turn the work over, knit the loops of the middle knitting needle and tie the last loop one with the first loop of the left side, turn the work over again. Repeat the technique until there are only loops left on the middle needle. Finish knitting by closing these loops.
Related article: 21 ways to clean your microwave from grease and other contaminants
Fashionable knitted men's jumpers for 2021 can be seen in the pictures below:
Warm stripes
Size XL. To knit this model, you will need yarn containing at least 70% wool in the amount of 300 g light and 500 g dark and silver, straight knitting needles and for circular knitting with a diameter of 4.5 mm, 5 mm.
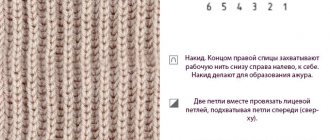
The main “rice” pattern is made on a background of knit and purl knitting. It is obtained by knitting two rows alternately knit and purl; in the third row, shift the position of the loops, knitting the purl over the front one, and the front one over the back. Use the decreasing stitch note , which consists of knitting one 2nd and 3rd stitch at the beginning of the row and a 3rd and 2nd stitch at the end of the row. The rib is done by alternating two knits and two purls.
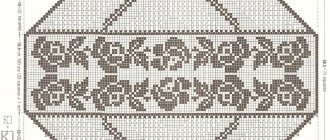
Knit braids according to patterns I, II, III, presented below, where only the front rows are indicated, knit the wrong side, as the loops lie.
Follow the sequence of colored lines: 20 cm dark, 25 cm silver; on the sleeves: 22 cm dark, 25 cm light and 21 cm silver. The knitting density of the “rice” motif using knitting needles with a diameter of 5 mm is a square of 10 cm by 10 cm, knitted in 28 rows on 16 loops.
Knitting the back
Using knitting needles with a diameter of 4.5 mm on 108 loops, knit a 6 cm elastic band with dark threads. Change the needle diameter to 5 mm, knit with a “rice” pattern, changing the color stripes, increasing the number of loops in a row to 120. Knit 17 loops of the “rice” motif, the next two loops in purl stitch, then five loops in knit stitch, then 18 loops in scheme I, again two loops in the front stitch, then 30 loops of the “braid” according to scheme III, again two loops in the front stitch, knit a “braid” according to scheme III, perform five loops of the front stitch, two loops of the purl stitch and finish with 17 loops “ rice pattern.
Article on the topic: Magazine “Irene” No. 4 2019
Following the pattern, knit 50cm and begin casting off stitches to form the armhole line. Symmetrically close 4 loops on each side and decrease two loops in every second according to the note, decrease one by one seven times until 94 loops remain on the knitting needles. Cast off the middle 24 stitches at a height of 70 cm to create a neckline. Finish each part of the fabric separately, casting off 5 and 4 loops on the inside once, until 26 loops remain on the knitting needles, and the length of the fabric from the start of work is 72 cm.
Front detail
Using knitting needles with a diameter of 4.5 mm, knit a 6 cm elastic band on 108 cast-on loops. Change the thickness of the knitting needles by 5 mm, knit in “rice” stitch, changing the color stripes, increasing the number of loops to 120. Knit 17 loops in “rice” stitch, the next two loops in purl stitch, then five loops in knit stitch, then 18 loops according to pattern I, perform two loops of the front stitch, a “braid” of 30 loops according to scheme III, again two loops of the front stitch, a “braid” according to scheme No. II, again five loops of the front stitch, two loops of the purl stitch and finish the row with 17 loops of “rice” .
Knit 50 cm, bind off 4 loops on both sides to create an armhole line. In every second row, decrease two loops according to the note, continue decreasing 1 loop seven times until there are 94 loops left on the needles. To deepen the neck line, close the middle 18 loops at a height of 54 cm from the bottom. Finish each side separately, equally covering both sides in each front row once with 5, 3, 2 loops, twice with 2 and again once with one loop, until there are 26 loops left on the knitting needles, and the length of the fabric is equal to 72 cm.
Dark sleeves
Using dark threads, knit a 6 cm elastic band on 50 loops, using knitting needles with a diameter of 4.5 mm. Change the diameter of the knitting needles to 5mm, knit in “rice” stitch, changing the color stripes, and increasing the number of loops to 62. Knit 19 loops in “rice” stitch, the next two loops in purl stitch, then six loops in knit stitch, perform two loops in purl stitch, repeat 19 loops "rice" and finish the row. At a height of 8 cm, increase from two edges by one loop, then in every sixth row 13 times by one loop, until there are 78 loops on the knitting needles. Knit the cuff line of the sleeve at a distance of 52 cm from the bottom, closing 4 loops on both sides and in every second row decrease 2 loops once according to the note until 20 loops remain on the knitting needles and the length of the fabric is 68 cm.
Related article: DIY Halloween costume for girls and boys with video
By analogy, knit the second sleeve.
Before assembling, moisten the parts, align them according to the pattern, and leave until completely dry.
Having previously connected the shoulder sections, cast on 100 loops along the neck line on circular knitting needles with a diameter of 4.5 mm and knit 3 cm with an elastic band. Sew side and sleeve seams, sew sleeves into armholes.
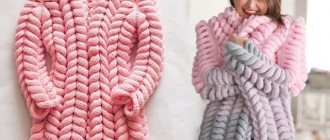
DIY hoodie for women
It’s better to plan everything in advance so as not to return to trifles:
- Decide on a model; it can be an elongated model or, conversely, a shortened version. You should also carefully consider the choice of color, based on trendy fashion colors and those that suit the model.
- You need to know exactly your dimensions; it is advisable to try on some indicators before work.
- Calculate the amount of yarn for your size. There are many ways to calculate the amount of yarn, but you always need to take it in reserve; it is impossible to calculate its exact amount even for a small part.
- If the product has some kind of motif, then practice performing it before creating the product.
Important! One wrong loop can ruin the entire product. If you make a mistake, it is better to immediately unravel the product and correct it before assembling the hoodie begins.
Set of first stitches for 2 knitting needles
Knitting a hoodie step by step
Three patterns were used for this hoodie model
- elastic band 1*1;
- pearl pattern;
- braids.
Schemes of each pattern are presented separately.
- The elastic will be used to create elastic at the bottom of the garment and elastic at the sleeves.
- A pearl pattern will be required for the middle front and back, as well as small triangular inserts on the sleeves.
- The braids are used to frame the pearl pattern on the front, back and along the edge of the hood.
Important! The model uses several motifs and therefore it is worth practicing separately on creating an elastic band, trying to create braids and accordingly making a pearl pattern. This is necessary to know how to knit and not to unravel the product further in case of a small mistake. Moreover, the more frequent unraveling of the yarn leads to the fact that the thread becomes much thinner, and then the hoodie will turn out with braids of different sizes and other elements.
Sleeves
Cast on 40 stitches with knitting needles. Go straight to the 1*1 elastic band pattern. You need to create 4 rows with an elastic band. On the wrong side, knit according to the pattern of the fabric. Then go to the front loops, and in the center of the sleeve you need to make a pearl pattern for 16 loops.
On the wrong side, also according to the pattern of the fabric, then in each subsequent one, decrease one loop of the pearl pattern, and knit knit stitches instead. In other words, in the 7th row there will be 14 loops of the pattern, and in the 9th there are already 12. Continue this way until there are 2 loops left. Then all rows with the same facial loops until the 60th row. Pay attention to the additions (in rows 25,29, 33, 37, 41, 49). Next, bind off the stitches on the front row.
Important! If it is difficult to understand knitting, it is better to draw your own drawings in advance and indicate where and how many loops need to be knitted.
Back
Cast on 57 stitches on the needles and start with 1*1 elastic. Knit only 4 rows and proceed to the fabric pattern. 12 knit stitches - braid - pearl pattern (17 loops) - braid - 12 knit stitches.
In order for the braids to neatly diverge to the sides, it is necessary to make increases between the braids and decreases in the front loops on the sides.
Additions should be made at the level of the cross in the braids on the sides of the pearl pattern, so that the displacement of the loops is not visible.
Decrease at the very beginning of the row and at the end of the row and also at the level of the cross in the braids.
The result should be 14 rows with increases and decreases. Accordingly, 28 loops will be added and they will need to be subtracted. There were 57 loops in the canvas, so they will remain at the end of the part.
Before
Knit the front similarly to the back. Only here, at a height of 10 of the intersection of the braids, it is necessary to mark the neckline. To do this, make one front loop in the center of the pearl pattern, then in each row add two from the sides of the central loop, so the front loops will gradually obscure the pattern. When there are 9 knit stitches in the center of the row, bind off one in the center and continue knitting separately on each side.
To the pattern of the canvas you will need to add a small braid from diagram number 3. The right one is tilted to the right, the left one is tilted to the left. At the height of the 13th cross of the braids, close the loops on the sides - leave the braid and 10 loops for the hood.