Methods of knitting a hood from the neck
Even for beginners, knitting this part will not be a stumbling block, since there are several options for how to knit a hood from the neckline on knitting needles. Simple stipulates that the functional part of the product must be knitted separately, in the shape of a rectangle, and then sewn on one side, and then connected to the neck. Another way is to pick up stitches along the neckline, lift them up to the desired level, bind off the knitting and sew the edges. There are other options: classic (like the heel of a sock), hood or hood-collar. Choose any method and get down to business.
- Kefir donuts - recipes for making dough, technology for frying in a pan or baking in the oven
- Folk remedies for high cholesterol
- Why is Heparin dangerous for patients with COVID-19?
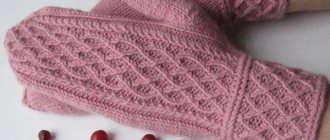
We knit an original hood
Having learned the theory, we propose to knit together an original women's hood-hood with an unusual pattern. Don't be afraid, it couldn't be easier to knit!
For work we will need:
- yarn (50 grams per 100 meters, preferably in a combination of alpaca + wool or wool + acrylic) – 8 skeins
- Red;
- knitting needles No. 6 (straight and circular with 60 cm fishing line);
- 8 buttons (diameter 20 mm);
- additional needle for braids.
The size of the finished hood is 43 x 61 cm with a knitting density of 19 p. x 21 r. = 10 x 10 cm (drawing according to the pattern with a thread in two folds using knitting needles No. 6).
Important! Knitting is done with a thread folded in half. We use circular knitting needles without fail, since during the work a large number of loops will be involved at once. There is no need to combine them into a circle!
Scheme
Description of knitting
Stage one: foundation
Using circular knitting needles, cast on 146 sts.
Zero row (wrong side of knitting): 2 l. p., (2 i.p., 6 l.p., 2 i.p., 2 l.p.) x 12 times.
Now we adhere to this scheme:
- 1 rub. (front side): knit the first 2 stitches according to the diagram, then repeat 12 stitches of rapport x 12 times.
- 2 r. (wrong side): repeat 12 stitches of repeat x 12 times, then knit the two outer loops of the pattern.
We adhere to the same knitting according to the pattern, knitting 1-16 rr. x 2 times, then repeat 1-12 pp.
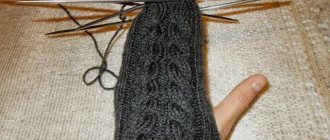
Stage two: divide the knitting in two
We knit the right part of the part like this: using straight knitting needles, we knit the first 26 stitches according to the diagram, turn the knitting, the remaining 120 stitches remain on circular knitting needles.
We knit 26 stitches according to the pattern until the 16th row, then repeat 1-12 stitches. according to the scheme.
We knit the left part symmetrically: we transfer the last 26 stitches to regular knitting needles, leaving 94 stitches in the center on circular knitting needles. We knit 26 stitches according to the pattern until the 16th row, after which we repeat 1-12 stitches. according to the scheme one more time.
Close the loops and cut the thread.
Stage three: tie the top and bottom
Top: from the front side we cast on 16 stitches along the inner side of the right side, cast on 1 stitch between the right side and the central loops, knit (2 sts, 2 sts) x 23, then 2 sts. p. along 94 middle stitches from circular knitting needles, cast on 1 p. between the central loops and the left side, cast on 16 stitches along the inner side of the left workpiece = 128 p.
1 rub. rubber bands (wrong side): 3 l. p., *2 i. p., 2 l. p.*, from * to * to the last 3 p., 3 l. P.
2 r. rubber bands (face): 3 i. p., *2 i. p., 2 l. p.*, from * to * to the last 3 p., 3 i. P.
Repeat 1-2 pp. to a height of 10 cm, finishing with the second row. We close the loops.
We turn the elastic band over the face, folding it in half, and attach it with pins on each side. Fold the cast-on edge of the knitting in half and sew it together.
Bottom: from the front side, using circular knitting needles, we cast on 108 stitches along the bottom side of the hood-hood, knit with an elastic band, starting from the purl row x 11 pp, finishing with the 1st row. rubber bands. We close the loops.
Stage four: knitting the bar
On the front side of the knitting, we cast on 8 sts along the right side of the bottom trim of the hood, 20 sts on the side of the right side and 8 sts along the top trim of the right side through both layers (it is folded in half) = 36 sts.
We knit 3 rows with an elastic band, starting from the wrong side.
We make buttonholes from the front side: 3 l. p., (1 i. p., yarn over, 2 p. together with knit stitches, 1 l. p.) x 8, 1 l. P.
We knit 3 more rows with an elastic band.
Close the loops to the outermost 2 stitches, knit 2 stitches together.
Cut the thread and hide the tail.
Plate with buttons: we collect the loops from the left side of the work in the same way as we did on the right side. We knit 7 rows with an elastic band and close all the loops. Sew buttons opposite the holes. Ready!
Video tutorials for beginners on knitting a hood from the neck with knitting needles
Beginners who want to learn how to knit cannot always figure out the patterns of even simple knitted patterns. When the off-season period begins outside the window or the real cold comes, you still want to look stylish. The relevance of video tutorials on knitting for beginners increases with the onset of cold weather. How to make a beautiful warm outfit with your own hands and complement it with a comfortable detail - a hood that is knitted from the neckline? Take an online course on knitting a hood.
Master class on knitting a hood for a coat
Warm hoodie knitting tutorial
Hood with bib for girls
Snood hood on circular knitting needles
Step-by-step master class on creating basic hood models
Even a novice needlewoman can make a knitted hood if she follows the instructions and counts the stitches. You can also create a product according to your own idea, combining known patterns and techniques.
Many people try to knit according to the pattern; the description allows you to do this without errors. It is usually difficult for beginning needlewomen to correctly imagine how to knit a hood. It is recommended to find a master class with a description and use it to create your first product. It's better to start with something simple like elastic or stockinette stitch, and then move on to more complex patterns.
All measurements must be taken taking into account the desired pattern.
Classic on a jacket (from the neck)
Even a novice needlewoman can knit a classic hood with knitting needles from the neckline. It is better to make the product in the same pattern as a jacket or sweater. To ensure that the front neckline is not deeper than the back, it is advisable to even out its depth. This can be done using shortened rows. You can learn how to knit a hood from the instructions:
- First you need to cast on loops around the neck of the sweater.
- The first row is knitted with purl stitches. The second is done like this: 6 knit stitches after the bar, unroll the knitting to start the next row. The third is knitted purl. The first and last two stitches are the hood strap, they need to be made in garter stitch. The fourth row is made front row. Repeat this 2-3 more times.
- Next comes the bar and 12 knit stitches after it. Knit this way 5-7 times.
- After this, the shortened rows end. The placket and 16 knit stitches are knitted. This is repeated two more times.
- To expand the hood, you need to make an increase after the bar and knit in two loops in front of it. Add one crossed yarn over every sixth row.
- The hood is knitted to the required height using stockinette stitch or elastic, at the request of the craftswoman.
- When you reach the desired size, you need to close all the loops, fold the knitting in half and sew the top of the hood.
It is better to wash or steam a finished sweater with a hood, knitted with knitting needles. The smoother the seam, the neater the hood will look.
Kapor
The hood is another interesting knitted hood model. It is better to knit such a product with bulky threads, so it will look more interesting. Knitting goes from the face to the back of the head in a single fabric, and is sewn at the back. To make the hood beautiful, you need to follow the instructions step by step:
- Cast on the required number of loops.
- Knit in stockinette stitch to a height of approximately 7-8 cm, depending on the desired size of the hood.
- Next, according to the pattern, an openwork fabric is knitted, about 35-40 cm.
- Having reached the required length, you need to finish the row. You can’t do this in rows 1 and 15, otherwise the pattern will go wrong.
- Then, at the beginning of each row, 9 loops are closed, so another 6 rows are knitted.
- The remaining loops are closed.
- The entire fabric is sewn with a thick thread using a vertical seam.
It is better to start the satin stitch with thin threads, and knit the pattern with more voluminous threads.
When the product is ready, it needs to be washed and steamed, and then sewn to the jacket by the collar. If desired, the hood can be decorated with pompoms or plaits.
Based on the heel knitting principle
The hood is knitted using the heel knitting principle and is neat and without seams. This product can be sewn onto a sweater or jacket. The hood is knitted on two knitting needles. In order not to get lost, you need to count the number of loops and rows. The principle of how to knit a heel-shaped hood with knitting needles is simple:
- First, a rectangular canvas of the desired height is created. This is the top and back of the product.
- Afterwards, edge loops are cast on the sides. The fabric is knitted according to the selected pattern. It is advisable to choose something symmetrical, for example, diamonds or zigzags, this will make the hood look more beautiful.
- After completing all the rows, you need to close the loops on the sides and sew the hood on top.
- You can also knit an elastic band at the end, then the product will not lose its shape after washing and long-term wear.
This style of hood is suitable for a sweater or jacket, and it will also look good sewn to the neck of a knitted cardigan made from fine yarn. If necessary, strands and decor in the form of sequins or rhinestones are added. In addition, the hood can be decorated with a pompom.
With bib for a child
For a child, it is better to knit a hood with a shirtfront. This model looks like a hat connected to a scarf. The product helps keep you warm in windy or frosty weather. A hood of this model, knitted from warm yarn, often replaces a hat.
For a hood with a shirtfront, children's acrylic with a mixture of wool is best, so that the thread is pleasant to the skin. To knit such a product with knitting needles for children, you must follow the instructions:
- Measure the height of the neck to make a collar.
- Cast on 150 stitches on circular needles and knit ribbing (1 knit, 1 purl), which is done on smaller tools than the rest of the piece. At the beginning of the first row, you need to connect the two ends and knit in the round up to 10 - 15 cm, depending on the desired length.
- Next, the crown of the head is knitted in stockinette stitch as a separate element. This hood is made in the shape of a heel so that it fits well to the head.
- After knitting the crown, the rows are closed (4 loops in every sixth row on both sides).
- Both pieces are sewn together.
This knitted hood is decorated with felt applications, flowers, beads, and rhinestones. If necessary, you can add strands and pompoms. The elastic band can be made with a zipper so as not to pull the entire hat over your head.
Hood-heel
This hood can be knitted by making loops along the neck of the fabric using a tool with fishing line. As a result, the product will be rounded, according to the shape of the head.
- Make a set of loops to the edge of the throat and knit a 1x1 elastic band. When it is 2 cm, start stocking stitch. Decrease for the next stitch: cast off 5 stitches from opposite edges of the row. Knit straight to the back of the head. Make fittings to determine where to form the rounding of the fabric.
- Count the stitches and use markers to mark the edges of three equal sections and divide them into three knitting needles. If there are extra loops in the remainder, add them to the middle part. Then we make the hood with knitting needles in this way: row on the left side; central part; the last loop of the central and the first loop of the right side at the same time as the front one.
- Unfold the work and knit the central part, connect the last one with the first side one. Unfold the canvas again and continue the steps described above until only the central part remains in the work. Close all loops.
- Cast on the loops on the needles along the high edge of the product and tie with an elastic band. Its height should be equal to 5 previously closed loops on both edges of the hood. Close the final row.
How to knit a hood with knitting needles: techniques with descriptions and photos
There are different ways to knit a hood. They differ in the technique of execution and the place where the knitting begins. The most common way to knit a hood is from the neckline. This method involves separately knitting the jacket, and then the hood from the collar.
This is one of the simplest techniques. But there are many other methods on how to knit hoods correctly. The method of sewing on a hood is very popular, when it is knitted separately and then attached to the main product with a needle.
By analogy, a snap-on model is made, which can be attached to the collar with buttons or a zipper, performing a decorative function. Very often, hoods are used in knitting for children. Which method to choose depends on the purpose for which the work is being done.
For sweaters and jackets, the neck technique is better suited, and for decorative purposes - a hood or a sewn-on model. They are all easy to knit, so it will be easy for a beginner to master how to do each one.
How to knit a hood from the neck: diagram with description and photo
This technique consists of making a hood from the neckline by lifting it up. First, a product is created, for example, a jacket, then using Art. s/n or st.
b/n you need to dial the required amount nearby to rise up. By simply adding and subtracting loops you can control the depth and width of the product.
There are several ways to knit a hood from the neck with knitting needles.
How to knit a hood from the neck with knitting needles step by step: master class method No. 1
Depending on the model, the depth of the front and back may vary. To prevent the hood from pulling down the front of the product, it is necessary to equalize the depth using a shortened one. rows. For work it is better to use circular knitting needles. We carry out according to the scheme:
- Cast on sts around neckline in circular sts;
- Shortened r. knit 1 rub. purl p. 2nd r. — 6 persons. n. Expand. elm. and in about. eg purl p. up to the first 2 p. 2 first p. and 2 last. p. each r. knitting handkerchief elm to form slats. Expand elm. and in about. eg Track. R. – persons n. Expand. elm. and in about. eg and knit. 6 p. n. after plan., unfold. elm. and in about. eg 6 persons. p. Next p. - purl n. Rather. elm. and knit 12 stitches after the knit stitch. p. Elm. deployment and knitting 12 p. p. in arr. eg Believe it or not. elm. and knit. R. persons n. Expand. elm. and knit. 12 p. after plan. purl p. Elm. deployment and knitting 12 persons. p. in arr. eg Believe it or not. elm. and knit. R. purl n. Expand. elm. and knit 16 p. after plan. persons p. Elm. deployment and knitting 16 p. p. in arr. eg Expand elm. and knit 16 p. after plan. purl n. Expand. elm. and in volume eg and knitting 16 persons. P.
- At the same time, perform increases: after the first 2 points of the plan. and before the last 2 stitches, decrease by 1 cross. Yarn over every 6th r.
- Knit faces. satin stitch the entire remaining height;
- In the last r. close the item;
- From inside Art. crochet 2 tsp. b/n;
- Wash the product, dry and steam.
You will get the simplest version of a hood from the neck, which can be applied to absolutely any product. Very often this technique is used for children's sweaters, but the technique is also perfect for women's jackets, cardigans and knitted coats.
How to crochet a hood from the neck step by step: master class method No. 2
This method is also performed from the neck. This pattern is the simplest on how to crochet a hood. Before starting work, knit the neckline 1st r. Art. b/n. Next, follow the scheme:
- Knit 1 rub. Art. s/n from the edge of one shelf. to another. Fold the product in half and mark. center on spin. Mark.;
- Knitting Art. s/n, performing 2 sk. across the river 1 tbsp. s/n together, note. Mark.;
- Complete 18 p., find the middle. and put a mark;
- Next, knit. 1 half to the mark, performing decreases (3 tbsp. s/n vm.);
- Unfold the elm. and the first 3 tbsp. s/n knit vm. Do 6 p.;
- By analogy I will connect. 2nd half;
- Connect 2 floors. Art. b/n;
- Tie the edge with a border according to cx. 2.
You will get a simple crochet hood that can be used for children's and adult patterns.
How to knit hoods correctly: pattern of a knitted hood based on the heel principle
The essence of this method is to use a technique similar to that used when knitting socks. This model can be part of a pullover, coat or be an independent product.
Very often this technique is used to knit a scarf-hood. This is an excellent option for a hood that fits tightly to the neck and protects from the wind. This model can replace a hat.
Perform the work according to the scheme:
- Dial the required number of points (about 24 points). Knit 1 rub. elastic band 1x1, then 1 p. with a “hole” pattern (alternate 2 p. vm. double crochet). These will be buttonholes. If you want to knit a hood on a jacket, then you can skip this point;
- Knitting the required length with a 1x1 elastic pattern (about 43 cm). Make a row of “holes” (alternate 2 p. vm. double crochet), another 1 p. elastic bands and close the st. Step back along the lengths. Art. 3 cm each for plan. and put a mark. Between them, type along the edge of the sp. p. from braids
- Knit 1 rub. faces in satin stitch with double the number of stitches. For this, knit. 1 person n, cross. Yarn over, and so on until the end. R.;
- Next, knit. all stitches with 1x1 elastic band at the back of the head. Chapter. number of items for 3 equals h. If the number of sts is not divisible by 3, leave more sts in the middle. Place markers.
- Knit n. lateral and middle part. Last. n. Wed. h. knit vm. from item 2nd side. h. vm. persons Expand elm.
- Knitting n. Wed. h. to last p. Knit. afterbirth. n. Wed. h from 1st p. side. h. vm. persons Expand elm. Repeat until on sleep only items will not remain. h.;
- Close the stitch and hide the ends of the thread.
This is a simple pattern that will definitely come in handy for beginning knitters. This creates a tight-fitting hood. To get a tighter knit, use 2 threads at the same time. A great option instead of a hat for the winter.
Snap-on hood: diagram with description and photo
This pattern is ideal for attaching a hood to a sweatshirt, raglan or coat. It can be done with a thread of a contrasting color or to match the tone of the main product. Before starting work, measure the circumference of the neck where the fastener will be. hood. This is the length you need to dial the initial chain. Further according to the scheme:
- Dial the flail. from air p. (for example, 47 cm). Knitting Art. s/n. to the height of the back of the head = 10 rubles;
- Divide the elm. for 3 hours (10 cm for the central part, and 17 cm for the side parts). Knitting center. h. art. s/n. = 18 cm;
- Conn. cr. Art. b/n. one b. hours from center h. Similarly conn. 2nd b. h.;
- According to the bottom h. knit 1 rub. Art. b/n;
- Track. R. perform step for buttons. Mark the places for the fasteners with a marker and sew the buttons onto the collar of the product. Attach the hood and mark the button holes. Perform 2 air. lifting, and knitting. 2 r. Art. s/n. Close the item and fasten it to the product.
The result is a functional and practical hood that can be easily removed and attached using buttons. A very interesting solution, especially for children's knitting.
Knitting a hood step by step: master class on knitting a hood
A bonnet is a headdress that is a combination of a hat and a hood. The hood fits snugly to the face and neck, thereby protecting against cold and wind. The hood pattern can be used to create a patterned hood or to pair it with a jacket or coat. We knit a hood with knitting needles, diagrams and descriptions.
Scarf-hood for a fashionable and impressive addition to your wardrobe
The hood as a separate wardrobe detail looks fashionable and impressive. The hood-scarf is no exception. Look at the photo. Stylish thing, isn't it? You can knit such a thing with your own hands. To help you, we have posted diagrams and descriptions.
To work you will need mohair/acrylic yarn - 400 g, knitting needles No. 8, hook No. 9, faux fur strip - 70 cm, buttons - 3 pcs., pieces of suede (eyelets). The dimensions of the hood are shown on the pattern.
First of all, the scarf is knitted. Cast on 26 stitches and knit, distributing the patterns as follows: 1 edge, 1 purl, 2 knits, 3 purl, 5 knits. braid pattern (pattern), purl 3, knit 2, purl 3, knit 5. braid pattern, 1 chrome. After knitting the scarf to a length of 222 cm, bind off the loops. Next you need to knit the hood: cast on 60 stitches on the knitting needles and knit with a 2×2 elastic band. After 28 cm from the cast-on edge, divide the fabric in half and begin making decreases to round the hood, knitting 3 stitches together 4 times in every 2nd row, then close all the loops. Connect the hood with the top seam. Fold the scarf and hood in half, align their centers, and sew the hood to the scarf. Crochet chains (ties) from air loops 32 cm long, decorate their edges with pom-poms. Make tassels of 12 cm each along the short edges of the scarf. Sew faux fur along the edge of the hood. Sew suede loops along one side of the shelves. To do this, bend 3 strips of suede 10x1 cm in half and secure with pins. Cut triangles with 4 cm sides from another piece of suede, place them along the edges of the loops and stitch along the perimeter. Sew 3 buttons along the other side.
By the way, this type of hood is ideal for a women’s cardigan like this - look at the article and see for yourself!
Scheme, pattern, symbols:
For young women
The technology of knitting a hood for young women is no different from children's hoods. The classic shape can complement both a thick knitted scarf and a finished product - a men's sweater, a women's sweater or cardigan. But first, it’s still better to familiarize yourself with the basic master class and simply knit a hood of a simple model.
It is performed according to the scheme of a regular rectangle:
- Loops are made from the neck loops and lifted onto the knitting needle. It is better to do this from the front side, as it will look more aesthetically pleasing;
- Simple garter stitch is used for knitting. A rectangular fabric of the required height is knitted. 60 rows will be enough for a child, for an adult - at his discretion;
- The loops of the last row are closed and both sides are connected with a neat seam.