- 22469
- 13-10-2020
- Author: Mysekret Team
- 0
Dense patterns are often used to knit warm clothes, which are so necessary for every person during the cold season. These patterns are used to make coats, skirts, hats, blankets and sweaters made from thick yarn, which are sure to keep you warm and comfortable during bad weather. In addition, another advantage of dense patterns is the ability to perfectly retain its original shape.
These patterns are crocheted by interlacing different types of columns. That is why there are a huge number of variations of these thick and seemingly knocked-down patterns, among which there are both simple, ordinary ornaments made of yarn, and interweaving threads of incredible beauty.
Circuit Descriptions
The opposite of openwork crochet patterns are dense ones; they are suitable for knitting warm winter clothes.
Dense crochet patterns, the diagrams of which are presented below, are widely used by modern craftswomen.
They look very beautiful when knitting women's cardigans, children's coats, berets, snoods, blankets, bedspreads and even rugs. Lush columns give the canvas texture and density. The patterns in this group are simple if you carefully study the pattern and understand the knitting process.
Video lesson
Another interesting type of dense pattern, which can be used to knit hats, sweaters or coats, will look original and beautiful on any item. To make the process of learning how to crochet this pattern go quickly, you can use a video with a detailed master class on crocheting this type of “bumps.”
Video tutorial on how to crochet a dense pattern:
Share with your friends!
- 101
- 4
- 1
- 106
Shared
Subscribe to our Yandex.Zen channel or Yandex.Messenger
Pattern with lush columns
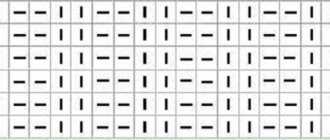
Before proceeding with the description, it is necessary to consider the symbols of the circuit symbols (they have a similar designation in all circuits and are standard):
| Designation | Decoding |
| Ellipse | Indicates an air loop. |
| Cross or plus | Connecting stitch or single crochet. |
| Long stroke with 2 slashes at the top | Double stitch or double crochet stitch. |
For this diagram, these notations are sufficient.
What you need to pay close attention to is how many loops are included in the pattern repeat. It is recommended to do this, since it is necessary to correctly calculate how many loops should be cast on for a part of the product without violating the integrity of the pattern and ease of use.
Almost every diagram has an icon with the letter “R” or “P”. This is the designation of rapport. In this pattern, the pattern repeat includes 2 loops. To cast on stitches when knitting, you should stick to a number that is a multiple of 2.
Now you can begin the knitting process itself. It consists of alternating rows consisting of arcs in one air loop, which are secured with 2 single crochets in a chain, and lush columns, between which 1 air loop is knitted. Positioned one above the other, the convex columns create the effect of a raised path, which looks very beautiful in the finished product.
Multicolor pattern
The original pattern, the diagram of which is presented below, has elements of openwork, but they are almost invisible in the finished canvas. It can be made in several colors, knitted in two colors or in one color. In any case, the pattern will look beautiful in children's items, cardigans, and blankets.
To knit such a pattern, you should first calculate the rapport. In this scheme it is equal to 12 loops. This means that in order to maintain the integrity of the pattern, it is necessary to cast on so many loops so that they are divisible by 6. An additional symbol in this pattern will be a double crochet stitch (st 1/n), and a single crochet stitch is designated +.
Description of knitting
The repeat in height of the pattern is 2 rows, which, repeated in a checkerboard pattern, create the effect of small convexities in the form of a fan, which looks very attractive in the canvas.
Knitting pattern:
- The 1st row consists of alternating 5 single crochets and a triple double crochet, between which a pair of chain stitches is knitted, retreating 3 chain stitches.
Dense crochet patterns - multi-color knitting patterns
- Knitting the second row is carried out by alternately knitting 3 single crochets in 5 lower and 9 single crochets under arcs of air loops.
- Then the pattern is repeated, but the “fans” are shifted to the middle single crochet below the knitted row.
How to knit yourself
A crochet bag is an easy-to-make accessory that you can make yourself in 1-3 days. You will need to take a hook identical to the size of the yarn, if you want to get a dense product, for a string bag and a shopper, choose a thicker tool.
Beach
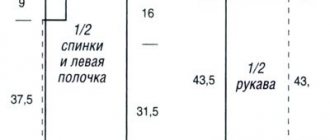
The crocheted knitted beach bag, the knitting pattern for which is shown below, is functional and eye-catching with its unique design. And the manufacturing process will not take much time. The width of the model will be 39.5 cm, height – 33.5 cm.
You will need the following materials and tools:
- hook No. 5.5 mm;
- knitting yarn (approximately 200 g).
Diagram and description of a crocheted beach bag:
- Knit a chain - 21 loops, then sc.
- Add in every second row from the beginning: 1 time for 4 loops, 1 time for 3, 2 times for 1 - up to 39 loops.
- Tie the bottom. Pull the loop to the wrong side. Tie the bottom with rounding loops.
- PS knit 45 VP.
- To round, add 1 loop from the second row 1 time, in each 6 - 3 times 1 loop.
- Make a handle from a chain of 9 VPs, closed in a ring, connected in a spiral RLS.
The diagram and description of a bag made from crocheted motifs is freely available. Beginning knitters find it difficult to knit the warp. If it is difficult to understand how to crochet the bottom of a bag, you can watch numerous videos.
Shopper
Before crocheting a handbag, beginners should stock up on everything they need. You will need:
- hook 5 mm;
- 2 skeins of thick yarn.
Knitting pattern:
- bottom: 14, 28, 42, 56, 74, 84, 98, 112 loops, sc;
- side: 8 VP - 44 cm;
- top: 112 loops.
Handles are done right away. Three or four rows before the end, 15 loops are left open. At the next step, instead of them, air loops are collected - 20 pieces for small handles, from 35 for long ones.
A crocheted shopping bag must be dense, so it must be made from cord thread. The handles are not attached, but knitted straight away.
String bag
How to crochet a string bag is a common question. Of course, novice craftswomen may be intimidated by the abundance of options. In fact, the patterns and descriptions of crocheted avoska bags are repeated, but for knitting it is enough to understand the algorithm.
Material and tools:
- hook 5 mm;
- yarn of choice.
Step-by-step master class:
- 6 VP, close them into a ring.
- 11 PBN and close.
- Next - 2 loops of the previous row (a total of 22).
- 3 circle - multiplication 2 steps, 1 SS.
- Using the same algorithm, close row 4.
- Round 5 - chain 6, 1 sl st in 4 pbn.
- Connect 8 loops, transition, repeat.
- Knit the remaining rows to the desired size (at first the string bag will be flat, but after 10-12 cm it will begin to curve).
- Handles are made by tying a loop with single crochets.
It is better to take dense yarn that is resistant to mechanical damage. Crocheted string bags made from high-quality material will last much longer. In addition, they will be stronger and will withstand greater loads.
Pattern with transitions
The dense pattern of this type, crocheted, has a more sparse structure. It consists of alternately using fragments of various schemes. It can be either monochromatic or multi-colored. Used in knitting dresses, skirts, scarves. In it, rapport is calculated based on the first pattern. In this case it will be equal to 3.
Description of knitting
Step-by-step process for creating a pattern:
- The 1st row is performed in double crochet stitches. Afterwards, several rows are knitted (at individual request) and knitted in arcs of air loops. Their number and places of attachment to the bottom row may also vary.
- Then the next pattern begins, consisting of triple double crochets, knitted under arcs of air loops.
- Further rows are knitted in the same way, but under the spaces between the triple stitches of the lower row. Their number is also determined individually.
- In the outer row of the pattern, air loops are additionally introduced, one at a time between the 1st, 2nd and 3rd stitches with 1 triple crochet. This is necessary to make the transition to knitting the next pattern.
- Now you should knit several rows of the transition itself, the 1st of which is made from arcs of air loops, secured in a central column with 1 crochet of the row below.
- In the next row, the pattern is leveled by reducing the length of the arcs.
- Then a row of double crochets is performed in the next chain stitch of the row below.
- Then a new pattern begins. It consists of sequentially alternating a triple double crochet stitch with 1 similar stitch, which is knitted into every 2nd stitch of the row below. Again, the height of the pattern is determined at will.
- This pattern ends next to a double crochet stitch in the previous one. It is also transitional for knitting the next pattern.
There are a lot of options for selecting patterns, as well as transitions from one to another. It all depends on the choice, taste and imagination of the needlewoman
Wave pattern
The diagram shown shows a medium density pattern. This is due to the presence of gaps in it, obtained when knitting through a loop. It is simple to implement, but has a very beautiful appearance.
Products made with this pattern can be multi-colored, two-colored or single-colored. It is used in knitting tunics, blouses, sweaters, berets, snoods, scarves, blankets. To start knitting, you need to determine the number of repeat loops. In this scheme it is equal to 18.
Description of knitting
The presented pattern is very simple in execution, but very beautiful in the finished product. The height of the repeat is 2 rows. The main thing is to be careful that the vertical lines are straight.
Step by step knitting:
- The 1st row is knitted in sequential alternation of 6 double stitches with 1 crochet in the next subsequent chain stitch and 5 single stitches with 1 crochet, which are carried into the subsequent second chain stitch.
- 2nd row - only single crochets. Subsequent rows are analogues of the previous ones. The central columns of the valley and the tops of the “wave” can serve as a guide for correct knitting.
There is one nuance in the Wave pattern that can change its appearance. If, when knitting a double crochet, you grab the working thread only by inserting the hook behind the back of the loop of the row below, then the wavy line created by the rows of single crochets will be clearly visible on the front side of the pattern.
Video master class on knitting bags from knitted yarn
We love this type of yarn for knitting so many things, and the bags made from it are probably the most beautiful, elegant and stylish. But knitting from knitwear is not very easy; nevertheless, it requires experience and you first need to get good at it. Therefore, it is preferable to create small-shaped products with simple patterns, and due to the fact that the threads are thick, any of them will look great. We looked at different types of patterns for knitting from knitwear in detail on baskets; they would also be appropriate for bags.
So, here you need to choose the option that you like, decide on the shape and knit the simplest handbag; in any design it will be very beautiful.
We have round bag ideas in a separate post, take a look.
And for example, a few photos of the authors, unfortunately I don’t know their names, they were all apparently posted on Instagram.
The small “marshmallow” bag is very popular among needlewomen.
Here is an interesting shape, almost like a barrel. All you need to do is knit an oval and two round pieces.
For a change, someone came up with a triangular-shaped model.
And I suggest you also watch a video master class on knitting a magnificent bag called “Oreo”.
Pattern "Bumps"
Dense crochet patterns (schemes of some are given in the text) are a voluminous fabric with clearly defined “bumps”. This method will look very nice in children's sets consisting of a coat and a hat; cardigans for adult women will be distinguished by the originality of the idea.
Based on the diagram, unfamiliar components appeared in it: a convex single crochet and the already familiar fluffy double crochet, but consisting of 6 stitches with 1/n. 4 loops – repeat of this pattern.
Description of knitting
The height of the pattern repeat is 4 rows. It includes 2 identical rows, arranged in a checkerboard pattern:
- In the 1st row, alternating 3 single crochets and an air loop are performed, which are performed by retreating the air loop.
- The 2nd row consists of alternately knitting a lush column consisting of 6 double crochets and a convex column, which is knitted not in a loop, but in the girth of the column of the lower row before work. The columns are connected to each other by an arc of 2 air loops.
- The next row is alternately performing 2 single crochets and 1 chain stitch.
- The next row is an exact analogy of the second, with the only difference being that the stitches are arranged in a checkerboard pattern and a convex single crochet is knitted around the fluffy stitch before work.
Then everything repeats.
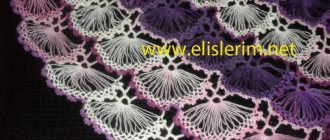
Pattern "Shells"
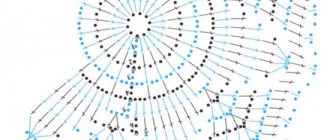
One of the list of dense crochet patterns is “Shells”. It is simple and original, looks beautiful in products for any purpose, from things for newborns to bedspreads. The pattern repeat of this scheme is 8.
Description of knitting
The height of the repeat of the presented pattern is 2 rows, representing a repetition of the same row in a checkerboard pattern.
The pattern is made by repeating small “fans” consisting of 6 double crochets, in the middle of which an air loop is knitted. Such a bunch of columns is performed in the next 8th loop of the chain with intermediate fastening in the next 4th loop.
Next rows are performed similarly to the first, but the “fan” is knitted from a single crochet of the row below, and secured into the air loop of the top of the beam.
Flower glade
A pattern like the one in the photo above can also be used for the same purposes as the Tunisian pattern. The flower meadow pattern is a cute dense floral pattern with braids. It is quite complex, but looks great in knitted coats, leg warmers and various warm items.
The pattern will repeat every four rows. In the first and third rows we alternate the elastic band from connecting posts and berries. In the second and fourth rows we knit only connecting posts. Please note that when knitting a pattern, you need to knit all the loops behind the back wall of the loop.
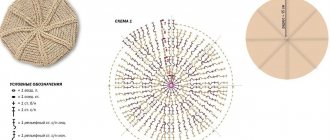
Let's start creating. We cast on 23 air loops, of which three loops for the elastic band, four loops for the berry, four loops for the gap between the berries, four loops for the berry, four loops for the gap, three loops for the elastic band and one loop for lifting, as in image one.
The first row is the front side. We knit the first connecting column into the 2nd chain stitch from the hook. Connecting column into the next two loops, as in figure two. Next we knit the berry, rapport: 1 single crochet into the next stitch, one chain stitch, now we find the front leg of the just knitted single crochet, as in image three, make a yarn over and insert the hook into this left front leg of the single crochet, grab and we pull the thread, now we hook the thread again and pull it through two loops on the hook, there are two loops left on it, so we knit an unfinished double crochet, as in figure four.
Now you need to yarn over again, then insert the hook into the front leg of the single crochet, pull out the thread and grab it again and pull it through three loops at the same time on the hook, after which two loops remain on it. Now we skip a loop (for the first row, one chain loop of the original chain), as in figure one. We insert the hook into the next loop and pull out the thread, grab the yarn and pull it through all three loops on the hook, as in figure two, without crochet into the next loop. The rapport ends. The berry is finished, as in picture three. Now we make 4 connecting columns, as in the figure there are four, make a berry, repeating the rapport and again four connecting columns for the gap and three connecting columns for the elastic band.
Related article: Crochet heart patterns with description and video
The second row is the wrong side. We knit one air loop for lifting, a connecting column to the end of the row, it turns out 22. So that the back walls of the loops are clearly visible, you can take the fabric vertically, as in the first picture. It is necessary to count the number of connecting columns to eliminate errors. Remember that in the extreme loop of the row, which is the chain loop of the previous row, you need to knit a connecting column, as in figure two.
In the third row we knit one air lifting loop and three connecting columns for the elastic band, then four connecting columns for the gap, as in figure three. Now there are four more connecting columns, a berry, three connecting columns for the gum, while the berry is shifted in a checkerboard pattern, as in figure four. We knit the fourth row like the second row. Repeat from the first to the fourth row to continue the pattern.
Pattern "Rice fields"
Dense crochet patterns (patterns are very simple and do not require special skills) are suitable for warm jackets, coats and rugs. The repeat of this scheme is equal to 2 loops.
Description of knitting
The repeat in height of this pattern is 2 rows:
- The 1st row is a series of double crochets. The difference lies in the knitting process itself. A short single crochet is usually knitted, and a second, elongated one is knitted in 2 stages. First, one captured working thread is knitted, and then the 2 remaining loops on the hook are knitted.
- In the next row, these columns are swapped and knitted only into the elongated columns of the row below.
Tunisian pattern
A transitional coat is a very useful piece, and knitting it with thick patterns is a great choice as it will provide a cozy feel and confidence. They also keep their shape without stretching and retain heat well. And besides all this, such patterns look very unusual in the finished product; one of such patterns is the Tunisian pattern.
Related article: DIY locks made from geometric shapes with photos
This pattern is an excellent choice for coats, sweaters and cardigans because the design does not release heat or stretch. To figure out how to knit it, let's study the process in detail with a description.
Note:
- For this pattern, a specialized long knitting hook is used. Because in this technique there are all three loops on the hook.
- It is necessary that the size of the hook is equal to the width of the knitted fabric, otherwise it will be necessary to sew it from separate strips.
- The hook should be held in your hand like a knitting needle.
- Sometimes a crochet hook is used larger than the required yarn size to give the fabric a little elasticity.
- Tunisian knitting uses less yarn than classic knitting.
- It is necessary to knit the loops, tightening them a little.
- The product curls due to its rigidity, so before connecting all its parts, they must be steamed.
We assemble a chain of air loops. From the 2nd loop, pull out one loop from each element of the chain, leaving them on the hook.
The number of loops of the 1st row should repeat the number of air loops in the chain. In the 2nd row, we alternately close the loops. This series is also called “reverse”.
Now we knit the 1st loop, then close all the remaining loops in pairs. As a result, 1 loop remains on the hook.
The first 2 rows are knitted the same way in any Tunisian knitting pattern.
Now we will knit rapport, it will be from two rows. 1st row - catching loops. 2nd row - closing the loops. The knitting is not turned inside out; the fabric of the product is always knitted on the right side.
In order to grab the loops, you need to straighten the first 2 rows and clearly mark the protruding vertical broaches. One by one, insert the hook from right to left through the broach, grabbing the working thread along the front side, and pull it out.
Using this method, we put the loops on the hook again. You need to make sure that the loops on the hook are the same height and not too tight. In the second row you need to close the loops in pairs, while remembering that we close the first one, and so we will raise the rows.
Related article: Tractor made of mastic: master class with photos for beginners
Tunisian motif
The Tunisian knitting technique is an imitation of dense fabric knitted with knitting needles. Unlike regular crochet, this technique uses a long hook because all the loops being knitted remain on it while knitting.
Description of knitting
The height of the rapport of this technique is 2 rows:
- After casting on the chain, a loop is caught on the hook from each of its loops, but not knitted. This is done until the end of the row.
- Then the work is not turned, as in normal crochet, but is crocheted from end to beginning.
- The edge loop is knitted alone, capturing the working thread. Subsequent loops are knitted in pairs until the beginning of the row.
- Without turning the work, the loops are again set on the hook from the received broaches when knitting the previous row.
- Then everything is repeated.
Dense pattern with elongated single crochets
This knitted fabric is knitted almost the same as the previous one, but it turns out to be more elastic and soft. Unlike simple s. without n., elongated ones give small gaps.
We collect the quantity we need. p., then do 2 v. p.p. and knit the first s. without n. in the 3rd century. p. from the hook. We should have 2 sts on the tool. We tie the stitch by pulling the thread through the 2 sts on the hook. We knit columns in each loop, at the end of the p. knit 2 in. p.p. and turn the knitting.
"Scales" pattern
Dense crochet patterns, the patterns of which seem confusing, are actually not difficult to perform. “Scales” is the record holder of all similar knitting options in terms of yarn consumption. The connected “scales” slightly overlap each other, giving an attractive volume and relief to the product.
This method is used for knitting coats, baby envelopes, baby clothes and blankets. The repeat of this pattern is 6 loops. Therefore, to calculate a set of loops, it is necessary to take into account that the number of them dialed must be divided by 3.
Description of knitting
The height repeat of this pattern consists of 4 rows, of which the second 2 repeat the first 2, only they are staggered relative to each other. If we figuratively describe this pattern, then it is a base, that is, a mesh, the vertical partitions of which are tied with a certain number of double crochets, creating the effect of scales.
If we look at the presented diagram in more detail, there is nothing complicated in it. The main thing is to understand in which direction each subsequent row should be knitted. It may not be entirely convenient to perform the initial rows, but then this disadvantage will go away by itself.
Step by step knitting:
- To knit the 1st row, you should alternately perform double and single stitches with 1 crochet, between which 1 air loop is knitted.
- It is necessary to make columns in every 3rd loop of the chain.
- When performing the next row, it is best to turn the work vertically first.
- A nuance: in order for the outer scale not to be tightened, but to look more beautiful, it is recommended to knit 3 air loops and only after that perform 5 double crochets. After this, tie 1 air loop and turn the work 180 degrees again.
- Continue knitting the second part of the scale with 5 double crochets. Do this until the end of the row, not forgetting to knit 3 air loops again at the end. This nuance is applicable only in those rows in which the scales are extreme; in others there is no need to do this.
Crocheted coat: patterns and detailed descriptions of knitting
View > Home / Knitting patterns, Knitting for women, For beginners, Miscellaneous, Collections, Coats
09 Nov 2021 Category: Knitting patterns, Knitting for women, For beginners, Miscellaneous, Collections, Coats
your feedback
A knitted coat is an item of women’s wardrobe that never loses its relevance. Extraordinarily beautiful crocheted coats will come in handy from the first to the last days of “plus” temperatures: light openwork coats will be very useful in spring and summer, thicker coats will keep you warm on cloudy autumn days.
A crocheted coat gives the needlewoman an exceptional opportunity to emphasize individuality by getting an exclusive item that fits perfectly to the figure. Moreover, knitting a coat for a craftswoman is also a chance to demonstrate all her skills in crocheting needlework.
In the process of knitting a coat, you can experiment with yarn in every possible way. By knitting patterns from various textures and colors of yarn, you will be able to create a unique outerwear model of its kind. Moreover, even from simple patterns you can knit an attractive and original coat, in particular, if you use yarn with an unusual texture: fur-grass, bouclé thread, contrasting yarn with a melange effect.
Depending on the type of yarn, you can get either a stylish “going out” model or interesting outerwear in a casual style, suitable for work, for a walk, and for romantic meetings! Let’s not bore you with stories, let’s immediately move on to master classes on crocheting women’s coats.
Abbreviations used in step-by-step descriptions:
- VP or v.p. - air loop;
- runway – air lift loop;
- Art. s/n – double crochet;
- Art. b/n – single crochet;
- Art. s/2n – double crochet stitch;
- Art. s/3n – double crochet stitch;
- pet. - a loop;
- flail - chain;
- PR – previous row;
- SS or connect. Art. – connecting column.
Stylish autumn-spring coat with a hood
A gray openwork coat is a real squeak of fashion today! A calm color that suits almost any female look and a flowing, loose fit are two of the most important advantages of a coat that fits perfectly on both thin and curvy ladies.
For knitting, it is better to take acrylic yarn with the addition of wool or merino (about 1.2-1.4 kg), as well as a hook No. 6-6.5.
Knitting pattern for a fantasy pattern
We knit a base chain in a number of loops that is a multiple of: 7 + 5 + 3 runways. Row No. 1: 2 tbsp. s/n in the 4th VP, skipping 3 stitches, 1 st. b/n in the next p., then - rapports to the end of the row: “3 VP, according to the 1st art. s/n in each of the 3 tracks. pet., skip 3 pet., 1 tbsp. b/n in the next pet."
Row No. 2 and all other rows: 3 runways, 2 tbsp. s/n in the 1st art. b/n., in each arch of 3 traces. VP knit 1 tbsp. b/n, 3 VP and 3 tbsp. s/n, ending the row with the 1st st. b/n in last arch.
Knitting steps:
Loop calculations are presented for sizes 42-44. Pattern:
Back and front
We knit it up to the armholes with a single piece of fabric.
We collect the flail. from 204 VPs, we knit 28 motifs according to the pattern. Approximately 52 cm from the beginning of the row (29-30 rows), we begin to knit each element of the coat separately. For the top of the right shelf, we continue to knit the first 6 motifs of the pattern, continue knitting 20 cm (about 11 rows), and finish the work. We count out two patterned motifs for the armhole, for the top of the back we knit 20 cm (11 rows) with a fancy pattern for 12 rows. patterned motifs, let's finish the work. We are fine-tuning two more motifs for the armhole, for the top of the left shelf we will knit 20 cm (11 rows) with a pattern, and finish the work. Hood
: in continuation of the top of the front and back, we knit a pattern on the first 4 motifs of the right front, then on the 8 middle motifs of the back and on the last 4.
We knit 16 patterned motifs on the left shelf motifs. After 38 cm (about the 21st row) from the beginning of the hood we will knit a trace. combinations: 3 VP, 1 tbsp. s/n in the 1st art. b/n, 1 tbsp. b/n in the next arch of 3 VPs, repeats to the end of the row: “3 tbsp. s/n in next Art. b/n, 1 tbsp. b/n in the next arch of 3 VPs.” Sleeves:
pick up a flail.
on 78 VP, we knit fantasy. pattern. Having knitted 60 cm (about 34 rows), we will knit the next one. combinations: 3 VP, 1 tbsp. s/n in the 1st art. b/n, 1 tbsp. b/n in the next arch of 3 VPs, then repeats to the end of the row: “3 tbsp. s/n in next Art. b/n, 1 tbsp. b/n in the next arch of 3 VPs.” Assembling the coat:
sewing the shoulder seams. Fold the hood in half and sew a seam along the upper part of its wrong side. We sew sleeves into the coat. To fasten the coat, you can decorate (knit with columns of non-woven stitches) a special large pin. Ready!
Cozy chunky crochet coat
With the onset of the first autumn cold weather, knitted coats come onto the scene. They come in handy at a time when it’s too early to put on a warm jacket, but it’s not particularly comfortable to walk down the street without a top. A bright pink coat made with a dense fantasy pattern will definitely appeal to the fair sex who plan to have a stylish and warm coat in their wardrobe for all occasions.
Pattern diagram:
Knitting steps for the pattern:
We dial the number of VPs, a multiple of 4, add 1 VP. Row No. 1: 2 runways, skip next. 4 VP bases, 1 tbsp. s/3n next VP basics, 1 tbsp. s/n in 3 of the missing 4 VP bases, at the same time, we perform all the columns behind the inclined st. s/3n, then we knit with rapports: “skipping 3 VP of the base, 1 tbsp. s/3n next VP basics, according to Art. 1. s/n in 3 missing VP bases (don’t forget to make columns behind the inclined st. s/3n)”, the end of the row is 1 tbsp. s/n in the same VP, according to the last art. s/3n. Row No. 2: 2 runways, skip next. 4 tbsp. s/n PR, 1 tbsp. s/3n in art. s/3n PR, 3 tbsp. s/n in 3 of the missing 4 sts. s/n PR (attention: we make columns in front of the inclined stitch s/3n, because beveled columns should only be obtained on the front side of the knitted fabric). We continue to knit with rapports: “skip 3 stitches. s/n PR, 1 tbsp. s/3n in art. s/3n PR, 3 tbsp. s/n in three of the missing 4 sts. s/n PR, while doing the columns in front of the inclined st. s/3n", end of row: 1 tbsp. s/n into the loop into which the last was knitted. Art. s/3n. Row No. 3: knit as the second row, but stitch behind the inclined st. s/3n. We perform subsequent rows of fabric according to the principle of 2nd-3rd rows. You can also knit a pattern according to the pattern, replacing the knitting of three double crochets and an inclined column with 4 double crochets.
Original striped coat with a simple pattern
The advantage of the coat is the absolute simplicity of knitting, as well as the original cut with an asymmetrical fastener located on the side. The model is knitted with regular double crochets; you only need to control the transition of colors in the fabric.
For standard size 44-46 you need to take about 350 grams. acrylic yarn in four desired colors, six large buttons, and a hook No. 3-3.5. The coat fabric is knitted with the main pattern - 10 rows of each color.
Description of the knitting sequence:
We knit in s/n columns, start each row with 3 runways (replace 1 st. s/n with them), end with one st. s/n in last Runway PR. Rows No. 1-9: knit with regular stitches. s/n. Row No. 10: knit with relief st. s/n, knitted from the front wall. Row No. 11: knit with relief st. s/n, hooking onto the back wall (insert the hook behind the PR column). Rows No. 12-19: knit with regular stitches. s/n. Row No. 20: knit according to the principle of the 10th row. Next, we alternate knitting, knitting rows No. 11-20 and observing the colors.
Coat pattern:
Knitting steps:
- Back:
We use yarn of the first color to make a flail. on 174 VP + 3 VP, we knit with the pattern described above, systematically changing the colors of the thread. To create a side bevel, decrease 6 x 1 stitches on both sides of the fabric every four rows. and in every third row there are 17 x 1 stitches, for this we knit both the first and last loops of the row with one vertex, a total of 128 stitches should be obtained. We knit 74 rows (about 67 cm), in the 75th row we skip 14 stitches. on the sides to form the armhole line. We get 100 pet. in a row. In the 99th row we draw up the neck line: we skip 50 central loops, on the remaining 25 loops on the sides (shoulders) we knit another row (maximum two).
- Left shelf
Using a thread of the selected color, we collect the base-flail. for 92 VP + 3 VP, knit with a pattern in accordance with the sequence of colors. We reduce the side bevel and armholes by analogy with the back, as a result we get 32 loops in a row. On the left edge we subtract 7 rubles in every second row. one loop at a time, on the remaining 25 shoulder loops we finish knitting as soon as the fabric reaches the height of the back.
- Right shelf
We collect the flail. for 140 VP + 3 VP, knit according to pattern and color. Decreases in the bevel and armholes of the sleeves are similar to the back. We get 80 pets. Important: in the process of knitting the right front, you need to remember about the holes for buttons - skip 7 loops + 3 VP evenly in rows to form a void in the fabric for threading a button. In the 91st row we form the neckline. On the right edge we skip 33 stitches to round the neckline, in each stitch. row skip 2 times 5 stitches, and three times 4 stitches. The remaining 25 pets. We knit the shoulders in rows until the right shelf reaches the height of the back.
- Sleeves
Using yarn of the selected color, we cast on a base chain for 62 VP + 3 VP, knitting according to the pattern. To create a sleeve bevel, add one loop in every second row 26 times. In total we get 114 pets. We knit the sleeve fabric until it reaches a height of 54 cm.
- Collecting coats
We sew the side and shoulder seams and sew in the sleeves. We tie the neckline next to the SS. We sew the buttons opposite the holes made in the front. The coat is ready!
Spring-summer openwork coat with lace border
If a knitted coat for the off-season is chosen on the principle of maximum heat retention, then coats for a warm spring-summer are knitted more for a decorative purpose - to emphasize the original style and impeccable taste of its owner. A translucent openwork coat with a lace border will look great with short dresses, light trousers and fluffy sundresses.
Knitting pattern and pattern:
Detailed description of knitting:
The coat is knitted in one piece, including the back, right and left panels. First, we form a flail. at 201 VP (198 VP + 3 runways). Row No. 1: 1 tbsp. s/n in the 5th VP, 196 art. s/n in next 196 VP of the basic chain. Row No. 2: 3 VP lifting, 1 tbsp. s/n in next Art. s/n PR from hook, 65 rapports: “2 tbsp. s/n in the 3rd art. s/n PR from the hook, between st. s/n - arch from one VP” we complete the row with the 1st st. s/n in the 3rd art. s/n PR from hook + 1 tbsp. s/n in next Art. s/n PR from the hook. Rows No. 3-49: we knit the fabric in the forward and reverse directions according to the pattern of the main pattern. Row No. 50: we divide the fabric for subsequent knitting of the coat elements separately:
- 16 repeats each - on the right and left shelves;
- 33 rapports - on the back. Rows Nos. 50-67 are knitted forward and backward according to the pattern.
We knit the left and right fronts according to the pattern up to 65 rows, with which we begin to decorate the neckline. From the beginning of the row we do not knit 8 repeats of the pattern; 8 repeats remain in the work (we knit the shelves symmetrically to each other). We knit the sleeves:
We attach the thread to the lower edge of the armhole.
Row No. 1: 1 VP lifting, 71 st. b/n in the eyelets of the armhole line. We finish SS. Row No. 2: 4 VP (3 VP rise + 1 VP), 1 tbsp. s/n in the 1st VP of lifting, 24 rapports: “2 tbsp. s/n in the 3rd art. b/n PR, between Art. s/n arch from one VP.” SS. Rows Nos. 3-19: continue work in a circle according to the pattern of the main pattern up to the 19th row inclusive. Row No. 20: 1 VP rise, knit with regular single stitches in the amount of 32 stitches, finish connecting. Art. We knit the border to the sleeves:
using the circular method according to the border pattern (rows 4-23), each ending with a SS.
Final assembly:
- knitting a stand-up collar:
attach a new thread behind the neck line, knit 4 rows with non-woven stitches. - tying the shelves with a border:
attach the thread to the bottom of the left (right) shelf, knit a row of non-woven columns. Next - forward and backward according to the border knitting pattern (2-23 rows), 6 repeats. - tying the edge of the collar and the upper edges of the border of the shelves:
we knit two rows of non-woven columns. - decoration with buttons.
The summer openwork coat with patterned edges is ready!
A selection of coat crochet patterns
Airy spring coat made of square motifs
Bright boho coat made from granny squares
Exclusive coat with a spectacular zigzag pattern
Light openwork coat in office style
Sunny chunky knit coat
Cozy coat with ribbed pattern
Video tutorials on the topic “Crocheting a coat”
We also recommend:
- Calculation of the amount of yarn - table for calculations
- Knitting trends 2021: patterns, materials and new things
Like? Press!
Tags:
Relief pattern
The presented relief pattern is both dense and openwork. Made from loose and thick yarn, it will “lay” beautifully into a figured, relief pattern.
It can be used in a variety of knitwear and household items. The repeat of this pattern is 8 loops.
Description of knitting
The repeat height of this pattern is 4 rows, which are repeated in pairs in a checkerboard arrangement:
- The beginning of the work consists in sequentially alternating triple lush columns, separated from each other by 2 chain loops, which are secured with single crochets through a chain loop in every 4th loop of the chain.
- In the 2nd row there is an alternation of triple double crochets, secured through 2 chain loops with a single crochet to the top of the central fluffy double crochet of the row below.
- The next row is similar to the first, with the difference that triple puffy stitches are knitted from the central triple stitch of the previous row, and secured into a single crochet stitch.
Then all rows are repeated.
Two-tone wave pattern
A dense pattern will be a good choice for a hat, as its purpose is to keep the head warm and protect the hair from wind and cold, so it is better to use dense patterns in knitting. One of them is the two-color wave pattern, let's take a closer look at it.
The number of air loops in the cast-on chain must be a multiple of three, with the addition of one more loop and 2 lifting air loops.
In the 1st row we knit two chain stitches, two double crochets in one base loop. Then we skip two air loops of the dialed chain. Now repeat: one single crochet and two double crochets in one base loop, skip two chain loops of the cast-on chain. And one single crochet.
In the 2nd row we knit two chain stitches, two double crochets into one base loop. Now the rapport is one single crochet and two double crochets in a single crochet. After one single crochet in a lifting chain loop. We do this a second time.
Pattern "Twists"
The Crocheted “Twists” pattern imitates embossed longitudinal stripes knitted with knitting needles. It is denser and less subject to deformation, it is very simple to perform, the main thing is to understand how the front and back loops are knitted when crocheting. In this pattern, repeat is equal to 6 loops. It depends on the width of the strands in the pattern.
Description of knitting
The height of this pattern is 2 rows. The width and height of the strands are determined individually, depending on the main pattern or the product being manufactured.
To make plaits, you only need to know how to knit stitches on the front and back. To do this, you should knit subsequent stitches not in the loops of the lower rows, but in their girth before work (front) and behind work (purl).
In the 1st row there may be slight inconvenience when performing. But with further knitting, the pattern itself will tell you which stitch should be made.
Pattern "Braids"
This dense pattern also imitates similar “braids” knitted with knitting needles. It is durable, original and practical. It is mainly used for knitting men's and women's sweaters and stoles.
This diagram contains a new designation. This is a hook with 2 cross bars. Its meaning is a knit stitch with 2 crochets. Rapport again depends on the width of the braids. In this scheme it is equal to 8.
Description of knitting
Carrying out this pattern requires special attention. This is due to the fact that in the front and back rows the columns are reversed. But these difficulties will only be encountered at the beginning of work. Further, following the pattern, it will be clear which columns to use.
The height and width of the knitted braids is arbitrary, selected individually, based on the main pattern and the product being performed:
- Getting started is by knitting a row of single crochet stitches.
- In the next row, the location is determined and the braid or several braids are calculated. There are 2 of them in this scheme. They consist of 6 columns.
- The 3rd row (purl) begins with 2 knit stitches, then 6 purl stitches of the 1st braid, 6 stitches of the 2nd braid and ends again with 2 knit stitches.
- In the 4th row, the stripes of the braids overlap. First, 2 purl stitches are knitted, then 3 knit stitches are knitted around the 4th, 5th and 6th stitches of the row below, after which 3 knit stitches are knitted again with 1 crochet, but around the 1st, 2nd and 3rd stitches. -th columns. The row ends with 2 purl stitches.
Then everything is done in the same way as the previous description.
Using the discussed dense crocheted patterns and patterns for them, you can replenish the wardrobe of the whole family, as well as update the interior and create comfort in your home.