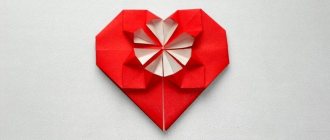
Heart shaped paper ring
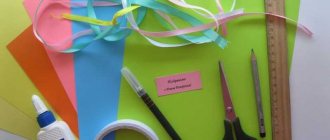
You will need: colored paper, a pencil, a ruler and scissors.
Master Class
- Cut out a square and fold in half.
- Lay out and divide the half into four equal strips using a ruler and pencil.
- Turn the square over with the white side facing up.
- Fold the top strip inward.
- Turn the square over with the pink side facing up.
- Fold in half vertically and fold the edges toward the center to form a triangle.
- Fold the top of the triangle under and straighten the edges as shown in the picture.
- Fold the remaining paper along the lines.
- Insert the ends of the strip into each other.
Origami paper ring with heart
The heart-shaped paper ring is ready! It will be a wonderful gift for your wife or girlfriend, especially if it is made from a large denomination banknote.
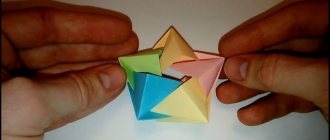
Original heart
You will need: colored paper.
Master Class
- Take a rectangular piece of paper and fold the corners so that they touch the bottom edge.
- Straighten and make the same bend on the reverse side. (If you did everything correctly, then a rhombus and triangles should appear).
- Squeeze the center with your fingers, then press down to form a three-dimensional triangle.
- Repeat step #3 on the reverse side.
- Take a corner of the triangle and press down to form a diamond shape.
- Fold the bottom edges towards the center of the diamond and straighten them.
- Repeat steps No. 5 and No. 6 with each corner of the four sides of this workpiece.
- Fold the square into a heart shape.
DIY crafts. Origami Heart. Origami Heart. Valentine's card.
The original paper heart is ready!
Video material
https://youtube.com/watch?v=7f3YitCrgtA
Communicate with each other more often, both in the virtual world and in person. We hope that our information will help you establish correspondence with those people who do not have their own page on the Internet, but really want to “hear” you. Please your loved ones with letters written in your own hand, because in this way you can convey to them a piece of your soul.
Heart-shaped envelope made of paper
You will need: colored office paper.
Master Class
- Take a square sheet of paper and fold it twice diagonally. (You should get a diagonal marking).
- Fold one corner of the square towards the center and the opposite corner towards the bottom edge.
- Fold the side edges as shown in the picture.
I recommend watching this video!
How to make a heart envelope from colored paper with your own hands
The paper heart-shaped envelope is ready! You can put a mysterious message in it and confess your love.
How to design an envelope for a letter?
To speed up the processing of correspondence and reduce sending time, you need to format the envelope correctly. Follow the following procedure for filling out the form.
How to fill in sender information?
In the upper left corner of the form, fill in the sender information:
In the first line - the full name of the sender (for a citizen), for a legal entity - the full or short name. For example, from Petrov Petrov Ivanovich, if the sender is an individual. If the sender is a legal entity, then it can be abbreviated, for example, from LLC “Style”. All data is written in the genitive case.
- Name of the street (avenue, alley).
- House number (building).
- Apartment number (office).
- Name of the locality (village, urban settlement (UGV), city, etc.).
- Name of the area.
- Republic, region (territory, autonomous district).
- The name of the country.
- Index.
How to fill in information about the recipient?
All information about the recipient is filled in in the lower right corner. All data is filled in in the same sequence:
- Last name, first name and patronymic in the dative case.
- Recipient's address: street, house, apartment, locality, district, region, republic (territory, autonomous district), state, zip code.
If the exact address of the recipient is unknown, then instead you need to write “poste restante”.
The recipient's index is filled in in the lower left corner. Use a standardized form for writing a code stamp, a sample of which is usually found on each envelope. If necessary, check the addressee's index in the classifier on the Russian Post website. Correctly filling out the code stamp will speed up the delivery time of correspondence.
How to issue a 1st class envelope?
1st class correspondence is always sent first, thanks to the reduced delivery times. The price of such correspondence is slightly higher than that set for sending registered letters.
A distinctive feature of the 1st class package is the yellow stripe located in the middle of the form. The 1st class envelope is filled out using the same template as the simple form. All information about the sender and addressee is prepared in the same order as in a regular envelope sent within Russia.
How to design a registered letter envelope?
Registration of a registered letter with notification occurs in the same way as simple correspondence. The only difference is filling out a special notification form, which indicates information about the sender (on the one hand) and the recipient (on the other).
When accepting registered mail, the operator is obliged to issue a check to the sender with a displayed track number, which can be used to track the shipment. When delivering a registered package to the addressee, the courier must ensure that the recipient’s signature appears next to the recipient’s details. The sheet with the recipient's signature is returned to the sender to confirm the delivery of the correspondence to its destination.
Registration of international shipments
To issue an envelope within Ukraine, you need to fill it out in the same way as a simple form for correspondence within the territory of Russia. All entries are made in Ukrainian with the obligatory repetition of the country in Russian.
How to design an envelope for a letter abroad?
When sending correspondence to Belarus, Ukraine and other neighboring countries, no questions should arise. The rules for completing the forms are identical, and entries can be made in Russian. But for processing international postal items from Russia, the following rules exist:
- The address is filled in Latin letters and Arabic numerals.
- The sender's Russian address is completely repeated in the same sequence as for the Russian addressee without any rearrangements or translations. The names of streets, regions and districts are not translated. They are simply written in Latin letters. The only recommended translation is the translation of the city name, for example, Moscow, not Moskva.
- The recipient's foreign address must also be entered in Latin letters and Arabic numerals. It is allowed to write the recipient's address in the language of the destination country, provided that the name of the state is duplicated in Russian.
Popular articles Sewing toy sheep in love socks
If we consider the general scheme for an English recipient, it looks like this:
- Name (name of the recipient).
- House number.
- Street.
- Apartment (office) number.
- City.
- Index.
- A country.
For example:
From whom: from Petrov Ivan Mikhailovich
From: st. Pobeda 12 apt. 213 Moscow Russia, 112113, Moscow Russia
To: Spencer Alessandro
Where: 5 Green Avenue, Apt. 3 Ann Arbor 48104 USA, USA
Wicker paper heart
You will need: A4 sheets of two colors, a ruler and scissors.
Master Class
- Fold each sheet of paper in half.
- Turn them over and fold them again.
- Cut into 4 strips 15 cm long.
- Trim the edges of the workpieces so that they become semicircular.
- Make cuts from the fold line to the rounded edge to create a heart.
- Thread strips of paper alternating colors.
The woven paper heart is ready! I recommend watching the video tutorial!
VOLUME PAPER HEART\ VALENTINE
Volumetric 3D heart
You will need: colored paper or cardboard, a template, scissors and glue.
Master Class
- Print the template or redraw it.
- Trim the excess cardboard along the outside lines.
- Fold in the inner lines.
- Assemble step by step as shown in the picture.
- Tape the edges.
Volumetric 3D heart is ready! It can become an original gift box. I recommend watching the detailed video lesson!
DIY voluminous paper heart
The heart is a symbol of love, by making it with our own hands we once again remind our neighbor of our feelings, we give a piece of ourselves and our creativity!
Guide to making original envelopes
Above you learned how to make simple types of envelopes - square and triangular. What should you do, for example, if you have some kind of celebration planned, you want to stand out and present a gift or money in a beautiful package? You can try to learn how to make gift envelopes with your own hands. Surely no one will have such a gift!
Heart envelope
You will be surprised, but this envelope is also easy and simple to make, you don’t even need glue, the main thing is to smooth the folds well.
And when you unbend the envelope, you get a heart. We cut out an even and symmetrical heart-shaped figure from paper according to the template we made. This is an important part in the manufacture of this envelope.
We unfold the cut out heart with the front side facing the work surface. We bend the sides symmetrically into the inside of the future envelope. We bend the bottom and top parts and form an envelope. The letter package is ready.
It is better to make it from thick paper or cardboard. Preferably with a beautiful bright color. You can put something inside the envelope or write a congratulatory text with your wishes.
Disc sleeve
How to store discs so that they remain intact and do not get scratched? You can make an envelope for them.
For the base we take cardboard or thick paper. Typically, the dimensions of a CD sleeve are 140x140 mm.
We cut out a workpiece measuring 140x280 mm. If it is thick cardboard, then we will use a stationery knife. To do this, we divide the finished sheet in half to determine the fold line, take a non-writing pen and draw it along the ruler, so the fold will be even. We have prepared the groundwork.
We cut out the corners for inserting the disk according to the template and glue them to the inside of our base.
All that remains is to decorate the envelope to your liking. You can use ribbons, a figured hole punch, stickers, etc. The envelope is ready.
Envelope with rounded edges
Suitable, for example, for packaging jewelry.
Prepare a square of cardboard, bend the sides so that a square is formed in the middle. Using scissors, cut out the excess, rounding each side, forming separate labels, without reaching the folds. We collect all the labels towards the center.
The envelope can be tied with lace or jute rope, and complemented with appliqué.