Common types of shawls
A typical shawl is a cape over the shoulders. Depending on the season and purpose, the appearance of the accessory may change. The following types of products are popular:
- Summer cape. A lightweight item of any typical shape. Helps keep you slightly warm during the warm season.
- Cape. A small round cape. Used for insulation in combination with formal outfits.
- Bactus. A triangular shaped thing. Designed to be used instead of a classic scarf.
- Handkerchief. Square shape option. When used, it is usually folded in half into a triangle.
- Stole. Scarf with increased dimensions. The item is made longer and wider.
Sometimes a shawl is even called a poncho. The product envelops the entire body of the body, covering not only the shoulders, but also the back, chest, stomach, and arms.
Preparing for work
Before starting the fascinating process of knitting, be sure to determine the model of the product. The next stage will be the selection of tools and materials. Each preparation step has some nuances.
Selecting a product type
After looking at the photo of knitting a shawl, it becomes clear that different products will be made. Simple bacti are popular among beginners.
Experienced craftswomen knit openwork shawls. Attention is paid to the size of the proposed product, design, and complexity of execution.
Simple option
For such a shawl we need threads 60% acrylic and 40% wool, 480 meters per 100 g. The yarn should be thin. Crochet number 2. If the yarn is thicker, then take a thicker hook. The thickness of the hook should correspond to the thickness of the thread.
The creation scheme is given in detail below. Let's start knitting a shawl from the very beginning. To do this, we wrap the working thread around our fingers and form a ring, making the main loop. We knit a chain of 5 chain loops (v.p.). Next we make a yarn over, you need to insert a hook in 5 ch. loop from the hook, we knit a double crochet into it, as in the photo.
Turn the knitting over and perform 5 chain stitches again.
The first 3 air. loops are replaced by dc (double crochet). We make a yarn over, then you need to insert the hook into the 3rd loop of the 5 chain loops that we knitted before turning over.
We take out the thread and knit a dc. Then we make 2 air loops. You need to make a yarn over, insert the hook into the same third loop where you just knitted a double crochet. And now we will knit a dc into the same loop.
Turn over and perform 5 chain stitches again. You need to make a yarn over and insert the hook into the first single crochet stitch.
Pull out the working thread and knit a dc.
Now we make 2 chain loops, again you need to make a yarn over, insert the hook into the next stitch with one crochet, and knit a dc there.
Now we perform 2 chain loops again, yarn over again and you need to insert the hook into the 3rd chain loop of the previous five chain loops. Having pulled out the thread, we knit a dc there.
Here we knitted 3 rows, in the first row there is 1 square, in the second there are 2 squares, in the third row there are 3 squares. At the beginning of each row we will perform 5 chain stitches.
Turn the knitting over and make 5 chain stitches. Again we need a double crochet, we find a double crochet and, stretching the thread, we knit a dc there.
Now again 2 chain loops, yarn over again and insert into the next double crochet stitch, knitting a dc. Again 2 air loops, yarn over again, insert the hook into the third loop from the chain loops of the previous row. And we knit a dc. We get 4 cells.
Turn the knitting over. We make 5 air loops. Yarn over Hook the first stitch and knit a dc. Next, we knit one double crochet over each double crochet, then 2 chain stitches and again a double crochet. And so on, we get 5 cells.
This way you only need to knit 10 rows.
We have our first finished triangle. Now let's start knitting the second triangle. To do this, turn the knitting over and perform 5 chain stitches again. We make a yarn over, insert the hook into the first double crochet and knit one double crochet. We have 1 cell again.
Related article: DIY “Sorceress” costume
Turn it over. Make 5 ch, make a yarn over, insert a yarn over into the 3rd loop of 5 loops. And we do a double crochet. We perform 2 ch. and in the same third loop we knit a double crochet again.
We have 2 cells. Turn over and knit the 3rd row. We make 5 ch. Yarn over and knit in the first double crochet and knit 1 double crochet. Now 2 ch. and a column, again 2 vp. and again 1 double crochet in 3 loops of 5 air loops. This is how it should turn out:
Now we will knit an openwork pattern. Without turning the knitting over, cast on 7 vp. Let's move on to the first triangle.
We insert the hook into the third cell of the first triangle and make a connecting column.
Turn the knitting over and make 1 ch. rise and over a chain of 7 ch, you need to knit 11 RLS (single crochet).
Next, insert the hook into the next first double crochet and knit 1 single crochet. And then we make 4 ch, make a double crochet and knit 1 double crochet into the next double crochet.
We returned to knitting the second triangle. We make 2 ch. and above the next column we knit a dc, again 2.ch. and in the 3rd loop of 5 ch. we knit a dc.
Now we need to make an addition. Without turning over, make 2 ch. and in the same loop that we knitted in the previous double crochet, we perform 1 more double crochet. We get 4 cells.
Now we turn the work over and make 5 ch. And in the first column we knit 1 double crochet. Now 2 ch. and again a double crochet, again a double crochet. p. and knit a double crochet stitch, 2 ch. and a double crochet stitch. Again ch 2, insert a hook into the 3rd loop and knit a double crochet. We get 5 cells.
Without turning the work over, we perform a chain of 8 ch. We are looking for the 6th single crochet, as shown in the photo:
Insert a hook into the 6th stitch and knit a single crochet there. And again we perform a chain of 8 vp.
Once knitted, we count 3 cells and after three cells in the first column we knit a connecting column.
Turn the knitting over and perform 1 ch, knitting 9 sc (single crochet) above the chain.
We go straight to the next chain of chain stitches, above it you need to knit 5 sc.
Now we turn the knitting over and make 6 ch. Where there were 9 single crochets, we find the 5th stitch and knit a single crochet there.
Turn it over and take the discount card. We put it in a ponytail, as in the photo below. Pull the loop to fit the card.
We need to insert the hook under the chain, grab the thread, pull the thread forward, grab the thread again and pull it through the loop that is on our hook. We pulled it out and put a loop on our card.
Related article: DIY heart box with paper candies
Again you need to insert the hook under the chain, grab the thread and pull it out, grab it again and pull it through the loop and pull it out to the desired length and put it on the card.
So we will make only 20 loops. That is, there will be 20 long loops on the card.
Now we must continue knitting. Insert the hook into the last base of the loop on the card.
Now we insert the hook under the arch from the ch, pull out the working thread and pass it through 2 loops, we get a single crochet.
After knitting, carefully remove all the loops from the card.
At the bottom of these long loops we first knitted 9 single crochets, and then knitted 5 single crochets.
Now in the next arch after the long loops, where one single crochet has already been knitted, you need to knit 3 more stitches. In total we got 4 columns.
We knit row 6. Now we single crochet the next stitch of the previous row, then we knit 4 ch in the same place. Usually we knitted 5 air loops, but now one loop has been replaced by the first single crochet. Yarn over, insert the hook into the next stitch and, stretching the thread, knit a dc. 2 v.p. and above the next column we knit a DC again. 2.ch. and again a single crochet stitch. 2 v.p. and again the column CCH. 2.ch and insert the hook into the 3rd loop of five and knit a dc, again 2.ch. and dc in the same place in the third loop.
We ended up with another triangle, knitted after the loops were pulled out and removed from the card. On top we have 6 cells in the sixth row.
We knit row 7. Next, we will turn the work over and again dial 5 vp. CCH in the first column of the previous one. Row, 2 ch. again dc, ch 2 + dc, ch 2. + Dc, 2 ch. + Dc, 2 ch. + DC, ch 2 + DC in the 3rd loop of five loops and DC again.
We knit the 8th row in the same way as the 6th row and the 9th row as we knitted the 7th row. We get 9 rows and 9 cells.
Without turning over the work. We make 2 ch. Now we have reached the long previously knitted loops.
We take one long loop and insert our hook under the loop.
We grab the working thread, pulling it through the loop, we get 2 loops on the hook. Grabbing the thread again, we knit a regular sc.
Now we do 2 ch again. take the next long loop and, like the first time, knit a single crochet, again 2 ch. and again a column, and so on until the end of the long loops, we had 20 of them.
This is how beautiful it turns out:
After knitting the last long loop, make 2 ch. and insert the hook into the last arch of the triangle, into the 3rd loop out of 5, as in the photo:
Article on the topic: Magazine “Irene” No. 4 2019
We received the first big “fan”. Now we turn the knitting over again and make 3 ch. Next we will knit over the long loops that we just finished knitting.
So, skip the first 2 loops and insert a hook, as in the photo. We knit a sc here:
3 v.p. again skip 2 long loops and knit sc. And so we knit until the end of the long loops.
This is how it turns out at the end of knitting.
Last time we dial 3 v.p. and knit, as in the photo, in the first double crochet of the previous row. So we finished knitting over the fan.
We got 20 arches, the ones we just knitted. Now we turn the work over and do 3 ch. Insert the hook under the second arch and knit RLS.
Again 3 ch and above the next chain we knit a sc. And so on at the end of the fan we knit 3 chain stitches + sc. The last sc is finished above the arch of the previous row. We got 19 such arches in this row.
Now let's turn the work around. We will knit over the arches of the previous row. Again over the fan. And do 1 ch. rise. We knit 1 sc, then 3 ch. and above the same arch, sc, 3 ch + sc and again 3 ch. + RLS. It turns out that 3 arches of 3 ch each were knitted above the first arch. and we got 4 single crochets made above the arch. Now let's move on to the second arch. We will tie only RLS into this arch and move on to the next arch. We knit into the third arch in the same way as the first arch. We make a single crochet, ch 3 + sc, ch 3 + sc, ch 3 + sc. And the next time just 1 sc. This is how we alternate.
We continue knitting until the end of the fan.
Now we must connect our arches with the triangles; to do this, we will make a single crochet into the first double crochet of the triangle.
Next we start knitting the triangles again using fillet stitch. We immediately make 4 ch. and dc, knit to the end of the row * 2 ch + dc * at the end of the row in 3 loops of 5, first knit one dc, then in the same loop we knit another dc after 2 ch. It was row 10. And it turned out to be 10 cells.
Yarn selection
It is better for beginners to hone their experience on yarn of medium thickness. In this case, it is better to take options of light shades for work. Threads with a mixed composition fit well into the product: natural fibers with synthetics.
We recommend reading:
Knitting bactus with knitting needles - detailed description with photos and diagrams. Step-by-step instructions and recommendations from craftswomen. TOP 30 best modelsKnitting socks with knitting needles - step-by-step master class with instructions. A selection of the best knitted socks models
Garter Stitch Knitting - 140 photos and videos of basic garter stitch patterns and projects
Experienced craftswomen can take on “cobwebs” made from the finest threads. It is difficult to work with silk, weightless or fluffy fluff.
Ribbon set
To create a straight edge on a shawl, the cast-on stitches are made in a special way called a ribbon cast-on edge. Watch the mini master class of this set.
Take an auxiliary thread suitable in thickness to the knitting yarn. It is better if it is brighter in color than the main one. Make a set of three crochet stitches.
Using the main working thread, knit three loops as follows: slip the first one, knit the remaining two. Thus make 14 rows.
Turn the work, cast on seven more loops from the extended edge of the resulting strip.
Remove the auxiliary thread and pick up the loose stitches on a knitting needle. As a result, you will get 13 loops on the knitting needles. Mark the middle of the work with a pin or marker, i.e. the middle loop, and constantly knit the 3 initial and final loops with knit stitches (garter stitch), creating an edging of the product, the remaining loops form a pattern.
Related article: Asymmetrical cardigan with knitting needles: step-by-step master class with patterns
Preparing tools
The choice of tool depends on the yarn. It is important to take into account the manufacturer's recommendations. The thinner the thread, the smaller the number of hooks to work with.
It is easier for beginners to manipulate a tool of medium thickness. It is better to refuse options marked less than 1 at the beginning of your creative journey.
Let's move on to the description
The first three and last three stitches of the row are always knitted. The middle loop is marked with a pin/marker. We perform: yarn overs - purl, loops - according to the picture - in even rows.
Knit 3 edge stitches, then, according to the first pattern between arrows number one and two, the middle loop (designated in the diagram as a black circle), and again knit the pattern, as in the pattern in mirror image between arrows numbered one and two. Repeat according to the pattern - 20 rows again.
Knit the twenty-first row in a mirror image, knit the “arrow” icon: at the beginning, as with knitting, remove one loop, two knit stitches together and pull it through the removed loop:
The second time, inserting the knitting needle from below, knit 3 stitches together:
You will get symmetrical decreases. Also decrease in the twenty-seventh row. The first openwork leaves will come out.
Then each row: edge, between arrows 1 and 2 - 1 time, between arrows 2 and 3 (rapport) repeat 2 times, between arrows 3 and 4 - 1 time, middle loop, and in reverse order - between arrows 4 and 3 - 1 time, between arrows 3 and 2 repeat 2 times, between arrows 2 and 1 - 1 time, edge.
In order not to count the stitches, you can follow the knitting pattern. Make double decreases for the right and left halves of the shawl (35th, 41st, 49th, 55th rows).
The second pattern must be knitted twice during the process. When knitting the pattern for the second time, repeat the report between arrows 2 and 3 4 times. After completing the third scheme, dots should “grow” between the leaves.
Repeat the rapport between arrows 2 and 3 of the fourth diagram seven times. The result is a nice border:
Close the loops in the following way. At the top of the fourth diagram there are printed signs in the form of arches with numbers indicating the number of loops that need to be picked up with a hook. At the beginning and end of the row, you need to knit 3 (not 2) edge loops together.
Related article: Sabrina Magazine number 1 - 2019
Throw the required number of loops onto the hook:
Pull the thread through these loops, you will get 2 loops on the hook:
Pull the thread through them (a single crochet will come out) and knit 7-8 chain stitches.
Repeat these steps until the row is completed, fasten and break the thread, leaving a length of about ten cm.
Running a sample
The selected yarn, hook, and pattern must be tested. It is recommended to make a sample measuring 10 cm in width and height.
The test copy must be washed and dried. After completing these steps, we begin to calculate the loops for the main product.
We recommend reading:
- How to knit a turban with knitting needles - 115 photos and videos of ideas, patterns and features of knitting a turban
Knitting bags - 155 photos and videos on how to quickly knit a stylish bag with descriptions and diagrams
Knitting a jacket: 125 photos and video description of knitting with patterns for beginners and masters
Threads for fillet knitting
The undisputed leader for loin knitting napkins, tablecloths, curtains, summer tops and tunics is Iris yarn. This is an ecological cotton thread that perfectly holds the shape of the finished product. In addition, knitting a fillet from it is easy and pleasant.
Today you can order 100% Ukrainian Yaroslav cotton on the Internet. In a ball of 50 g, the length of the thread is 350 m. Ideal for knitting loin masterpieces.
If you plan to make a shawl, stole, skirt or dress with fillet, then the following threads are suitable for this purpose:
- "Pearl";
- "Alize";
- children's cotton “New”;
- "Trinity Pekhorka";
- "Bonbon Festival";
- Chinese eco threads;
- "Kudelnitsa."
Read
Crochet Doll Stesha: patterns and description of knitting
Order the yarn you need in the online store. On the Internet, many bloggers post reviews in video format on threads that are used for fillet knitting. We offer one of them:
Knitting patterns for beginners
There are different patterns for knitting a shawl. Beginners are advised to choose those options that contain monotonously repeating motifs.
In this case, it is not necessary to knit in separate blocks, subsequently assembling the product piece by piece. There are similar schemes for continuous webs.
The best patterns with a description of loin knitting
Openwork motifs rarely decorate men's clothing. But they are an ideal option for romantic women's and children's clothes. It is worth considering detailed patterns for fillet crochet patterns.
Summer sweaters
You need to start crocheting a summer sweater according to the fillet pattern with a set of loops. Their number must be divisible by 12, + 1 auxiliary (edge). A simple motif in the finished work will look like circles arranged in a checkerboard pattern.
To knit a blouse using this pattern, you need to follow a simple algorithm (one repeat for 12 loops is described):
- 4th century p., s. s n. in the 6th century P.; 1st century p.s. from N., 1st century. paragraph 7 p. from N., 1st century. p., s. s n. Row 7 s ends. s n.
- 3rd century p., 5 s. with n., 3 empty cells (with n. knit under air loops so that the mesh is offset), 7 with. s n. Alternate until the end of the row and finish it with 3 empty squares + s. s n.
- 3rd century p., 2 p. s n. Row 4 s ends. s n.
- 3rd century p., 1st century p., 1 p. from N., 1st century. p, 7 s. with n., 3 empty cells. The row must end with an empty cell.
- 3rd century p., 7 p. with n., 3 empty cells. Alternate until the end. The row ends with two empty cells + 1 s. s n. into the last stitch of the previous row.
- 3 empty cells, 7 s. s n. Finish row 7 s. s n.
Further crocheting of the sweater is carried out by repeating steps 1-6 until the desired size of the fabric is achieved.
A similar pattern can be used for a top, shawl, jacket, blouse and other clothes.
Even more master classes on fillet crochet for elegant summer blouses.
Cardigans
This beautiful knitted cardigan consists of geometric motifs: alternating squares.
According to this pattern for crocheting a sirloin mesh pattern, the number of cast-on stitches should be divisible by 12 + 1 additional. The order of the rows:
- 4th century p., 1 p. s n. in the 6th century. p., 1st century p., s. from N., 1st century. p., 7 p. from N., 1st century. p., s. s n. Alternate to the end of the row and finish it with 7 s. s n.
- 3rd century p., 5 s. s.n., 3 empty cells (s.s.n. knit not in s.s.n. of the previous row, but under the air loop, that is, the mesh is shifted), 7 s. s n. and so on. Finish the row with 3 empty cells + s. s n.
- 3rd century p., 2 p. with n., then according to the picture. Cast off row 4 s. s n.
- 3rd century lift point, 1st century p., s. from N., 1st century. p., 7 p. s n., 3 empty cells, etc. The row must end with an empty cell.
- 3rd century p., 7 p. with n., 3 empty cells. Finish the row with 2 empty cells + 1 s. s n. into the last lifting loop of the previous row.
- 3 empty cells, 7 s. s n. etc. Close row 7 s. s n.
Read
Master class for beginners: crochet dress for Barbie doll
The pattern is repeated until the product reaches the desired length.
Tunics
Stylish beach tunic for women with geometric patterns. The product must be knitted crosswise, each part (back and front) separately.
Step-by-step description of the crochet pattern for the loin knitting pattern:
- Cast on 144 air loops (this will be 6 parts of the ornament) + 3 in. P.
- First row - p. without n.
- Second row – 48 sec. from 3 n., 36 p. from 2 n., 36 p. from 1 n., 24 half-columns.
- For the sleeve armhole in the second row, dial 48 in. p. and on them in the next row do s. without n., on the remaining columns of the previous row, knit half-columns.
- Make 9 r. u. 1 and 2 r. u. 2, in the 3rd r. For the neckline, leave 18 seconds unknitted. without n., knit 9 r. u. 1 and 2 r. u. 2. In the second row for the cut, leave without knitting for 30 seconds. without n., again 9 rubles. u. 1, in the first row add new 30 in. P.
- For the neckline, dial 18 new stitches. p., 3 r. pattern 2 and 9 r. pattern 1, 3 r. pattern 2. In the second row for the second armhole, leave the sleeves on the left side undone for 48 seconds. without n., 9 rub. pattern 1, 3 r. pattern 2. In the second row, cast on 48 new sts. p. Knit pattern 1 9 times and pattern 2 3 times.
- Repeat alternating patterns until the desired width.
After preparing all the parts, assemble the product. You can knit a tunic in the form of a sleeveless vest or turn it into an option for a cool summer evening by adding sleeves knitted in the same pattern.
Dresses
Loin knitting patterns for a dress or sundress for the summer are easy to find on the Internet. There are many options on pinterest.com, kryuchkom.ru and other resources.
Dresses can have both small repeating patterns and one large one. Floral motifs (lilies, roses, bunches and leaves of grapes, etc.) are popular, allowing you to create a boho-style outfit.
Pattern "Pineapples"
The most common, simple, and quite attractive pattern is considered to be a pattern of cones or pineapples formed by chains of air loops.
For beginners, it is better to start from a corner. The working surface is gradually expanded. The best thing: choose a ready-made scheme.
The bumps can be located one after another, on a grid or other background. If you have experience, you can dream up the pattern yourself.
Let's try to make a stylish openwork shawl with a "Fan" pattern
To knit a shawl you will need:
- Yarn – 150g;
- Hook - No. 2.
In this example, the size of the shawl is 124 by 65 cm.
You should knit with a density of 26 loops and 16 rows in a square of 10 by 10 cm.
Knitting needs to start from the top edge. It is necessary to cast on a chain of 321 air loops, that is, 26 repeats of 12 loops plus 9 loops in order for the pattern to be symmetrical. Next we knit 101 rows according to the pattern. In this case, it is necessary to reduce the width of the shawl on both sides.
The shawl should be tied with a separate thread. You should start doing this from the top side. And then perform a circular row with picot.
Another interesting version of the shawl, which can be found very often on the pages of magazines.
For knitting you will need:
- Hook - No. 3.75;
- Yarn – 400 g.
The final size of this shawl will be 142 by 53 cm.
We knit a shawl with a density of one repeat horizontally, that is, 6 cm and 6 rows.
You need to start knitting a shawl by casting on 124 chain stitches, that is, 7 repeats of 16 loops each plus 12 loops so that the pattern is symmetrical. Next we knit 151 rows, as shown in the figure. Rows two through seven must be repeated. When the 7th row is knitted, knitting should be stopped.
It is better to tie a shawl in two circular rows. In the first row, arches of five chain stitches are tied; in the second row, on the arches it is necessary to alternate single crochets and fans of two single crochets, three double crochets and picots, and two more single crochets.
Shawl with fillet pattern
The good thing about the fillet knitting method is that it does not require high skill. You will only have to be able to perform air loops and single crochets.
They act according to the scheme of the selected pattern. You can use any picture developed for this technique as a basis.
The pattern is knitted against a background of fillet mesh. Work on the shawl begins from the bottom corner of the product. For beginners, it is better to use ready-made diagrams of such things.
Medium complexity openwork shawl with knitting pattern
To knit a thin, openwork work of art you will need a considerable amount of time, three skeins of snow-white yarn, as well as hooks No. 3 or No. 5. This shawl will use such patterns as: a chain of air loops, connecting stitches, single crochets and double crochets. Follow our scheme strictly and you will definitely succeed.
- First we need to make individual elements that will decorate our future shawl. Knit several dozen small decorative flowers, maybe not white, but another color of your choice.
- To start knitting a shawl correctly, you should start with a chain pattern of air loops, and make the same chain 1A in the center. On the left side, dial chains 1B and 2B, and on the opposite side of the center, two identical chains B, but dialed in a mirror image.
- Each cast-on tape should have 16 loops. Initially, make tape 1A, then 2A, as indicated in the diagram, connecting 2A with the above arches using a connecting post.
- We decorate the arches themselves with our flowers knitted earlier.
- Next, we make a new openwork ribbon for 1B and stick it to the outside. Then we work on tape 2B and attach it in the same way as 1B.
- Then we follow the intended pattern, knitting 2 more ribbons, exactly the same as 1B and 2B, but located on the right side of the center with flowers.
- We knit our shawl to the end using this method and at the bottom we connect two short parts with a chain from a set of five chain stitches.
- Then we cast on another row of arches, then one single crochet, 7 chain stitches, 1 single crochet in every 2 stitches. We continue this process until the very end. We finish the work with one row of single crochet.
Don't miss: How to sew a bonbon blanket with your own hands
Shawl with Spider pattern
A product with a pattern of “spiders” is considered a real classic. The number and arrangement of elements can easily be changed at will during the work process.
The pattern can be combined with plain knitting or other patterns. It is better for beginners to act strictly according to the ready-made scheme. Knitting begins from the middle of the wide edge.
Filet Crochet Patterns for Beginners
For beginners, it is better to look for patterns that describe patterns for fillet crochet. This will prevent confusion while working.
With experience, you can copy plain patterns for cross stitch or knitting needles, and also invent them yourself, putting them on paper, in an Excel or Word spreadsheet.
Read
Crochet frame amigurumi doll: master class
Animals
Kitty:
- 2 p., 4 z., 3 p., 7 z., 4 p.
- 5 p., 7 z., 1 p., 6 z., 1 p.
- 2 z., 2 p., 3 z., 1 p., 5 z., 7 p.
- 6 p., 9 z., 3 p., 2 z.
- 3 z., 3 p., 9 z., 5 p.
- 5 p., 8 z., 3 p., 3 z., 1 p.
- 2 p., 2 z., 3 p., 8 z., 5 p.
- 6 p., 7 z., 3 p., 2 z., 2 p.
- 2 p., 2 z., 4 p., 6 z., 6 p.
- 6 p., 6 z., 3 p., 2 z., 3 p.
- 3 p., 2 z., 3 p., 7 z., 5 p.
- 5 p., 7 z., 8 p.
- Repeat step 12 2 more times.
- 9 p., 6 z., 5 p.
- 4 p., 7 z., 9 p.
- 9 p., 8 z., 3 p.
- 2 p., 3 z., 3 p., 3 z., 9 p.
- 8 p., 5 z., 3 p., 3 z., 1 p.
- 3 z., 3 p., 7 z., 7 p.
- 7 p., 7 z., 4 p., 2 z.
- 8 p., 5 z., 7 p.
- 7 p., 2 z., 11 p.
The pattern looks interesting on children's blouses, although it can also be used in other ways.
Birds
Miniature bird:
- 5 p., 2 z., 4 p.
- 5 p., 3 z., 3 p., 1 z.
- 1 p., 6 z., 4 p.
- 3 p., 8 z.
- 1 p., 8 z., 2 p.
- 2 p., 7 z., 2 p.
- 3 p., 4 z., 2 p., 1 z., 1 p.
- 2 z., 1 p., 3 z., 5 p.
- 6 p., 3 z., 2 p.
These birds can be used to decorate the corners of Easter napkins, nose caps and other small items.
The pattern combines beautifully with flowers, buds, leaves and other plant patterns.
Flowers
Rose:
- 11 p., 2 z., 5 p., 2 z., p., 11 p.
- 8 p., 5 z., 3 p., 5 z., 9 p.
- 9 p., 6 z., 1 p., 6 z., 9 p.
- Repeat point 5.
- 5 p., 3 z., 1 p., 5 z., 1 p., 5 z., 1 p., 3 z., 5 p.
- 4 p., 8 z., 5 p., 8 z., 4 p.
- 4 p., 5 z., 2 p., 5 z., 2 p., 5 z., 4 p.
- 4 p., 5 z., 1 p., 9 z., 1 p., 5 z., 4 p.
- 4 p., 4 z., 1 p., 11 z., 1 p., 4 z., 4 p.
- 5 p., 3 z., 1 p., 11 z., 1 p., 3 z., 5 p.
- 8 p., 4 z., 1 p., 3 z., 1 p., 4 z., 8 p.
- 4 p., 3 z., 1 p., 4 z., 1 p., 3 z., 1 p., 4 z., 1 p., 3 z., 4 p.
- 3 p., 4 c., 1 p., 4 c., 2 p., 1 c., 2 p. 4 c., 1 p., 4 c., 3 p.
- 3 p., 4 z., 1 p., 4 z., 5 p., 4 z., 1 p., 4 z., 3 p.
- 3 p., 4 p., 1 p., 3 p., 1 p., 1 p., 3 p., 1 p., 1 p., 3 p., 1 p., 4 p., 3 p. .
- 4 p., 4 z., 1 p., 2 z., 1 p., 2 z., 1 p., 2 z., 1 p., 2 z., 1 p. 4 z., 4 p.
- 6 p., 2 z., 1 p., 2 z., 1 p., 5 z. 1 p., 2 z., 1 p., 2 z., 6 p.
- 5 p., 4 z., 1 p., 1 z., 1 p., 5 z., 1 p., 1 z., 1 p., 4 z., 5 p.
- 5 p., 5 z., 3 p., 3 z., 3 p., 5 z., 5 p.
- 6 p., 3 z., 2 p., 2 z., 3 p., 2 z., 2 p., 3 z., 6 p.
- 10 p., 9 z., 10 p.
- 10 p., 4 z., 1 p., 4 z., 10 p.
- 10 p., 3 z., 3 p., 3 z., 10 p.
In the overall picture, such flowers can alternate in a checkerboard pattern or in compliance with horizontal and vertical lines.
The pattern is suitable for napkins, decorating the edges of curtains and tablecloths.
Butterfly
When considering patterns and fillet crochet patterns, the butterfly pattern for beginners should also not be overlooked:
- 4 p., 3 z., 5 p., 3 z., 4 p.
- 3 p., 2 z., 1 p., 2 z., 1 p., 1 z., 1 p., 2 z., 1 p., 2 z., 3 p.
- 3 p., 1 z., 3 p., 1 z., 1 p., 1 z., 1 p., 1 z., 3 p., 1 z., 3 p.
- 3 p., 2 z., 2 p., 5 z., 2 p., 2 z., 3 p.
- 4 p., 2 z., 2 p., 3 z., 2 p., 2 z., 4 p.
- 5 p., 9 z., 5 p.
- 4 p., 2 z., 2 p., 3 z., 2 p., 2 z., 4 p.
- 3 p., 2 z., 2 p., 5 z., 2 p., 2 z., 3 p.
- 3 p., 1 z., 3 p., 1 z., 1 p., 1 z., 1 p., 1 z., 3 p., 1 z., 3 p.
- 2 p., 2 z., 2 p., 2 z., 3 p., 2 z., 2 p., 2 z., 2 p.
- 1 p., 2 z., 2 p., 2 z., 5 p., 2 z., 2 p., 2 z., 1 p.
- 2 p., 4 z., 7 p., 4 z., 2 p.
It is not difficult to make such a picture; the pattern is suitable for beginners.
Geometric patterns
Geometric motif:
- 6 z., 1 p., 1 z.
- 1 z., 1 p., 1 z., 5 p.
- 1 p., 3 z., 1 p., 1 z., 1 p., 1 z.
- 1 p., 1 z., 1 p., 1 z., 1 p., 1 z., 1 p., 1 z.
- 1 p., 1 z., 1 p., 3 z., 1 p., 1. z.
- 1 z., 5 p., 1 z., 1 p.
- 1 p., 7 z.
Read
Greek crochet patterns. Master class on crochet hats
The result should be a curl with right angles.
Learn about fillet crochet for beginners from A to Z from this article.
Patterns for experienced knitters
Possession of skill allows you to “swing” at a more complex model. There are different original DIY shawl ideas. The choice is limited only by the personal preferences of the experienced craftswoman.
Shawl “Golden Autumn”
Products made using the Irish lace technique look gorgeous. The method involves the development of motives of different formats. You can knit patterns of autumn leaves, flowers, fruits in autumn shades.
All parts are connected using mesh strapping. You can take winter or spring themes as a basis.
Cape "Peacock"
The luxurious pattern imitating peacock feathers looks original. The option is not considered difficult to perform, but requires care.
Before starting work, carefully study the diagram. You can additionally use lurex, beads, and colored yarn for decoration.
Shutdown
It’s not enough to simply complete the basic part of the shawl according to the pattern. The product must be tied along the edge. You can use simple posts or a patterned border. Blocking makes the item look complete.
Edge binding resists edge stretching. The finished item must be washed, dried, and, if necessary, steamed.
A knitted shawl is a great addition to any wardrobe. The product is used in combination with classic and modern clothing sets.
The greatest value belongs to the options created by hand. If the opportunity to make a product yourself exists, then you should not miss it.
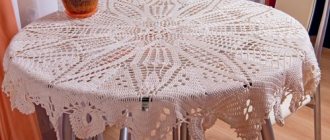
Crocheted white shawl
Dimensions: approx. 90 x 150 cm
Material: 350 g white polyacrylic yarn. (100% polyacrylic, thread length 170 m / 50 g); 1 hook No. 3
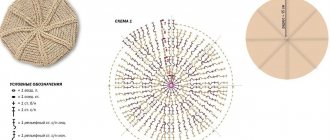
“Rosette” motif: cast on a chain of 8 air loops and enclose them in a ring with a connecting loop. Next, knit according to pattern 1, in the round. Each row begins with a chain stitch as indicated and ends with 1 connecting loop in 1 row. After the 2nd row, use a connecting loop to the beginning of the third row. Knit rows 1-3.
Connecting star: connect to the “socket” with 1 connecting loop (see Figures 1+2), and according to scheme 4, connect 4 motifs each.
Knitting density: rosette motif diameter = about 6 cm
Note: Dimensions taken from model.
Description of knitting
Knit 171 motifs and, starting from the 2nd, connect them together with single crochets in the places indicated by the arrows. The finished sides each consist of 18 motifs (including the border).
Assembly:
fill the gaps between the motifs with double crochets, guided by diagram 2 and figures 1-2. First align the top border of the shawl with chains of 10 chain stitches, then fill in the intermediate space.
Scheme
Crocheted white shawl video
Crocheted white shawl video tutorial
Up
Photos of crocheted shawls
Did you like the article?
0