Beautiful knitted beret made of thick yarn
This unusual headdress, knitted from thick yarn, is suitable for early spring or late autumn. Check out the detailed tutorial: our description will help you make such a hat, even if you have only recently mastered the crochet hook!
For MK we need:
- yarn (100% wool, 50 grams per 50 meters);
- hook number 8.
Knitting density: 9 s. from 3 n. = 10 cm.
At the beginning of each row, instead of s. from 1 n. do 1 in. p., instead of s. from 2 n. – 3rd century p., instead of s. from 3 n. – 4th century p.. At the end of each p. do 1 ss. in the 1st s..
Decrease = decrease 1 p. from 1 n. = knit 1 s. from 1 n., without pulling the thread through the st. (= 2 sts on the edge), knit with. from 1 n. and pull the thread through all 3 stitches to the edge..
Scheme
Description
We crochet 3 v.
p. and close them in a circle. 1 p.: 5 s. from 1 n. in a circle
2 p.: 2 s. from 2 n. in every s. from 1 n. = 10 s. from 2 n..
3 p.: 4 v. p. (= 1 s. with 3 n.) + 1 v. p. + 1 s. from 3 n. in the 1st s. from 2 n., 5 c. p., *skip 1 s. with 2 n., 1 s. from 3 n. + 1 c. p. + 1 s. from 3 n. in the next With. from 2 n., 5 c. p.*, from * to *, at the end of the p. skip the last one With. with 2 n., 1 connecting p/s in the 4th century. P..
4 p.: 1 connecting p/s in the 1st chain of 1 v. p., in all chains from c. p. previous R. knit 6 s. from 3 n. (= 1 shell) and in all chains of 5 c. p. previous R. do 1 s. from 1 n. – link this one with. from 1 n. also through s. from 2 n. 2nd r.*, at the end of the r. 1 connecting p/s in the 4th century. n. = 5 groups s. from 3 n. (= 5 shells).
5 p.: 4 v. p. (= 1 s. with 3 n.), * 7 v. p., prop. shell, 1 p. from 3 n. + 1 c. p. + 1 s. from 3 n. + 1 c. p. + 1 s. from 3 n. in the village from 1 n. between 2 shells*, from * to*, 7th century. p., 1 p. from 3 n. + 1 c. p. + 1 s. from 3 n. +, 1 c. p. in the last s. from 1 n. and 1 connecting p/s in the 4th century. n. from the beginning of the r..
6 p.: 1 connecting p/s in the 1st chain from v. p., *1 p. from 1 n. in a chain of 7 c. n. - knit this s. from 1 n. also between the villages from 3 n. shells 4th r. – 6 s. from 3 n. in the 1st chain c. p., 1 p. from 1 n. in the middle of 3 s. from 3 n., 6 s. from 3 n. in the 2nd chain from 1st century. p.*, from * to *, 1 connecting p/s in the 1st s. from 1 n. from the beginning of the river..
7 p.: 9 c. p., *prop. shell, 1 p. from 3 n. + 1 c. p. + 1 s. from 3 n. in the village from 1 n. between 2 shells, 5th century. p.*, from * to *, 1 p. from 3 n. + 1 c. p. in the last s. from 1 n. and 1 connection p/s in the 4th century. n. from the beginning of the r..
8 rubles: conn. p/s to the 1st chain from v. etc., in all circuits from 5 V. p. knit 1 s. from 1 n. in the middle of the loop - this s. from 1 n. another through the loop of circle 6, and into all chains from 1 in. p. knit 6 s. from 3 n. and at the end of the row 1 connection. p/s in the 1st s. from 1 n. from the beginning of the river (= shells).
9 p.: 10 v. p., *prop. shell, 1 p. from 3 n. + 1 c. p. + 1 s. from 3 n. in the village from 1 n. between 2 shells, 6 c. p.*, repeat from * to *, 1 s. from 3 n. +, 1 c. p. in last With. from 1 n. and 1 connection p/s in the 4th century. n. from the beginning of the r..
10 rubles: conn. p/s in v. n. In all circuits from 6 v. p. knit 1 s. from 1 n. – this s. from 1 n. also between the villages from 3 n. in a shell 8th r. - and in all circuits from 1 century. p. – 6 s. from 3 n., at the end of the river. 1 connection p/s in the 1st s. from 1 n. from the beginning of the river..
11 p.: 1 p. from 1 n. in every s. from 3 n. previous p. = 60 s. from 1 n..
12: *1 s. from 1 n. in each of the first 3 s. from 1 n., 2 s. from 1 n. vm.*, repeat from * to * = 48 s. from 1 n..
13:1 p. from 1 n. in every s. from 1 n..
14: *1 s. from 1 n. in each of the first 2 s. from 1 n., 2 s. from 1 n. vm.*, from * to * = 36 s. from 1 n..
15-17 pp.: 1 p. from 1 n. in every s. from 1 n., cut off the thread.
Crochet beret for autumn for women - diagrams and description
Autumn berets should not be airy, like lace, because their task is to warm. Such a product needs to be made from thick threads, but it is not necessary to use wool and, especially, down yarn, because these are options for winter. For September and early October, you should choose acrylic yarn.
Crocheted berets - options in pictures
Look at the pictures to see what crocheted berets look like. Openwork knitting is used for summer items, and for winter items it is more dense.
Knitting patterns
Crochet products are sometimes easier to understand if you see a diagram in front of you rather than a row-by-row description. After all, most of the work is knitted in a spiral, so it is not always possible to understand where the row ends and the next one begins.
Knitting patterns for an autumn beret
Knitting patterns for a woman's beret for autumn
Knitting patterns for a woman's beret
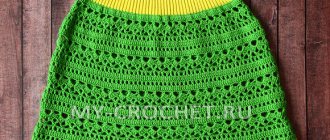
Delicate openwork beret for the summer
The universal beret from this MK will suit everyone: both young girls and older women, and the correctly selected color of yarn and scarf will create a full-fledged romantic look.
For MK hats we will need:
- yarn (100% wool, thread length – 100 m per 50 g) 2 skeins;
- cr. No. 4.
An openwork beret is suitable for a head circumference of 56-58 cm.
Knitting density: 17 s. without n. = 10 cm.
Important! Replace the 1st s. without n. in kr. R. at 1 in. p., we finish the cr. R. 1 ss. to the beginning of p.. 1st p. s n. replace with 3 v. p.p., we finish the cr. R. 1 ss. in the 3rd century. p.p..
We knit an openwork pattern following the pattern
Rachy step: p. without n. in the opposite direction, from left to right.
Knitting pp. from the village s n. and arches from the. p.: turn the work inside out towards you, 4 in. p. (= 1 s. with n. + 1 v. p.), skip 1 v. p. (last v. p. of the previous p.), * 1 p. s n. into the space under the next c. p., 1st century P.*. from * to *, ending p. 1 p. s n. to the last arch from the. p. (corresponds to 4 v. p. of the previous row), 1 ss. in an arch of 4 c. n. at the beginning p..
Description
The openwork beret is knitted from the crown down in circular rows.
1st p.: dial 4 v. p. and close them into a ring using ss. in the 1st century. P.; then 8 s. without n. into the ring (don’t forget to dial 1 v. p. p., as recommended above).
2 p.: 2 s. without n. in every s. without n. to the end of the river = 16 s. without n..
3 p.: *1 p. without n. in the 1st s. without n., 2 p. without n. next With. without n.*, from * to * = 24 s. without n..
4 p.: *1 p. without n. in each of the tracks. 2 s. without n., 2 p. without n. next s.*, from * to * = 32 s. without n..
Next we knit according to the pattern (4 repeats of the pattern in each cr. r.). After knitting all the rows of the pattern, we will get 32 arches from c. P..
We continue to knit the openwork beret in circular stitches. description of which is below:
1 p.: 4 s. s n. in each arch from the n. = 128 s. with n..
2 p.: 1 s. s n. in each from the village s n., at the same time evenly decrease 2 s. s n. = 126 s. with n..
3 p.: 1 s. from n., each 13 and 14 s. s n. knit together = 117 s. with n..
4 rubles: 1 s. s n. in each With. with n., at the same time we knit each one together. 12 and 13 s. s n. = 108 s. with n..
5 rubles: 1 s. s n. from the village s n., with each 11 and 12 s. s n. knit together = 99 s. with n..
Row 6: 1 dc in each stitch, with the 11th and 12th stitches knitted together = 88 dc.
7-10 pp.: 1 s. s n. no reductions.
11 p.: We tie the edge with a double thread in a crawfish step.
Unusual knitting of a beret with embossed stitches
Such a warm winter hat will not only complement your look, but will also prevent you from freezing in the cold! We recommend using threads containing mohair, which will make the beret softer, airier and warmer.
For MK hats we will need:
- yarn (70% viscose, 20% mohair, 10% polyamide, 190 meters per 50 grams), 3-4 skeins;
- cr. No. 3.
The finished beret with embossed columns is suitable for a head circumference of 56-57 cm.
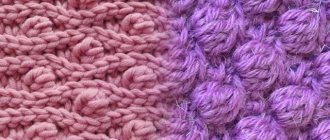
Relief columns can be called patterns of two types: convex and concave.
Using embossed stitches you can knit a fabric similar to a 1 x 1 rib knitted with knitting needles.
When knitting a convex s. cr. enter for s. previous r., i.e. around the leg s. as shown by the arrow in Fig. 1. At the same time, p. s n. should be on top of the edge.. Grab the working thread, pull out the loop, knit with. in the usual way.
Performing a concave s., cr. we insert it into the loop in the direction indicated by the arrow, i.e., from the IS of the canvas toward ourselves, and we bring out the cr. on the IS from yourself, as in Fig. 2. Grab the working thread, pull out the loop, knit with. in the usual way.
Scheme
Description
We start working with a “sliding loop” (Fig. 3), then 3 c. p.p., 11 p. from 1 n. to the center of the ring and tighten the loop.
We continue knitting according to pattern 2, increasing stitches to the desired diameter of the hats. We end the rows with ss., and begin with the required number of s. p.p.. In this case, the total number of “cones” is 18. If you need a beret with a smaller diameter, you can reduce their number to 12.
We continue to work without increments, working on an even part of the canvas. To round the hats, you will need to reduce the loops: we knit 2 embossed columns together where increases were previously made.
We continue knitting with an elastic band 1 x 1. Having completed 5-7 pp, we finish knitting.
We tie the edge of the product with a “crawfish step” (see Fig. 4), turning the edge. into the holes between the last p. rubber bands.
Two-tone beret
A beret knitted with knitting needles looks very beautiful, so we will tell you how to make it. Depending on what time of year you plan to wear it, choose the yarn density, but in any case it will be a warm option, for winter or cold autumn (spring).
Related article: Do-it-yourself family tree for kindergarten step by step
You will need:
- Single color brown yarn (70 m/100 g);
- Melange yarn (100 m/100 g);
- Knitting needles No. 5;
- Knitting needles number 6.
Stages of work.
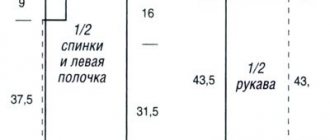
- Cast on ten stitches of brown yarn on needles numbered five. Knit with an elastic band with the loop removed in a circle that should fit snugly on your head. Then, along the long edge of this ring on the front side, using mohair yarn with knitting needles numbered six, we cast on 106 stitches, making the pattern “one braid loop, one yarn over” (you can see how it is done in the diagram below), leaving two edge loops in reserve.
- In the second row, yarn overs are knitted with crossed knit stitches.
- Now we knit in garter stitch up to the thirteenth row, while knitting half of the rows with brown thread, and half with melange thread (alternating them).
- Now we make decreases with melange thread as follows: we knit through one loop into two stitches together behind the front wall. We knit six rows in this way, and then switch to brown yarn.
- Decrements need to be made every three rows four times. After this, we knit two loops together, collect all the loops and tighten. All that remains is to sew up the hole using a knitted seam.
Our wonderful beret is ready.
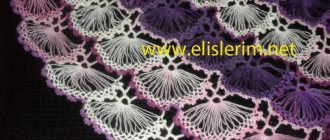
Openwork beret from motifs
Summer hat? Why not! This model will successfully complete the look of any romantic dreamer in a flowing dress or even a tomboy in jeans and sneakers!
For MK we need:
- yarn (100% mercerized cotton, 282 meters per 50 grams), 2 skeins;
- cr. No. 1 for motifs and No. 0.85 for mesh.
The size of the hat made from motifs is designed for a head circumference of 56 cm.
Schemes of motifs and pattern
Description
We make patterns from two circles: the outer one, which will serve as the bottom and will be 28-30 cm in diameter, and the inner one – 16-18 cm.
We work on motives, adhering to the schemes proposed above. We first lay it out on the pattern, placing the parts in such a way that their edges do not reach the border of the pattern by 5-10 mm. We thread the ends of the threads into the fabric and secure the blanks with needles inside out, after which we fill the empty spaces between them using an irregular mesh, alternating arches of 2-3 in. p. and columns with 1-2 n..
We perform the lower part of the hat in the same way, adhering to the boundaries of pattern No. 2.
After this, all we have to do is fold both circles “facing” one another and connect them, alternating with. from 1 n. and 2-3 c. P..
The headband is knitted with 8-10 stitches. With. without n., and then another 1 r. “Crawfish step” and our openwork beret is ready!
How to knit takes from motifs: MK
It is quite simple to knit a beret in this way: it consists of individual motifs connected to each other by a mesh. It can be either fillet knitting or a chaotic mesh - both options are perfect for creating a light, romantic look.
For MK we need:
- white yarn (100% cotton, 530 meters per 100 grams) - 100 grams, 10 grams yellow (100% cotton, 565 meters per 100 grams), 15 grams of light green yarn (80% polyamide, 20% metallic, 340 meters per 90 grams ); cr. No. 1.2 and No. 0.9;
- polystyrene foam 4 cm thick, covered with tape;
- pins with beads at the end;
- 7th class knitting machine "Brother".
The size of the finished hat made from motifs is suitable for a head circumference of 56 cm.
Scheme
Description
Before starting knitting, we make a hat pattern: an outer circle (bottom) with a diameter of 28-30 cm and an inner circle with a diameter of the outer circle of 28-30 cm, and the inner circle of 16-18 cm.
We will calculate the diameter of the inner circumference according to this principle: the circumference of your head minus 2 cm for a tight fit, divided by 3.14. If you have a standard head circumference (56 - 2): 3.14 = 17.2 cm.
On average, the diameter of a small circle is approximately 16-18 cm.
We are working on individual patterns: flowers (diagrams 24, 24a), leaves, leaves on branches. We carefully but chaotically lay out the finished elements on the pattern with the wrong side up, laying out bouquets and compositions at your discretion, or, as shown in the title photo, we fix them with pins. We connect the bouquets together with an uneven mesh in a circle (this is an important condition), especially along the edge of the circle.
You need to try to ensure that the mesh along the edges does not stretch into a line, but is free and lies in the form of rounded arches. Inside the circle, the direction of knitting can be arbitrary.
We thread the ends of the threads into the elements.
By analogy, we assemble the part of the inner circle.
We fold the two finished parts with their front sides facing each other and connect them together in this way: p. without n. with gripping loops (under the arch), both parts, 5 in. P..
The seam should be elastic and not pull the fabric.
The headband can be knitted on a 7th grade Brother machine at a gauge of 4 20 stitches. Chl., 230-240 rub. from "Iris". It can also be knitted on thin knitting needles by independently calculating the correct density.
We hope that our master class today will help you choose a stylish, fashionable and exclusive headdress, and crocheting berets will bring only pleasant emotions. Even stitches and happy knitting!
Mischievous "Sailor"
Sometimes you want to do something unusual for your daughter, all these ruffles, flowers and butterflies are already boring, in this case such a playful “Sailor” beret would be an excellent choice.
This particular instruction and description is designed for a 4-year-old girl, but it can be made smaller or larger.
You will need:
- Cotton beach 400 m/100 g (50 g white, the rest blue and red);
- Hook No. 2.
Work process. Cast on 6 chain stitches with white thread and close them in a circle. Next, we knit according to pattern 1 until your circle becomes 30 centimeters in diameter.
Article on the topic: Crochet shawl “Pineapples”: diagrams and description with photos and videos
Then we knit a single crochet with blue threads, making decreases (5 loops, 7 loops, 10 loops) in a circle to the required head circumference. Next, we knit with a blue thread of 1.5-2 cm in a single crochet and without decreases.
Tie the edges of the beret in one row with a single crochet. The diameter of the beret is approximately 31-32 centimeters. Now knit a lifebuoy using white and red yarn according to pattern 2. Sew it to the beret; you can also decorate the beret with a blue pompom, this will make it even more interesting.
The result is a very unusual and cute headdress that your child will definitely like. Here are some other interesting options for berets in this style: