Determining the size of the future sweater
The size of the product will dictate to us the number of loops that need to be cast on and the total amount of work on individual parts of the sweater. The size of the sweater is determined based on the measurement - chest circumference.
How to measure chest circumference
- To measure we will need a measuring tape. If there is no such thing, then you can take the braid, take measurements, and then attach it to a ruler or tape measure.
- You can take measurements yourself, but then you need to be very careful that the tape does not slip off your back. It is better to ask someone for help in this matter, so the results will be more accurate.
- For women, it is better to take measurements in a bra, since the finished product will be worn exactly on it.
- Wrap the measuring tape around your chest so that it goes under your armpits and is horizontal to the floor. The tape should be positioned so that the starting point begins in the center of the chest, and it covers the widest part of it.
- Do not puff out your chest or take a deep breath or exhale. Remember to ensure that the tape does not twist. All this can distort the measurement results.
Converting bust size to product size
- XS (extra small): 81 cm
- S (small): 91 cm
- M (medium): 102 cm
- L (large): 112 cm
- XL (extra large): 122 cm
- XXL (super large): 132 cm
Hand knitting
Hand knitting is the most budget-friendly option for creating things. But if you do something grandiose and big, it will take a lot of time. For beginners, this can be a test of strength. Many questions will arise in your head: is everything correct, is it the right size? This article takes a closer look at how to avoid all these questions and create with peace of mind.
Choosing yarn
First of all, let's start with the yarn. Yarn made from natural wool is suitable for a winter sweater; adding acrylic up to 50% does not spoil the quality of the finished product. On the contrary, it makes the thread softer and less prickly. For light spring options, cotton or knitted yarn is suitable. For beginners, it is better to choose thick yarn. This will significantly reduce the work time, and the result will be visible much faster.
Choosing a knitting tool
You can knit a sweater either on a knitting machine or with knitting needles. Let's look at knitting. For knitting such a large-scale product as a sweater, long straight knitting needles are more suitable, and for knitting a neckline you will need circular knitting needles one size smaller. The size of the knitting needles depends on the thickness of the yarn.
Required tools and materials
- Yarn - here it is important to correctly determine the number of skeins required to make the product. The amount of yarn is determined based on the size of the intended sweater.
XS: 3 skeins
S: 4 skeins
M: 4 skeins
L: 5 skeins
XL: 5 skeins
XXL: 5 skeins;
- Knitting needles - everything is simple here, you need to choose the right size knitting needles for the product you are going to knit;
- Scissors;
- Yarn needle with a blunt tip and a wide eye;
- A row counter is an indispensable thing for a beginner, because in the first couples it is difficult not only to distinguish rows, but also to simply knit stitches;
- Pins for locking loops are a necessary thing if, during the knitting process, it becomes necessary to close loops in vulnerable areas of the product. If you cover such places with an additional knitting needle, it can simply fly off and add a lot of trouble to the needlewoman.
Scissors and ruler
A ruler is necessary to measure the yarn as it deforms after washing. We knit a small sample, measure before washing, wash and measure again. Thus, we will be able to identify the difference.
Be sure to test your yarn before knitting any project. It would be a shame if you put a lot of effort into knitting, but in the end your product becomes deformed after the first wash.
Loop calculation
To calculate the density, you need to knit a small piece of the pattern that you have chosen for the sweater, measuring 10x10 cm. Thus, we get a sample that needs to be steamed with an iron or washed and dried in order to understand the final shape and appearance of the product. Then you need to measure how many loops/rows you get in 1 cm of the sample. Based on these data, it is already possible to calculate the number of loops for a product of a certain width.
On the website of the fair of masters - https://www.livemaster.ru/ we found another interesting formula for calculating loops for a sweater, published by the user ODemi - handmade with Soul.
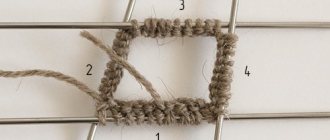
- The craftswoman suggests knitting a small sample (10x10 cm or less).
- She counts how many loops there are in 1 cm and 5 cm.
- Based on the obtained numbers, using proportions, she calculates how many loops need to be cast on for a product with a width of 55 cm. Thus, 2 values are obtained.
- It is also calculated how many loops are contained in 1 cm and 5 cm. But this calculation differs in that the craftswoman stretches the product a little, exactly in the way it will be worn. There is a slight tension in the threads of a sweater when we put it on.
In this case, it is important not to overdo it with stretching the sample. Just imagine how the threads of the product will be stretched when it is put on a person.
- Based on the obtained values, using the proportion, she calculates how many loops need to be cast on, for example, for a work with a width of 55 cm. Again, 2 values are obtained.
- It calculates the arithmetic mean between the 4 obtained values.
(110 + 99 + 83 + 77) : 4 = 92 p.
- The resulting number is slightly adjusted: for example, 92 stitches + 2 edge stitches.
This is a scientific approach to knitting. Share in the comments, did you manage to calculate the required number of loops this way?
Pattern selection
Before you start knitting, you need to choose a pattern for the future product. Beginners are not recommended to rush headlong into the pool and try to master the most complex and technical patterns. It's worth starting with garter stitch, which is knitted with facial stitches.
Video tutorial on garter stitch
Here are a few variations of simple patterns that will definitely suit beginner needlewomen.
Checkers pattern
The most popular and universal pattern.
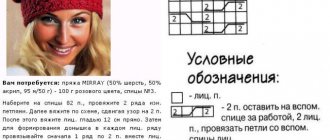
Knitting pattern for the “Checkers” pattern
Legend:
+ Edge loop
⬤ Face loop
☐ Purl type loop
Pattern "Spikelets"
Due to the specific pattern, the items will look narrow and may even be a little tight.
Knitting pattern for the “Spikelets” pattern
Legend:
+ Edge loop
⬤ Face loop
☐ Purl type loop
"Rhombus" pattern
At first glance it may seem quite complicated, but in reality this pattern uses a knit and purl variation. Traditionally used for knitting men's clothing.
Knitting pattern for the “Rhombus” pattern
Legend:
+ Edge loop
⬤ Face loop
☐ Purl type loop
Lightning Pattern
The difficulty with this pattern lies in the transfer of the knit stitches, so a small step is needed to shift the pattern.
Knitting pattern for the “Lightning” pattern
Legend:
l – front
- - purl
"Rice" pattern
An alternative name for the pattern is “tangle” or “pearl”. Below is a diagram of a small pattern.
Knitting pattern for the “Rice” pattern with symbols
Elastic band 1x1
The video explains in detail how the process of creating a 1x1 elastic band occurs. Which we will need in one of the sweater knitting patterns.
Video tutorial on knitting elastic 1x1
Simple patterns for knitting sweaters
We have selected two simple schemes for you. The first is a simple oversized women's sweater, the second is a simple men's sweater that every novice needlewoman can handle.
Simple oversized women's sweater
Women's sweater without knitting the armhole. Source
Tools and materials
- Bulky yarn
- Knitting needles number 6 or 7
Pattern for a women's sweater
Knitting the back
It is better to start knitting a women's sweater from the back. If you make a mistake with the size, and the risk is high, if you are a beginner, then the front part can be made a little wider for the chest.
- Cast on 52 loops on the knitting needles - 50 loops will go into the fabric, and 2 loops are edge loops, which are never included in the calculations of knitting the fabric with knitting needles.
- Knit the first row with a 1x1 elastic band (knit 1 loop, purl 1 loop). Continue in this alternating manner to the end of the row.
- Turn the product over and continue knitting the elastic using the “pattern” method. If you have an even number of loops, you will end up with the second row starting with a purl stitch. Knit 7-9 rows with an elastic band.
- Start knitting the main fabric from the front row - the front row “looks” at you. Start knitting the back to the height of the shoulder line (not reaching 3 cm), only with knit stitches - this is how you get a garter stitch.
- Beginning needlewomen should not spend a lot of time knitting armholes - this will make it difficult and a little confusing. Make your first sweater by knitting with the sleeves dropped.
- Having reached the shoulder line, start knitting the neckline. To do this, knit 15 loops on the front side with knit stitches, bind off 20 loops, knit the remaining 15 loops. Now you will knit the shoulders separately, but do not slip the stitches on the auxiliary needles. Turn the work over, knit 12 loops - the last 3 are “removed” by knitting 2 loops together according to the pattern. Turn the work over again and knit another row of 12 loops. Close the loops if you already have 3 cm for the neck. Attach the thread to the edge of the second shoulder and make a symmetrical decrease, bind off the loops, tear off the thread.
Knitting before
If necessary, the front can be made slightly wider than the back (if the chest size is greater than 3). Knitting should begin in the same way as the back, but 5 cm is not knitted to the edge of the shoulders - so that you can knit the neck.
Changes in loop calculations
- Knit 19 stitches, cast off 12 stitches, knit the remaining 19 stitches.
- Turn the work over and knit a row with 15 loops.
- Turn the work over again, bind off 3 loops, knit 12 loops - so knit 5 cm of the neckline.
- Similarly, symmetrically tie the second part of the front.
Knitting a sleeve
This model is knitted without knitting the armhole, due to which the sleeves are lowered and the style resembles oversized clothing. In this option, after finishing knitting, you just need to close the loops.
Subsequence
- Cast on 24 loops and knit the same 7 or 9 rows with a 1x1 elastic band.
- Now move on to the main knitting, increasing the loops in every 4th row - increase in the front rows to make the increases unnoticeable.
- It is better to increase by pulling an additional loop from the previous row. You can use other methods of adding loops, but it is better to do it unnoticed.
- The main pattern will have to knit approximately 30 rows. Taking into account the addition of loops after and before the edge stitch, the result should be 38-42 loops.
- Close the loops.
- Knit the second sleeve in the same way.
Assembly and strapping
Take your time to connect the sweater pieces together. To begin with, it is recommended to soak them in water, and then dry them on a towel. Then the parts can be sewn together in any convenient way.
- The shoulder seams are sewn first.
- Then the sleeves are sewn on.
- Next, the side seams are made.
- At the end, all seams must be ironed.
If the sweater is the size you originally intended (this pattern is designed for clothing size 46), then it’s time to start tying the neckline.
- Using circular knitting needles, begin pulling the sweater neck loops from the middle of the back.
- Gently pull the stitches onto the needles. Make sure there are an even number of them.
- Knit the binding with a 1x1 elastic band (7-9 rows will be required).
- When knitting the neckline, there is no need to reduce the number of loops - the elastic band is elastic, so the collar zone bandage will fit properly on the neck.
Simple men's sweater
Men's striped sweater. Source
Sweater sizes
48/50 (52/54) 56/58
Tools and materials
- Yarn (100% section-dyed sheep wool; 100 m/50 g) 650 (700) 750 g;
- Knitting needles No. 5;
- Circular knitting needles No. 5, 50 cm long.
Basic pattern
Alternately - 4 knits, 2 purls.
Knitting density
16 p. x 22 r. = 10 x 10 cm.
Pattern for a men's sweater
Knitting the back
- Cast on 90 (96) 102 stitches on knitting needles and knit as follows: edge, 1 purl, 14 (15) 16 x 6 stitches each with the main pattern, 1 purl, edge.
- After 45 (46) 47 cm = 98 (100) 102 r. from the initial row, close on both sides for armholes 2 (3) 4 p., then in every 2nd p. 1 x 2 p. and 3 (4) 6 x 1 p. = 76 (80) 84 p.
- At armhole height 21 (22) 23 cm = 46 (48) 50 r. close for shoulder bevel in every 2nd r. 2 x 6 (7) 8 p.
- Simultaneously with the first decrease for the shoulder bevel, close off the middle 32 stitches for the neckline, then knit both sides separately.
- Along the inner edge for further rounding, close in every 2nd r. 3 x 1 p., then bind off the remaining 7 p.
- Finish the other side in a mirror image.
Knitting before
- Cast on 90 (96) 102 stitches on knitting needles and knit as follows: edge, 1 purl, 14 (15) 16 x 6 stitches each with the main pattern, 1 purl, edge. Next, knit like the back, but with a deeper neckline.
- To do this, at an armhole height of 17 cm = 38 r. bind off the middle 26 sts, then knit both sides separately.
- Close along the inner edge for rounding in every 2nd r. 6 x 1 p.
- Start performing the shoulder bevel at the same height as on the back.
- Finish the other side in a mirror image.
Knitting sleeves
- Cast on 42 (48) 54 stitches on the knitting needles for each sleeve and knit as follows: edge stitch, purl 2, 6 (7) 8 x 6 stitches each with the main pattern, purl 2, edge stitch.
- For bevels, add on both sides every 6th r. 5 x 1 p., in every 8th r. 5 x 1 p. = 62 (68) 74 p. Include increases on both sides in the pattern.
- After 47 (48) 49 cm = 104 (106) 108 r. from the initial row, close the sleeves on both sides for piping 2 (3) 4 p., then in every 2nd p. 1 x 2 p., 4 x 1 p., 1 (2) 3 x 2 p., 2 x 3 p. and 2 x 4 p.
- In the next row, bind off the remaining 14 sts.
Assembly and strapping
- Moisten the parts, stretch them according to the dimensions indicated in the pattern, pin them onto the pattern and leave until completely dry.
- Sew shoulder seams.
- Using circular knitting needles, cast on 74 (80) 86 stitches along the edge of the neckline and knit with the main pattern 20 (21) 22 cm = 44 (46) 48 stitches, close the loops loosely.
- Sew side seams and sleeve seams, sew in sleeves.
Share in the comments, did you manage to knit your first sweater following the recommendations from our article? Did you like the knitting patterns we have selected here? Or maybe you are interested in a specific sweater model, but you didn’t find it on our website? Then definitely leave your wishes in the comments, and we will try to find the right scheme for you.
Footnotes
- https://raikovstudio.ru[]
- https://mysekret.ru[]
How to knit a sweater?
A sweater is an integral part of the wardrobe. It is necessary for women, men and children. Where to start carrying out your creative work?
Before you start creating a masterpiece, you need to figure out what exactly needs to be knitted. It will be a sweater with a closed collar or a small round one, loose or tight, with a beautiful pattern or knitted with a simple elastic band. In any case, it is worth deciding on the size and materials. Next, we’ll take a closer look at how to knit a sweater for beginners.