In order for the acquired material to be better consolidated in an educational institution, you need a comfortable and beautiful workplace at home. Of course, a desk and a comfortable chair are important, and it is also very important that everything you need is always at hand. A desktop stationery set - a keeper of pens, pencils, erasers, paper clips and other such important little things - should cope with this task.
In this article, the News portal “Vtemu.by” has prepared especially for you the best selection of the most original stands for pens and pencils, which you can easily make yourself from scrap materials. You can use this homemade stand for pencils and pens yourself, or you can give it as a gift to your girlfriends or friends, brothers or sisters.
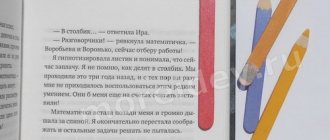
DIY stand for pencils and pens
Necessary materials:
- threads;
- scissors;
- plastic jar;
- wooden popsicle sticks;
- brush and glue.
Manufacturing:
We cut off the top of the plastic jar so that the bottom remains and a few more centimeters up. Using glue, glue the wooden sticks to the plastic jar (see photo).
Now we intertwine wooden sticks with multi-colored threads, filling the voids with threads.
Use threads of different colors, then the pencil holder will turn out especially bright and unusual.
You can decorate the finished pencil holder with rhinestones, interesting stripes or buttons.
Modular origami pencil stand – Origamir
The order on the desktop is an excellent indicator of the organization and orderliness of the thoughts of the person who works at it. Nowadays you can find many options for desktop organizers on the Internet. But it’s much more pleasant to surround yourself with unique things that suit you. Anyone can make a pencil cup with their own hands and decorate their desk with it.
You just need a little patience and a little imagination. Material for creativity can be very diverse, sometimes you can simply find it at hand.
For example, make a cup for pencils out of paper. But the following are also suitable for this craft:
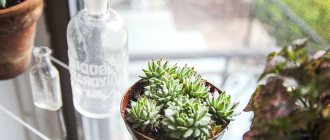
- flower pots;
- glass or tin jars;
- plastic bottles;
- knitting yarn;
- cardboard tubes;
- pencils or markers;
- modular origami.
Modular origami pencil cup: step-by-step instructions
Modular origami is the creation of three-dimensional objects from paper elements - modules. Using this technique, you can assemble a toy for a child, a decoration for a desktop, or a cup for pencils. Beginners should not immediately take on complex work and buy special paper. Newspaper sheets or magazine pages are quite suitable for training.
Craft materials
- sheets of paper of two colors (here red and yellow);
- ruler;
- scissors;
- cardboard;
- glue;
- slate pencil.
Using a cup as an example, you will learn the basics of creating paper modules for three-dimensional origami, connecting them into a cylinder, and experimenting with paper shades.
The work is painstaking, you need to be patient, but the result is worth it.
First we need to prepare the paper from which we will make modules.
We turn ordinary paper into a module
Cut out 176 pieces of paper rectangles. We fold them as shown in the picture.
Assembling the base of the cup
When all the modules have been assembled, you can begin to assemble the first circle. To do this, we insert two modules with their sharp ends into the third. The first 8 rows will be assembled from modules of the same main color.
We create a circle of 24 modules. For beginners, making and connecting the first circle correctly is not an easy task. The parts can be glued together. Then they won't fall apart.
Next you need to connect the modules according to the same pattern, 8 rows up with 24 modules in each.
In the 9th row we begin to introduce modules of the second color, according to the scheme: 1 yellow module, 5 red ones and so on in a circle.
Next, the pattern and edges of our cup are formed. For each yellow model we put one yellow and five red ones on top.
We gradually reduce the number of red modules between the yellow ones. We decorate all sides of the stand in a similar way.
Next, we assemble 4 rows, alternately changing the color of the models.
Decorating the bottom of the craft
To decorate the bottom of the cup, you need to carefully turn its bottom over and seal it with another row of modules.
If desired, you can cut out a circle of cardboard that is suitable in diameter and glue the cup onto it.
Paper pencil cup: step-by-step instructions
Modular origami is a very beautiful and painstaking art. But there are times when time or paper resources are limited, but there is a desire to decorate your desktop with a cute and original stand for stationery. A master class on creating a cup for pencils from paper will come to the rescue.
To create a cup you only need one sheet of paper, but you have to be extremely careful, the paper wrinkles very easily. To prevent your craft from losing its appearance while working, you need to assemble the cup with light movements.
Step 1
We make a square from a standard A4 sheet. To do this, take it by the corner of the short edge and bend it diagonally. Trim off the rest.
Step 2
We bend the sheet diagonally and horizontally. In further assembly we will focus on the resulting lines. Fold the paper along the horizontal fold line to form a triangle.
Step 3
The upper corner of the triangle needs to be bent about two centimeters, drawn along the fold line with a fingernail and straightened back to its original position.
Step 4
We bend the lower right corner of the triangle to the left to the line marked at the top.
Step 5
Fold the lower left corner of the craft to the right to the same mark. Next, fold the left fold diagonally to the left again. We hide the bottom corner down, between the layers of the product.
Step 6
We carry out similar manipulations on the other side of the craft. Carefully smooth out the finished craft. Turn over and open the cup from the bottom. Use your fingers to smooth out the bottom of the cup from the inside.
Our stand is ready.
Video selection on the topic of the article
- You can watch all the details and even more options for creating a pencil cup with your own hands by watching the video master classes.
- https://sdelala-sama.ru/3138-stakanchik-dlya-karandashey-svoimi-rukami.html
Source: https://origamir.ru/bez-rubriki/modulnoe-origami-podstavka-dlya-karandashej.html
DIY stand for pencils and pens made from newspaper tubes
Necessary materials:
- newspapers or magazines;
- cardboard toilet paper roll;
- glue;
- cardboard;
- double sided tape;
- threads;
- acrylic paints.
Manufacturing:
Make tubes from newspaper or magazines and coat the ends with glue to prevent them from unraveling.
Using glue, glue the newspaper tubes vertically onto the cardboard roller. For more security, tie them together using threads.
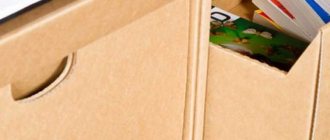
Make a shaped bottom for the pencil holder from a sheet of thick cardboard (it can be a flower, a leaf) and glue the bottom with double-sided tape.
Now you can decorate the pencil holder and the bottom.
You can decorate a finished stand for pencils and pens using different elements - grass cut out of paper, leaves, flowers, etc.
Using origami technique
There is a way in which you only need paper to create a pencil cup. This method is called modular origami. The technique is simple, but requires perseverance and patience.
You will need:
- sheets of paper;
- scissors;
- sheets of cardboard;
- PVA glue;
- simple pencil.
- You need to cut out 176 rectangles from paper.
- Fold them as shown in the picture.
- To assemble the first level you will need 24 modules. They need to be folded in this way: 2 modules are inserted with sharp edges into the third, which will be located between them.
- Using the same principle, 8 levels are connected upward.
- Next, we seal the bottom of the product. To do this, you need to turn it upside down and reinforce the first row with another row of modules.
- A circle with a diameter equal to the diameter of the cup is cut out of cardboard and glued to the bottom. This will be the bottom of the cup.
Related article: Do-it-yourself clothes for Baby Bon with knitting needles with photos and videos
The glass using the origami technique is ready.
If you wish and acquire a certain level of skill, you can create cups from several colors, as well as create colored patterns from paper modules.
If you are unable to master such a technique, you can simplify the task. To do this, just glue the paper modules together. In this case, they will no longer fall apart, and working with the product will be much easier. After making the first few cups, you will gain steadiness in your hand and in the future you will be able to work without glue, creating not only cups, but also more complex products.
Stand for pencils and pens from the telephone directory
Necessary materials:
- thick book (telephone directory);
- glue;
- acrylic paints;
- cardboard toilet paper rolls;
- cardboard;
- scissors or stationery knife.
Manufacturing:
We cut the telephone directory and wrap the pages into cardboard rollers, fixing everything with glue. We cut out a shaped bottom from a sheet of thick cardboard and glue it to the finished structure. Now you can decorate everything with acrylic paints.
If you cut a telephone directory into pages of different heights (see photo), you can end up with an original and unusual pencil holder, different in height.DIY pencils
Pencil holders are a necessary and useful item for a writing interior. Manufacturers offer us a huge, good range of pencil holders and that’s good. However, manual work has its advantages. You can create an even better pencil holder to suit your taste in an exclusive version with your own hands. In this article we will look at how to make original pencil holders with your own hands.
Paper pencil
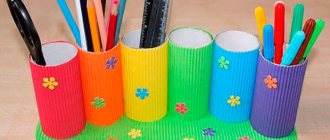
You will need: toilet paper rolls, colored corrugated paper, scissors, glue, a ruler and a simple pencil.
Master Class
- Measure the length and circumference of the sleeve.
- Prepare strips of colored paper to fit the sleeve.
- Cover the bushings with colored paper.
- Cut a cloud from a sheet of paper so that all the sleeves fit on it.
- Glue the bushings onto the stand (cloud).
- Cut out the flowers and glue them onto the pencil holder.
The paper pencil is ready! I recommend watching this video!
Salt dough pencil
You will need: water, flour, extra salt, a cardboard jar for the frame, PVA glue, scissors, a piece of decorative rope or corrugated paper, gouache, a brush, a button, stacks, acrylic varnish for crafts, a toothbrush.
Master Class
- Knead the salted dough in this way: add a glass of flour, a glass of salt, add water, then knead until the desired consistency of the dough. Separate part of the dough, add beige gouache, then knead.
- Roll out the cake to a thickness of 10-15 mm.
- Apply PVA glue to the outer rim of the jar and wrap it with dough.
Cut off the excess with a stack and smooth the joints with a damp brush. - Create a small dotted texture with a toothbrush on the surface of the dough.
- Knead the brown dough, roll it into a flat cake 10-15mm thick.
- Cut a 5cm wide strip of brown pastry and glue it to the bottom of the jar.
- Make 2 large owl eye bases from white dough, then glue them on.
- Make a beak out of brown dough and glue it on.
- Make eyes from turquoise dough and glue them on.
- Roll out 8 strips of pink dough, twist them into 4 flagella and make a bow, then leave it to dry for 2 hours.
- Make droplet-shaped owl wings using brown dough, then glue them on.
- Weave ropes of beige dough and glue them onto the neck of the jar.
- Roll out a sausage from white dough, draw the texture of the lace with a stack and glue it as a collar under the beak.
- Place the craft in a warm place for a day.
- Paint the bottom and wings with brown gouache and decorate with white dots.
- Draw the pupils and eyelashes with black gouache, wait until the paint dries, then paint white highlights on the eyes.
- Glue a pink bow above the wing.
- Glue a button with a bow from a corrugated strip onto the lace.
- Cover the craft with varnish and wait until it dries completely.
The salt dough pencil is ready!
Original pencil holder
You will need: a tin can, white and green fleece fabric, green felt, scissors, padding polyester, glue gun, thread, needle, centimeter, pencil, plastic eyes for toys.
Master Class
- Measure the height, bottom diameter and circumference of the jar.
- Cut out 2 pieces each from white and green fleece according to the dimensions (can height + 0.5 cm allowance and circumference + allowance).
- Sew the parts together with a back seam using a needle, or use a machine.
You should get 2 blanks, as shown in the picture - one green, the other white. - Turn the white part inside out and set the cylinders aside.
- Make 18 paired pieces (faces with ears) and sew them together, leaving a hole for stuffing. You should get 9 faces.
- Mark the location for attaching the eyes.
- Stuff the faces with padding polyester and sew up the hole.
- Glue the plastic eyes to the designated locations.
- Wrap the jar with padding polyester and sew the edges, then sew on the bottom of padding polyester.
- Place the green fleece piece on the can.
- Glue the padding polyester to the bottom of the jar.
- Apply glue to the bottom of the jar and glue the white fleece piece, and sew the edges of the white and green fleece together with a blind stitch.
- Glue on the animal faces.
- Cut out the leaves from felt and glue them too.
The original pencil holder is ready! I recommend watching this video!
Apple shaped pencil
You will need: an oval-shaped plastic bottle, red liquid acrylic paint, golden cord, artificial leaf, glue gun, plate, nail file.
Master Class
- Pour paint into the bottle and shake well so that the entire inner surface of the bottle is painted.
- Drain off any remaining paint.
- Place the bottle on a plate and wait until it dries completely.
- File the edges of the neck if necessary, removing excess paint.
- Wrap the neck with golden lace and glue the leaf.
The apple-shaped pencil is ready!
Creative pencil holder
You will need: glass jar, yellow liquid acrylic paint, black permanent marker, nail file.
Master Class
- Pour the paint into the jar, close the lid and shake well to evenly color the inside of the jar.
- Drain off any remaining paint.
- Wait until completely dry.
- File down the edges of the jar neck, removing excess paint if necessary.
- Draw a funny face with a permanent marker.
The creative pencil holder is ready! I recommend watching this video!
Minion pencil holder
You will need: superglue, hole punch, scissors, EVA polymer material (bathroom mats are made from it) in blue, white, black, gray, brown, wooden skewer, black and blue felt-tip pen, simple pencil, printout of the template.
Master Class
- Print the template and cut out the blanks.
- Cover the outside and inside of the jar with yellow polymer.
- Glue the blue resin jumpsuit and black buttons onto it.
- Glue on a white background for the eyes, then brown eyes and black pupils, a black strap for glasses and a gray frame.
- Draw stitches on the overalls with a blue felt-tip pen and a minion smile with a black felt-tip pen.
Minion pencil holder is ready! I recommend watching this video!
Pencil holders made from plastic bottles
You will need: 3 plastic bottles (for example, shampoo), photo frame, glue gun, scissors, acrylic paints.
Master Class
- Cut off the neck and cut out the front top as shown in the photo for each bottle.
- Color the bottles to your liking.
- Glue the bottles to the frame.
Pencil holders made from plastic bottles are ready!
Cheerful pencil girl
You will need: a plastic shampoo bottle, scissors, a stationery knife, glue, colored paper, pencil, double-sided tape.
Master Class
- Cut off the top of the bottle.
- Draw the desired shape with a pencil, such as a crown or horns, then cut it out.
- Cut out the paws from plastic and glue them.
- Cut out eyes, teeth, and a tummy from paper and glue it to a pencil holder.
- Attach the pencil holder to the wall using double-sided tape.
The funny pencil holder is ready! I recommend watching this video!
Pencil from a book
You will need: a thick paperback book, pencil, cardboard, scissors, white acrylic paint, glue, clamps.
Master Class
- Divide the pages of the book into 5 equal parts and secure with clips.
- Glue the pencil to the side of the book.
- Wrap the book around the pencil so that it is in the center.
- Form petals and secure with glue.
- Paint the top of the petals with white acrylic paint, thereby priming the pages so that they do not separate.
- Trace the bottom of the pencil holder onto thick cardboard, then cut it out.
- Glue the cardboard bottom and wait for it to dry.
The pencil from the book is ready! I recommend watching this video!
Pencil holder made from pencils
You will need: 32 pencils, glue gun, cardboard, scissors.
Master Class
- Glue 8 pencils together to form a wall.
- Make 4 walls this way.
- Glue the walls together to make a square.
- Cut a square of cardboard to the size of a pencil holder and glue it as the bottom.
The pencil holder is ready!
Exquisite pencil holder
You will need: a tin can, two-strand braid, braid with roses, satin ribbons, stationery pins, a glue gun, scissors.
Stand for pencils and pens from a tin can
Necessary materials:
- tin jar;
- textile,
- glue;
- decorative braid and ribbons.
Manufacturing:
We measure the tin can and sew a cover for it from the scrap of fabric we like. Covers the fabric with beautiful ribbons and braid. We put a cover on the jar.
We tuck the edges of the cover inside and glue them with glue.
Stand for pencils and pens made of mosaic
Necessary materials:
- can;
- a piece of foam;
- primer;
- stationery knife;
- acrylic paints;
- glue
- cement mortar, sealant, or putty.
Manufacturing:
First of all, you need to apply a layer of primer to a previously cleaned tin can of dirt.
Using a sharp knife, cut out squares from a sheet of foam plastic that need to be decorated with colored acrylic paints.
We glue the decorated foam plastic pieces to the tin can using glue, not forgetting to leave gaps between them.
Now fill the cracks with primer using a regular sponge. All excess is wiped off and the pencil holder is ready.
Stand for pencils and pens made of thread
Necessary materials:
- can;
- threads;
- glue;
- buttons, braid, ribbons and bows for decoration
Manufacturing:
The tin can must be carefully wrapped with multi-colored threads, periodically coating them with glue so that they do not unwind later.
Now you can start decorating. Decorate the pencil holder with buttons, beads, decorative braid and rhinestones.