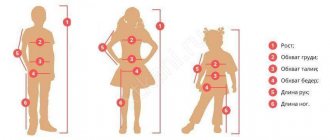
How to knit a hat for a woman: new models
A hat is the most important item of a winter wardrobe. In addition to being warm , she must be beautiful . Of course, shops and markets are full of a choice of hats, but it is much nicer to have an individual hat, knitted with your own hands.
Both experienced craftsmen and novice needlewomen can knit a hat. For this you will need high-quality yarn and a detailed diagram. In addition, it is useful to watch several video lessons and master classes to understand all the intricacies of knitting a product.
The easiest way to knit a hat is on knitting needles. You can use absolutely any number of knitting needles , as well as circular knitting needles, which greatly simplify “knitting in the round.” Each hat is knitted “in decreasing order”, that is: the closer you get to the “bottom” of the hat, the fewer stitches you cast on.
The knitted hat also has an elastic band . “Rib” is a type of knitting that involves a set of alternate knit and purl stitches. This knitting allows the product to tighten and stretch in a certain area.
Scheme:
Simple version of hat No. 1
Simple version of hat number 2
Spring accessory
Warmer spring days are coming and you need a lighter and simpler, but bright hat, for example, as in the photo below. Such a knitted hat for spring will not take much time to create, as it can be made in about a couple of days.
This kind of hat with alternate stitching of elastic and stockinette stitch is made using knitting needles of different sizes.
Required materials and tools:
- Fifty grams of melange yarn in beige, orange or pistachio color 50 g/33 m;
- Fifty grams of melange yarn in purple, orange or sand color 50 g/90 m;
- Circular knitting needles number three and a half and nine with a cable of forty centimeters;
- Stocking needles number three and a half.
Article on the topic: Tunic with knitting needles: knitting patterns and descriptions, do-it-yourself warm jacket for obese women
Work progress. This description is designed for head sizes 54-56. Knitting density: a square with sides of ten centimeters will equal nineteen stitches for twenty-five or twenty-six circular rows in stockinette stitch, using a thinner thread and number three and a half needles.
A square with sides of ten centimeters will be equal to ten stitches for twelve or thirteen circular rows in stockinette stitch, using thicker thread and number nine needles.
We take a thin thread and number three and a half circular needles and cast on ninety-six stitches, then make eight circular rows with an elastic band one on one, marking the beginning of the first row. And then we knit in circular rows.
In the next row we knit eleven stitches in repeat, and from the next loop we knit two. Repeat until the end of the row, which is equal to one hundred and four loops. Next, we knit the fabric in circular rows using the following pattern. For the first row, using thick yarn and number nine circular needles, knit two stitches together to the end of the row, which equals fifty-two stitches. From the second to the fifth row we knit with facial stitches.
In the sixth row we use a thin thread and circular needles number three and a half. We knit rapport: one knit stitch and one yarn over. We knit this way until the end of the row, which is equal to one hundred and four loops.
From the seventh to the thirteenth row we knit with facial loops. Now you need to repeat from the first to the thirteenth circular row one more time, then do from the first to the seventh circular row. When the product reaches eighteen and a half centimeters of elastic, we will continue knitting using stockinette stitch, thin yarn and number three and a half circular knitting needles. As you decrease stitches, you will need to start using double needles.
Article on the topic: Crafts for the New Year DIY Christmas trees - ideas
In the next circular row we make decreases according to the following pattern: we knit a rapport consisting of eleven knit stitches and two knit stitches together, repeat from eight to the end of the row, which is equal to ninety-six loops. We make the next row with facial loops without decreases. After this, we repeat the decreases in every second circular row three more times, and then in each row eight more times, and before each decrease we make one less loop. Then we cut the yarn, pull the thread through the remaining loops twice and tighten, then fasten the thread.
The height of the entire hat is twenty-seven and a half centimeters.
How to knit a warm winter hat for women?
A woman's hat is immediately different from a man's hat . It has a more delicate pattern that is easy to create with knitting needles. The most popular: openwork patterns, braids, cones. You can also decorate a woman’s hat with flowers knitted from threads, brooches, pom-poms and even ears.
A winter hat should be knitted either from thick yarn or from woolen threads. Large yarn will help create a dense product that does not allow cold to pass through and does not “release” heat. Wool thread, due to its naturalness, retains heat better.
Scheme:
Option #1
Option No. 2
Selecting materials for knitting a hat
Before you start making a knitted women's hat with knitting needles, it is recommended to decide on the style, select a description of the model and correctly select all the material that will be required for knitting a warm accessory. Recommendations for the selection of material.
Yarn selection
There are 3 types of yarn:
- natural 100% (cotton, wool, etc.);
- mixed yarn (most often such yarns contain 50% natural fibers and 50% synthetic fibers, for example acrylic, viscose, etc.);
- synthetic yarn containing 100% non-natural fibers.
When knitting a hat with knitting needles, it is recommended to use mixed yarn, as it is more resistant to external influences (it shrinks less when washed and does not pill) and is softer and more pleasant to the touch.
You should take into account what time of year the hat will decorate and warm its owner:
- for lighter and summer options, it is better to select thin yarn with the addition of cotton or linen threads;
- for winter cold you will need bulky yarn with added wool.
To make warm hats, you will also need a lining fabric, such as fleece, which will also help keep the shape of the hat.
Knitting needle selection
Knitting needles are made from a variety of materials: plastic, metal, bamboo. They come in three types: straight knitting needles with a limiter on one edge, circular knitting needles connected to each other, for example, with fishing line or wire, hosiery knitting needles - there are five knitting needles in a set.
The size of the knitting needles depends on the thickness of the thread and the knitting density. It is recommended to take them twice as thick as the thread used; if the knitting is loose, then it is necessary to use smaller knitting needles; for tight knitting, larger ones. The characteristics of the yarn are indicated on the labels, which indicate the length of the skein and its weight. The smaller the meter of yarn in a skein per hundred grams of its weight, the thicker the thread.
When using circular knitting needles, you will need a knitting marker and a needle or hook for sewing the hat fabric together when knitting on straight knitting needles.
Beginners are recommended to use straight knitting needles with stoppers at the ends when knitting a women's hat.
Women's openwork knitted hats for spring: diagram with description
A spring hat must be knitted from thin and light threads. If you have special knitting skills, creating floral or openwork motifs will not be problematic.
In addition, you can create a large knit with an abundance of “holes” in the pattern . This will prevent the spring cap from being too hot, but at the same time keep warm.
Scheme:
Option #1
Option No. 2
How to knit a beautiful, simple women's hat for beginners?
For those who are just starting to get acquainted with knitting , it will be useful to know about simple patterns that simplify the work process. Such patterns clearly explain how to knit each stitch and at the same time allow you to knit a beautiful hat. If you don’t knit often, it’s best to start your practice with garter stitch.
The hat is knitted in garter stitch and fits securely and “tightly” on the head. It's quite dense. Depending on the pattern, you can choose any headdress design.
Garter stitch
Knitted cap for beginners
For those of you who have never tried to knit a cap, we will conduct the first master class.
Prepare for needlework 200 grams of yarn of small thickness, and circular knitting needles No. 4. First, take a measurement of the head circumference to calculate the required loops (P) of the cast. The calculation will be made for a head circumference of 56 cm, that is, the hat size will be 56. The description of the work is given for knitting with a fabric density of 20 P and 30 rows (R) in a sample of 10x10 cm. We will dial 112 P for the work, and we will knit in the round with that pattern , which is selected in advance. We knit upwards to a fabric length of 25-27 cm, and as a result we get a knitted fabric that resembles a pipe in appearance. Having knitted the product to a length of 25 cm, we begin to reduce the number of P on the knitting needles. For this purpose, we knit 2 stitches together in every 3rd row until 3 stitches remain in the work. When making decreases, knit the fabric with garter stitch. Having finished the work, we cut the thread, leaving a tip 10 cm long. We will stretch this tip through the last Ps and tighten them together. Read
Knitted crossed stitches and their use in knitting
Hummingbird - fashionable women's hats: knitting, pattern
The “Hummingbird” hat is distinguished by its original knitting . It has a tight elastic band that sits on the forehead and a loose bottom of the cap that hangs back or to the side. The hat goes well with sports and business style clothing; it allows you not to spoil a woman’s hairstyle and effectively warms her head in the cold season.
Often the hummingbird hat is decorated with decorative elements to add femininity to it:
- Tied flowers
- Brooches
- Hairpins
- Fur
- Rhinestones or beads
Scheme:
Option #1
Option No. 2
Women's hat with a visor: diagram with description
A hat with a visor is somewhat similar to a professional headdress. In this case, the visor plays a purely decorative role , adding charm to the product and complementing the female image. This hat goes perfectly with jeans, trousers, high boots and cropped coats.
You can decorate such a hat with original openwork knitting or attach decorative elements to it.
Scheme:
Option #1
Option No. 2
Option No. 3
Women's winter drop hat knitted: diagram with description
The word “drop ” is translated from English as “droplet”. The “drops” hat is visually somewhat similar to the “hummingbird”. It is distinguished by a longer and hanging bottom , which falls back.
This hat can have a tight or loose elastic band. It is often decorated with beautiful openwork knitting or complemented with decorative elements: brooches, embroidery, rhinestones and beads. The hat goes well with any style.
Scheme:
Option #1
Option No. 2
Winter hat knitted cap
This is a youth original model of a cap hat, which is also similar to the Pinocchio hat. This type of cap looks very playful, so it suits a girl with a cheerful, mischievous character. The needlework is done using knitting needles No. 3.5 from 200 grams of melange acrylic threads in soft pink and lilac shades (400 m/100 g). Handicrafts are made using patterns such as stockinette stitch and Fig. We cast on 75 P with knitting needles and knit a fabric 11 cm long with the “Rice” pattern. The pattern diagram is presented in the master class.
Read
We knit warm slippers for the whole family
Then we knit a flat section of the product 14 cm long with the “Front stitch” pattern. After this, we proceed to reduce the number of stitches. For this purpose, at the beginning and end of each 6th row we knit 2 stitches together. When the height of the product is 48 cm, you need to close the P of the last R. We tighten these closed P and sew the cap fabric along the side seam. Now all that remains is to make a large, beautiful pom-pom and carefully sew it onto the top of the cap.
How to knit a beanie hat for a woman?
beanie hat very popular among modern youth . It has a baggy shape that is easy to fold in your preferred way: back, inward and even upward (if the knitting is tight).
As a rule, the “beanie” has a knitting called “elastic” . This method of knitting allows the product to sit “confidently” on the head and take the desired shape. The hat goes well with a sporty or casual clothing style.
Scheme:
Option #1
Option No. 2
Cross pattern for a hat
Women's hat with knitted lapel: diagram description
A hat with a lapel is a classic version of a headdress. This hat suits any face shape and goes with most outerwear options. Often the cap with a lapel is decorated with a bubo. The bubo is knitted from threads or made from a piece of fur. This hat is suitable for adults and children. Depending on preferences, it can be made with garter stitch, elastic or any curly stitch.
Scheme:
Option #1
Option No. 2
simple knitting
Patterns for hats with knitting needles: diagrams and descriptions
English rubber band
This model is almost dimensionless. On average, we cast on 78 loops (for a simplified English rib, the formula for the number of loops cast on is 4n+2) on needles No. 4.
If desired, you can make an elastic headband from a 1 by 1 elastic band that can be tucked under. Otherwise, we make a headband with an elastic band 2 by 2 = 8 rows
We knit with an English elastic band: in the first row we make increases (= 95 sts).
A simplified version of the English gum:
- 3lp + ip - repeat;
- 2lp + ip + lp - repeat.
You can learn how to knit the classic version of the English rib using YouTube, but they look no different.
We knit upwards to make it 25 cm from the base. We begin to gradually decrease the singing, always knitting 3 together. In the first row, we take into account the outer edges, then ignore them and knit 3 along with the rest.
Finally, tighten the loops and sew the product along the seam. Keep in mind that you cannot tighten it too much, as the hat should turn out fluffy.
Stylish with braids
We cast on 94 sts and go (with knitting needles No. 4) with an elastic band (2 knits, 2 sp) about 6 cm. Move on to the braids:
- 2ip + 6lp + 2ip + 2lp - repeat;
- We knit according to the pattern, respectively, ip-ip and lp-lp.
On the 7th row of this knitting we make overlaps in a place with 6 lp. This can be done using toothpicks, alternately knitting the desired parts. Then we continue to follow the pattern 2ip + 2p + 2p and overlap again.
After the braids, we knit a row along the IS according to the pattern.
We perform the cycle described above only 3 times (3 overlaps are obtained).
Further - similarly, but decreasing to narrow it down.
Rubber band 2 by 2
We cast on the required number of loops and go in a circle to achieve the desired height of the hat:
- We knit the first sp under the second sp - the whole row;
- We knit 5 cm straight;
- (lp, sp, lp) - together + lp + sp + lp - the whole row;
- knit directly according to the pattern;
- 3lp-together + un - the whole row;
- ip under lp;
- insert the thread into the loose loops and tighten.
How to knit a hat for a girl?
A cat hat is an ideal option for a child.
Prepare the ears: cast on 17 loops and knit 4 rows in turn:
- lp;
- ip.
Next, we begin to remove the loop once in two rows on both sides.
The sharpness of the ears can be adjusted - it depends on the moment of the end.
The hat model can be almost anything - it all depends on your creativity. The main point is to form groups of wedges when we begin to decrease the loops. Their number should be even (usually 6) so that it is clear where to sew the ears.
How to knit the lapel of a hat with lush columns?
A hat knitted with a “lush column” is a beautiful headdress. the “lush knitting” with the passing of certain loops that adds originality to it There are a lot of patterns of “lush loops”; everyone can find simple and complex patterns according to their desire. With lush knitting you can knit a hat of almost any design.
How to knit a puffy stitch?
Women's hats knitted with braids and rollers: diagram with description
Braid is a classic knitting pattern that is present on most products: scarves, mittens, sweaters and hats. The braid can be large, small, from large “strands” or from small ones. At the same time, the knitting can contain one or many braids.
You can decorate a hat of absolutely any design with a knitted braid. To do this, you should study each proposed scheme in detail and practice your skills. The braid will add volume and elegance to the headdress. A hat decorated with braids looks very feminine and gentle.
Scheme:
Option #1
Hats made from extra thick yarn
They will always look like new models. And very popular in cold climates during the cold season. The yarn used for them is such that the knitting is dense and at the same time soft.
A mixture of acrylic and natural wool in a one to one ratio is suitable. They require size 4 knitting needles for the main fabric. And No. 5 for knitting decor. The pattern can be chosen using horizontal and vertical braids, asterisks, and the always popular English elastic band.
One of the varieties of thick hats is called “Rock Star”. The fashionable model got its name because of the star-shaped pattern that converges in the center.
Knitted Kubanka hat for women with description
The Kubanka hat is distinguished by its original style. It is made in the form of a folk Kuban headdress with a high stand. The cap covers the ears, forehead and back of the head, and has the shape of a short cylinder.
The advantage of such a hat is that it suits almost every face shape and can visually “stretch” even full, round faces. This hat “accepts” a variety of decorations:
- Figured knitting
- Volumetric knitting
- Openwork knitting
- Multi-colored knitting with patterns
- Decorative elements
Knitting patterns for a “Kubanka” hat are very simple and understandable. Depending on your preferences, you can choose a large or small “kubanka” design . You can knit a hat from simple and unusual threads: “grass”, “terry”, “thick yarn”.
Scheme:
Option #1
Option No. 2
Let's take a closer look at popular models of knitted hats.
- Classic knitted hats are a regular style, without any elements or additions. Well suited for every day, looks especially stylish with sporty and casual styles.
- Hat with ear flaps. Brings back memories of childhood. Probably everyone had earflaps - warm, comfortable, and always fit perfectly on their head. Now there are models for adults - they are just as cute and touching, the ears can be tied or fastened with buttons or snaps.
- A knitted cap is a headdress that combines a cap visor and a hat base. An original combination for people who value style and convenience.
- Stocking. A multifunctional item - both a hat and a scarf. It became popular in the 80s and is now again in great demand among young people.
- Pipe. It is also called a transforming hat. It has been known since the beginning of the 20th century. And today she is again at the peak of popularity. Suitable for both adult women and young girls. A funnel hat emphasizes all the advantages of the face, while correcting its oval and shape.
- A bonnet is a comfortable headdress. A knitted bonnet combines a hat and a scarf; it can be used to easily protect your face and neck from the cold, and it will also preserve your hairstyle. The last point becomes the main factor in choosing this product.
- Turban and turban. I remember the words from the famous film: “The East is a delicate matter!” And it is not surprising, since these headdresses look impressive and unusual, having absorbed the beauty and spirit of eastern countries. But a knitted turban and turban require a special style of clothing; you should forget about this when thinking through the details of the image.
- Bowler hat. An original model that gives the whole image an aristocratic feel. Not for every day and only with certain clothes in a classic style.
- Berets. Two main types of knitted berets are extremely popular among women: a voluminous beret with an overhanging edge and a neat style in the style of the 70s. The beret is synonymous with elegance and emphasizes the dignity of its owner.
- The knitted hat-helmet looks unusual. Its main difference is its voluminous ears. They effectively protect against wind and cold.
- Kubanka. As you might guess, the name comes from Kuban, and such a hat is the calling card of the Kuban Cossacks. Kubankas are made from astrakhan wool, merlushka, and also knitted fabric; they look attractive and elegant on girls, making the image fragile and feminine.
- Hooded hat (scarf-snood). An accessory that will help you feel comfortable even in the most severe frosts. It looks luxurious and goes well with fur coats, sheepskin coats, coats, and down jackets. For lovers of sporty style, it will be an excellent alternative to classic knitted hats.
- Large chunky knitted hats. Designers have one inflexible rule - the larger the hat, the better. The voluminous knitted model looks great with a sports jacket or parka; it fits perfectly into the picture of the city and nature.
We knit a hat White Tenderness with knitting needles
The white color of a headdress is not even protection from the cold, but a luxurious decoration that every woman should have. The hat will suit any style of outerwear: from a down jacket to a fur coat made of natural fur. To knit a hat, take Alpaca Wool yarn from Vita (40% alpaca 60% laster wool) 100 grams/300 meters, circular knitting needles No. 3.5 and 4.5, additional. spoke. Knit in 2 threads. Elastic density 10cm - 20 loops.
How to tie correctly? We cast on 110 loops with knitting needles and knit four rows with an elastic band 1*1. The main pattern of hats for women is braided. Knitting pattern: Evenly add 70 stitches, then knit 4 rows. Learn more about how to knit the pattern here. In the fifth we make a five by five crossing according to the pattern:
Before decreasing, you need to knit about 16-17 cm according to the description, depending on how tall you want to knit the hat. Decrease pattern: 1. While crossing, decrease two loops in each repeat, you will get a 4*4 braid. Then 3p. facial stitch. 2. 2nd cross - tie the same decrease. There remains a 3*3 cross.
3. Two rows of satin stitch. 4. We cut again in the same way, all we have left is a 2*2 crossing.
5. Knit two rows. 6. Knit all loops two together, tighten the remaining ones with a working thread.
How to knit a hat with large stitches
It's cold outside, we need to take care of our ears.
And make it fashionable. The latest trend of the season is voluminous knitted women's hats. You can knit this headdress in one evening. For work you will need: knitting needles No. 10, yarn 75 meters per 100 grams. If you don’t find one that’s suitable, feel free to wind any one into several threads. And if you get a little creative, you can combine different colors. The knitting description is very simple. Even an inexperienced knitter can knit a hat with knitting needles. We cast on 32 loops plus 2 edge loops on straight knitting needles, knit 12 rows with facial loops. Then we subtract 2 at a time. 16 left. Let's knit a purl row. Next time, decrease again in 2nd place. 8 left. Pull it through the working thread and pull it tightly. If desired, make a pompom. Let's make a bomb using our own hands.
To do this, pinch the tail of the thread with your fingers (leave it longer). We wrap 3 fingers with thread. The more revolutions you make, the more voluminous the bombon will be. Cut the thread, pull it together, connect it to the beginning, cut along the opposite side. How to make a beautiful pump in a variety of ways.
Now sew on the bump. Ready! Everything is very simple. If you have never tried it before, start knitting a hat with knitting needles with this model. Choose a color that suits you. Buy yarn that is pleasant to your skin and start knitting!
Universal earflaps for women
If desired, you can knit in 2 threads.
For the ears : using 4 mm knitting needles, cast on 6 stitches. We go with the front ones, every 2 rows adding a loop from both edges - 6 times in total.
The size of the eyelet can be adjusted by changing the number of added loops and rows accordingly.
Base : now we assemble the cap. One by one, we cast on the loops from the ears and new ones for the front and back ends of the cap onto the knitting needle. There will be 2 parts in total, which are connected with a mattress seam, since the back part will gradually expand. If it’s hard to imagine, you can compare it with a pattern.
As a result, we add a loop, knitting the loops of one ear using any technique (to taste). We cast on another 20 loops (for the front part), knit another eye and cast on another one.
Continue with any knitting stitch.
You can add patterns at your discretion. But it is necessary to add to increase the back of the cap (every second row) on both sides of the product:
1 time - 2 sts and 1 time - 3 sts. As a result, there will be approximately 8 rows (this is the full width of the entire product, which can be adjusted during the knitting process).
We set the height of the cap before further narrowing, knitting approximately 16 next to each other.
Decrease stitches: 1 kp. 5 kp = 2 p together (leaning to the right) + 2 kp + 2 p together (tilting to the left) + 5 kp - repeat 1 kp.
We perform the decrease cyclically only 4 times every 2 rows. The remaining ones are pulled together through 2 rows. Sew the hat.
To make a lapel, cast on 20 stitches and work in front rows to the desired height. We fasten the lapel by closing the loops.
To weave braids, cut 18 threads 1 m long. Fold it in half and thread it into the bottom loop of the ears.
Wool turban for the cold season
We gain the height of the hat (on average 26 sts) and knit to a length equal to half the circumference of the head minus 2 cm. Divide the loops into 2 equal parts. We set aside one part, and knit 4 rows on the second.
We place the knitted half over the unknitted half and knit further, putting them on one knitting needle (remembering to follow the features of the pattern). If there are 2 loops of the same type together (for example, a stitch next to a stitch), then we knit them together, but then at the end you need to add 1 stitch.
Close, knitting to the required length. We cast on loops along the entire length of the fabric and work 9 rows with an English elastic band. Then we go with an elastic band (1 by 1) 2.5 cm. Next - the bottom of the hat in garter stitch, 2 rows.
Next, we reduce the loops by half, knitting together - lp over sp so that it is on top. 4 rows of simple stockinette stitch, then 2 rows of double stockinette stitch. Next, together 2 rows of 2 stitches. Close off the free ones. The bottom of the cap should be steamed through a damp cloth.
Winter knitted with lapel
Number of loops = 4n+2 (average 98) You can knit on any knitting needles, but you need to consider what exactly you want to get. Based on this, we select the diameter and type of knitting needles.
We knit with an elastic band 2 by 2 (2p + 2p) until the desired height is reached.
We begin to gradually decrease:
- We knit 2p together, leaving the edges;
- follow the drawing;
- We knit 2 knits together, taking into account the edges;
- according to the drawing;
- we knit 2 adjacent ones as one single stitch;
- ip - everything.
We fix and mask the end of the thread with the IC. We tuck the edges of the hat.
Snood hat
You will need circular knitting needles No. 5 and 200 g of yarn.
The length and width of this model can be any - it depends on your desires. A wide hat can be styled much more effectively. The classic snood hat is knitted with a Polish elastic band.
We cast on the required number of loops, connect them in a circle and knit cyclically in rows:
- 3lp + 1 sp - repeat;
- 2lp + 1 sp + 1 lp - repeat.
Voluminous women's hat with knitted braids for beginners
A women's knitted hat with a description can be made with or without a pompom.
A voluminous knitted women's hat with knitting needles with a description according to the “Braid” pattern will appeal to novice craftsmen. They will be able to knit it by studying in detail the recommendations for its creation. For a hat with braids, you will need two skeins of thick yarn, circular knitting needles No. 3.5 and No. 4.5.
On circular needles size 3.5 you will need to cast on a number of stitches that will be a multiple of 12, plus one additional stitch. It is needed to close the knitting in a circle. For a beautiful knitting connection in the round, transfer the first loop from the left knitting needle to the right one, then lower the last loop through this loop from the right knitting needle and return the first loop removed from the left knitting needle back.
It is recommended to start knitting a hat with a simple 2×2 elastic band, which is recommended to be done to a height of 5 – 7cm. In the last row you need to switch to needles No. 4.5. Proceed to knitting a headdress according to the basic pattern: knit 2 purl stitches, 6 knit stitches, 2 purl stitches and 2 knit stitches, perform throughout the row. Repeat the pattern for another 6 – 8 rows.
Start forming the “braid”. Throughout the entire row, alternate the combination of stitches: purl 2, knit the next 3 on an additional knitting needle or pin, knit the other 3, then knit 3 stitches from the third needle, then knit 2 and purl 2 stitches.
Complete the pattern to a height of 12 cm, then proceed to decreasing the stitches. The first row must be decreased every 3 stitches, the second row must be knitted without decreases, the third row must be decreased every second stitch of the row, the next row must be decreased without decreases, and finally pull off all the remaining loops by threading a sewing needle and thread through them.
Such a hat can be decorated with a ready-made fur pom-pom or you can make it yourself from threads.
To do this you will need yarn, the same color as the hat or contrasting with it, scissors, a sewing needle and two cardboard blanks. It is better to take cardboard for the workpiece of medium hardness.
Using a compass, draw a circle with a radius of 1.5 cm on a cardboard sheet,
then from the same cent, for a pompom with a diameter of 10 cm, draw another large circle with a radius of 6.5 cm.
Cut along the contour of the outer diameter and inner hole. Make a cut between the circles 2-3 mm wide. Make the second workpiece in the same way.
Place the two blanks together and pass a thread between them, which will subsequently be used to tighten the finished pom-pom.
Wind the thread tightly around the folded pieces so that the hole is halved.
Next, holding the middle of the prepared pompom with your hand, cut the wound threads along the larger diameter of the workpiece. Tighten the thread that was laid between the two blanks and tie a knot tightly so that the threads do not come out of the pompom. Pull out the workpieces. The pompom is ready. Sew it to the top of the hat.
Takes knitting needles with a transverse braid
To create a beret you will need a skein of yarn 100 g (350 m, 50/50), straight knitting needles number 5 and 6, 1 additional knitting needle for knitting a braid, a sewing needle. The size of the beret, at the request of the master, can be favorite and depend on the selected materials and the length of the associated transverse “braid”. Cast on 20 stitches on size 6 straight needles. The “braid” is knitted in turning rows. The first row is front.
In the 1st row it is necessary to alternate: 4 purl stitches, 12 knit stitches and 4 purl stitches. Turn the work over. 2nd row is the opposite - 4 knit stitches, 12 purl loops and 4 knit stitches. Repeat the first two rows once.
From the 5th row - start knitting a three-strip braid. Knit the first 4 purl stitches and 3 knit stitches, transfer the next 3 stitches to an additional knitting needle behind the knitting, then knit 3 knit stitches. Return and knit 3 slipped stitches. Place the other three stitches on an additional needle before knitting.
Knit three more stitches, return to the thrown stitches, knit them. The row ends with 4 purl stitches. The 6th row is knitted similarly to the 2nd. In the 7th - 10th, repeat the first two rows twice. Repeat the 1st – 10th rows until the required hat size is achieved. Finish knitting, bind off the loops.
The bottom side of the hat is done as follows:
- On one long edge of the strip, on knitting needles No. 5, cast on loops from the front side, approximately 1 loop is equal to two rows of the braid.
- Knit approximately 6-8 rows in garter stitch.
- Close the loops.
Top side:
- On knitting needles No. 5, cast on stitches in the same way as the bottom side, plus 2 additional ones to give the required volume to the beret.
- Work in stockinette stitch for 7 rows.
Proceed to decreasing stitches. Continue knitting with stockinette stitch. In the 1st row, knit every 8th and 9th loop in one loop. In the 2nd and further in each even row, do not decrease, all stitches are knitted purl. In the 3rd row, knit every 7th and 8th stitch in one, in the 5th row - every 6th and 7th stitch.
Continue decreasing until there are 17 stitches left on the knitting needles, which will need to be pulled together with a thread and a needle. Hide the remaining end of the thread on the wrong side. Make a seam. The hat is ready.
Knitted hat with honeycomb pattern
For a hat measuring 54 cm, you will need a skein weighing 100 g (meter 240 m, composition 50/50 wool/acrylic), circular knitting needles No. 3, an additional knitting needle, a knitting marker. On the knitting needles, cast on 96 stitches and 1 additional loop for knitting in the round.
Start knitting the hat with a simple 2×2 elastic band, in which the front loops must be knitted through the front wall of the loop, and the purl loops through the back wall. The height of the elastic will be 15 rows. At the request of the person for whom the hat is being knitted, you can knit more rows. In this case, the hat can be worn with a lapel.
When knitting an elastic band in its last row, it is necessary to increase the loops so that the resulting number of loops is a multiple of 8. To do this, knit two knit stitches into each first knit stitch of the elastic band. Start knitting the hat according to the basic pattern - all stitches will be knit stitches. The first two rows must be done in stockinette stitch.
In the 3rd row - the first 2 loops must be thrown onto an additional third needle at the back of the work, the 2 loops following them must be knitted, then the 2 thrown loops must be knitted. 2 more loops must be transferred to an additional knitting needle in front of the work, knit the 2 loops following them on the knitting needle and 2 removed loops. The repeat of 8 loops is completed. It must be repeated until the row is completed.
The next 2 rows are knitted in stockinette stitch. The 7th row is knitted similarly to the 3rd, but the first time the loops are removed before work, and the second time - after work. Repeat rapport until the row is completed. Next, repeat from rows 1 to 8 to the required height. Proceed to closing the crown of the knitted women's hat.
To do this, it is recommended to use the following description: throw the first 2 loops onto an additional knitting needle (based on the resulting pattern at the back of the work or in front of the work), join the next 2 loops into one, then join the removed loops into one. Continue until the row is completed. The next 3 rows are knitted with knit stitches without decreasing.
In the 5th row of decrease, knit the first 2 stitches in one, knit 1, repeat until the end of the row. Next 2 rows are knitted without changes. Row 8 – knit each first and second stitch into one. Pull the thread through the remaining loops on the knitting needle and tighten, hiding the end of the thread. Knitting is completed.
"Tacori" hat
A hat knitted with this pattern looks like a long stocking with an elastic band 1*1 or 2*2, with a lapel. The completion of the crown may vary. The length of the hat can also be different, depending on the desired width of the lapel.
Fold the working thread in half.
Cast on the loops. Their number depends on the circumference of the head.
The standard number of loops for this model when using wool blend threads is 60.
The method of knitting a hat is English elastic. 1,3,5, etc. (i.e., odd rows) are knitted in one way, and 2,4,6, etc. (i.e., all even) – to others.
First knit in stockinette stitch. Knit the first centimeters of the fabric with a 1*1 elastic band (alternating knit and purl stitches).
Divide the entire fabric of the hat into 3 parts. When finishing each row, knit the last 2 stitches together.
Make the first decrease in stitches with an edge loop. This way the decrease will be smooth and beautiful, and the decreased loops will form a neat “pigtail”.
Decrease loops in 30-40 rows, depending on the size of the hat. At the end, pull the thread through the 1 remaining loop and complete the work. Secure the end of the thread from the inside of the hat.
Do-it-yourself voluminous hat made of yarn
A voluminous hat is a modern headdress. Little tricks will help you create a work of art.
- To make the hat as warm and voluminous as possible, you need to take thick yarn (or fluffy). You can also make your own fabric from 2-3 layers of regular thread. You need to knit with thick plastic or wooden knitting needles.
- The elastic band of the hat or its edge should be knitted with smaller diameter knitting needles. If we initially knitted with sixth needles, we need to take fourth ones to the edge.
- For a large hat you need textured and bright patterns: cones;
- braid (or tourniquet);
- English gum.
Simple and beautiful knitted hats with a lapel
Many people prefer hats with lapels; the rolled edge creates a small volume at the bottom of the model and the hat fits differently, it seems better than without a lapel. In addition, the additional layer of material will reliably warm our ears.
And such hats, although simple, are very beautiful thanks to the choice of soft yarn and suitable color.
For example, you can choose a model only with an English elastic band. We already know how to knit it (see above).
Cast on 70 loops and make this pattern to a height of 32 cm.
Then you should switch to a 1x1 elastic band and knit another 3 cm with it.
In the next row we knit 2 loops together.
The next row is knit and another row is 2 together.
A stylish hat with light braids from viktori_vikt is knitted from mixed yarn (60% merino, 25% alpaca, 15% angora) in 2 threads (50 g/112.5 cm).
The number of loops is determined by calculation; it must be a multiple of 4.
For example, at 54-56 head volume, 104 loops are cast on.
We knit 13 cm with a 1x1 elastic band, and then in satin stitch with braids according to the pattern.
After 25 cm from the bottom, we make decreases on both sides of the braid with a left and right slope. We make decreases through the row.
Original two-color
A two-color cap can be of any model, so the general method for introducing a thread of a different color will be described below.
Let the fabric be knitted with an elastic band 1 by 1. If you want to make vertical stripes of different colors, then here the division will be along the lines of the rib and sp. We simply draw the second thread next to the first. When you need it, we knit it; otherwise, we remove it with a crochet.
In the case of wide horizontal stripes, you can trim and tie in knots, and then mask with IS.
Another option is to knit in two threads (in different colors, respectively). Or you can buy multi-colored yarn.
Winter hat for men
In order for a hat to really warm you in winter and not be a decoration, you need to find warm and high-quality yarn. It could be:
- Sheepskin (sheep's wool).
- Angora.
- Llama wool.
- Mixed yarn, where there will be half synthetic, half hare or goat down.
When choosing sizes for a future product, a beanie hat would be an excellent option; it can easily fit in your pocket. More suitable for cold autumn-winter. The winter version can be knitted from regular yarn and two knitting needles, sewn, and later insulated with a special material.
Accessories for successful work:
- Knitting needles, you can take two pieces, sew the resulting fabric.
- Black and white threads. White yarn will make a beautiful ornament, black yarn will be the basis.
You need to knit from the top of the hat. You need to make Turkish loops, not ordinary ones, so that you can knit in all directions at once. You can simply knit the insulated fabric and sew it.
We cast on several loops, taking into account the size of the head. We knit to the middle and begin to make patterns (ornament). If you have a rich imagination, then this will not be a problem. Next, our product needs to be finished. We decrease 8 loops one by one until there are 10 left. We collect the rest on the needle and simply sew it together.
Hat made of thick yarn with knitting needles: knitting pattern
Thick yarn is a special type of thread for knitting . It has one thick thread, which consists of many small ones. Due to this, the product always turns out voluminous , lush and warm. Knitting with such yarn is difficult only at first. If you get the hang of it and study knitting patterns, you can discover many beautiful patterns. The advantage of large yarn is that the product is knitted faster due to the “large” loops.
You can use plain threads, but melange threads with many bright shades or colors that change from one to another look much more impressive.
Scheme
LiveInternetLiveInternet
Quote from VALERI-ELIN
Read in full In your quotation book or community!
Knitted women's hats.
We knit with pleasure How to knit a warm hat for women
If you like to create beautiful fashionable things with your own hands, then this article with a detailed description and diagrams on how to knit a hat for a woman is especially for you. Honestly, today every woman must be able to knit, because there is nothing more pleasant than the opportunity to pamper herself and her loved ones with budget new clothes.
If you are still a beginner, you can start with the first tutorial below on how to knit a simple hat for a woman. As a visual aid, you can use the video, which is also attached. so have fun knitting!
Many ideas were shown earlier FASHIONABLE KNITTED WINTER HATS 2016-2017. INSPIRATION IDEAS, now you can knit the hat you like with the help of detailed descriptions and videos provided.
Lesson 1. How to knit a simple hat
Knitting a beautiful hat is not as difficult as it seems. To do this, you need to arm yourself with knitting needles, yarn and patience.
Simple terry hat
Necessary:
- 125 g mohair
- knitting needles 4.5 mm
PP (patent stitch) = insert the right needle into the next stitch one row below (discard the loop of the current row). Description: Cast on 75 loops and knit with an elastic band as follows: 1st row (RS): k2, *p1, k1; repeat from * to last stitch, k1. Row 2 (WS): k1, *p1, k1; repeat from * to the end of the row. Knit another 8 rows with an elastic band, finishing on the wrong row.
Then continue with a patent elastic band: 1st row (RS): 1 knit, * PP, 1 knit; repeat from * to the end of the row. 2nd row (WS): k2, *PP, k1; repeat from * to the end of the row. Repeat 2 rows of the pattern until the height of the cap is 26 cm from the cast-on, ending on a purl row. Top formation: Row 1 (RS): k1, *PP, p3tog; repeat from * to last 2 stitches, PP, k1 = 39 stitches. Row 2 (WS): k1, *p1, k1; repeat from * to the end of the row. Row 3 (RS): *k2tog; repeat from * to last stitch, k1 = 20 stitches. Row 4 (WS): P1, [P2tog] 9 times, P1 (0) = 11 sts.
Beautiful winter hat made of angora
Required: -120 g angora - 5 mm circular needles - stitch marker - set of 5 mm double-pointed needles - knitting needle Garter stitch: knit stitches in each row. Openwork pattern (the number of loops is a multiple of 7). Round 1: knit stitches. Round 2: *K1, K2. together, yarn over, knit 1, yarn over, 1 p. remove, knit 1. and stretch it through the removed st.; repeat from * to the end of the circle. Round 3: knit stitches. Round 4: *K2. together, yarn over, knit 3, yarn over, remove 1 stitch, knit 1. and stretch it through the removed st.; repeat from * to the end of the circle. Repeat 1-4 rounds. row of pattern. Description: Cast on 84 stitches on circular needles. Do not join in a circle, knit in straight and reverse rows in garter stitch 2.5 cm. Place a marker at the beginning of the row and join in a circle. Repeat 1-4 rounds. rows of openwork pattern 6 times.
Shaping the top: Switch to double-pointed needles when the number of stitches decreases. 1st round: *10 knits, 2 knits. together; repeat from * to end of round = 77 sts. Rounds 2, 4 and 6: knit stitches. Round 3: *K9, K2. together; repeat from * to the end of the circle = 70 sts. Round 5: *K8, k2. together; repeat from * to the end of the circle = 63 sts. Round 7: *K7, k2. together; repeat from * to end of round = 56 sts. Round 8: *knit 6, knit 2. together; repeat from * to the end of the circle = 49 sts. Round 9: *K5, k2. together; repeat from * to the end of the circle = 42 sts. Round 10: *K4, k2. together; repeat from * to the end of the circle = 35 sts. Round 11: *K3, k2. together; repeat from * to end of round = 28 sts. Round 12: *k2, k2. together; repeat from * to the end of the circle = 21 sts. Round 13: k1, k2. together; repeat from * to the end of the circle = 14 sts. Round 14: k2. together; repeat from * to end of round = 7 sts.
Cut the thread, leaving a long end. Thread the piece through a knitting needle, pull through the remaining stitches and pull off. Thread the thread from the cast-on stitches into the needle and sew a garter stitch. Hide the remaining threads on the wrong side.
Warm grass hat
Necessary:
- 100 g of grass yarn - knitting needles No. 6. Description: Start knitting by casting on 60 loops on knitting needles No. 6. Knit with a 1x1 elastic band about 4 cm. In order to expand the circle, every 5 loops add 1 loop with a twisted yarn over. Then knit straight 5 cm, after which start decreasing 1 loop in each front row every 5 loops. Use a needle to gather the remaining loops (there will be about 10) onto a thread folded in half, and then fasten it.
The hat must be sewn with a knitted seam.
Lesson 2. How to knit a fashionable hat
Once you have learned how to knit simple hats, you can move on to more complex patterns. In 2021, the following models will be relevant: voluminous hat, earflap hat, beanie (also called stocking hat, sock, cap), turban, hood (or helmet hat), model with a visor, hat with a pompom, double a mischievous hat with ears, a regular one with a lapel, a snood hat (or a hooded hat).
Fashionable voluminous hat made of large yarn
Universal size 53-54 cm. Required: - thick yarn 200 g - circular knitting needles 10 mm long 40 cm - stitch marker - thick knitting needle Description: Cast on 32 loops. Place a marker at the beginning of the row and join into a circle. Knit with an elastic band as follows: *k2, p2; repeat from * to the end. Work 14 more circular rows and decrease 2 stitches evenly, knitting 2 knits together in the last rib circle = 30 stitches. Next, knit 12 circular rows with knit stitches only. Track. round: knit 2 stitches together = 15 stitches. Work 2 more rounds with knit stitches. Cut the thread, leaving a long tail. Thread the piece into a knitting needle. Slip all loops onto the thread. Pull and secure the thread on the wrong side.
Watch the video on how to wear such a voluminous hat for a woman.”
Universal hat with earflaps for women
Size - 54 cm (head volume) Required: - 250 g of yarn - regular 4 mm knitting needles The hat can be knitted in 2 threads. Ears: Cast on 6 stitches and start knitting the hat in garter stitch. At the same time, add 1 loop on both edges 6 times every 2 rows. Then knit straight for another 14 rows. If you add more loops, your eye will be much wider. If you knit more rows, then your eyelet will be longer than in the photo. So, you have knitted 2 identical ears. HAT WITH EAR FLAPS:
Now we collect everything into one product. To do this, on a long knitting needle, alternately cast on the loops from your ears and new ones for the front and back of the hat. Please note that at first the back of the hat will gradually increase in size and will eventually consist of two parts connected by a mattress seam. For a visual representation, look at the photo of the pattern.
Thus, you need to add 1 loop, knit the loops of one ear using knit stitch (or any other stitch, if you don’t want the option from the photo), cast on an additional 20 loops for the front of the hat, knit the second eye and cast on an additional 1 loop. Continue knitting the hat using your pattern or stockinette stitch as suggested in the photo. At the same time, add loops to expand the back of the product in every second row on both sides of the knitted fabric 1 time for 2 loops and 1 time for 3 loops. This will be about 8 rows. This will be the full width of your header. If necessary, you can adjust it by adding more loops during the knitting process.
You need to knit about 16 more rows, which will be the height of the cap before tapering at the crown. Decrease in this way: 1 edge loop *, 5 knit loops, 2 loops with a tilt to the right, 2 knit loops, 2 loops with a tilt to the left, 5 knit loops *, repeat from * to *, 1 edge -I'm a loop. Decrease stitches in this manner 3 more times every 2 rows, and pull off the remaining stitches after 2 rows. Sew the hat at the back using a mattress stitch.
For the front lapel, cast on 20 stitches along the edge and knit in garter stitch to the desired height. then close all the loops and attach the flap in any suitable way. For braids, you need to cut 18 threads 1 meter long, fold them in half and thread them through the bottom of the ears and braid them into braids.
Watch the video on how to knit a hat with earflaps.
Knitted beanie hat (stocking hat, sock hat, cap)
Necessary:
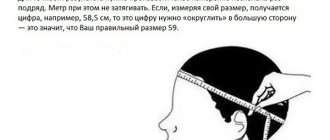
- circular knitting needles 4 mm - 200 g of medium thickness yarn - measuring tape Description: First of all, using a measuring tape, measure the circumference of the head for which you plan to knit a hat. Let's say you get 56 cm. This means that you will knit a size 56 hat.
The second important step is to determine the knitting density. What does knitting density mean? This is the number of loops and rows required to knit a fabric measuring 10x10cm. What this means in “simple language” is to correctly calculate how many loops you need to cast on at the beginning of the work. Cast on 22 loops and knit 10 cm in the pattern chosen for the hat.
Iron the knitted sample through a damp cloth. You don't need to smooth it out too much. Do this carefully, lightly “steaming” the sample. Measure the prepared sample around the perimeter. Let's say you get a sample measuring 10x10 cm when knitting 30 rows. This means that the knitting density with this pattern will be 2 loops per 1 cm and 3 rows per 1 cm.
That is, for a size 56 hat you need to cast on: 56x2=112 stitches and knit 30 cm, that is, 30x3=90 rows.
Cast on the required number of stitches on circular needles. And knit in a circle, using the fishing line, with the previously selected pattern 25-27 cm up. You will get a knitted fabric in the form of a pipe. After 25 cm, start decreasing stitches by knitting 2 stitches together in every third row until you have 3 stitches left on the needle. When decreasing the stitches, knit the fabric in garter stitch. Break the thread from the skein, leaving about 10 cm, and pull it through the 3 remaining loops, knitting them together and securing the end on the wrong side.
Watch the video “knit a beanie”.
Hat with visor
Required: - 250-300 g of yarn - circular knitting needles No. 2.5 - silicone cap Description: Cast on 80 loops, close in a circle and knit 4-6 rows with stockinette stitch, i.e. facial loops.
When I join in a circle, I leave a tail of thread to mark the beginning of the row. Divide the number of loops into three parts - 18 loops, 44 loops, 18 loops. On 44 loops we will knit the visor, making an increase of 10 loops every 4 loops. We make an increase so that the visor fits well and fits comfortably in its pocket. When the pocket for the visor is knitted and the decreases are made, we knit the second half of the headband.
We fold the fabric into pieces, throw the tail of the thread onto the face of the knitting (beginning of the row!). We knit one loop from the knitting needle, lift one and knit it from the cast-on edge. We reach approximately the middle of the visor, insert the visor blank and continue knitting loops to the end of the row, i.e. to the tail. The upper part of the rim (i.e. the front) should be several rows larger than the inner one (to hide the holes from turning).
And so we have 160 loops on our knitting needles. You can start knitting the crown. We divide the loops into 8 parts (wedges) and knit a zigzag pattern. One wedge - 20 loops. Rapport-*from 1 pet. knit 3 loops, knit 8, 3 loops together (behind the back wall), knit 8* - repeat 7 more times. If you want a larger cap, you can add 16 stitches = 176 stitches. One wedge - 22 loops. Rapport-*from 1 pet. knit 3 loops, knit 9, 3 loops together (behind the back wall), knit 9* repeat 7 more times.
We knit the crown height we need, knitting one row in a zigzag pattern, one row evenly.
Tulya is ready. We begin to make reductions. One row is zigzag, one row is straight. One row - we knit only 3 loops together, and we don’t make 3 loops from 1 loop, one row exactly. When there are 16 loops left on the knitting needles, knit 2 loops together and pull them onto a thread. The cap is ready!
Watch the video “knit a hat with a visor.”
Stylish hat with pompom
Universal size. Required: - 1 skein of yarn (75% acrylic, 25% wool; 136 m/85 g) of three different colors: Oxford Gray (78046) - A, Steel Blue (78105) - B, Soft Teal (78209) - C; - knitting needles 5.5 and 6 mm; - auxiliary knitting needle.
Knitting gauge: 15 stitches and 20 rows = 10 cm in stockinette stitch using larger needles.
Legend: K8P = slip 4 stitches onto the auxiliary needle while working, knit 4, then knit 4 from the auxiliary needle; K8L = slip 4 stitches onto the auxiliary needle before work, k4, then k4 from the auxiliary needle; +1 (add 1 loop) = lift the loop from the broach and knit behind the back stitch. wall.
Description: On smaller needles, using thread A, cast on 73 stitches and knit 7.5 cm with an elastic band, k1, p1. Finish on a purl row. Switch to larger knitting needles. 1st row (RS): knit with thread B k3, *+1, k2, +1, k3; repeat from * to end = 101 stitches. 2nd and all purl rows: purl stitches. 3rd row: k5, *K8L, k4; repeat from * to the end. from 4th to 10th row: start on a purl row and knit in stockinette stitch (7 rows in total). Row 11 (RS): K1, *K8P, k4; repeat from * to last 4 stitches, k4. 13th row: facial loops. Rows 15 and 17: knit with thread C. from the 19th to the 27th row: knit with thread C and repeat from the 3rd to the 11th row again. Row 28 (WS): purl stitches. Forming the top: Row 1 (RS): k1, *k2tog, k3; repeat from * to end = 81 stitches. 2nd and all purl rows: purl stitches. Row 3: k1, *k2tog; repeat from * to end = 61 stitches. Row 5: k1, *k2tog, k1; repeat from * to end = 41 stitches. 7th row: k1 * k2tog; repeat from * to end = 21 stitches. Cut the thread, leaving a long tail. Using a needle, pull the piece through the remaining stitches. Pull and secure the thread. Make a seam. Pompom: Using thread A in 2 layers, wrap your hand about 50 times. Leave a long piece. Carefully remove the skein from the rug and tie it tightly. Sew the pompom to the top of the hat.
Watch the video on how to knit a hat with a pompom.
Hat with ears
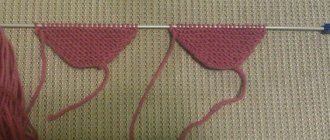
Size 56-57. Required: - 150 g of yarn - 4 mm circular knitting needles Description: For the first “eye” you need to cast on 7 loops and knit in this order: 1Krom., 1IP, 1LP, 1IP, 1LP, 1IP, 1Krom. The 2nd and all purl rows are knitted according to the pattern.
Next, knit 1LP x 1IP with an elastic band, adding loops on both sides in each front row 7 times, 2 loops each (at the beginning and end of the row). Insert new loops into the drawing.
Once you have about 21 stitches on your needles, measure the length of the eyelet. If the length is suitable, then set it aside and start knitting the second one. If not, then knit directly the required length, but without adding loops. Tie the second “ear” in the same way.
Then, on circular or stocking needles (you can knit on straight ones, but then there will be a seam along the back of the head, and the loops will need to be distributed taking into account this seam), cast on 33 loops, add 21 loops of the first “eye”, cast on 33 loops again, add 21 loops of the second “eye”.
Next, knit with a regular elastic band 1LP x 1IP for about 3-4 rows. Make sure that the elastic pattern is distributed harmoniously across the new cast-on stitches. Those. for the front and back of the cap, which consist of 31 loops, distribute the loops as follows: 7 elastic loops, 6 rope loops, 7 elastic loops, 6 rope loops, 7 elastic loops = a total of 33 loops; for the “ears”, each of which consists of 21 loops, distribute the loops in this way: 6 loops of the harness, 1 IP, 6 loops of the harness, 1IP, 6 loops of the harness = a total of 20 loops. Carefully shorten 1 loop, i.e. knit 2 loops together without ruining the pattern.
Knit straight, repeat the repeat of the “harness” according to the pattern, about 14-16 centimeters. Then start decreasing stitches. To do this, in every 4th row, reduce evenly throughout the entire row: 3 times, 1/4 of the total number of loops
Check the height of the cap, if it fits, then pull the remaining loops with the end of the thread and secure them. As a rule, the height of a hat with ears can be from 20 to 22 centimeters. Perhaps some people like it taller. If the height is not enough, then knit a few more rows in height, while shortening the existing loops, and close at the end. For the ties, attach pieces of yarn to the ends of the “ears”. About half as long as the desired length of the strings themselves. Take the yarn in several threads for three parts, which you will then braid into a braid. This will be your tie. Tie a knot at the end and straighten the yarn at the bottom of the tie with scissors. For the top of the head, make a pompom.
Watch the video “how to knit a hat with ears for a woman.”
Lesson 3. How to knit a shaka with a pattern
Hats with a pattern look more impressive, but knitting them is much more difficult, since you need to monitor both the shape of the hat and the pattern. Sometimes you get lost and have to start all over again. But if you are careful and practice on a small sample, you will succeed the first time.
English elastic hat
Required: - wool yarn - 50 g at 135 m; — straight knitting needles No. 4 – 2 pcs.; - crochet hook; - scissors; - darning needle.
1. Find out the head circumference of the future owner of the headdress and be sure to make a small square of knitted fabric for the sample - the knitting density is always calculated individually. When knitting a hat with English elastic, an elastic, almost dimensionless product is created. In the described example, with a head circumference of 55-60 cm, a knitwear density of 18 loops for 46 rows, 78 loops are cast on for the headband of the hat. The knitting needles are straight and of medium diameter (No. 4). You can start knitting a hat with English elastic without making an elastic border. At the same time, you can make the fabric of the product either with or without a turn. Please note: the 1x1 elastic band secures the edge well!
2. Knit the headband in straight and purl rows, alternating 2 knit stitches and 2 purl stitches. When 8 rows are ready, start knitting the hat with an English elastic band. In the first row of the pattern, you will need to make uniform increases, bringing the total number of loops to 95. To add loops, divide the row into equal sections, and knit an additional thread in each. To do this, grab and twist the transverse threads between adjacent loops.
3. Work the fluffy fabric with an English elastic band until you reach a height of 25 cm from the edge of the rim. To form the main knitwear pattern, alternate stitches in the following sequence. In the first row of the pattern, do only knit stitches; start the second row with the edge loop (it can be removed unknitted); do the front one. Next, repeat the so-called double knit stitches, inserting the right knitting needle into the thread bow of the previous row. The final loops are the front and edge stitches.
4. Start the third row of English rib also with an edge loop, then alternate double and regular knit stitches until there are only a couple of thread arches left on the left needle. Knit the first one as a double knit stitch, the second one will be an edge stitch. Repeat the pattern according to the finished sample of the second and third rows until you have made the main fabric of the headdress of the desired size.
5. Start shaping the crown of the hat. To round the knitted fabric and tighten it at the top, make uniform decreases in the forward and reverse rows: at the beginning, an edge loop; during a row of 3 thread arches are knitted together with a regular knit stitch; at the end - edging. In the next row, make decreases without leaving edges, always knit 3 loops together.
6. Cut the working yarn, leaving a tail about 10 cm long. Pull it over the open loops of the last row and drag it with the hook inside the hat. Form a strong knot.
7. Turn the hat wrong side down, steam the knitted fabric and carefully connect the side edges of the part. Make a neat connecting seam using a darning needle and thread from a working ball. To ensure that the stitching remains sufficiently elastic and the product does not deform, do not make the stitches too tight.
Watch the video “how to knit a hat with an English elastic band.”
Stylish hat with braids
Required: - 150 g of yarn - knitting needles No. 3.5, - knitting needles No. 4, 5
I knitted it on two needles, because I have a large thread on circular needles and it results in a lot of tension and large holes between the loops, and I like it tighter. Then I sewed it together. I cast on 96 stitches on the knitting needles. Knitting needles No. 3.5. Knitted in 2 threads, yarn with 20% wool, 135g per 50m. I knitted a 2×2 elastic band about 6 cm. I switched to knitting needles No. 4.5 Pattern: 1) (2 p2, k6, p2, k2) - repeat until the end of the row. 2) knit according to the pattern, where from inside to outside, where from faces to faces.
Knit 6 rows like this and in the 7th row make overlaps where there are 6 faces. (YouTube is full of videos on how to knit braids). I did this: I transfer 3 loops to a toothpick, knit the next 3, return these 3 loops from the toothpick to the left knitting needle and knit them too. Then, according to the pattern, 2 purl, 2 knit, 2 purl and again overlaps. So until the end of the row.
After these overlaps, we knit 1 row on the wrong side according to the pattern, I don’t count it.
And repeat all 6 rows again, in the 7th there is an overlap And again repeat all 6 rows and in the 7th there is an overlap. In total, we made 3 braids. And from the beginning of knitting we knitted about 15-17 cm.
Then knit in the same way, but make decreases. I won’t write how to make decreases, because in three hats I did it differently all the time, I still haven’t figured out how to do it better. The most important thing is that they are invisible.
Watch the video “how to knit a hat with braids for a woman.”
Based on materials from http:/mysekret.ru/vyazanie/svyazat-shapku-spicami-dlya-zhenshhiny.html