What patterns are suitable for beginners
Using the simplest and most common elements - front and back loops, you can knit many good motifs that are distinguished by their beauty and reliability. There is a whole set of unusual and original works for beginners, which even people who do not have developed skills can perform.
With their help, you can improve your skills and immerse yourself even more in the wonderful world of hand-made things. There are several types of knitting, not all of which are suitable for beginners.
Drawings created by surface and hidden stitches are not always used only by inexperienced knitters. Such paintings, as a rule, decorate products that do not have a strong structure.
You can also use them to create a background for braids or diamonds. Motifs with back and front loops are used to create men's, women's and children's clothing, as well as as decoration for home textiles: blankets or pillowcases.
Blueprints
Creations created from front and back loops using knitting needles can have different dimensions. Fine mesh adorns men's sweaters or cardigans, and is used in combination with other creations.
Large sections of the illustration act as the main element of the image. We will give as an example several ornaments with descriptions and diagrams.
Handkerchief
A beautiful and simple pattern that does not require extraordinary skills. Each column is created only with the help of external loopholes. Please note: if you want to use the circular technique: the chains are knitted with front and hidden loops in order.
Note!
How to crochet a mouse and a rat: video master class on crocheting the 2020 symbol
How to knit a warm hat with ears for a newborn boy and girl - video tutorials with patterns, instructions for beginners
How to crochet a beautiful scarf: video master class on creating unusual, beautiful, simple scarves for boys, girls, men and women
Rice
A double-sided extended motif with a nice, slightly loose pattern. A chain of loops is used as a backlog, the number of which is divided by two. How to start knitting: a row is placed on a rod and used for further work with the diagram.
Then, the illustration is repeated, starting from the first row. It turns out that the front reef, located on the needle, is secured from the underside, and the rear one - with a frontal loop. Thus, the 1st row alternates from reverse and outer loops, and the second - vice versa.
Interesting pattern for a cardigan
A knitting pattern for a cardigan that looks expressive and is knitted in turning rows. It is a one-sided pattern.
How to knit a pattern - video:
Knitting pattern in rotary rows:
Pattern repeat: 7 loops; 12 rows.
The number of loops is a multiple of 7 + 6 for symmetry + 2 edge loops. It is better to knit the pattern using a classic purl loop.
- ROWS 1, 3, 5: K2; *P2; 5 persons*; 2 purl; 2 persons
- ROWS 2, 4, 6: purl all stitches.
- ROW 7: P1; *1 loop is removed – the thread is BEYOND the work; 2 purl; 1 loop is removed - the thread is BEHIND the work; 3 purl;* 1 loop is removed - thread BEHIND the work; 2 purl; 1 loop is removed - the thread is BEHIND the work; 1 purl.
- ROW 8: P1; *1 loop is removed - thread BEFORE work; 2 purl; 1 loop is removed - thread BEFORE work; 3 purl; *1 loop is removed - thread BEFORE work; 2 purl; 1 loop is removed - thread BEFORE work; 1 purl.
- ROW 9: P1; *1 loop is removed – the thread is BEYOND the work; 2 purl; 1 loop is removed - the thread is BEHIND the work; 3 purl;* 1 loop is removed - thread BEHIND the work; 2 purl; 1 loop is removed - the thread is BEHIND the work; 1 purl.
- ROW 10: P1; *1 loop is removed - thread BEFORE work; 2 purl; 1 loop is removed - thread BEFORE work; 3 purl; *1 loop is removed - thread BEFORE work; 2 purl; 1 loop is removed - thread BEFORE work; 1 purl.
- ROW 11: knit 1; *4 loops are removed - knit 1 is knitted first. 4th loop, then purl the 2nd and 3rd loops, then knit the 1st loop; K3.* 4 loops are removed - k1 is knitted first. 4th loop, then purl the 2nd and 3rd loops, then knit the 1st loop; 1 person
- ROW 12: purl all stitches.
Holes
A popular and beloved ornament by all, also often used by beginners. As a backlog, a chain of loops is used, the sum of which is divided by twelve. You also need to cast on 2 edge and 2 symmetrical loops.
According to the schedule: an empty square means p-i, a half-empty one means two stitches knitted together, with a pick-up behind the pin, and a semicircle means a yarn over.
Step by step from the photo:
- The first row is knitted in the following sequence: yarn over, 10 front lines, yarn over, another couple of loops knitted together.
- 2nd, and all lines that are multiples of two must be created using back loops. Odd numbered stripes are knitted with outside stitches.
- The eleventh line is performed according to the sequence: six frontal, two knitted behind the back wall, four frontal with a crochet and two PBN.
- Subsequent odd stripes are made using outer reefs only.
- Upon completion, the illustration is repeated, starting from the very first line.
Note!
How to knit a hat with a lapel using knitting needles or an elastic band: step-by-step instructions for beginners
How to crochet a winter hat: 95 photos of new models of warm, fashionable, original knitted hats with a lapel and a beautiful pattern
- How to knit a beanie hat correctly with knitting needles: video master classes, patterns, knitting patterns for fashionable models
Folded Loop Pattern
An interesting pattern that looks elegant but is easy to knit. An ideal solution for knitting cardigans, blouses, hats and other products. This beautiful pattern can be used to decorate individual details, for example, when knitting a lapel on a hat. Knitted in turning rows and in the round.
The pattern consists of slipped loops that form a kind of horizontal tracks. These “paths” can be placed in different sequences - closer or further from each other.
Beautiful pattern for a cardigan or blouse - MK:
Knitting pattern using rotating rows of a pattern made from pink yarn:
Pattern repeat: 2 loops; 4 rows.
The number of loops is cast on, a multiple of 2 + 1 for symmetry + 2 edge loops. The pattern repeat is indicated by *___*.
- ROW 1: *P1; 1 loop is removed (not knitted) - thread BEFORE work*. Row 1 ends.
- ROW 2: P1. ; *knit 1; purl 1*
- ROW 3: knit all stitches.
- ROW 4: purl all stitches.
Knitting pattern in the round with pink yarn:
Pattern repeat: 2 loops; 4 rows.
The number of loops is cast, a multiple of 2.
- ROW 1: P1; 1 loop is removed (not knitted) - thread BEFORE work.
- ROW 2: K1; P1.
- ROW 3: knit all stitches.
- ROW 4: knit all stitches.
Knitting pattern with turning rows of a pattern made of lilac yarn:
Pattern repeat: 2 loops; 6 rows.
The number of loops is cast on, a multiple of 2 + 1 for symmetry + 2 edge loops. The pattern repeat is indicated by *___*.
- ROW 1: *P1; 1 loop is removed (not knitted) - thread BEFORE work*. Row 1 ends.
- ROW 2: P1. ; *knit 1; purl 1*
- ROWS 3 and 5: all stitches are knit stitches.
- ROWS 4 and 6: purl all stitches.
Knitting pattern in the round with lilac yarn:
Pattern repeat: 2 loops; 4 rows.
The number of loops is cast, a multiple of 2.
- ROW 1: P1; 1 loop is removed (not knitted) - thread BEFORE work.
- ROW 2: K1; P1.
- ROWS 3, 4, 5 and 6: knit all stitches.
Stripes
It is also a common and simple pattern that you won’t spend a lot of time executing. The diagram is very easy, but it also requires some comments.
The peculiarity is the alternation of reef patterns from the first to the sixth row, starting with the frontal loops. The sixth in turn is performed in reverse p-mi, like the seventh.
The eighth phalanx is again the front-line units. Once all the strips are completed, the process is repeated, stopping only when you reach the required length.
Strokes
A fashionable and stylish pattern that can be used for knitting a jacket, cardigan or sweater. As a backlog, it is necessary to cast on the rod a composition of loops that is a multiple of twelve, as well as six symmetrical and 2 edge loops.
Step by step guide:
- The 1st, third, seventh and ninth lines are created only with the help of front buttonholes.
- Even lines, starting from the second, are performed according to the general image. This means that you need to make stitches exactly as they are located on the tool.
- The fifth parallel is knitted by alternating reverse and front stitches, starting from the first. You need to take six pieces.
- The eleventh line also alternates, but now from the front loops.
- The process ends on the thirteenth chain, after which the entire procedure is repeated according to the same layout.
Spectacular leaves on the reverse surface
Unusual leaves are knitted on the reverse stitch and connected by weaving. These spectacular fragments, which resemble leaves, can be knitted with a stripe up, or placed in a checkerboard pattern. The pattern looks especially beautiful in voluminous products, including snoods. You can knit in rotating rows and in the round.
Leaves with knitting needles - video:
Knitting pattern in rotating rows and in the round:
Checkerboard pattern repeat: 16 loops; 32 rows. Note! After the first rapport in height, rows are repeated from 9 to 32.
Rapport of one leaf: 8 loops; 20 rows.
The number of loops is a multiple of 8 + 1 for symmetry + 2 edge loops. For circular knitting, multiples of 8.
- ROW 1: P1; 7 persons; 4 purl; 1 person; 3 p.
- 2, 4, 6, 8, 10, 12, 14, 16, 18, 20, 22, 24, 26, 28, 30, 32 ROWS (all even): knit according to pattern.
- ROW 3: purl 2; 5 persons; 4 purl; 3 persons; 2 p.
- ROW 5: P3; 3 persons; 4 purl; 5 persons; 1 purl.
- ROW 7: purl 4; 1 person; 4 purl; 7 persons.
- ROW 9: P9; 7 persons.
- ROW 11: purl 9; 7 (4+3) crossed loops with a tilt to the LEFT.
- ROW 13: purl 4; 1 person; 4 purl; 7 persons.
- ROW 15: purl 3; 3 persons; 4 purl; 5 persons; 1 purl.
- ROW 17: purl 2; 5 persons; 4 purl; 3 persons; 2 p.
- ROW 19: P1; 7 persons; 4 purl; 1 person; 3 p.
- ROW 21: P1; 7 persons; 8 p.
- ROW 23: P1; 7 (4+3) crossed loops tilted to the LEFT; 8 p.
- ROW 25: P1; 7 persons; 4 purl; 1 person; 3 p.
- ROW 27: purl 2; 5 persons; 4 purl; 3 persons; 2 p.
- ROW 29: purl 3; 3 persons; 4 purl; 5 persons; 1 purl.
- ROW 31: purl 4; 1 person; 4 purl; 7 persons.
To continue the pattern you need to knit from the 9th to the 32nd row.
Legend:
- front loop;
- purl loop;
- 7 (4+3) crossed loops with a tilt to the LEFT: 4 loops are thrown onto additional. knitting needle and left BEFORE work, knit 3, knit 4. with additional knitting needles
Diamonds
A simple openwork knitting consisting of narrow multi-colored diamond shapes. You can also knit it using simple loops, which even inexperienced amateurs of homemade textiles can perform.
Since the type is double-sided, it looks the same inside as it does on the outside. Stitches, the number of which is divided by eight, are used as a basis. A couple of edge loops should be added to them.
Pattern in the form of leaves on the reverse surface
A beautiful knitting pattern for a sweater, cardigan, children's dress, skirt and many other products. The unusual pattern in the form of leaves can be classified as openwork. The “leaves” are knitted in a checkerboard pattern, thereby simplifying the knitting pattern.
Beautiful knitting pattern for a sweater - video:
Leaf knitting pattern:
Pattern repeat: 6 loops; 12 rows.
The number of loops is a multiple of 6 + 1 for symmetry - edge loops are INCLUDED in this number. The pattern repeat is indicated by *___*.
- ROW 1 (purl): K1; *P3; K3.* Row 3 ends; 1 person
- 2, 3 and 4 ROWS: how the loops look (according to the picture).
- ROW 5 (purl): k1; *purl all stitches*. Row 1 ends.
- ROW 6 (front): P1; *yarnover FROM MYSELF; the loop is removed (not knitted) onto the right knitting needle (the knitting needle is wound from left to right); 2 loops together, knitted with a slant to the RIGHT (knitted behind the front walls, then the removed loop is thrown over the knitted knitted one); yarn over FROM YOURSELF; 3 persons.* The row ends: yarn over FROM YOURSELF; the loop is removed (not knitted) onto the right knitting needle (the knitting needle is wound from left to right); 2 loops together, knitted with a slant to the RIGHT (knitted behind the front walls, then the removed loop is thrown over the knitted knitted one); yarn over FROM YOURSELF; 1 purl.
- ROW 7: knit 1; * 3 persons. (yarn over, loop, yarn over); 3 p.* Row 4 ends.
- ROWS 8, 9 and 10: how the loops look (according to the picture).
- ROW 11: knit 1; *purl all stitches*. Row 1 ends.
- ROW 12: P1; *3 persons: yarn over FROM YOURSELF; the loop is removed (not knitted) onto the right knitting needle (the knitting needle is wound from left to right); 2 loops together, knitted with a slant to the RIGHT (knitted behind the front walls, then the removed loop is thrown over the knitted knitted one); yarn over FROM MYSELF*. Row 3 ends; 1 purl.
Rubber
A simple knitting that will take you very little time to complete. For the base, you need to cast on the rod a number of loops that is a multiple of two. The elastic bands themselves are knitted according to the diagram: changing the upper and inner ties. After this, the sample is turned to the other side and work is carried out on knitting the loops in the same form in which they are attached to the needle - according to the figure.
Beautiful chains on the front surface
A simple and elegant knitting pattern in horizontal chains that can be worked closer or further apart. The 1st, 2nd, 3rd, 4th rows of repeat are responsible for this distance. This pattern can be used to knit cardigans, sweaters, blouses and much more. It is worth noting that the pattern is ideal for knitting a hat in the round. Thanks to the stockinette stitch, which is knitted between the chains, you can beautifully shape the crown. In this case, the loops are decreased in every 4th row of the repeat, knitting two loops of one knit behind the front walls.
Beautiful knitting pattern - MK:
Knitting pattern in rotary rows:
Pattern repeat: 2 loops; 6 rows.
The number of loops is a multiple of 2 + 2 edge loops.
- ROWS 1 and 3: all stitches are knit.
- ROWS 2 and 4: purl all stitches.
- ROW 5: P1; 1 loop is removed (not knitted) - thread BEFORE work.
- 6 ROW: 1 loop is removed (not knitted) - thread BEHIND the work; 1 person
Knitting pattern in the round:
Pattern repeat: 2 loops; 6 rows
The number of loops is cast, a multiple of 2.
- ROWS 1, 2, 3, 4: knit all stitches.
- ROW 5: P1; 1 loop is removed (not knitted) - thread BEFORE work.
- ROW 6: P1; 1 loop is removed (not knitted) - thread BEFORE work.
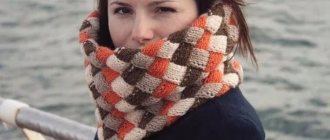
Convex elastic band
A representative of convex embroidery, suitable for bulky home textiles. Also, such a simple ornament will look good on women's and men's sweaters. Sweaters knitted with raised illustrations have a pleasant appearance and can give warmth on cool autumn evenings.
Among other things, knitted in the round, the basis of which is a convex elastic band, can turn into a newfangled scarf. Seamless variations of this wardrobe element are now very common. You can start from scratch using this scheme:
Choosing yarn
Depending on what time of year the item is created to be worn, the yarn is selected. If you plan to wear knitted clothes in the warm season, then it is best to use yarn based on cotton threads: cotton, viscose, acrylic and others. The fabric made from such threads turns out to be lighter and more noble in appearance.
Related article: How to knit mittens with an owl pattern with photos and videos
If you are knitting something for the cold season, it is better to use yarn with added wool. Such a thing will be denser, the pattern on it looks especially good.
You don't have to follow these tips exactly. After all, only you can decide when and what item to wear. The main thing is that knitting and subsequent wearing of clothes should be a pleasure.
A little advice. Do not throw away the yarn packaging until you have knitted the finished item. After all, there may not be enough yarn and you will have to buy more.
An important point is the correct choice of knitting needles. Since the fabric associated with the use of structural patterns is itself quite dense, it is not recommended to use knitting needles with a small number. When knitting with such needles, the item may turn out to be so dense that it will be uncomfortable to wear. At the same time, you should not use the largest numbers, in this case there is a risk that after washing the pattern will change greatly.
Before you start creating an item, it is best to try knitting a small item and see how the yarn behaves.
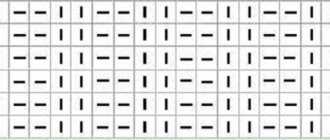
Honeycomb
An excellent type that is easy and simple to knit. Its appearance is a bit like a regular honeycomb. It will make a beautiful knitted sweater, suitable for giving as a hand-made gift. How to knit a pattern:
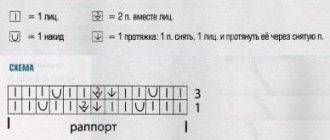
Since there are no symbols on the template, we clarify them ourselves:
- An empty square represents a loop.
- A circle enclosed in a square - alternating knit and purl stitches.
- A half-shaded square is a pair of loops tied together.
- Semicircle - yarn over.
- A square with two lines means that in this place the stitch moves from the left knitting needle to the right tool, remaining unknitted. A square with one line is the opposite.
- Hatching - no reefs.
In principle, such notations are standard and are used in almost all patterns and techniques.
Having learned them once, you will be able to work with any tables and even knit easy patterns from memory.
What types of patterns are there for knitting?
If the patterns are knitted from yarn of the same color, then the patterns imply the presence of several colors of threads on the fabric:
We will devote this lesson to the study of ornaments, and will try to explain to beginning craftswomen the technique of creating them. This image originates in 18th century France. In those days, a certain Frenchman named Jacquard invented a machine on which knitted products could be made. People have learned to create canvases with patterns that seem to be knitted by hand. Somewhat later, needlewomen borrowed the technique and actually adapted it for knitting. As a result, the style of creating colored patterns with knitting needles began to be called Jacquard, after the name of this brilliant inventor. It involves the use of yarn in each row (P) of different shades, often very contrasting:
The working condition in this case is to use threads that are similar in thickness, structure and composition, but different in color. Each thread passes along the wrong side of the fabric from one loop to another, in accordance with the diagram. In the process of needlework, so-called broaches are formed from the reverse side of the work, that is, pieces of yarn located horizontally between the loops. The tension force of the broach should be such that the fabric does not tighten. Otherwise, the appearance and elasticity of the product will be impaired:
Read
Technique and pattern for knitting hats with English elastic
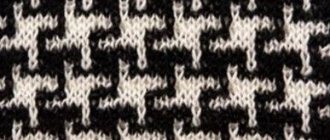
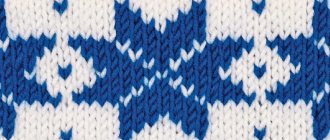
The photo shows how, by alternating threads, a pattern is formed on the face, and broaches on the wrong side of the knitting. It is this technique that allows you to create dazzlingly beautiful images. Their second name sounds like Jacquard (Norwegian) patterns. At the time of the emergence of this knitting technique, ornaments were made only with white and black yarn, something like this:
Most often, according to tradition, the motifs of such knitting bore echoes of the northern peoples, depicting snowflakes, Christmas trees or deer. Today everything has changed, jacquard has become colored and you will see many different items on it. These are geometric figures and numbers, animals and flowers, made with face knitting. In this case, the color pattern is obtained on the front side of the product, and the broaches are on the wrong side of the fabric.
Any drawing is made according to a scheme consisting of symbols printed on a sheet lined in a checkered pattern. In the figure, one cell corresponds to a single loop (P) of a horizontal row, and 1-2 rows vertically. For large items, both large and small motifs are suitable. If you are knitting a small item, then the motifs should be small, as for example for mittens:
Photo selection on the topic - simple knitting patterns for beginners
Please repost
0