In frosty winters, warm mittens are a beautiful accessory and a necessary insulating part of the wardrobe. For those of you who have knitting skills, making warm mittens will not be difficult.
We want the mittens to be spectacular and beautiful, and for this we need to place original patterns on the canvas. This type of relief looks stylish, such as plaits and braids.
This master class will show you options for knitting mittens, using a description of the work and corresponding patterns.
Amazing ornament
Not only summer, but also winter is a time when you want to look beautiful and charming, but also not freeze. Therefore, in this master class we will learn how to knit mittens with two braids. To make the work easier, below are diagrams with which even a beginner can easily knit such mittens.
What you need to prepare:
- Elysee Laine threads 100% acrylic, we will need approximately 70 g;
- stocking needles, size 3.5.
We remember that we knit the mittens in the same way, with the exception of the thumbs. This is the basic rule when knitting.
We need to cast on 48 buttonholes, distribute them evenly onto 4 knitting needles, each should have 12 buttonholes.
Next, we knit an elastic band two by two, the height of which will be 3.5 cm, you can make it higher as you like. When the elastic is knitted, start knitting the main pattern.
To make knitting more convenient, we transfer the loops from the first and second knitting needles to one. We start knitting from a knitting needle with 24 buttonholes.
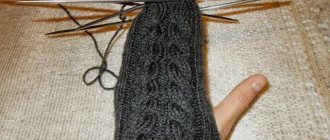
Rows 1 and 6 - first we knit a knit stitch, then two purl rows, knit stitch again, only 8 rows, 2 purl rows, 8 knit stitches, 2 purl rows and one knit stitch, and knit the buttonholes on the palm side using stockinette stitch.
7 rows - knit, 2 purl, 8 buttonholes need to be moved to the left side, 2 purl, now cross 8 to the right side, 2 purl, knit, and so on until the end of the mitten, repeat from the first to the seventh row.
When knitting, you need to try on the mitten to determine the location of your thumb. And when we knit it to the finger (we knit it on the left mitten), from the side of the palm on the third knitting needle we knit 4 knit stitches and 6 loops. It is necessary to remove it with a pin, then on a knitting needle you need to cast on 6 buttonholes so that there are 12, and knit 2 knit stitches. We knit according to the pattern.
We begin to decrease the buttonholes when we reach the tip of the little finger. To make the mitten round, you need to knit two knitting needles together in the center. So we decrease until there is one left on each knitting needle. Then carefully remove it and use a hook to pull the thread through all four buttonholes.
We knit the second mitten symmetrically.
Next you need to knit your thumb. To do this, remove the buttonholes from the pin on the knitting needle, then on the second one we put on 4 buttonholes on the opposite side and on each side. As a result, you should get 20 buttonholes, which we distribute on all four knitting needles. And then we knit in the circle with facial buttonholes. We make decreases from the middle of the nail plate in the same way as in the main part. We're done.
For harsh winter
Mittens, which are knitted using knitting needles, are the basics of knitting. It is not difficult to knit such mittens with this pattern, the main thing is patience. Homemade mittens will look no worse than regular store-bought ones. In this master class, beginners will be able to learn how to knit mittens that are knitted on five needles.
What you need for knitting:
- Nako Arctic yarn 100 g per 100 m, 40% wool and 60% acrylic;
- knitting needles number 6 and an auxiliary needle.
We cast on 24 buttonholes on two knitting needles and now distribute them across 4 knitting needles. It turns out that there will be 6 knitting needles on each knitting needle. We begin to knit the cuff, for this you need to knit the elastic, as you prefer - one after one or two after two. When knitting, you need to add four more buttonholes.
The result should be 28. We knit the desired cuff height, usually up to 5 cm. If necessary, you can add a few buttonholes in the middle of knitting. And we knit additional loops as usual. Using the pattern below, you can knit a braid pattern.
The diagram is light and easy to read.
It is important that half of the pattern will be on the third needle, and the second - on the fourth.
When the fabric is knitted to the place of the finger, you should try on the mitten while knitting, marking the place of the finger with another thread. We knit the first buttonhole on the first knitting needle, but in the next buttonhole we insert a thread of a different color. We knit the last one in the working color and then return all the buttonholes to the knitting needle, where there is only one left.
We knit the mitten to the tip of the little finger. Then we start making decreases. We make decreases at the beginning of the first and second buttonholes, and at the end of the third and fourth buttonholes. This means that we make one from two buttonholes. And so on until one loop remains on the knitting needles. Then we remove them from the knitting needles and pull a thread through them - tighten them.
We begin to knit a finger, to do this we pull out an additional thread and insert knitting needles into the loops. There should be one more buttonhole at the bottom.
Don’t forget to distribute all the stitches onto four needles and start knitting in regular stockinette stitch. When we reach the nail plate, we begin to decrease.
We will decrease the loops in the same way as in the main part. And now our mitten is ready.
Video on the topic of the article
- This lesson presents a video collection with which you can learn how to knit mittens with braids.
Source: https://DekorMyHome.ru/rukodelie/kak-sviazat-spicami-varejki-s-kosami-shemy-s-foto-i-video.html
Mittens with braided knitting needles: diagrams and descriptions of different models
Perhaps every craftswoman who is seriously interested in knitting has tried to knit mittens with braids at least once in her life. We will discuss diagrams and descriptions of interesting, fashionable and original models in today’s article.
Braids are an interesting pattern that is often used for knitting cardigans, sweaters, jumpers and other products. Voluminous braids will decorate any wardrobe item.
Of course, every fashionista prefers to make mittens with her own hands using knitting needles with a pattern. It’s not difficult to find braid patterns, and they suit every taste.
Simple, trompe l'oeil, multi-row, voluminous, gradient - all this can become the highlight of a knitted product.
What kind of mittens to knit with bias knitting needles? The knitting pattern for the pattern can be any. The main thing is to master the principles of knitting on stocking needles, because it is much better to knit seamless mittens.
Enrich your creativity with a few fashionable mitten ideas with a pigtail pattern:
- traditional small braids;
Advice! If you decide to knit mittens with braids, look at the diagrams first. To make it easier to cross stitches, use an auxiliary curved needle. As for the yarn, you need to choose a soft one, consisting half of wool mixture, angora or wool.
Mittens with oblique knitting needles: diagrams and descriptions for beginners
For yourself or for a young fashionista, you can easily knit original mittens with cable knitting needles. Choose patterns according to the level of your knitting skills. To make it easier to cross stitches, you may need an auxiliary curved needle or a knitting pin.
Necessary materials:
- stocking needles - 5 pieces;
- plain yarn made of wool or wool mixture - 1 skein.
Step-by-step description of the process:
- We start by preparing the materials necessary for the work. It is advisable to choose soft yarn. You can knit multi-colored or plain mittens.
- For knitting, we need to cast on only 32 loops, that is, 8 loops for each stocking needle.
- Place two knitting needles together and cast on 8 stitches.
- We continue to cast on loops on the second needle in this way.
- By analogy, we cast on loops for 2 more knitting needles. It turns out that we have this design from the cast-on 32 loops.
- To avoid getting confused in the rows, it is better to put a colored marker first.
- We knit the first stitch.
- Alternating the front and back loops, we knit a 1x1 elastic band. We knit in the round, so there are no edge loops. Don’t forget to constantly move the marker, tying the row to the end.
- We knit the elastic to the desired height. In our case, the height of the elastic band is approximately 6-6.5 cm.
- We will knit the braid on the first and second knitting needles. And we will knit all the stitches on the third and fourth needles with knit stitches.
- To determine the needle order, pay attention to the tip of the working thread that remains from the cast-on. The first knitting needle that goes in the direction of this tip will be the first in the count.
- Next below is the second, above - the third and parallel to the second - the fourth.
- On the first knitting needle we knit a rapport like this: two knit stitches and two purl stitches, then four knit stitches.
- Let's move on to the second knitting needle. We start knitting with four knit stitches. Then there are two purl and two knit stitches.
- Using knit stitches in a circle, we knit stitches from the remaining two knitting needles. By analogy, we repeat the pattern in height for another seven rows.
- In the next, that is, the ninth row, we begin to knit the braid, crossing the loops first to the right.
- We knit two knit stitches and two purl stitches from the first knitting needle according to the pattern.
- We transfer the next four loops to the auxiliary needle and leave them to work.
- Next, we knit loops from the second knitting needle onto the first knitting needle. First we knit 4 knit stitches.
- We leave the knitted loops on the knitting needle and then knit 4 loops from the auxiliary knitting needle.
- Next, on the same knitting needle, we knit 2 knit stitches and 2 purl stitches from the second knitting needle.
- Until the ninth row, we knit all the rows in a circle with facial loops.
- In the 9th row we cross the braid again, only to the left.
- We tie the product to the base of the thumb.
- Since we are knitting the left mitten, we will leave the needles for knitting the thumb on the fourth needle.
- We knit the loops from three knitting needles, and on the fourth knitting needle we will remove several loops for knitting the thumb. The most convenient way is to use a safety pin.
- We knit the first two loops from the last knitting needle, and we transfer the next five without knitting onto a pin.
- We cast on five stitches on the right knitting needle, and then knit the remaining loop from the left knitting needle.
- It turns out we have a hole for the thumb. We leave it like that for now and continue knitting mittens further in the circle.
- We knit the mitten according to the pattern another 9 centimeters in height. Don’t forget to cross the loops in the braids every 9th row.
- Let's start decreasing the loops.
- On the first knitting needle we remove the first loop, knit the second and pull the first through the second.
- We knit the remaining loops according to the pattern. We knit the last two loops on the second knitting needle together.
- On the third knitting needle we make the decrease as on the first, and on the fourth - as on the second.
- We decrease until one loop remains on each knitting needle.
- We knit two loops together with the front one so that there are 2 loops left on the knitting needles.
- We pull one loop through the other and tighten it well.
- Let's start knitting the thumb. We collect loops from the previous row of 5 and add 1 more on the side.
- We distribute 12 stitches evenly onto 3 knitting needles. We knit the required number of rows in height, and then decrease as described above.
- One mitten is ready. It remains to knit the second one, but only in a mirror way, making a hole for the thumb on the opposite side.
Knitting mittens: braid patterns and master class (photo)
If we talk about knitting mittens, then there is nothing complicated in such work.
Even for novice needlewomen who only know what a knit, purl and chain stitch is, it will be very easy to cope with such knitting.
For those who consider themselves more experienced, they will enjoy Marina K’s master class presented with a step-by-step description of how to knit mittens with braids based on the pattern.
Learning to knit mittens with knitting needles with a braid pattern
After preparing all the basic materials required for the work, you can begin the master class. Place forty loops on two metal bases. Distribute them in a circle onto four knitting needles, ten pieces each respectively. The cuff will be knitted in a simple ribbed pattern and should be approximately eight centimeters high.
Circular knitting of the mittens continues. On the first two instruments you will have the formation of an outer part, shaped like a braid. On the last two, the back part is knitted, which is done in front rows.
Before crossing the braids for the first time, you should knit according to the following pattern: on the first one, do 7 purls. loops and 3 faces. On the next one knit 3 knits. and 7 p. On the remaining two, all the front buttonholes are knitted.
Approximately five more rows should be done in this way.
The braid ornament pattern will be demonstrated below in the text. Its first crossing is knitted like this: knit seven purls on the first one. take the loops, and the three located on it, to the side so as not to interfere. For the first tool, knit 3 stitches. things from the second knitting needle.
On the second, knit the three that were set aside, and then the remaining seven with the wrong side. On the two remaining instruments, loops are knitted using the front method. According to this pattern, it is necessary to complete six circular rows. The next crossing will be done in exactly the same way.
After this, a thread of a different color is inserted into the product, in the place of which the thumb will be located.
Knitting mittens with a braid pattern continues according to the same pattern that was described above until the end of the smallest finger of the hand, that is, the little finger.
Then you need to decrease the loops, namely, knit two stitches together at the very beginning of the first and third instrument, as well as at the end of the second and fourth.
Such manipulations are done until there are two pieces left on each. Next, tighten all the loops and hide the thread in the inside of the mitten.
After this, proceed to work on the rest of the product. You need to pull a thread of a different color from the fabric, and distribute the remaining loops onto three knitting needles. Add two more pieces to make five on each.
Knit your thumb in the round, periodically taking measurements on your hand. Reducing the loops should be done when the knitting approaches the middle of the thumb nail.
Just like the previous time, knit two buttonholes together on each instrument.
This completes the master class on knitting a left mitten with a braid pattern. The right mitten should be knitted in exactly the same way, only the position of the thumb should be the mirror opposite. To make the braid pattern on the right mitten look the other way, you need to remove the tool, which leaves three loops not behind the product, but in front of it.
And one more nuance is worth mentioning when you tie the hole for the thumb.
It will be much easier to do this correctly if you knit the last loop with knitting needles with the main thread, and seven pieces with yarn of a different color, and move them to the inside of the mitten.
Then on the fourth knitting needle you should make two elements with the main color, seven with another color, and the last one also with the main thread.
As you can already see, knitting beautiful mittens with a braid pattern using knitting needles according to the pattern is not at all difficult. The main thing is that such an accessory will not only warm you in cold weather, but will also complement your look with its pattern. The patterns and descriptions of knitting rows are extremely clear, and to make it easier for you to consolidate the material you have covered, we suggest watching an interesting video.
Video: How to knit mittens
Source: https://vishivashka.ru/vyazaniye_spicami/varezhki_shemy_kosy.php
Knitting pattern for mittens with a braid pattern
In winter, mittens will reliably protect your hands from frost. Many people prefer to wear gloves, but their fingers get cold. Store-bought products are not always able to provide warmth, and a suitable model can be difficult to find. Hand-made mittens with braids will warm you not only because of the thick yarn, but also thanks to the care and love of the needlewoman.
Knitting mittens
Before you start knitting mittens with braids, you need to separately make a sample pattern. The thickness of the selected yarn affects the number of loops. It can be determined using a sample pattern. All work is carried out on four knitting needles, so the resulting number of stitches is divided by four. The first 20-25 rows are knitted with a regular elastic band.
When the elastic is ready, you need to change the knitting needles to larger ones. The needlewoman needs to continue knitting in a circle until the hole for the thumb. The loops on this notch are removed from the knitting needles and transferred to a pin, new loops are cast on above them and knitting is continued in stockinette stitch.
When reaching the little finger, you need to make cuts in the rows, creating a beautiful toe of the mitten. To do this, it is put on the hand, which makes it clear which rows need to be decreased. Two knitting needles should touch on the palm at the thumb hole , the rest should touch on the outside of the hand, where the pattern itself will go.
The loops are shortened so that the tilt is to the right:
- on the first and third knitting needles at the beginning of the row, two loops are knitted behind the back walls;
- behind the front walls, the last two loops are knitted on the second and fourth tools.
Creating a Braid Pattern
In order to knit mittens with braids, you need to select wool yarn, take measurements from your hand and draw a diagram of the product. Then a sample of the pattern and elastic are knitted, and the density of the future mitten is determined.
Knitting mittens with a pigtail step by step:
after calculating the loops, they are cast on knitting needles, distributed and knitted twenty rows of 2x2 elastic;- on two knitting needles you need to knit the stockinette stitch, on the rest - the pattern itself;
- leave a hole for the finger at the required level;
- after the finger the braid pattern continues;
- from the tip of the little finger, the decrease in loops in the rows begins;
- the last two loops are secured with a working thread from the wrong side;
- the second mitten is knitted in a mirror image.
We knit mittens using knitting needles according to the pattern with a “braid” pattern
If you know how to knit, then knitting mittens will not be difficult for you. And in order for the mittens to not only be warm, but also beautiful, they can be knitted with various designs, patterns and braids.
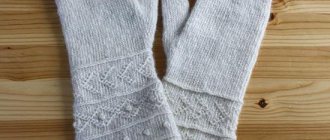
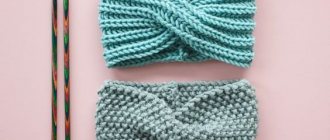
White mittens with braid pattern
For these tops you need 100 grams of yarn. 100 m. It is better to take thick yarn.
Knitting pattern for braids on mittens
Circular needles size 7 work best.
We cast on 30 loops on the knitting needles and knit 6-9 cm with an elastic band. Elastic knit 1 p. purl 1 p. front.
After tying the elastic band, move on to the braid pattern. To begin forming the pattern, we knit 2 stitches, purl 9 stitches and again purl 2 stitches. The rest of the braid is knitted only with facial loops, as shown in the diagram. Look at the diagram to the left and follow it. You just need to start knitting according to the pattern, and then the principle will become clear.
Having knitted 15 centimeters, we leave 6 loops on the finger, threading a pin through the loops, and put 6 new loops on the knitting needles and continue knitting.
When the mitten is the size of your hand, start casting stitches.
First on the sides of the picture and approximately in the middle of the palm. When 8 loops remain, tighten the loops.
So we got beautiful, knitted mittens.
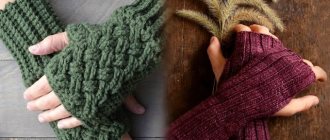
Patterned Gauntlets
Mittens with convex braids
These mittens with beautiful braids are knitted on five needles or so-called double needles. We cast on 52 loops, this turns out to be 13 loops per knitting needle. The elastic is knitted 2x2 for about 40 rows. Below is a diagram and description of how to properly knit braids.
We knit a finger on the 10th row. On the side of the small braids, add to the two middle loops - 3 times in the second row. Then in the third row 3 times. When there are 18 loops, transfer them to a pin and continue knitting the mitten. The finger can be tied later. It is knitted exactly like the mitten itself, only in a smaller size.
Next comes double knitting, in the first row on knitting needles we alternately knit one knit stitch and two knit stitches together. In the second row with facial loops, two loops together and so on until the end of the row. Pull all remaining loops.
Knitting pattern for braids on mittens Symbols for the knitting pattern
Beautiful knitted mittens
White mittens with openwork braids
Mittens are knitted in stockinette stitch, circular knitting, all stitches are knitted
Knit the braid according to the pattern (see pattern below).
Divide 48 stitches onto four needles and knit together to make a circle. From the first two knitting needles, these are 24 loops, there will be a palm. From the remaining two knitting needles, these are also 24 loops, there will be a back side. The first and second needles are knitted using stockinette stitch.
We count the third and fourth knitting needles on the pattern, 3 knit loops, 9 knit loops, on one needle and on the second 9 loops on the braid and 3 knit loops. Next, after 40 rows, remove 7 finger loops onto a pin, and cast on 7 chain loops on a knitting needle.
Having knitted the mitten along your hand, begin to run it; to do this, decrease a loop in every second row. To get a triangular start, you need to remove it from the 1st and 3rd needles at the beginning of the row. With the 2nd and 4th needles, last stitches. After 24 stitches remain, begin decreasing on each row. Pull the last 8 loops.
Knitting a finger
Separately, remove 7 loops from a pin onto a knitting needle, cast on 7 loops from the top edge on the second knitting needle, and remove two on each side. There should be 18 loops. Knit the finger in a circular stitch, all stitches are knit. After the desired size, run your finger, just like the mitten itself.
The edges of the mittens can be crocheted and decorated with beads or seed beads.
Knitting pattern for openwork braids on mittens
Here's how to knit mittens with braids:
Source: https://domklubka.ru/dlya-zhenshin/varezhki-spicami-po-sxeme.html
We knit mittens with braids according to the pattern from fingers to wrist
Warm clothing for hands is indispensable in the harsh season. It is especially necessary for cheerful children who are planning to play snowballs or build a snow woman. Beautiful mittens, knitted , amaze with a variety of styles. Intricate patterns, complex braids and pearl beads decorate the upper part of the palm, but the main advantage of warm mittens is the preserved warmth of mother’s gentle hands. Any needlewoman will want to knit such a magnificent couple.
Video: How to knit double mittens
Step-by-step photo of MK knitting mittens with a braid and beads
Preparatory process
To work you will need:
- 100 grams of yarn (wool mixture);
- set of double needles No. 3.5;
- beads;
- hook;
- pin;
- threads with a needle.
For beginners! The stocking needle set includes 5 pieces of short, double-edged tools designed for seamless knitting of garments, socks, knee socks, gloves, etc.!
The description of the work with the attached diagrams represents the author's master class, where original mittens with braids are knitted from fingers to wrist.
- To calculate the number of loops, you need to take two measurements, the circumference of the palm and the length from the top of the index finger to the base of the palm. From the calculation of 10 cm - 19 p. the total number of loops for the mitten is derived.
- The sample is knitted with 40 stitches + 2 stitches, which are added as you work. A chain of 20 chain stitches is crocheted and distributed onto 4 needles in this way: 1 – 10 stitches, 2 – 10 stitches, the work is turned, and on the other side of the chain we cast on the 3rd needle – 10 stitches, on the 4th – 5 stitches .
- The result is a design as in the photo. Next, 7 rows have certain knitting patterns, which must be strictly adhered to and form the rounded beginning of a warm mitten. For convenience, you can place all the initial rows in a plate:
- The result should be 42 stitches and the front paths for three braids should be laid.
- You can choose braid patterns at your discretion. Schemes of frequently used braids are given below, and for mittens the needlewoman defined 2 strands on the sides of 2 faces. * K2, and in the center there is a knit 4 braid. * 4 persons.
- When working with braids, it is convenient to use a crochet pin. Loops that cross are removed with a pin before work. At the moment of moving the loops and forming the braid link, a bead is placed on one of the loops (as in the photo). A needle and thread are passed through the bead, then after 1 stitch and again through the bead, secured on the wrong side..
Master class on knitting braids with detailed description
- The central braid crosses in every 8 facial rows. Links of side bundles are formed in every 4 r. The mitten is knitted with this pattern to the base of the thumb.
Important! Additional loops for the thumb of the left mitten must be cast on between the second and third knitting needles, and for the right - between the first and fourth. - Using a thread of a different color, we cast on a chain of 16 chain stitches. Using knitting needle No. 2, pull out 8 stitches from the chain, then using a working knitting needle No. 5, the remaining 8 stitches, and then connect the work with loops on tool No. 3. Thus, the work is done for the left mitten, and for the right one, the finger is formed on the other side.
- The added loops for the finger must be reduced evenly and returned to the original 42 sts. To do this, 2 p. knit in a circle, and from the third in each row decrease the outermost loop of the base of the finger on both sides.
- Next, using stocking needles, knit the thumb and the end of the mitten to the desired length of the elastic. For the finger, unravel an additional thread and pick up 16 sts + 2 sts from the mitten itself. We knit on 3 needles 16 r. and at the end we close 2 together. The elastic band on the wrist is knitted only from the back side; if desired, the edge of the product is crocheted and chained.
Video: Knitting stylish mittens on two knitting needles in the round
A selection of patterns with descriptions of braid knitting
Video: Knitting mittens for little ones
In conclusion, a master class on knitting mittens with a “braid” pattern for children 2-3 years old. Correct calculation of loops based on measurements for any size and a detailed description of the process of knitting a warm pair of mittens.
Photo MK for creativity
Source: https://rukodelnichaem.ru/vyazanie_spicami/vyazanyj_spitsami_varezhki_kosy_shemy.php
Knitted mittens, braid pattern with shadow
Good afternoon, dear needlewomen!
In our last lesson we learned how to knit simple mittens, now we will learn how to knit mittens with braids. In this article you will find a diagram, description and video of how to knit mittens with a pattern. More precisely, the pattern is called a braid with a shadow. It looks stylish and is quite easy to knit. And now we’ll tell you how to knit mittens with a braid pattern.
So, we cast on 44 loops and knit in the round on two knitting needles. We knit a 2x2 elastic band, knit 14 rows of elastic, this is about 4-5 centimeters. After this we knit five more rows with simple knit stitches for our basic braid pattern. Next we move on to the main pattern. We find the thread remaining from the set of loops, we will count from it - this is the first loop.
We knit the first 17 loops simply with facial loops, this is the palm. Then we move on to our braid pattern. Leave 5 stitches on the right needle.
We pull the remaining loops onto the fishing line and visually divide them in half - into the palm and the back of the hand.
We begin to knit our braid pattern on the mittens, this will be the back of the hand, for this we will need an additional knitting needle.
Braid color and options
Products decorated with embossed braids can have any color. Here are some of the most popular and spectacular options:
- Solid yarn with shiny gold or silver lurex;
- The main part of the mitten is one color, and the thumb is a different color. This is a great option for children and teenagers; such a funny color will certainly lift everyone’s spirits;
- Several intertwining embossed braids, each of which has a different color. Another option is several braids of the same color, but in different shades;
- Classic solid color, decorated with applique.
Before choosing one or another color option, you should pay attention to the level of complexity of the scheme. For beginning knitters, it is best to use yarn of one or two colors when knitting, no more. Experienced craftswomen can take on variegated multi-color patterns.
Braids on mittens can also be different . Here are some options:
- One thick, embossed braid of three flagella;
- Several thin braids, located separately from each other;
- Several braids intertwined;
- Two braids of contrasting colors, located next to and parallel to each other.
Any of these options will look impressive. The main thing is to carefully follow the pattern so as not to get confused while knitting the pattern.
Knit mittens with braids. Description, diagrams
To prevent frostbite on your hands in winter, you need to wear mittens. Not gloves, where each finger must “warm up separately,” but mittens . You can either buy them in a store or knit an exclusive model with your own hands from very warm threads. Naturally, mittens knitted with love will be much warmer than purchased ones.
Mittens with braids
If you learn to knit, the easiest product for beginners will be a scarf, followed by a hat. It’s worth trying to prepare an excellent set for the winter, consisting of a simple scarf, hat and mittens. All things knitted from the same threads look original.
General knitting pattern for all mittens, master class
Before knitting a product with braids , you need to separately knit a braid sample. Since there are so many options for knitting braids, you need to choose the one that suits you best.
https://www.youtube.com/watch?v=u4gfwCCIlt8
Depending on the thickness of the thread, the number of loops that will be needed for work will change.
As always, we knit a sample , and from it we calculate how many loops there should be on the knitting needles to knit one voluminous mitten.
We will do the work on 4 knitting needles, so the resulting number of loops must be divided by 4 and knitted in rows of 20–25 with an elastic band. The elastic band can be either 1x1 or 2x2, which depends on your wishes and the density of the thread itself.
After you have knitted the elastic height you need, you can switch to other knitting needles, one size larger.
With stockinette stitch, knitting continues in the round until it becomes clear that you need to knit a finger. We leave a certain number of loops on the pin and continue knitting.
In the next row, above the removed loops, we cast on the same number of loops on working knitting needles and continue our knitting.
This is interesting! Read the article on how to knit mittens.
After finishing knitting the mittens, knit a finger. The principle is the same as knitting the mitten itself.
When knitting in stockinette stitch reaches the little finger on your hand, you can already make cuts to create a beautiful toe of the mitten.
First of all, you need to put a knitted mitten on your hand to understand which needles you need to decrease on.
If two knitting needles fall on the palm, where the finger will be tied, then the other two are on the outer part of the hand, where it would be possible to come up with some kind of pattern in any other model, for example, a pigtail.
On needles 1 and 3, decreases are made at the beginning of the row: 2 loops are knitted together behind the back walls. In this case, the tilt turns to the left. On knitting needles 2 and 4, the decrease is done at the end: 2 loops are knitted together behind the front walls . The tilt is to the right .
This reduction is carried out until there are 2 loops left on the knitting needles - a total of 8. A working thread is passed through each loop, and the loops are removed from the knitting needles. Then they are tightened and secured from the inside out.
Knitted mittens with a braid pattern
The pattern on the mittens makes the product unique and original . If it is a braid pattern, then the mitten will also be warm. It is advisable to take threads with wool.
Before starting work you need:
- take measurements and draw a diagram of the mitten;
- knit a sample of an elastic band and a braid pattern;
- determine the knitting density and the number of loops required for work.
Progress
- Cast on the knitting needles the required number of loops obtained in the calculation. Distribute them onto 4 knitting needles and knit 2x2 rib for as many as 20 rows.
- Next, on two knitting needles we knit the selected pattern of braids or one braid, and on the other two knitting needles we knit the stockinette stitch.
- At a certain height, on the front surface you need to make a branch for the thumb. How to make it is described in detail in the general description of knitting mittens .
- Knitting the braid pattern continues.
- When the knitting reaches the tip of the little finger, the loops begin to decrease for a beautiful formation of the toe of the mitten. Details on how to do this are described above.
- The last 2 loops on each knitting needle need to be pulled together with thread and secured to the wrong side of the product.
The second mitten must be knitted in the same way, but in a mirror image.
Samples of braid patterns
- Row: P5, K6, P4, K6, P5;
- row: loops according to the pattern;
- row: P5, 3 sts on the auxiliary needle before work, k3, then k3 from the auxiliary needle, p4, k3 on the auxiliary needle while working, k3, then loops from the auxiliary needle, p5;
- - according to the drawing;
- - according to the drawing;
- - according to the drawing;
- - according to the drawing;
- - according to the drawing;
- row - like 3.
If the braid here consists of 6 loops, then it can be made larger and knitted with either 8 loops or 10 loops.
Sample No. 2.
Children's and women's mittens will turn out fluffy and elegant if you use or angora for knitting them The braids should be placed in the middle of the mitten. Since the knitting density is different for each person, then calculating a certain number of loops before and after the braids will be individual for each case. Therefore, the description will talk about 1 purl loop, and you will need to substitute your quantity.
- Row: P1, K8, P1;
- row - according to the drawing;
- row: P1, 2 stitches, slip onto auxiliary needle while working, knit 2, then knit 2 from auxiliary needle, k4, purl 1;
- - according to the drawing;
- - according to the drawing;
- - according to the drawing;
- row: P1, k4, 2 stitches on the auxiliary needle before work, knit 2, then k2 from the auxiliary needle, purl 1;
- - according to the drawing;
- - according to the drawing;
- - according to the drawing;
- row - like 3.
In this version, the braids are not intertwined simultaneously, but in sequence: one after another.
If such simple braid patterns do not suit your mittens, you can choose more complex patterns that will have several braid options at once. The pattern will turn out to be very complex, you can knit it for a very long time. But the result will please not only you, but also your friends.
Useful tips
- Depending on the thickness of the thread, knitting needles are also selected. The density of knitting and the number of loops that will be involved in the work depend on its thickness.
- The thinner the thread, the more loops there will be on the knitting needles. The more complex braids can be depicted on mittens.
- If you want the elastic band of the mittens to be double, you can simply knit it not 20 rows, but all 40. Then simply fold it in half, without even hemming.
- To make the product unique, you can add a small braid on both sides of your palm. This will complicate the work, but will make the product unforgettable.
Conclusion
Tying mittens with braids is not at all difficult, especially if it is done for a loved one. The product will be warm and beautiful, and most importantly - made with love.
Since the product is much smaller than a sweater, if desired, it can be knitted in 4 evenings. Do something nice for yourself, your children and your beloved husband - knit a pair of warm mittens with braids for winter.
How to knit mittens with MK braids step by step, pattern diagrams
Before knitting women's mittens, you need to measure your wrist. In my case it is 17-18 cm. Usually 40 loops are cast on for this size for warm mittens.
To work you will need:
- Yarn, in my case of 2 colors, dark gray cotton “Pekhorka” of Russian production and yarn of Turkish production “Alize” Angora Gold Star (yarn with small sequins);
- Colored auxiliary thread;
- Toe knitting needles 2.5 mm (5 pieces);
- Hook and scissors;
- Pattern diagram for mittens (pattern for the elastic band and diagram for the main pattern).
Before you start knitting, you need to study the pattern; when knitting, faces are used. and out. loops. Elastic band 2x2, consists of 2 faces. and 2 out. loops, knit stitches need to be crossed when knitting (first we knit the 2nd stitch and then the 1st).
Scheme
Row 1, cast on 10 stitches on each needle. We knit in two threads.
2-36 rows, knit according to the elastic pattern in circular rows. Knit the elastic to the required length, usually in the 36th row add one st on each knitting needle. In these mittens, loops are not added; one more strand of Alize yarn is added. This way the mitten fabric thickens.
37-38 row, purl. loops;
Row 39, faces. loops;
Rows 40-41, from. loops.
Start knitting
Row 42, knit on 3 needles. There should be 20 loops on one knitting needle, and ten on the other two needles. From 20 loops we will knit the second pattern according to the diagram. On the other two, knit stitch (all stitches are knit)
43-56 rows according to the drawing;
57-row and further, knit the main pattern (of 20 loops), k2. Next we will form a hole for the finger. To do this, take an auxiliary thread of about 20 cm, preferably colored, and knit 6 faces. loops Next, we return and knit colored loops in the amount of 6 persons. loops and continue knitting in a circle until the cape of the mitten. Having knitted to the little finger (to hide) we begin to decrease.
We close the loops as follows, closing only on the sides of the mitten. The 1st loop is knit, knit two together, we reach the end of the row knit 2 together. and 1 persons. Likewise for the next side where there is no picture. Closing occurs in each subsequent row. When there are 8 stitches left on the knitting needles, cut the thread, pull it through all the loops and fasten. Using a hook, pull it through to the wrong side. side and secure. Cut the end of the thread.