How to knit gloves for beginners, in detail from scratch
For those who are just learning how to handle knitting needles, it is best to start knitting gloves with the simplest model. These will be gloves that start from the wrist and are knitted in the round using stockinette stitch.
You need to prepare a set of number two double needles, five pieces. The yarn you will need is 55% acrylic and forty-five percent wool. There are 380 meters in one hundred grams. The example is designed for a hand with a girth of twenty centimeters.
First of all, you need to take your own measurements. Next you need to knit a sample that will help determine the knitting density. We will knit with a density of 2.7 loops per centimeter. To ensure that your gloves fit well and are comfortable to wear, choose a yarn that has good stretch. It is better to knit the cuff one centimeter narrower than it should be.
To make it more convenient to calculate the required number of loops, use the formula and round the result to a multiple of four, since we will be dividing the loops into four knitting needles.
(Wrist girth - 1) • knitting density =
It turned out like this: 20 - 1 = 19, 19•2.7 = 51.3, rounded to 52. We can spread this number of loops into four knitting needles, 13 each. For convenience, we number the knitting needles.
Traditionally, it all starts with the cuffs. Cast on the number of stitches you need and divide them into four needles. We have 13 each. Next we knit an elastic band one on one in a circle. The height of the elastic band is approximately nine centimeters. Since we have a change of colors, we will alternate four rows of dark and light yarn.
Then you need to make a thumb wedge. You can start it right from the cuff, or knit a couple of rows. We'll start right away. The wedge on the gloves is positioned in a mirror image; on the right one it will be at the beginning of the 1st knitting needle, on the left one at the end of the 4th.
The wedge is made by adding loops. We will knit the right one first. We need to perform an addition. To do this, yarn over before the 1st stitch, on the 1st needle. After this comes face.pet. and do the yarn over again.
Next, we knit in the round for three rows without adding. After three rows we add again according to the same pattern. First, yarn over before the 1st stitch, then knit three stitches, yarn over again. We make such additions every three rows. Only after the yarn over do we knit five, then seven, nine and so on. Odd number of loops. And so we add to the base of the thumb.
We transfer the wedge loops to the pins. One has six, the other seven loops. Above them we again make up for the lost loops, cast on air ones, preferably an even number.
All that remains is to reach the beginning of the little finger, its base. Then we will distribute all the loops under the fingers.
Little finger.
Some of its loops are on the second, and some on the third knitting needle. On the second knitting needle we knit stitches up to those that belong to the little finger. We transfer the remaining six to the pin. From the third knitting needle we will remove seven loops. Next, on the second knitting needle we add three chain stitches. and knit the rest. We knit in the round. We go up about five rows to the beginning of the index finger.
Forefinger.
Fifteen index finger stitches are on the first and fourth needles.
We knit the finger in a circle. Having reached the middle of the nail, we begin to complete:
Ring finger.
Divide the loops from the clubs. on knitting needles. Again, let's call the knitting needle that faces the palm 1st. Attach. thread and knit four stitches. from the 1st needle. We are starting to introduce new spokes. We knit three loops from the first and 1 from the 2nd. Add a knitting needle and use it to knit four stitches on the second stitch. Then we knit two more loops from the 2nd one and pick up three stitches. from the middle finger jumper. We check the distribution of loops: 4p, 4p, 4p, 5p. We finish knitting as on other fingers.
Let's return to the little finger.
We transfer everything that is on the pins to two knitting needles. Then we follow the description of the ring finger.
We knit the left glove in exactly the same way, only in a mirror way.
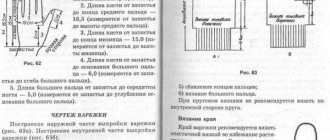
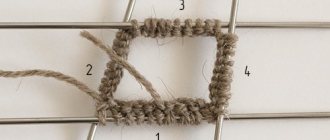
How to knit gloves on knitting needles?
diagram of the distribution of loops for knitting fingers on a glove with knitting needles
So, we distribute the loops for knitting the fingers of the glove:
- each finger consists of upper and lower loops, that is, the little finger of the right glove is the end of 2 knitting needles and the beginning of 3 for the right and 4 and 1, respectively, the index finger is the end of 4 and the beginning of 1 for the right and for the left, 2 and 3, respectively. Between them are the loops of the ring and middle fingers,
- divide the total number of loops by 8. If there is a remainder, for example, 4 loops, add them to the top of the fabric of each finger. If the remainder is 3 or less, then increase the amount from the index to the little finger,
- adjust the loops of the upper part of the index and ring cloths - subtract 2 loops from the second in favor of the first,
- draw a diagram of the number of loops for each finger, similar to the drawing for the current section, and stick to it in your work,
- Before knitting fingers, add 3-4 connecting loops, or so-called bridges between them. That is, the total number of loops for each finger will be greater by this number,
- work in the round on 3 or 4 needles when creating finger blankets,
- start knitting with the index finger, then continue with the middle, ring, little finger and finish with the thumb. Some needlewomen adhere to the order from the little finger to the index finger or mixed finger,
- decrease the loops from the level of the middle of the nail plate. To do this, knit 2 loops together 2 times in one row,
- Pull the final 2 loops with thread, tear it off and hide it inside on the wrong side of the product,
Schemes of openwork gloves with knitting needles, detailed description
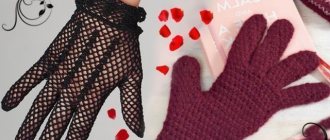
An openwork pattern always adds lightness and airiness. Openwork gloves look very beautiful in a bride’s wedding dress.
Preparation
Before starting the main work on making gloves, do not forget about preparing materials and measurements. This would be an ideal option for knitting gloves or mittens. It does not harm human skin and retains heat from the hand inside.
Each person has an individual hand size, so before starting work it is necessary to record the size of the wrist, the length of the fingers and hand in general from different sides. This is necessary to ensure that the glove fits well and does not cause discomfort.
Knitting a mitten or glove is very easy. There is a lot of useful information on the Internet about various options for creating a glove; in this article, the option of knitting from the wrist was considered. This type of needlework is not limited to one model for all occasions.
This is a large set of different variations, a huge scope for creativity and skill development. Knitting will not only help you develop another additional skill, it is a way to show your care for loved ones.
https://youtu.be/15ljqX_FzyUhttps://youtu.be/nw_l7bAF0mM
_
Knitted fingerless gloves, diagram with description
When it's not very cold outside, you can show off these interesting fingerless gloves. They are very easy to knit as they end just above the palm. You only need to knit the thumb. These gloves look very good when made from melange yarn. In the example, a brown one is taken, only one hundred grams, consists of 75% wool and 25% is polyamide. The thickness in one hundred grams is 420 meters. We will knit on needles number 2.5.
We knit the main ornament with a width of twenty-eight loops. We work with it according to the scheme from the first to the twelfth row. Gauge is 28 stitches. and forty rows, it turns out 10 by 10 centimeters. Let's start with the right glove.
Cast on and distribute fifty-six stitches evenly on the needles. Knit one centimeter with a two by two elastic band. This will be for the top bar. Next, count twenty-eight loops and knit a pattern on them on the back. Knit the next twenty-eight stitches. Ch. Complete eighteen rounds. rows. Then you need to make an addition for the thumb.
On both sides of the first stitch, in every second stitch. row 2 on one stitch.
After you knit ten circles from the edge of the large stitch, add for alternating. from 1st and last. pet. in every second row 2 for one st. Set aside the loops.
Carefully ensure that the crossed pets. The patterns were above the crossed elastic bands. Once you have knitted 12cm of the cuff, complete the knitting by casting off the stitches. Fix all the necessary threads and make a seam on the bridge of the big toe. The second glove is knitted in a mirror pattern.
Several more options for fingerless gloves made of melange yarn and with an openwork pattern.
Features of knitting patterns on gloves
There are several significant points in this process that are worth paying attention to.
Yarn thickness and tool number
When creating any type of weave, thick fiber is not used . It is advisable to choose a thread with parameters of 400–450 m/100 g and knitting needles No. 3.
Coloring
- A single-color thread will emphasize the grace and originality of the pattern.
- Using the sectional option will mute these options.
Exact calculation
The larger the area covered by the design, the more carefully the craftswoman should monitor the design. Even the slightest mistake can ruin a beautiful weave.
Location of patterns
Depending on the location, the drawing is divided into the following levels of complexity.
- Simple: the design is located in the center of the upper part . This method is most suitable for beginner knitters. Usually this is a single motif, made in aran, openwork or in color.
- Medium complexity: the pattern is located over the entire surface of the upper part from the edge, through the center and on the toes . Most often these are openwork paths or aran braids.
- Complex: weaves alternate throughout the entire fabric . This type of work requires great skill and utmost care.
Advice! For a complex level, to make the work easier, print out the entire pattern of the pattern and cross out the rows as you knit them.
Long knitted gloves, diagram with description
Long gloves make the hand more graceful. This option is perfect for a fur coat or vest.
In order to knit such gloves you need 150 grams of wool blend yarn. Thickness per 50 grams is 75 meters. Stocking needles number 3.5 and 4.5. Pins for slipping off loops.
Let's knit the left glove first. You need to cast on and place forty-eight stitches on size 3.5 needles. Next we knit an elastic band. We knit it in the round for eight rows. Important, start with three purl stitches. After this, change the knitting needles to 4.5. Then we knit like this: purl three, 21 stitches according to the pattern, * purl three, knit three.*. Repeat from asterisk to four times.
Now pay attention to the diagram and find the row under the number one. There you need to perform a decrease. In the middle from number one to number two there are three central ribs made from purl loops. For each edge you need to decrease one loop. To do this, knit two purl loops together, getting one. In the row under number two we do the same. We should have 34 pets left to work with.
In the row marked with the number three, we also knit with fifteen stitches, make a relief and knit three purl stitches along the cuts from it. In the row under number four, on the contrary, loops need to be added for the wedge of the thumb. Using a yarn over, add one stitch at a time, before and after the previous stitch of the row. Such additions need to be made five more times, in each even row it turns out to be two stitches more, between two yarn overs after each inc. You must get for bol.p. eleven loops. And only 48.
Having knitted five centimeters of the wedge, these eleven stitches must be transferred to the pin. After them, pick up one pet. As a result, 38 pets.
Knitting fingerless mitts
Among all the gloves, mitts are the easiest to knit. Even beginner knitters can cope here.
To work you will need 150 g of wool, as well as knitting needles No. 3.
We cast on 82 loops and knit the 1st row on the wrong side.
Next, we switch to knitting an elastic band 2 by 2, and knit upwards 20 cm. As soon as the work is done, add one loop after the edge loops to the total number of loops. We repeat this action every 7 rows on the 8th.
After 50 cm of work, the loops close.
Next, the fabric must be sewn correctly. To do this, when stitching the glove along the seam, you need to leave a notch for the thumb. The size of the notch is 4-5 cm, and it should be located at a height of 6 cm from the bottom of the product. That's it, the job is done!
Beautiful knitted gloves, diagram with writing
Beautiful white gloves with braids will be the highlight of your wardrobe. This kind of thing will never go out of style.
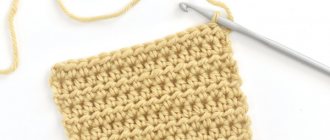
How to crochet men's gloves
Of course, the most common tool for creating this thing is knitting needles. But with the help of a hook you can make an equally beautiful and unusual accessory.
In this case, the product will consist of two separate parts, which are sewn together using a knitting needle . The simplest option is created with rows of double crochets.
Completing of the work
- Build a pattern based on the sample and make calculations based on it.
Pattern sample
- Dial the chain in. p. of the estimated length and knit the fabric.
- At the location of the thumb, replace the dc with an arch from c. P.
- Having completed two parts (with the thumb knitted on one), sew them together using a knitting needle. You can also use a hook to connect elements . Tie the parts along the contour with a half-column, while connecting them to each other.
Crochet mitts
In addition to gloves, you can crochet original mittens.
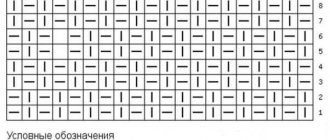
Patterns for knitting gloves
The three most popular patterns for gloves among needlewomen.
Knitted gloves will always adorn the hands of modern fashionistas. Handmade items are at the peak of fashion now. Therefore, if you have a couple of hours of free time and a desire to make a beautiful individual item, feel free to sit down and knit. With our article you will definitely succeed.