The art of decorating has an interesting backstory. The ability to transfer a design from one surface to another or attach an applique to a decorative item has been improved over time, with new techniques and materials being used to achieve a better effect. Today, decoupage elements are used to decorate the interior with your own hands, create bracelets or souvenirs. The technique allows you to turn even an ordinary thing into a real masterpiece.
Decoupage of glasses and wine glasses
For the base, you can choose any material with high density so that the applied pattern can be fixed. Due to its glossy and smooth surface, glass is not the best option for decoration, but the use of special glue allows processing of any complexity.
Anyone can cope with the process, just follow the instructions and carry out all stages of the work gradually.
To perform decoupage on glass you will need:
- Cup.
- Colored napkins. Their design should be quite noticeable and bright so that the elements stand out on the base. If you need to process several items, then identical napkins with a repeating pattern are selected.
- Scissors for applique.
- Acrylic varnish and paints to create smooth transitions between glass and the applied pattern.
- Brushes of different sizes. They will be needed to apply glue and paints to the surface.
- PVA or decoupage glue. The latter can be prepared independently and achieve greater density and endurance in the further process of operation.
The base for decoupage must be cleaned and degreased. Experts advise using alcohol applied to a cotton pad. Once the surface is clean, you can begin priming. To do this, apply a primer to the glass using a sponge. It gives a rough structure and a visual effect of aging of the item. This is a special mixture that you can buy at a craft store.
Advantages of using decoupage glasses
The advantage is the ease of application and creation of an original design. Decoupage of glasses is done with their own hands by people who have just begun to master this technique and do not have artistic skills. The only thing you need is care in gluing the napkins and coating the surface with varnish.
Using several layers of paper will help you achieve a three-dimensional effect. Unusual paper motifs look impressive with the inclusion of decorative elements: ribbons, beads, rhinestones.
Having mastered the technique of decoupage glasses in our master class, you will be able to make and present a unique gift for an anniversary, birthday, or wedding. Handmade work is always appreciated; it demonstrates your attention to the hero of the occasion.
Experiments with a transparent base
An interesting addition to the table would be decoupage on a glass surface without additional staining. There is no need to use a primer or apply multiple layers of paint to get the desired color . Not many elements are needed to work:
- Glass glass.
- Napkins with a pattern.
- Scissors.
- White acrylic paint.
- Brushes.
- Dark felt-tip pen.
- Glue.
- Nail polish remover.
The surface is degreased with alcohol. Then the design is cut out exactly along the contour so that there are no unnecessary details. The finished element is applied to the surface and outlined with a felt-tip pen. The outlined area is painted over with white paint several times , then the outline is washed off with nail polish remover. When the tone dries, you can glue the picture and protect the surface with varnish.
Beginning craftsmen do not need to experiment with the type of paper using scanned elements. The thicker the surface of the prepared part, the harder it is to carry out decoupage. To enhance your work experience, you can use rice paper and special masking tape. This will allow you to experiment with the type of pattern applied and create an original product.
Glue for decoupage
In order for handmade work to look neat and retain its original appearance for a long time, first of all you need to choose the glue with which the design will be glued to the product. Real decoupage glue should not smell strongly, darken, or leave marks after drying. Don't be thick or too runny. He doesn't need quick drying either. With the use of high-quality glue, the product should acquire a brighter appearance. Glue can be universal (suitable for any surface) and special (for glass, textiles and decorating candles).
Mod Podge PLAID . Manufacturer: USA. Used in decoration for hard surfaces. Drying time - 72 hours. Gives the product a matte surface.
Decola . Manufacturer: Russia. The glue is made on an acrylic base, colorless. Suitable for working with fabric, wood, glass and metal. Drying time - 12 hours.
La Doratura . Manufacturer: Italy. Made on an alcohol basis for gilding work. Suitable for glass, ceramic and other surfaces.
Glue recipes
In this type of creativity it is not necessary to use special compounds and adhesives. There are several ways to prepare glue for decoupage with your own hands:
- You can use a composition with gelatin. To do this, take 1 part gelatin and 2 parts water. Soak for a day, heat in a water bath until the lumps disappear.
- A tube of PVA is pre-diluted 1:1 and used for gluing pictures. But there is one little piece of advice - the glue must be fresh, it must be diluted every time before a new job.
- You can also make decoupage glue with your own hands in this way - take 1/4 cup of granulated sugar for 1.5 cups of flour, fill it with clean water, add a few drops of sunflower oil and vinegar, mix and place in a water bath. After heating, the mixture is removed from the stove, cooled and used for gluing napkins.
Homemade glue can easily replace store-bought decoupage glue. But in some cases, for example, in the decoration of dishes, it is necessary to use a special adhesive composition.
Tips for work
Even a high-quality mixture can be spoiled by improper application or drying of the glued elements. In order for DIY decoupage with napkins for beginners not to end in failure, you need to choose the right tools for the job.
- Brushes for applying glue should be soft so that the surface is evenly covered with the bonding mixture.
- Typically, the glue dries in about three hours, but it is recommended to use the product no earlier than after a few days. This is necessary to ensure that the parts do not become deformed during use.
- Experts do not recommend using a hairdryer to speed up the drying process, since artificial drying removes moisture and makes the surface hard.
- To ensure that the cut out element does not deform after gluing, it is necessary to gently and without pressure straighten the surface with a clean, thick brush.
Tips for Beginners
Do-it-yourself decoupage of wedding glasses is not such a difficult task. Even those who have never done hand-made before now come up with original creations. We recommend using the following tips when decorating wedding glasses.
Tip #1 : Cleanliness is the main secret to success!
Take your time to glue the ribbons and beads to the glasses. The first thing to do is degrease the work surface. To do this, you should first wash the glasses, dry them and wipe the outside with alcohol.
After this, it is recommended to cover the edges of the glasses with masking tape. This must be done so that in the future, while drinking, your lips do not come into contact with paints and varnishes.
Tip #2: Always have available materials nearby!
Look around you. What do you have in your house? For decoupage, you can use any available materials that you have. For example, it could be satin ribbons, beads or beads, rhinestones, lace and much more. However, it is worth noting that today in stores you can find special kits for decoupage and even special kits for decorating wedding glasses. The final decision on what types of decorations to use will be up to you.
Recently, boutonnieres have been used very often as decoration, as well as miniature “suits” for the bride and groom, in which wedding glasses are worn. For example, a glass for her can be decorated with a mini veil, and for him - a tuxedo.
These glasses look very impressive. In addition, they help create a special atmosphere at the holiday.
A selection of video lessons for beginners
There is a lot of useful information in this selection of video lessons and various MKs, be sure to watch the suggested videos!
Interesting decoupage of a glass cup
An interesting video describing the technique of decoupaging a glass cup.
DIY decoration of an elegant glass vase
Video about how to properly make a glass vase using the decoupage technique. Enjoy watching!
Creating volumetric decoupage
This MK tells how you can decorate a glass vase in volume.
Glass frosting technique using the example of vases and glasses
An excellent example of using the glass frosting technique, be sure to watch the video provided.
Ideas for decoupage of glasses for a wedding
The technique of decoupage or engraving of glasses has long gone beyond simply transferring images. Now there are many styles that look good at a wedding.
The first thing you need to do is determine in what style the decoration will be created. Provence and Victorian are popular. They are most suitable for the occasion.
- Most often, champagne glasses are made in the style of the bride and groom. One is emphatically white, with airy decorations, the second is black with several light accents.
- The second most popular is the creation of identical glasses, hand-painted, made in a simple style, and the color palette of the celebration.
- There are two ways to apply an image - on a prepared background, and on clean glass. Depending on the chosen method, with the same drawing the result will be radically different.
- Images must be used; if there are birds, then only in pairs, most often swans or doves.
- Decorative elements must include drawings with acrylic paints and contours on glass.
- The use of satin ribbons and bows along with delicate images and roses is suitable for a wedding in a classic style.
- Lace on a glass to match the surrounding interior, dress, beautifully decorated candles or the bride’s bouquet can both highlight the beauty of the image and be the main element of the decor.
- For more elaborate celebrations, glitter, feathers and rhinestones are suitable.
It is important to remember that the glasses should be chosen as simple and smooth as possible, then the image will lie flat.
Stylish decoupage of dishes
Dishes are a fertile material for this. Decoupage literally translates from French as “cutting.”
In fact, this is the basic decoupage technique:
- Cutting
- Pasting;
- Drawing a pattern;
- Edging design;
- Varnish coating.
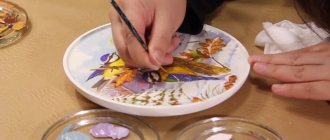
You can decorate dishes using the decoupage technique, either new or “revive” old ones. The easiest way to decorate the interior is decoupage of plates. The plates will not be used for their intended purpose, but will serve a decorative function. For example, to decorate your photos beautifully, you don’t have to use photo frames, but you can try placing them on decorative plates using the decoupage technique. There are 2 decoupage techniques: direct and reverse.
Before you start decoupaging the glass, you need to check it for cracks.
We present a master class on the direct method of decoupaging a plate using photographs:
- Preparation of the surface of the plate: degrease the surface with an alcohol-containing composition, coat with a primer;
- Dry and cool the plate;
- Clean the surface with fine-grained sandpaper;
- Next, the photograph is cut out along the contour of the picture or according to the size of the bottom of the plate (it is important to use the thinnest paper; rice paper is most often used, which easily takes the shape of any surface);
- The photograph is pasted onto the surface of the plate, using a brush the pattern is smoothed from the center to the edges, and air bubbles are expelled;
- Dry the product, possibly using a hair dryer;
- If folds have formed during the drying process, they need to be sanded with sandpaper;
- The background of the plate is created using oil pastels: the pastel is applied with a finger and rubbed thoroughly; you can use several colors to obtain beautiful shades or stains;
- Using a sponge, the edges of the plate are worked out: the paint is applied in a thin layer with light tangential movements;
- Drying the product;
- The last stage is applying varnish, for this it is better to use a sponge and apply several layers, each layer should be sanded with sandpaper and dried thoroughly;
- If the plate will be hung on the wall, a loop should be glued to the back side.
Thus, you can decorate old or new plates, you can create a whole panel from plates of various sizes and shapes - this will create an original and unique interior.
Using the decoupage technique, you can decorate almost any dishware: plastic, glass, clay, any type of enamel, metal and wood, even a glass stand is suitable.