Every mother can knit or crochet a beret for her daughter. Buy 50 grams of yarn and a knitting tool and create a stylish headdress!
It is impossible to imagine a feminine look without a beret. Little fashionistas want to be like their mothers, so they also like to wear berets.
- Every mother can knit such a hat for her daughter on her own.
- Buy some yarn, or find threads that you have in the house, prepare knitting needles or a hook, depending on the model, and in a few hours the beret will be ready.
- Your little princess will be able to brag to her friends in kindergarten or in the yard that her mother knitted such a beautiful hat for her.
How to knit children's berets for spring and autumn for girls: diagram with description
Every mother wants her daughter to look beautiful and fashionable. If you knit a stylish beret, it will become an excellent decoration for a girl’s image. How to knit children's berets for spring and autumn for girls? We offer several schemes with descriptions:
Beautiful beret with waves and openwork pattern. Knitted in the round. Suitable for both little princesses and older girls.
How to knit children's berets for spring and autumn for girls: diagram with description
This beret will perfectly decorate a girl’s face. The simple pattern is knitted on circular needles. Wool and cashmere yarn will make the product look luxurious. You can choose any yarn color. It will be beautiful to choose the shade of the threads of the future beret under a jacket or outerwear.
How to knit children's berets for spring and autumn for girls?
Just 50 grams of fine yarn and a unique masterpiece is ready! To knit such a beret, circular knitting needles are also used. First knit a fancy rib, and then start knitting the pattern with additions.
How to knit a baby beret for autumn for girls: diagram with description?
Important: Do not forget to moisten the finished products and stretch them to dry on a plate or jar of a suitable size. Thanks to this technique, the beret will take on a beautiful shape.
Knitting a beret for a little lady
The children's beret model is designed for a circumference of 50-52 centimeters. To knit, prepare yarn from mixed pink fibers and knitting needles number 2.5 and 4. A simple elastic pattern is knitted alternately, alternating faces. and out. p. The openwork pattern is knitted exclusively according to the pattern that will be shown below. If you start from the pattern, then the purl rows are knitted purl. loops.
With this description, it will be much easier for you to knit a headdress with knitting needles. So, cast on 153 sts with tool number 2.5 and knit three centimeters of elastic. Then switch to other knitting needles number 4 and make an openwork pattern according to the diagram. Make five repeats around the edges. At 56 r. start making decreases by knitting two faces. p. together into one. You should have 71 stitches left. Repeat the decreases again so that only 36 stitches remain. Break the thread, leaving its elongated edge, which must be threaded through the remaining links. After this, a baby beret for the girl needs to be sewn. Having finished knitting, you can now arrange a fitting!
Read
Several options for knitting patterns for the “Snake” pattern
How to crochet a beret for a girl for spring, autumn: diagram with description
Using a needlewoman's crochet hook and regular yarn, unique creations with interesting patterns and stylish models are created. If you crochet a beret, it will turn out very beautiful and will definitely add attractiveness and irresistibility to the image of a little princess.
How to crochet a beret for a girl for spring and autumn? Below are diagrams with descriptions:
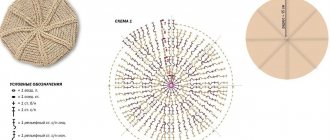
The beret can be based on knitting a napkin. Adapt this knitting to create a beret and create a unique children's headdress.
How to crochet a beret for a girl for spring, autumn: diagram with description
Knitting pattern for this beret:
How to crochet a beret for spring, autumn: diagram with description
How to crochet a beret for spring, autumn - diagram with description:
- Cast on a row of 6 loops and bind it off . Now make 16 single crochets in a circle.
- Then knit 7 double crochets in a circle . Also knit the second line - close the knitting.
- In the new row, make 2 chain loops and 4 double crochets . The result will be 5 columns. From the next pattern, continue knitting 5 stitches in this way.
- In the next row, knit 2 chain stitches and 3 double crochets . The result will be 4 columns. In the following pattern, knit 3 double crochets. Again 2 air loops and repeat the pattern. Knit this way until the end of the knitting line.
- Next row - make 2 chain stitches and 4 double crochets from the pattern . Continue this way until the end.
- Then 2 air loops and a column, again 2 air loops and a column . Then 11 double crochets.
- Start making decreases, knitting not 11 stitches, but only 9. Three chain stitches, 2 double crochets, 2 chain stitches and 9 stitches. Knit like this until the end.
The crocheting pattern for such a beret is described in more detail in the video. The craftswoman clearly shows how to knit each loop.
How to crochet a summer openwork baby beret for a boy
For the summer you can knit a very beautiful openwork beret. If your child is already 3-4 years old, then you can ask his opinion in choosing the color of the yarn in order to know for sure that the finished beret will suit the baby’s taste.
First you need to decide on the size of the product. Then we cast on the required number of air loops. We will knit the first row with single crochets. We knit the 2nd row with single crochets using the back thread, and not in the loop. We knit the desired height, and then we can start knitting the main pattern, which will look very impressive on threads of any thickness.
Pay attention to the knitting pattern.
The diagram shows that you need to knit double crochets into each loop. Then 3 lifting loops, 4 double crochets, while the hook must be inserted into the second loop. We do not knit it completely. Repeat 4 times. After this, you need to yarn over and knit all the loops that are on the hook. We perform 1 double crochet. As a result, we get one bump of the pattern. We repeat all the described steps until the end of the row. Then we cast on 3 lifting loops, and knit the bump with one double crochet, and where there is one double crochet, you need to knit the bump.
The pattern should be checkerboard. When the required height is knitted upwards, it is necessary to make additions by knitting additional cones during the transition from one row to another.
Let's do the decrease like this: through each two cones, we knit 1 double crochet into the cone, not completely. Then double crochet, into the cone we again knit one double crochet without knitting. Now we knit the cone with 4 double crochets and pull the hook through all the loops.
The result is a very neat and beautiful beret. Before putting it on, you must steam the beret.
You can decorate your beret with pearls, beads, hairpins in the shape of a flower, a butterfly or a berry.
Let's consider another interesting pattern option that can also be used in knitting a beret.
Pay attention to the picture.
The figure shows that in order to bring this pattern to life, it is necessary to perform a series of sequential actions.
- First, we will cast on the required number of loops and knit 11 double crochets, and then close them in a circle.
- Next, we cast on 3 chain stitches, two double crochet stitches that separate the two chain stitches, then a single crochet stitch. Using this principle, knitting is repeated.
- 3 chain loops, in the 2nd column we knit a single crochet, then we knit 2 chain loops into the arch of the previous row, 3 single crochet stitches with one vertex, 3 single crochet stitches into each column of the previous row and repeat.
- 3 chain stitches, single crochet, 2 chain stitches, 3 single crochet stitches with a common top in the arch, also in the next arch, then 3 single crochet stitches, one in each hole of the previous row, repeat until the end of the row.
- Now a single crochet stitch, and gradually add the number of lush stitches, if there were 2 in the previous row, now we knit 1 more, then repeat in the same way as in the 4th row.
- As a result of these actions, we should have an even number of lush columns in each wedge.
- Let's start decreasing the loops. In the first and last arch we knit 2 single crochets.
Video: How to crochet a beret? How to knit crochet beret?
An interesting beret model for a girl. Mom can knit the same headdress for herself. Get a stylish Family look.
How to crochet a beret for girls and women for spring, autumn: diagram with description
The beret model with a visor has been in fashion for several seasons. Such a headdress can be knitted for autumn, summer and even winter - stylish and beautiful.
How to crochet a beret for a girl for spring, autumn: diagram
Using the following pattern, you will knit an original beret for your daughter. You will only need 50 grams of yarn and a few hours of free time.
How to crochet a beret for a girl for spring, autumn: diagram and description
How to knit a beret for a boy: diagram with description
We are used to the fact that only girls and women wear berets. But such a headdress will be perfect for a boy, especially a child aged 1 to 3 years. Knit a sailor beret for your little one. The knitting is simple, so you will spend no more than 2 hours creating such a headdress. The end result will be stylish and interesting.
So, we knit a beret for a boy with knitting needles.
How to knit a beret for a boy: diagram with description
The pattern for creating this headdress is easy to understand - knit stitches in each line of knitting.
So, prepare the following materials:
- Denim color yarn - 50 grams and a little red yarn. Take medium-density cotton or acrylic threads so that the baby does not experience irritation.
- Knitting needles No. 4
Description of work:
- Cast on 64 stitches and knit 5 lines.
- Now the row with the addition : knit 5, add 1 loop, knit 1, increase 1, knit 8. Now add 1 knit, 4 knits 6 times.
- The next 5 lines are again knitted.
- 6 knit stitches, increase 1 knit stitch 1 time, increase 1 knit stitch 1 time. Continue until the end.
- 5 rows with knit stitches.
- Continue the pattern in the next rows , adding 14 stitches along the next knitting line, and in each subsequent 6th row, continue to increase stitches in the line until you have 120 stitches.
- 4 rows in knit stitch.
- Then rows with decreasing : 7 knit, 2 loops together (knit), 1 knit, 2 loops together (knit), 12 knit - 6 times, 2 loops together (knit), 1 knit, 2 loops together (knit). ), 6 facial.
- 4 lines of knit stitches.
- Decrease row : 6 knit, 2 loops together (knit), 1 knit, 2 loops together (knit), 10 knit - 6 times, 2 loops together (knit), 1 knit, 2 loops together (knit) , 4 facial.
- 4 rows in stockinette stitch.
- Thus, decrease in subsequent rows , and in every 5th row, maintaining the decrease in loops in the line to 22 loops.
- Row 1 in stockinette stitch.
- Decrease row : 2 stitches together, and so on until the end of the row, so that 11 stitches remain.
- Decrease row : knit 1, knit 2 stitches together until 6 stitches remain.
- Cut the thread, thread through the remaining loops and pull tight. Secure so that the thread does not unravel.
- Make a pompom with a diameter of 3 cm from red yarn and sew it to the top of the beret.
For a little boy, up to a year old, you can knit a beret hat with interesting waves. The yarn color can be whatever you like. For autumn, choose soft wool, and for summer - cotton threads. Knitting needles No. 3.5.
How to knit a beret for a boy?
Diagram with description:
How to knit an interesting beret for a boy: diagram with description
How to knit a beret for a boy: continuation of the pattern with description
Simple option
Let's try to knit a simple beret; this option is ideal for beginner needlewomen.
To knit it, you don’t need to be very clever; it’s enough to know how to knit knit and purl stitches. It is sized for a 4 year old girl.
You will need:
- Yarn (preferably warm) – 100 grams;
- Knitting needles No. 3.
Stages of work:
- Cast on 88 stitches on the knitting needles, knit a 1×1 elastic band about 8 centimeters wide, then knit one row with full knit stitches, after that, another row with purl stitches. Next, we knit another 4 centimeters with an elastic band (we have a cuff).
- We knit 40 rows of even elastic. After this, we begin to reduce through one row.
- We knit 10 facial loops, knit 2 together - repeat this until the end of the row.
- We make the following decrease: 9 knit stitches, 2 together to the end of the row.
- Now we knit 8 facial loops, 2 together - the whole row.
- We decrease the loops in this way until there are 12 of them, after which we tighten all the loops at once with a thread and sew the seam with the same thread.
Related article: DIY cardboard chest of drawers: master class with drawings and diagrams
As you can see, the process is really simple, and the headdress turned out very good. If you think it looks rustic, you can decorate it with a brooch, patch, applique, embroidery, beads, beads, in general, whatever your heart desires, the main thing is to apply fantasy.
How to crochet a beret for a boy: diagram with description
If you love crocheting, then create a beautiful headdress for your son. For the summer, you can knit a “paratrooper’s beret” or a “captain’s cap” for a boy. For the fall, using the same patterns, but from denser threads, it’s easy to create a stylish cap that will serve as an excellent addition to a boy’s look.
So, we crochet a beret for a boy.
How to crochet a beret for a boy: diagram with description
Diagram with description:
How to crochet a beret for a boy: diagram
- While knitting, move from the center to the edges , adding the number of loops as in the diagram. To do this, cast on 8 air loops, close the knitting, and continue according to the schematic drawing of the pattern.
- In each row, add 2 air loops and one half-column with one base. The result will be a bottom of 8 parts.
- After that, turn it down . In each row, the last loop should consist of 2 half-columns with one base. Details in the diagram below.
How to crochet a beret for a boy: finishing the pattern
Important: Knit the leg of the beret from the remaining stitches after decreasing. Using a dark thread, knit 4 rows in half-columns.
Tip: The visor is knitted tightly so that it does not bend. Soak the finished visor in a solution with starch and steam it with an iron through a damp cotton cloth.
Visor knitting pattern:
How to crochet a beret for a boy with a visor: diagram with description
How to crochet a beret for a boy and a girl: diagram with description
If you want to knit a captain's cap for a girl, then choose bright yarn and knit a visor with peaks along the edges:
Sew the visor to the beret, as well as an anchor patch or other decorative elements.
Master class: classic knitted beret
I want to share with you a master class on knitting a classic beret.
The beret is suitable for the autumn-winter period. Will decorate and refresh your look.
Necessary materials:
- white threads 50% wool, 50% acrylic (60 grams);
- knitting needles No. 2.5, No. 4.5;
- hook No. 2.5.
We knit everything in the round. Let's start with the elastic band. We cast on 2.5 knitting needles 128 loops (64 loops on each knitting needle) and knit with a 1x1 elastic band (1 knit, 1 purl) for 8 rows (2 cm).
Next we knit everything with facial loops and evenly add 24 loops. You will get 152 loops (76 loops on each needle).
After this, we switch to knitting needles No. 4.5 and knit 8 cm all with facial loops.
At a distance of 10 cm from the beginning of knitting, we divide our beret into 8 equal parts (19 loops each part).
To do this, every 18 loops we knit 2 loops together with the front one behind the back walls . This loop, obtained after knitting two stitches together, will be the guideline for our 8 parts. You can mark the parts with pins. I marked this loop in the photo with black lines.
The next row is unchanged - all with knits.
Now we make uniform reductions in each part , as a result of which we get 8 scars (like a zigzag) . Decreases are made through a row ( 1 row of decreases, the next row is all knitted ) and so on until the end of knitting.
1 row. We knit each part with knit stitches, to form a hem (zigzag) - we knit the last loop of each part together with the knit stitch behind the back walls with the loop that was previously obtained from knitting 2 loops together . And so on until the end of the row.
2nd row. All facial loops.
3rd row . We knit each part with knit stitches, and to form a hem (zigzag) , we knit together the knit loop behind the back wall, which was previously obtained from knitting 2 loops together with the first loop of each part . And so on.
4 row. All facial loops.
It turns out 8 scars (zigzags). The loops in each part are reduced.
Repeat from rows 1 to 4 until 16 stitches remain (8 stitches on each needle).
Last row - knit all stitches 2 together. 8 loops remain (4 loops on each needle). We pull the thread through them and tighten it. We do not break the thread.
Loop . We crochet number 2.5 8 chain stitches. Then we knit row 1 with single crochets and connect at the base.
You can do it without a loop, as you like.
That's all! The beret is ready.
You can decorate with a brooch or a knitted flower (there are many patterns on the internet). This will make the beret look more elegant.
I decorated it with a knitted flower, on a pin, so that you can unfasten it whenever you want.
Happy knitting everyone.
When copying a master class, please indicate the source and author of the idea.
It takes a lot of time to prepare a master class, thank you for your understanding.
Sincerely, Natalia Zolotoverkhaya.
How to crochet a warm beret for a girl: diagram with description
How to crochet a warm beret for a girl: diagram with description
Summer has ended and autumn has begun, and your little princess does not want to part with her beret, then knit her a warm headdress from yarn of two colors. You can knit a snood scarf for yourself or your daughter using this yarn.
Many mothers do not know how to crochet a warm beret for a girl. Below is a diagram with a description.
How to crochet a warm beret for a girl: diagram
Description of work:
- Cast on 8 chain stitches and close into a ring.
- Attach an additional thread to the last loop of this row if the beret consists of two colors. If you plan to knit a three-color headdress, then tie two additional threads.
- We knit the first sector , adding an additional thread as we knit.
- Second sector - change the thread. The previous working thread will now become additional.
- Third sector - replace the thread again, knitting the loops in a column.
- Close the row with a connecting loop , while raising additional threads to the next row.
How to crochet a warm beret for a girl: the beginning of a knitting pattern
Important: Do not forget to change the thread when knitting sectors. You also need to make increases in each sector, and knit the stitches in relief.
How to knit embossed columns correctly is shown in the figure below.
Crochet warm beret for girls - embossed columns
This picture shows how to add stitches with a crochet stitch.
How to crochet a warm beret for a girl: pattern for adding loops
After knitting 24 cm, start making decreases on both sides of each relief stitch (2 double crochets together) - so knit 5 rows. After this, make an elastic band by alternating purl and knit stitches.
Important: The face posts must coincide with the boundaries of each wedge.
Crochet a flower and sew it to the side of the beret. Sew a bead into the middle of the decor. How to make a flower is described in the following short video.
How to knit a baby beret with knitting needles with a voluminous flower: diagram with description
How to knit a baby beret with knitting needles with a voluminous flower: diagram with description
It is not necessary to knit a flower separately and then sew it onto the beret. You can tie a warm beret with a large flower on the top of your head.
How to knit such a children's beret with knitting needles with a voluminous flower? If you knit a beret with voluminous braids, a stylish flower will appear on the top of your head as you knit it. Scheme for creating volumetric braids with description:
How to knit a baby beret with knitting needles with a voluminous flower: diagram of voluminous braids
- Prepare 1 skein of Acrylic yarn and stocking needles . Cast on 96 stitches on two needles as usual.
- Divide the stitches into 4 parts to continue knitting in the round. Place a marker at the beginning of the line.
- Knit a beret elastic band 1x1 - 3 cm.
- The next line is knit 2, increase one loop with broaching, knit 2, and so on until the end of the line. You should have 48 more stitches.
- 1st row of pattern - 4 purls, 8 knits, 4 purls. Repeat this repeat on the remaining knitting needles.
- 2nd row of the pattern - 3 purl, 2 knit together with a slant to the right, 3 knit, 2 knit together with a slant to the left. Repeat on all needles.
- 3rd row - purl 3, knit 5 (5th loop is the first yarn over, 6th loop is the second yarn over, knit it behind the back wall), knit 4, purl 3. Repeat on all needles.
- 4th row - purl 2, knit 2 together with a slant to the right, knit 2, yarn over, knit 3, yarn over, knit 2 together with a slant to the left, purl 2, purl 2 again, knit 2 together with a slant to the right, knit 3, yarn over, knit 2, yarn over, knit 3, knit 2 together with a slant to the left and purl 2. Repeat on all needles.
- 5th row - purl 2, knit 12, purl 2, purl 2 again, knit 12, purl 2. Repeat until the end of the row.
- 6th row - 1 wrong side, 2 knit together with a slant to the right, 3 knit, yo, 4 knit, yo, 3 knit, 2 knit together with a slant to the left, 1 wrong side, 1 wrong side, 2 together with a slant to the right - repeat rapport until end according to the previous model. When two repeats are knitted, do the same on the remaining knitting needles.
- 7th row - purl 1, knit 14, purl 1, purl 1, knit 14, purl 1. Repeat.
- 8th row - knit 2 together with a slant to the right, knit 3, yarn over, knit 6, yarn over, knit 3, knit 2 together with a slant to the left. The second rapport is the same, but 2 knits together with a tilt to the right. Repeat.
- the 9th and 10th rows, knit all the stitches. Repeat the pattern for the next 10 rows.
- When you knit the required length of the beret, make decreases : 4 purl, 2 knit together with a slant to the right, 4 knit, 2 knit together with a slant to the left, 4 purl. Repeat for the second rapport. Repeat on all needles.
- 3 purl, 2 knit together with a slant to the right, 4 knit, 2 knit together with a slant to the left, 3 purl . Repeat.
- 3 back, 6 knit, 3 back, 3 back, 6 knit, 3 back . Repeat.
- 2 reverse stitches, 2 knit stitches together with a slant to the right, 4 knit stitches, 2 knit stitches together with a slant to the left, 2 purl stitches . Repeat the rapport and so on until the end of the row.
- 2 purl, 2 with a slant to the right, 2 purl, 2 knit with a slant to the left, 2 purl . Repeat the rapport to the end of the row.
- 1 wrong side, 2 together to the right, 2 knit, 2 together to the left, 1 wrong side . Repeat the rapport to the end of the row.
- 1 purl, 4 knit, 1 purl, 4 knit, 1 purl.
- 2 together to the right, 2 knit, 2 together to the left, 2 knit . Repeat.
- 1 front, 2 together to the right, 1 front . Repeat.
- 1 front, 2 together to the right . Repeat.
- Knit 2 together with a slant to the right - knit this way until the end of the row.
- Pull the remaining 9 loops together using a crochet hook . Fasten the thread to the wrong side of the beret.
In the detailed video you can clearly see how to knit such a beautiful beret.
Pigtail pattern
This model is knitted with regular stocking needles and is designed for a 2-year-old girl (that is, with a head circumference of approximately 48-50 centimeters).
This product is designed for cool weather (for example, spring or autumn), so it is better to use thicker threads, but not to overdo it.
First cast on 104 stitches for the headband. We distribute it among 4 knitting needles and knit it with a height of approximately 4 centimeters. Then the beret is knitted in stockinette stitch, adding 64 stitches to create the main part. After adding stitches, there should be 42 stitches on each needle.
When the height of your product reaches six centimeters, you need to start decreasing. For each stitch, count the twenty-eighth stitch and highlight it with a special marker or thread of a different color. Now make a decreasing stitch on the remaining 27 rows. To do this, knit the selected stitch with the previous one as one knit stitch.
When you are done decreasing, there should be 6 stitches on all needles, which need to be knitted over a length of two centimeters. Finish the work by tightening the loops that remain. Pull them all to one side and secure with working thread.
Related article: 12 ways to humidify the air without a humidifier
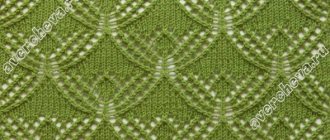
How to crochet a children's summer openwork beret for a girl: diagram with description
Both girls and young women love to wear an openwork beret. This headdress adds femininity and tenderness to the image.
So, we crochet a children's summer openwork beret for a girl.
How to crochet a children's summer openwork beret for a girl: diagram with description
Diagram with description:
How to crochet a children's summer openwork beret for a girl: diagram
How to crochet a children's summer openwork beret for a girl: description
Important: Along the edge of the beret there are picots and cloves. They are knitted like this: 3 air loops are knitted in a half-stitch at the place where the chain begins.
Tip: You can make picots as frequent or as rare as you like. All openwork items are usually tied in this way.
Crocheted openwork berets need to be starched and steamed with an iron. Warm berets should be wetted and pulled onto a plate or jar. This will give them a beautiful and neat shape. Create berets with your own hands for yourself and your daughter to make the look original and stylish!
Knitted berets: patterns with descriptions
Knitting a beret is a very interesting and educational activity that does not require special skills. There are many simple techniques for knitting berets. The design and style of the product depends on the option chosen. Openwork looks festive, made according to a standard pattern - everyday and ordinary.
See also...
✅ 6 reasons to learn to knit right now
✅ How to weave bracelets from rubber bands: patterns with detailed descriptions
✅ Fashionable women's knitted hats: winter 2019
✅ Vest for girls: knitting and crochet
It is recommended to match the color of the product to outerwear, not shoes. It is also important to consider your own eye color.
Takes in circular rows
So, the first version of the beret using circular rows for a head circumference of 60 cm. Merino wool is an excellent material for knitting. It's not difficult to knit with. Also take circular knitting needles number 2.5. The diagram and description are presented below.
Knitting consists of two patterns: M.R. and M.L.
M.R. – add one loop from the P.R. broach, while knitting L.P. for the front half of the loop. M.L. _ – add one P. from the broach P.R., L.P. in the back half of P., twisted S.R. - remove 1 P., remove 1 P. as when knitting a crossed I.P., return these two P. back to S. (left), remove 2 P. together in the process of knitting, L.P., pull out the removed P. via L.P.
- We dial 162 P., placing a marker and closing the circle.
- Knit 9 R. with an elastic band 1*1.
- R. additions: I.P., M.R., 2 L.P., M.R., 3 L.P., M.R., 2 L.P., M.L., 1 I. P. - repeat. It should be 234 P.
- Further along A/H 1, repeat from 13 to make 18 rubles.
- After 8 R. Agricultural 5 R. – 1 and 2 R. repeat.
- Continue working on A/H 2, repeat rapport 9 times. After 26 p.m. A/H 2 thread can be cut off. After finishing the knitting process, wet the beret with water and pull it onto a plate or jar to give it a beautiful shape.
- In this position, wait for the product to dry.
Easy scheme
Knitting a beret with knitting needles is not difficult if you follow the pattern. There are various options, but it is recommended to start with a simple and light weave.
Openwork beret with knitting needles
Take one hundred grams of yarn of any shade you like, circular knitting needles (3.5 and 5 numbers) and stocking needles. The openwork beret needs to be done in a circle; during the process, you can change the knitting needles to stocking needles to make it more convenient, but this step is performed at will. When knitting a product, you will come across the concepts of left and right diagonals.
Let's take a closer look at how each is done:
- Left diagonal : 1 R.: I.P., 2 together L.P. in a tilt to the left, yarn over (N.), L.P. 2 R.: I.P., 3 L.P.
- Right diagonal: 1 R.: I.P., L.P., N., 2 together L.P. 2 R.: I.P., 3 L.P.
Also known elastic band: 2 I.P., 2 L.P. (repeat up to 2.5 centimeters). The smallest S. dial 104 P. - in a circle. Knit an elastic band of 2.5 cm in the following R.: with large knitting needles, left diagonal pattern (L.D.U.) until a length of 10 cm is reached. After 2 R., stop knitting and start doing L.D.U. 15 centimeters, stop after R. 2 patterns are knitted. In the next R. repeat L.D.U. up to 20 centimeters, also stop after the row of the second pattern is ready.
Now let's move on to decreases (U.B.):
- Decrease R .: I.P., 2 together to the left, L.P. – until the end of R. (78 P.)
- I.P., 2 L.P. = repeat
- U.R.: I.P., 2 together to the left = repeat (52 P.)
- I.P., L.P. = repeat
- U.R. : remove P. as I.P., I.P., stretch the knitted P. through the one that was removed = to the end of R. (26 P.)
- All I.P.
- U.R.: 2 together I.P. = to the end of the P. Cut the thread , pull through 13 P., fasten.
Such a headdress with an English elastic band tied across it will look very beautiful in the autumn season!
Beret with braids
The beret is voluminous and openwork thanks to an interesting knitting, which you will now learn with us! The thread chosen for the work was 50% acrylic, 50% wool, i.e. You won’t freeze, but it won’t be hot either!
- Front stitch: L.R. – L..P., I.R. – I.P.
- Garter stitch: L. and I.R. – I.P.
- Elastic band 1*1: L.R. – L.P., I.P. I.R. - according to the drawing.
- Openwork pattern: according to pattern one. Only L.R. is represented on it, so I.R. knit according to the pattern.
- “Fantasy” pattern: pattern two. The rest of the instructions are the same as for the openwork pattern. The most important thing is that the thread needs to be folded in half!
- We dial 104 P., 2 cm – elastic band, “fantasy” pattern 13 cm in every 3 R. start decreasing P. This is done in widths of 20 P. Knit until there are 5 P left on the knitting needles. Tighten the thread at the end of the work.
Knitted from acrylic
You can knit this beret from two Gerda threads (two colors) in loose knitting using sock and circular knitting needles.
- S. number 3.5 — 120 loops for elastic (8 cm). Without the lower auxiliary thread, continue with an elastic band 2*2 for another eight centimeters.
- Next you need to connect the P. together – P. of the first canvas and the second canvas together – add + 24 P. (from broaches crosswise). The total should be 144 P.
- Now we continue with knitting needles 4.5 and for agricultural purposes 9 rapports (with wedges).
- Then on Agricultural 1. After knitting this pattern, move the fabric to the toe knitting needles and proceed to U.B.: 1 circle - in each repeat, all three I.P. together I.P. 2nd circle – 2 P. place L.P. (the third circle is similar).
- Wash the hat in cold water and dry. Also do this on a large plate (if you can’t find the plate, take a jar).
Takes knitting needles for girls 2 lech
A knitted beret for a 2 year old girl is not easy to make. If you have never knitted before, feel free to skip this option! The work mentions two notations, which we will now decipher:
- 2 together L.P. to the left (2 L.P.L.): using the right knitting needle (S.), remove the first 2 P. and return them to the left S., while turning each one, insert the S. on the right into 1 P., then into 2 P. with the left C. Knit these two loops together L.P.
- 2 together L.P. to the right (2 L.P.P.): insert the right S. into 2 P., then into the first P. with the left S., knit together the L.P. behind the front walls.
- The hat will be pink or purple, whichever you like best. Cast on 96 P. on four knitting needles in K.R. Make 12 R. with an elastic band (L.P., I.P.). Next R.: 2 L.P., knit a loop from the broach into the back wall on the left S. like L.P., do this to achieve 144 P.
- From the first to 10 R., do the pattern about 5 times.
In order for the hat to look beautiful, you definitely need to make a U.B. at 11 R.:
- 4 I.P., 2 L.P.P., 4 L.P., 2 L.P.L., 4 I.P. - repeat until the end of R., like all subsequent R.
- 3 I.P., 2 L.P.P., 4 L.P., 2L.P.L., 3 I.P.
- 3 I.P., 6 L.P., 3 I.P.
- 2 I.P., 2 L.P.P., 4 L.P.L., 2 I.P.
- 2 L.P., 2 L.P.P., 2 L.P., 2L.P.L., 2 I.P.
- 1 I.P., 2 L.P.P., 2 L.P., 2 L.P.L., 1 I.P.
- 1 I.P., 4 L.P., 1 I.Z.
- 2 L.P.P., 2 L.P., 2 L.P.L.
- L.P., 2 L.P.P., 1 L.P.
- 2 L.P.P., 1 L.P. - along.
- 2 L.P.P. = 9 P should remain here.
In addition to the diagram and description, we have prepared a video tutorial for you. It will help you better master this technique.