Casting on stitches on knitting needles is the very first obstacle that a beginning craftswoman faces. Of course, mothers and grandmothers will always tell us about the traditional option, but besides it there are many others that are suitable for different occasions and will ideally frame your work, as well as give its edge the advantages necessary in each specific case. This master class with detailed descriptions, photos and videos will help you make your choice and teach you many variations of buttonhole casting..
Traditional knitting set
Absolutely all knitters are familiar with this option, because it is the simplest, most universal and, accordingly, very common. Knitting with this emb. allows you to make a pattern starting from the first row and is perfect for the neckline and sleeves. Suitable for both regular and circular sp.
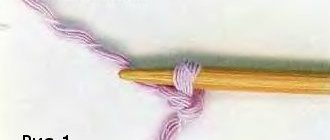
To begin with, we should take n. in the left hand, leaving n. in reserve, which should be two or two and a half times (depending on the knitting density) longer than the width of the finished fabric. Next, we circle it around the thumb clockwise and place it on the index finger, holding both ends in the palm. We insert two knitting needles folded together into the point on the thumb, grab the n. from the index finger and pull it into the loop on the big stitch, then drop it, while helping yourself to tighten the loop with your thumb and index finger. After, holding p. uk. p. We lower the knitting needles towards ourselves and repeat the knitting as described earlier, in the end we will get two loops. To prevent the chain of sts from twisting, you should constantly hold the sts. uk. P..
Video lesson
Perfectly straight knitting edge. Secrets of edge stitches with knitting needles
A beautiful, smooth edge of a product is an important detail in knitting. Even a well-knit fabric will look sloppy if the edges are warped and drooping in places. The neatness of the edge depends on the correctly chosen method of knitting the edge loops. There are many such methods, their selection depends on how you will use the edge of the knitted fabric in the future: stitching, connecting the parts with a certain seam, picking up loops along the edge for further knitting, or the edge will be used as a finished open edge of the product. Edge stitches are the first and last stitches on a knitted fabric, but sometimes the edge can be knitted from two or three loops from the edge. When calculating the number of loops, they are usually not taken into account the main pattern of the fabric. Next, we will consider several ways to knit edge loops.
Method one, classic.
The most common method, when knitted, the edge is obtained in the form of a chain of loops. This edge is well suited for further stitching and casting on loops along the edge, creating a smooth, flat edge. The disadvantage of this method is its strong twisting.
When knitting this edge in the front row, remove the first loop as a front one (thread at work), knit the front row, knit the last loop. In the purl row, remove the first loop without knitting as a purl (thread before work), and knit the last loop purl.
Second method: Edges with knots.
This method produces a clear, even edge with less curl than in the first method, in the form of neat knots along the edge. It looks beautiful in garter stitch, as if it is a continuation of it.
Remove the first loop as a purl (thread before work).
It is knitted almost like the first version of the edge with a chain, but in the front row, remove the first loop as a purl (thread before work), knit the last one. In the purl row, remove the first loop as a knit stitch (thread behind the work), and knit the last loop purl.
Third way. Edge in two loops.
Non-curling edge with a smooth edge, suitable for decorating scarves, belts, shoulder straps and other open edges of products. Knit using two loops at the beginning and end of the row.
In the front and back rows, remove the first loop as a purl, knit the second one, at the end of the row knit the penultimate loop, and purl the last one.
Fourth way. Compacted edge.
Ideal smooth edge of the canvas, with a dense braid along the edge. This method of making an edge is suitable for any knitting: knit stitch, purl stitch, garter stitch and elastic stitch. Knits easily and simply. Slip the first loop and yarn over, knit the last loop and yarn over together.
The first loop is double crochet.
Important moment! The last loop must be knitted according to the pattern, if the front one - knit, if the purl - purl!!! Only under these conditions will the edges be identical on both sides.
Fifth way. A braid of two loops.
To knit the edge using this method, you need to use three loops. The edge is compacted, smooth, and does not curl. A decorative non-curling edge with a straight chain on the sides is suitable for decorating open edges of products.
In the front row, slip off the first stitch (thread behind the work), cross the next two to the right and knit. Having reached the last three loops, cross two loops to the left, knit them and the last loop.
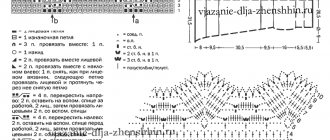
a- two loops crossed to the right, b- two loops crossed to the left
In the purl row, remove the first loop with the front one (thread at work), knit the next two loops with the front ones without crossing, then knit according to the pattern. Having reached the last three stitches, knit them without crossing.
Any product, if it is not knitted in a circle, has edges. Edge stitches are the edge stitches, usually the first and last on your needle. Why “as a rule” - because there are decorative edges, the creation of which can involve four loops (two from each edge) or six (in such an edge the loops are assembled by three from each edge).
Strictly speaking, four loops are no longer edge loops. It seems to us that this is already some kind of pattern along the edge, but there are no general terms in knitting. Here I came across the phrase “no matter what fabric you knit, you need to remove the first loop without knitting”…. And not always, and don’t sow misconceptions among the orderly ranks of beginning knitters, because someone is used to doing just that!
Let's try to figure out what the edge of a knitted product is and how to knit edge loops.
Different methods of knitting an edge stitch result in a different appearance of the edge.
Edge loops form the side edges of a knitted fabric and can be classified as auxiliary loops. When assembling the product, the edge loops will be tucked into the seam. Except, of course, when the edges are left open, and the appearance of the edge of your project will be highly dependent on your skill in selvedge knitting.
Edge loops do not participate in the formation of the pattern, so they are usually not included in the calculation of loops
for him, they are recruited additionally and knitted in their own way. If you see in the description “cast on forty-two loops” and edge loops are not mentioned, a couple of edge loops are worth adding. Although, of course, decent people, when describing patterns, indicate edges separately, including on diagrams (you can see how to read and understand the diagrams here).
There are two basic ways
selvedge knitting, which results in a standard selvedge (chain) and a knotted selvedge.
Chain edge
Standard chain edge
is a champion in application, it is universal and suitable for anything. This edge is the simplest and easiest to remember.
Edge edge “chain”
The first loop in both the front and back rows is not knitted and is removed from the left knitting needle to the right one. What does “removable” mean - just insert the right knitting needle into the loop on the left knitting needle from right to left and transfer this loop from the left knitting needle to the right one, without doing anything at all with it.
Do a, do b - the loop is removed!
When removing edge stitches, the main thing is to keep track of where your working thread is. It will depend on the edge edge. With the “chain” method of knitting a standard edge stitch, the edge loop is removed as a purl stitch, that is, the thread should be in front of the knitting needle
.
The last stitch of each row is knitted. Thus, for every two rows of fabric in height, you will get one edge loop.
On the wrong side of the front stitch, you can count the rows - one edge loop for two rows
However, I am accustomed to knitting a chain a little differently - the first loop is removed, as with a knotted edge - the thread behind the needle - and the last one is knitted purl-wise. This is not according to the canons and is not an example to follow, but I have been knitting this way for many years, the movements have been worked out to the point of complete automaticity and it is too late to relearn. I could go back to the beginning of my knitting journey - I would do it like everyone else.
The problem with the standard edge is uneven loops on the edges. We've all been there at one time or another, and it drove me crazy (to be honest, on slippery yarn it still infuriates me...). To keep the loops even, in each row there are two or three loops after
The edge should be
tightened
, and two or three loops
before
the edge should be knitted a little
looser
.
But still, the row unevenness of the loop in front of the edge loop can be avoided by a lucky few, so the chain is usually used for the edges, which then go into the seam.
Here you can clearly see the loop dancing in height next to the edge.
The edge turns out to be elastic, but without additional processing it can curl and usually does. In stockinette stitch it will be done with 100% probability, don’t even doubt it.
The edge of the chain often curls
Knotted edge
If you want a non-elastic edge that won't go into a tailspin when twisted, try a knotted edge.
.
Knotted edge
With this method, the first loop of the row is removed from the left knitting needle to the right one, but as a front stitch, the thread should be behind
the knitting needle
. The last stitch is knitted. Thus, for every two rows of fabric in height, you will also get 1 edge loop.
A knotted edge is tighter and has virtually no twist.
This edge works well with garter stitch and holds its shape better - it’s incredible how such a small difference in the position of the working thread when removing the first stitch can make such a dramatic difference in the appearance of the edge!
Left - chain, right - knotted edge
But knitters are not the people to limit their imagination to some banal two ways that everyone knows! And here's your proof - at least a few more ways to knit edge loops.
Edge edge " pearl"
» using crossed loops
“Pearl edge” is often called an edge in which three loops near the edge are knitted with rice (knit, purl, and in the next row the pattern is shifted by one loop). But, as it seems to us, these are no longer edge loops, they are practically an edge strip. Now we are talking about the edge that is obtained by using crossed loops - it is sometimes also called “pearl”.
Crossed edge loops
The first loop of each row of pearl edges is knitted with a knit stitch, and the last one is removed, the thread is in front. In this case, the edge loop is also one for two rows. You can turn around and knit the first and last stitches with a knit stitch on the front side of the product, and on the wrong side remove the edge stitches as in purl knitting (thread at the front of the work), without knitting them. I didn’t notice much of a difference; the edge loop also turns out to be one for two rows.
Edge edge " garland
»
Performed on four loops, two on each side.
Garland edge
On the right side of the work, slip the first loop as a knit stitch (thread at the back), 1 yarn over, knit the next loop and pull it and yarn over through the removed loop. On the wrong side of the work, slip the first loop as a purl (thread in front), 1 yarn over, purl the next loop and pull it and the yarn over through the slipped loop.
It's a bit tiring, but the edge is interesting and dense. Although confused.
By the way, one of the options for a double crochet edge
- remove the first edge loop with a yarn over, knit the last edge loop together with a yarn over. It all depends on the type of edge loop - if the first loop looks like a purl stitch, then the yarn over should be after it, if it looks like a knit stitch, then before it. And you also need to knit the last edge stitch according to the pattern - if the loop looks like a knit stitch, then knit it. If it’s like a purl, then it’s a purl. For me, this method is only suitable for elastic, since I knit with my grandmother’s knits, and with classic elastic. A method for the classics and, I believe, not for beginners. It seems that I tried to explain it clearly, but if I didn’t do enough, ask questions in the comments.
Edge edge " double chain"
»
On the right side of the work, remove the first loop as a knit stitch (thread at the back), knit the next loop purl. At the end of the row, purl the penultimate (before the edge) loop and remove the edge as a knit stitch (thread at the back). On the wrong side, purl the first two loops (edge and the one following it) and the last two loops (edge and the loop in front of it). It looks original, but the edge is a little loose and is not always appropriate.
The edge is “double chain” - although it’s not clear why it’s double... Creative people are knitters!
Some craftsmen prefer to knit loops on a double chain before crossed edge loops. The choice for knitting these crossed ones, as usual, is rich - knit or purl. Moreover, I have come across variants of a double chain, where the edge is removed from the wrong side. But in our understanding, a double edge chain is the edge removed on the face of the work, the second loop is knitted (the type - knit or purl - is no longer important). On the wrong side of the work, both loops are knitted, as described above - both the edge loop and its neighbor.
Edge edge " for set
»
A more uniform edge is created by knitting the first and last stitches on each knit row and purling each purl row. At the same time, the loops lie more evenly. This edge is perfect for casting on planks, since with this method there is one edge loop for each row of knitted fabric and the casting can be done one loop at a time. But everything beautiful has a downside - since such an edge creates a loop for a row, the edge can fold and stretch unnecessarily. Tighten the working thread on the edges if you choose this method.
A set of loops along the edge of the fabric with this method of knitting edge stitches will be more convenient, but the edge may stretch
You can knit the first and last loops of each row; each row will also have one edge loop, which makes this option also convenient for casting on loops for a bar. The edge will be a little less stretchy and more like a knotted edge.
Pico edge
»
I met by chance, I can’t help but note, although I haven’t knitted like this myself, there’s no need. The trick is that at the end of the row after the edge stitch, several air loops are cast on a working knitting needle (how many is determined experimentally, depending on the thickness of the yarn and desire), a “picot” is formed from them, and the last and first loops are knitted together. In the next row, the first loop is removed undone. When I have time, I'll try. Maybe one of the readers knitted this - please share it in the comments.
I found this photo of the picot edge on the computer - anyone who knits, please share your experience...
As you can see, there are many options and plenty to choose from. There is also i-cord, invented by Elizabeth Zimmerman, which can also be used on the edge. We did not mention it in this post, because i-cord is worthy of a separate description, and it will definitely appear on the channel! So keep an eye on the posts.
Edge I-cord from the front and back
The method of knitting the edge loop is selected depending on which edge of the knitted fabric you need. And it depends on the purpose of the edge
:
- for sewing parts - the edge goes into the seam
- for a set of loops along the edge - strips, collars. sleeves and other details, so that the edge will still close
- open edge, the most difficult to process - because it’s in plain sight
We all knit differently, so experiment and find the method that works for you. There are a lot of ways, the main and most commonly used ones are listed here. And if you are trying a new method, try it on a sample with a pattern, not all edges suit every pattern.
To ensure that the side braid of the edge looks the way you want, carefully monitor the position of the working thread when removing the edge loop
. One of the common problems of beginning knitters is that the thread moves back and forth, resulting in a rather creative edge, knots alternating with loops in random order, and as a result the product looks sloppy.
These are the kind of messy edges you can get if you throw the working thread around when removing the edge at random.
Remember the golden rule of knitting - if you have chosen a certain method, do not deviate from it until you have finished knitting the entire product.
And for lovers of granny loops, like me, make sure that when removing the loop, it does not unnecessarily spin at the base, turning into a crossed loop with a slight movement of the hand
The edges of the part must be smooth and tight, and for this you should monitor the tension of the working thread. You don't want loose, sloppy loops, do you? It’s better to tighten the edges a little, the edge will be prettier. Well, without fanaticism, of course. And you shouldn’t practice knitting one edge of the product this way, and the other edge like this. The edges should be the same. And training is best done on samples - remember how many cats ask “what time is it?” killed the famous hero Georgy Mikhailovich Vitsin? True, this didn’t really help him, but he didn’t knit!
That seems to be all. Happy knitting.
Cord-like set of loops
Such an embankment loops create the effect of a decorative edge and are ideal for reinforcing the bottom of the fabric when making mohair products. As in the previous case, here we can also start knitting the main pattern immediately after the first row; The loops of the initial row are formed from the main thread, and the bottom chain is formed from a thick thread folded in three, which makes the neck of the product quite strong. Suitable for any joint, including circular ones.
Fold n. three times, place it on the left palm so that the main n. was on uk. p., triple on the big one, the formed loop is located between us. p. and b. p.. Next, everything is very similar to the traditional embroidery: we insert two knitting needles into the loop under the main. n. and, holding it, we continue to work as in the first option.
Video lesson
A set of knitted stitches for a beautiful edge
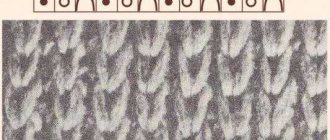
The cast-on edge is rounded and dense, ideal for voluminous patterns and 1x1 elastic. For turning rows, an odd number of loops is cast, for circular knitting - an even number.
Edge repeat: 2 rows.
- ROW 1: *knit 1; 1 purl;* 1 person.
- ROW 2: P1; *1 person twisted; 1 purl*
Beautiful, rounded edge - MK:
Gray yarn: knitting needles: 3.5 mm; yarn 50 g. - 100 meters. Yellow yarn: knitting needles: 2.5 mm; yarn 50 g. - 130 meters.
Set of hinges with thick edge
It is most often used as a finishing, because it perfectly retains the shape of the neck of the product and serves as a decoration for subsequent elastic or garter stitch. Also such an embankment. a loop with a thickened edge is called “double”; the compacted end is formed by embankment. p. and 1 r., and then, for example, 1x1 elastic bands.
After placing the double thread on your fingers in a figure eight pattern, make the first loop and tighten it. Next we will knit in the same way as with a regular embankment. pet., but with only one difference - on the thumb we remain with a double n., on the index finger - with one (we hold the second one together with the knitting needles). Thus, a dense “pigtail” is formed, which will reliably protect our work from deformation.
A set of hinges with a thickened edge: video master class
For beginners: the classic way to type
No extra thread
In this way, loops are often cast on only one needle. First, the loop is cast on in the usual way, followed by either a purl stitch (for an odd number) or a knit stitch (for an even number). The last loop is always the front stitch.
The thread is grabbed with a knitting needle from under the thumb. Then the knitting needle rises above the thread from the index finger, and extends under the thread from the thumb.
Now the purl is done. The knitting needle must be inserted from top to bottom of the threads from the index finger. Then it rises up, after which the thread is grabbed from the thumb.
In the next row, knit 1 is knitted. and 1 purl. alternately. They will look like they have been turned over. The working thread in the next row will be in front. Only the front ones are knitted, and the purl ones are removed. Subsequent rows are knitted in the usual way.
Italian version of the set of loops in the video:
A visual diagram of knitting a classic Italian cast-on with knitting needles, how to cast on loops:
With extra thread
Technology:
- The edge loop is cast on as usual. The main thread is located on the index finger, and the other on the thumb. It is held with two free fingers.
- A knitting needle is passed under the auxiliary thread, picking up the main thread - this is the first loop.
- The main thread is picked up, the additional thread is always behind the loop.
- The knitting needle is passed under the additional thread, pulling a loop from the main thread, then the base thread is picked up again.
This is how the whole row is formed. It will consist of an alternating arrangement of working loops in front and behind the auxiliary thread. An elastic band can be used as an auxiliary thread. The stitches that are in front are knitted as knit stitches, and those that are in the back are removed. The working thread must be passed in front, and the additional thread must be removed by knitting the required number of rows.
Tubular hinge set
This option is ideal in cases where we need an elastic and elastic end. Knitted after 1x1 elastic, it will perfectly retain the shape of the product, protecting the edge. from stretching. In addition, the tubular embankment. loops are also perfect for faces. satin stitch, to decorate the sleeve or neck of a sweater. For work we will need yarn of two different colors, but of the same thickness. Additional n. we will link the auxiliary r. and then we will delete it. The number of stitches should be half the amount we need + 1 stitch (for example, if we need a fabric 60 stitches wide, we make 30 + 1 stitch).
Loose ponytail n. and sp. put it in your right hand, and n. from the skein - to the left, holding it, we draw it around the thumb and index point.. Sp. enter from bottom to top under n. large p., grab n. from uk. p. and pull out the loop, resulting in a crossed p.. We continue knitting the st. n., without pulling n. too much, until we get it on the sp. 31 p., then we turn the work over and work on the basics. n.: we knit the row completely l. p. behind the back wall, next p. - And. p., and the third p. already l. etc., but in the classical way - behind the front wall; thus, on our sp. along the bottom edge there are alternate stitches. and auxiliary colors.
Next, we make the first st., then we pick up the bow of the st. color, we transfer it to the left sp. and knit l. p.. Then – and. p., pick it up and do everything the same as with the previous p., continue this until the end of the p.
It is important to remember that the stitches on top should always be purl, and the stitches below (those by which we grab the sp.) should always be knit!
We remove the auxiliary thread and begin our pattern. As mentioned earlier, the most suitable options for such a set are 1x1 or 2x2 elastic bands. In the case of 1x1, we simply continue the elm. n. how they lie on the back: i. p. - purl., l. p. - persons..
Tubular set of hinges: video master class
LiveInternetLiveInternet
Quote from Irimed
Read in full In your quotation book or community!
Elastic edge of products.
Elastic band 1*1 and 2*2. MK + video Irimed
: girls, one reader contacted me with a question: how to cast on loops for a 3*3 elastic band?
Let's start, as always, by studying the primary sources:
https://webposidelki.ru/post_1210994754.html
>>>
Italian method of casting on loops
The Italian method of casting on loops looks very neat and is ideal for making sleeve cuffs, 1 x 1 ribbed panels, patent or semi-patent patterns, since the edge remains very elastic and soft. This method consists of an initial set of stitches and knitting the next 3 rows, which are recommended to be done with knitting needles half a size smaller. Let's consider the Italian method of casting on loops with an additional thread.
Master class here:
https://domihobby.ru/457-italyanskiy-sposob-nabora-petel.html
Alternative twisted hinge set
https://www.klubok-info.ru/basic_techniques_5.html
The set is ideal for 1 x 1 rib. After casting on the stitches, knit the front stitches of the first row behind the back walls.
1. Cast on two loops from left to right * insert the right needle between the two cast-on loops with the point facing you.
2. Wrap the yarn around the right needle as in purl knitting and pull it away from you
3. Place a new stitch on the left needle as shown in the picture. Cast on the new stitch with a twisted cast-on. Repeat from *, always inserting the right needle between the last two stitches on the left needle.
Elastic band 1*1 and 2*2. Master Class
Author: lovely
Author's text: “We will need: main yarn, auxiliary thread (thinner than the main one) and two pairs of knitting needles with a half-size difference.
Step one: we cast on loops on smaller knitting needles in the amount of about half as many as we need (if it’s a little more than half, it’s not a big deal, lowering them later is easier than picking them up). The mint thread is our main thread, the raspberry thread is auxiliary.”
Continuation of the master class here:
https://forum.knitting-info.ru/index.php?showtopic=26618&st=0
Irimed
: I’m adding a video on my own:
Method of casting on loops using auxiliary thread
and description :
The initial row can be cast on using an auxiliary thread. Make the first loop, take the knitting needle on which the first loop, the ends of the working and auxiliary threads in your right hand. Place the thread coming from the ball on the index finger, place the auxiliary thread around the thumb, hold the threads with the remaining fingers of the left hand, as with the usual method of casting, the difference is that the auxiliary thread on the thumb will not participate in the formation of loops. Enter under the auxiliary thread (not into the loop on the thumb, only under the thread), with the tip of the knitting needle, pick up the thread coming from the ball behind the auxiliary thread (Fig. 1), pull the loop out from under the auxiliary thread.
Yarn over the right knitting needle (Fig. 2), then go under the auxiliary thread, use the tip of the knitting needle to pick up the thread coming from the ball behind the auxiliary thread, pull the loop out from under the auxiliary thread.
When casting on, alternately one loop in front of the auxiliary thread, the second behind the auxiliary thread (yo), loops are formed on the knitting needle, and the auxiliary thread remains inside (Fig. 3).
Continued here: https://tricoter.su/spicy/tech/nabor/5.html
Elastic set of loops for ELASTIC BAND. Elastic band 2*2. Master Class
Author: Olga
“We cast on a number of loops equal to half the calculated number. That is, according to the sample, we got an elastic band 2 x 2 from 64 loops, which means we cast on 32 loops + 2 edge loops.
We cast on the loops like this - the main thread forms the loops themselves, an additional thread (preferably strong and smooth, which will be convenient for you to remove, etc.) - the lower weaves.
We knit the first row purlwise. If you want a tight edge, for example, on mittens, then just purl them. If you want the edge to be more elastic, you can knit yarn overs between the purls. Whether yarn overs are needed or not in the first row depends on your knitting style, on the thread - in general, on a lot. If you like this set, then you will then decide for yourself whether to make yarn overs or not.
This is what the first row looks like with double crochets.”
Continuation of the master class here:
https://forum.knitty.ru/index.php?showtopic=14454
Well, and “for a snack”: video “A set of loops for an elastic band 2 * 2 using a chain crocheted in Japanese”:
Master class on this set option:
Author: Zipi
“... first, a chain is crocheted with an auxiliary thread.
The knitting stitches are cast on with knitting needles: - lift 2, skip 2.”
Continuation of the master class here:
https://zipi-knitting.blogspot.co.il/2013/01/how-to...elastic-cast-on-for-rib-2×2.html
Tubular set of loops
This option will give us a rounded edge, which is ideal for 1x1 or 2x2 elastic for the neck of the product. Suitable for both regular and circular sp. First, we need, as in the previous case, to dial aux. contrasting n. the number of p., half as much as necessary, and make a few p..
Basic n. – 1 purl. R., then - 3 R. persons Ch. (1 r. - l.p., 2 r. - i.p., 3 r. - l.p.), turn it inside out and then make the first st. purl, insert the tip of the right sp. for the first stroke, put a st on the left sp. and make her faces. behind the back wall. We continue knitting in the same way until we reach the last stitch that we knitted. from the wrong side, we raise the stroke under the edge. p. and knit it, and then make it with the intended pattern, you just have to remove the auxiliary. n., cutting a few sts.
Video lesson
Other options
With elastic edge
The elastic edge is formed due to the specific weave of the thread, which is adjusted manually. One loop is cast on. The working thread is located on the first and second fingers.
The knitting needle is brought out from under the first finger, then picks up the thread under the second finger.
Moving outward, the knitting needle is placed under the thread on the second finger, followed by the thread from the first finger. Continuing this way until a whole row is completed, in which there should be a number of loops that is a multiple of four.
From the next row a plastic elastic band is knitted. All odd rows are created in the following sequence: first two knit stitches, then two purl stitches. In even numbers it is knitted this way: purl one, knit two, purl two.
In the video, a set for an elastic edge in the Italian way:
English gum
The English rib is a timeless, classic pattern loved by all knitters. The loops are cast on in the classic Italian way, in an odd number. Then the elastic band is knitted as follows:
- Persons loop, then yarn over, the next one is removed, this must be repeated until the required amount is collected, leaving the working thread behind the work.
- The next row is knitted like this: yarn over, remove the loop, and work the thread. The yarn overs of the previous row are knitted with knit stitches.
- The first loop and yarn over from the previous row are knitted together, then yarn over, and remove the loop.
- Then the second and third rows alternate until the desired width of the elastic is reached.
Tubular set of loops
In this way, you can shape the edge in the shape of a tube or tube. It is more voluminous than others, but will be more decorated. To do this, you need to take yarn of a different shade, preferably contrasting, and cast on loops, then knit one or more rows as the wrong side. The next row is knitted purl again, but with the main thread, after which three more rows are knitted with the main thread using the stocking method.
You need to direct the product towards you inside out, and remove the edge loop. The knitting needle needs to be inserted into a horizontal loop of an additional thread, putting it on the right knitting needle and knitting it with the front knitting needle. The second loop is knitted in the usual way, and all these steps are repeated again.
Double hollow elastic band
Using the classic Italian method, you need to cast on the number of loops, which should be a multiple of two.
In the first row, one knit stitch is knitted, the next one is simply removed without knitting, like a purl stitch. The thread is located in front of the work. And so on until the end of the row.
In the second row, remove all purl stitches. With the thread in front of the work, knit stitches are knitted. Then the first and second rows alternate.
In a circle, for hats
Video lesson of Italian typing in a circle:
To knit hats in the round, you need to use circular knitting needles. The required number of loops and one connecting loop are cast on using the method indicated above. You need to close the circle by pulling a tiny loop through the connecting one and start knitting in the reverse order. Then in the first row knit first, purl next. The working thread is ahead. The next row is knitted by removing knit stitches and knitting purl stitches. The working thread is located at the back. This is how this elastic band is knitted, alternating the first and second rows.
Beautiful cross-shaped set
A cross-shaped set of loops (Bulgarian method) is carried out as in the following photos. That is, the loops cast on one or two knitting needles seem to cross. The edge of the product will look like a series of crosses or xes. This effect is realized thanks to an alternating set of loops with a working thread, either in front or behind.
Invisible loop set
This option helps if we start working from the top (for example, from the neck of a sweater) and helps to avoid unnecessary seams. Knitters know various methods, but we will advise you only one invisible one - the simplest, most inconspicuous and universal.
We unwind the resp. n. such a length that it contains all the points that we want to type on. Working stitch, having released the small tail, pick up 1 stitch with a slip knot and place it on the tip of the sp. Clamp the tail of the sp. n., holding it under the sp., so that the sp. n. was in front of the worker.
Then we need to take the slave. and aux. n. in your left hand and keep them together all the time; more n. lion We insert our hands between the slaves. and aux. n. and pull the finger towards ourselves, while crossing the slave knitting needles. and aux. n.. Left direction. p., insert between slave. and aux. n. and pull it away from us, holding it on it. n., we get something like a rhombus with a slave. n. on big p.. Then lower the tip of the sp. inside the diamond and grab the slave. n. towards you and up, we get the second st..
Later, we turn the brush towards ourselves and change the position of the p. n. and c. n. Because of this, working n. will pass under the auxiliary sp. below. We lower the sp. slave behind n. from under the far side of the diamond inward, capturing the worker. n. towards you and up, we get the third stitch. We continue knitting until the required width is reached.
Video lesson
Turkish
The edge with open loops, which is obtained with this embossing, is used if in the future it is necessary to continue knitting in opposite directions. The loops are cast on in the traditional way on each knitting needle (you can also use circular ones).
For two bedrooms of the same thickness we cast on one stitch, and the next one on the second sp. and so we alternate sp. until we reach the required length. If we make the Turkish embankment. correctly, then we will end up with one knitted r..
Video lesson
Pico edge
This stretchy stitch set is perfect for 1x1 ribbing. When typed, a jagged edge is formed that holds its shape well. This method is also called picot edge.
The MK shows two options for a set of loops. In the first case, the teeth are less pronounced, the edge is softer, but the elasticity of the canvas is not lost. In the second case, the picot cloves have more formed nodules, the edge is not only elastic, but dense and elastic.
Both options work the same way. The difference is that in the first case the loop is formed from a double “wrap”. In the second case, the “wrap” is strengthened and made from a double thread. As a result, the knots turn out to be larger, the elastic holds its shape better, and the edge is more expressive. Although both methods of casting loops are good in their own way.
Elastic set of loops with knitting needles - MK:
Knitting needles: 3 mm; yarn 50 g. - 120 meters.
Temporary
The temporary set is also universal, suitable in cases where you need to make a cr. as invisible as possible against the background of the pattern - when knitting the neck of a product or the edge of a jacket, for example. Perfect for rubber bands.
We make p. from basic. threads for 1 sp., add aux. n., we go under it and grab the base. n., get out from under the auxiliary, throw on the main. n. on the sp. We continue knitting until the required number of stitches is reached, then we turn the work and remove 1 stitch with knitting needles as an edge stitch, the next purl stitch. remove, then - l. p. and so on until the end of the r., we repeat one more r., and then we can easily pull out the auxiliary. n..
Video lesson
Bulgarian
The Bulgarian knitting set, also called cross-shaped or “Bulgarian beginning”, is widespread due to its ease of execution and the resulting voluminous, dense edge, which has not only practical, but also decorative significance. This knitting is suitable both for the neck of the product and for decorating the edge.
We need to cast on stitches in the usual way, leaving a tail behind (number of stitches * 4 cm long) and then work knit. crossed stitches, knitting each pair of stitches on the left sp. as one. Our working thread is yarn in the form of a double thread, which consists of n. from the skein and the remaining tail. The first two stitches have already been knitted by one lyceum. Crossed, but not yet removed from the left back. Next r. – lyceums. n. only with yarn from a ball. Last row: above the item of the previous row. we knit the purl ones, from the broaches between them - the front ones.
The scheme of work is clearly shown in this video tutorial:
Video (how to knit elastic bands)
Canadian Gum
French gum
Scotch gum
Polish gum
Norwegian gum
Ethiopian gum
You might also be interested in:
- Nine tips for choosing yarn, answers to questions from beginners
- History of knitting
- Knitting - as a type of needlework, general concepts
- General information about loin knitting
- DIY headband with a bow
- The Scarlet Flower
- How to make a owl from felt
- Decoupage is the best way to make ordinary things beautiful
- about the author
- New master classes
Natalia
I'm VKontakte
Decorative set with crossed loops
Perfect for knitting the neck of a blouse or its sleeves.
We use double yarn on the sp. an even number of stitches in the same way as in the “Bulgarian beginning” (see above), purl the row. pet. we don’t knit.
Further, in the new r. remove the chrome. p., 1 yarn over, knit 2. pet. behind the back walls, alternate until the end of the r., at the end in front of the cr. We don’t do a yarn over.
In the next r. remove the chrome. p., 1 i. p., 1 l. p. behind the back wall, alternate until the end of the p., i.e., purl. we do it over the purl, yarn overs - with the front ones, they will give us crossed loops in the end. 2nd row - remove the edge, 1 purl, 1 knit behind the back wall. Alternate until the end of the row, i.e. Knit the purls over the purls, and knit the yarn overs with the knit stitches - these are the ones that make the crossed loops. From the next day You can proceed to the main drawing.
Decorative openwork knitting set
This option is also suitable as a decoration for the edge of the product and its neck. It is quite elastic and soft, looks like knitted lace.
We need to dial in two sp. p., as in the previous case - an even number, do not forget to also leave a long tail.
1st r. – connect the main n. with a spare end and knit 2 loops together behind the back walls. 2nd r. (knit stitch of fabric, knit only the main st, break off the remaining tail) - without separating the double sts, knit them knit stitches. behind the front walls. 3rd r. – elastic bands 1×1: purl. p. above the wrong side, lyceums. we make from broaches between purl. p. and before the last edge. After all this, you can safely proceed to the pattern according to your scheme.
Set of loops with fringe
In this case, we will talk about a purely decorative set. Of course, it is not suitable for every item, but this set of loops looks original and can easily decorate, for example, a blanket or rug, a scarf or mittens, and will also serve as a decoration for children's and women's products.
We hang it on the sign. p. yarn from the ball, and wrap the free tail around the thumb; after that we introduce 2 sp folded together. in a loop on a large one. p. and grab both n. that come from the pointer. p., and output to p. on the big one. Drop the yarn from the large stitch and tighten the stitch. on a knitting needle.
As a result of these actions we will get the first fringe loop. We can adjust its length using the tension force of the tip, but if it is difficult for you to do this evenly, you can use a cardboard template.
Then we go back to sleep. under item on b. finger and grab both threads coming from the index finger, bring them into a stitch on the thumb, continue knitting until the end of the row, having received a set of double stitches, after which you can start working on the planned pattern.