We all know that any knitting begins in the standard way: with a set of loops. There are a huge number of options on how to do this, but today we propose to understand only one thing: how to make an elastic set of loops with knitting needles (sometimes called “Italian”). To work, we will need knitting needles half a size smaller than those recommended for your yarn thickness - manufacturers must indicate this information on the packaging. If you like to knit in the round, this method will also work for you, but note that for socks and mitten cuffs it is advisable to knit the edges tighter. Well, shall we get started?
Elastic set of loops with extra thread
It often happens that the standard method of casting on loops turns out to be a bit harsh, and the edge of the product must be stretchy so that the item fits the figure and is comfortable while wearing. This is where this method comes in handy!
We will knit a perfectly elastic elastic band that is suitable for cuffs, a high collar, and the bottom edge of a sweater or dress. Visually, such an edge will look like machine knitting - beautiful and very neat.
This knitting method is considered quite complex, but it also has a significant advantage: instead of the second thread, you can insert an elastic band - this edge will be even more springy (good for socks or a skirt).
Italian gum
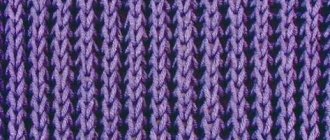
Among the huge number of various elastic options, the Italian one is especially beautiful. This elastic band is suitable not so much for cuffs and collars, but for the main fabric of hats, scarves, sweaters, half-shirts, cardigans, etc.
This is a very easy way to knit. The loops are cast on using the Italian method in multiples of four, then a beautiful elastic band is knitted according to the pattern.
Hollow elastic band
This method is great for belts, hats, mittens and gloves. A cavity is formed inside into which you can insert a wide elastic band or braid. The loops are cast on in the Italian way, then the front row is knitted by knitting only the front stitches, and the purl ones are simply removed and not knitted. On the next purl row, the purls are also removed, and the knit stitches are knitted. The working thread is located at the front. This creates a double elastic band with a cavity inside. In order to close it horizontally, you need to knit all the loops.
No matter how the product is knitted or designed, it must certainly be created with inspiration. It should absorb the warmth of the hands of its creator, as well as creative energy, and be ideally suited to the specific person for whom it was created.
Elastic set of loops with simple knitting needles: work progress
We make the initial loop in the usual way, without leaving a long tail. We place the main thread on the index finger, and the auxiliary thread on the thumb. Use your ring and little fingers to hold the thread.
So:
- we pass the knitting needle under the auxiliary. thread, grab the working one and get the first loop - the working one. It should be located in front of the complement. thread;
- we pick up the main thread, holding the additional one behind the loop;
- again we pass the knitting needle under the auxiliary. thread, pull out a loop from the main thread, pick up the main thread again. thread and get 3 and 4 loops.
We continue the casting of loops to the required length of the edge of the product.
Our first row looks like a checkerboard pattern, since during the work we alternate working stitches: in front and behind the thread. The loops that are located in front of the auxiliary. thread, are knitted with knit stitches, and all the rest are removed as purl stitches.
At the same time, we pass the working thread in front of the loops. In this way, we knit two more rows, after which we switch to knitting needles with the number required to knit the pattern of the product according to the description.
We knit an elastic band according to the pattern. Having knitted five rows, we remove the additional thread.
To show clearly how the Italian stitch set is performed, we suggest watching a short video tutorial:
For beginners: the classic way to type
No extra thread
In this way, loops are often cast on only one needle. First, the loop is cast on in the usual way, followed by either a purl stitch (for an odd number) or a knit stitch (for an even number). The last loop is always the front stitch.
The thread is grabbed with a knitting needle from under the thumb. Then the knitting needle rises above the thread from the index finger, and extends under the thread from the thumb.
Now the purl is done. The knitting needle must be inserted from top to bottom of the threads from the index finger. Then it rises up, after which the thread is grabbed from the thumb.
In the next row, knit 1 is knitted. and 1 purl. alternately. They will look like they have been turned over. The working thread in the next row will be in front. Only the front ones are knitted, and the purl ones are removed. Subsequent rows are knitted in the usual way.
Italian version of the set of loops in the video:
A visual diagram of knitting a classic Italian cast-on with knitting needles, how to cast on loops:
With extra thread
Technology:
- The edge loop is cast on as usual. The main thread is located on the index finger, and the other on the thumb. It is held with two free fingers.
- A knitting needle is passed under the auxiliary thread, picking up the main thread - this is the first loop.
- The main thread is picked up, the additional thread is always behind the loop.
- The knitting needle is passed under the additional thread, pulling a loop from the main thread, then the base thread is picked up again.
This is how the whole row is formed. It will consist of an alternating arrangement of working loops in front and behind the auxiliary thread. An elastic band can be used as an auxiliary thread. The stitches that are in front are knitted as knit stitches, and those that are in the back are removed. The working thread must be passed in front, and the additional thread must be removed by knitting the required number of rows.
Elastic set of loops without the use of additional thread
This method is often called classical. It is carried out in one stage and only on one needle. We recommend not using large knitting needles for yarn of standard thickness, since accuracy is very important here: the smaller the diameter of your tool, the tighter the edge of the product will be.
Progress
So let's get started! We knit the first loop in the usual way. We measure the thread in advance with a margin (its length should be approximately three times the width or circumference of the knitted item). Important! When casting on an even number of loops, knit one knit stitch after the edge, and if you get an odd number of loops, knit the first one after the edge with a purl stitch.
To begin with, we cast on an even number of loops, then pick up the thread using a knitting needle and move it away from the thumb. Next, we place the tool over the thread, which is located on the index. finger, and pull it under the thread located on the thumb.
We tighten the thread tighter and get one front loop.
We knit the next loop purlwise. We insert the knitting needle under the thread located under the index finger. finger, move it in an upward direction, pick up the thread from the thumb.
Tighten the resulting purl loop tighter.
We repeat knitting until we knit a row of the length we need. Alternate knit and purl stitches.
The first row should look something like this:
The loops may seem upside down to you. In a new row, knit each knit stitch behind the back piece, and remove the purl stitches, while always holding the thread in front of the knitting, like this:
We knit the next rows in the usual way.
In order not to get confused, we suggest watching how an elastic set of loops is performed without using an additional thread in the video:
More options
This option is suitable for those who are going to crochet a product. We will knit with half double crochets.
- We cast on three air loops (in.), make a yarn over, insert the hook into the first in.;
- We pick up the working thread and pull out one loop;
- We select the working thread again and knit three loops that are on the hook;
- Yarn over and insert the hook behind the left side of the loop.
Related article: Beaded swan for beginners: master class with diagrams and video
Repeat steps one through three until we have the required number of stitches.
The same is done with crochet, but with double crochets.
- We knit four chain loops, yarn over and insert the hook into the first st;
- We pick up the working thread and pull out one loop;
- Again we select the working thread (r.n.) and knit a loop;
- We grab the r.n. and knit the loops in two steps, which are located in pairs on the hook;
- Yarn over, insert the hook behind the left outer wall;
- We repeat from the first to the fourth step until we knit the required amount.
Here are a few ways to pick up stitches with knitting needles and crochet stitches that we suggest you learn. Perhaps some will be already familiar, while others will be new. We recommend that you try all the proposed ones, even though now you may be satisfied with the way you cast on the loops, but when making some new product you may need one of the proposed options.
Elastic set of loops for elastic 1 x 1 and 2 x 2
Typing in this way is done quite quickly, but at the same time it remains very elastic and looks neat. Suitable for any knitted items!
For elastic band 1 x 1
We take one knitting needle, a small thread with a tail of 60 centimeters for assembly. draw a thread around the index. and more finger, and with the middle one we regulate the tension of the yarn. We place the knitting needle under the thread in the upper left corner and unfold it, creating a loop. Hold the end of the knitting needle with your right palm.
Now we place the tool under the thread coming from the thumb. We grab the thread coming from the index finger. finger and pull it out like in grandma’s knitting, fasten it and get a second loop.
We bring the knitting needle under the right thread coming from the index. finger, and grab the thread located on top of the thumb. We pull it out using grandma’s purl method, fasten it and get the third loop*.
We repeat knitting from the first to the last star in the description text, casting on the number of loops required for knitting, after which we turn the work.
We change the knitting needle to a larger size and knit further according to the description of the specific product model.
Externally, the edge of the product will look like this:
For elastic band 2 x 2
We cast on the number of stitches we need, and then knit a preparatory row.
Important! The edge knit stitch is knitted.
Remove the next knit stitch, leaving it behind the knitting.
We knit the new knit stitch as it is – knit stitch. We return the loop that was removed earlier to the knitting needle on the virgin side and knit it on the wrong side. Alternate knit 1, purl 1*
Repeat from * to *.
We knit the required number of rows with an elastic band: first we knit 2 faces. p., then 2 purl. P..
So that you don’t get confused, we suggest you see clearly how this set is performed in the video tutorial:
LiveInternetLiveInternet
Quote from tati_mama
Read in full In your quotation book or community!
Italian set of loops for straight and circular knitting.
Italian set of loops for straight and circular knitting.
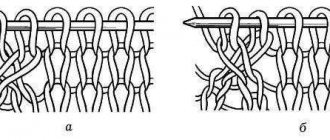
Italian hinge set
This method of casting on stitches, in which the edge, while remaining elastic, looks impeccable, is ideal for knitting cuffs and panels in 1 x 1 rib (= alternately k1, p1) and patent patterns. The initial row and the next 4 rows are made with thinner knitting needles - one full size smaller than those used to knit the rest of the fabric. Fig. 1 Lay the thread (the length of the free end of the thread should be approximately 3 times the length of the cast-on edge) around the thumb and forefinger, as shown in the figure (thread with an arrow = thread from the ball). Place the knitting needle under the thread, then unfold the knitting needle, moving its end in the direction of the arrow. Fig 2 The figure shows the 1st loop. Fig. 3 Place the knitting needle under the thread coming from the thumb, in the direction of the arrow, grab the thread coming from the index finger, and tighten the loop on the knitting needle. Fig. 4 The figure shows the 2nd loop obtained after performing the technique (Fig. 3) Fig. 5 Place the thread coming from the index finger in front of the knitting needle, as in the figure, and grab the thread coming from the thumb in the direction of the arrow. Repeat techniques 3-5 until the required number of loops is cast. Attention! This method always casts on an odd number of stitches. The next 4 rows are performed as follows: 1st row (knit row): 1 knit, * remove 1 loop like a purl, pass the thread in front of the loop, 1 knit crossed; repeat from *. finish: slip 1 loop as if purling, 1 knit. 2nd row (purl row): 1 purl, * 1 knit, slip 1 loop as if purling, pass the thread in front of the loop; repeat from *, finish: 1 knit, 1 purl. 3rd row (knit row): * Knit 1, slip 1 loop like a purl, pass the thread in front of the loop; repeat from *, finish: 1 knit. 4th row (purl row): knit as 2nd row. From the 5th row, continue working with an elastic band (alternately 1 knit, 1 purl, sample - see photo) or a patent pattern, while switching to thicker knitting needles.
Italian set of loops with auxiliary thread
This is another version of the Italian set of loops. As when casting on without an auxiliary thread, the first 4 rows are made with knitting needles one full size smaller than the rest of the fabric, and knitting continues with a 1 x 1 rib (alternately 1 knit, 1 purl). Fig. 1 First perform the initial loop, as with a simple cast-on. Wrap the working thread around the index finger of your left hand. Place an auxiliary thread of a contrasting color (the length of the auxiliary thread is equal to twice the width of the finished knitted piece) around the thumb of the left hand. Hold the ends of the thread with your right hand. Place the knitting needle under the auxiliary thread and, in the direction of the arrow, grab the thread coming from the index finger. Fig. 2 Lay the thread coming from the index finger in front of the knitting needle, bring the knitting needle under the auxiliary thread and grab the thread coming from the index finger in the direction of the arrow. As a result of each technique, 2 loops are formed on the knitting needle. Make sure that loops are not formed from the auxiliary thread! Together with the initial loop, the number of loops must be even. Fig. 3 We knit the loops of the initial row: the loop in front of the auxiliary thread is knitted, the loop behind the auxiliary thread is removed, as in purl knitting, while the working thread is pulled in front of the loop. Attention! Purl the penultimate stitch, slip the last stitch (= starting stitch) from the needle and unravel. Fig. 4 In the next 2 rows, knit the front loops with the front ones, remove the purl loops, as in purl knitting, while pulling the thread in front of the loops. Then switch to thicker knitting needles and continue working with the corresponding pattern. The auxiliary thread can be removed at this stage of work.
https://mvz.kz/index/italjanskij_nabor_petel/0-58
Italian set.
We take a thread of a contrasting color, a hook of a suitable size and knit a rather loose chain of air loops.
The number of loops in the chain is calculated as follows: if you need N loops for work, the length of the chain should be N: 2+1 loops.
We put aside the hook, take a knitting needle and cast on loops on it using the following sequence of steps: one loop is knitted from the chain as a knit stitch, yarn over with a thread from a ball, knit from the chain again, yarn over again, etc. Having completed the row, we connect the second knitting needle to the work: we knit all the yarn overs of the previous row with knit stitches, and remove all the knit yarn overs (now we see them as purl ones) as in purl knitting, leaving the working thread before work.
We will knit three more rows in this mode. It is curious that a side effect of such knitting is the cavity that is formed between the many knit stitches and the many slipped stitches: if all the knit stitches of one row are removed on one knitting needle, and all the slipped loops of the same row are removed on another, then we will get two parallel fabrics. A side effect with great potential! The contrast thread unravels.
The cast-on edge - with neat teeth, absolutely elastic - is ready.
Italian method of casting on loops. https://domihobby.ru/457-italyanskiy...bora-petel.html
The Italian method of casting on loops looks very neat and is ideal for making sleeve cuffs, 1 x 1 ribbed panels, patent or semi-patent patterns, since the edge remains very elastic and soft. This method consists of an initial set of stitches and knitting the next 3 rows, which are recommended to be done with knitting needles half a size smaller. Let's consider the Italian method of casting on loops with an additional thread .
First, make the initial loop with the main thread as in the classic cast-on (you don’t have to leave a long end of the thread). Then place the main thread around your index finger and the secondary thread around your left thumb, holding the ends of the threads with your ring and little fingers.
Then *insert the knitting needle with the initial loop under the auxiliary thread and grab the main thread, the first loop is formed on the knitting needle in front of the auxiliary thread.
Then simply pick up the warp thread with your knitting needle.*
Insert the knitting needle under the auxiliary thread again, pull out the next loop as the first and grab the main thread with the knitting needle, we get the fourth loop.
So repeat from * to * further, casting on the required number of loops.
Make sure that all the loops on the knitting needle are the color of the main thread, and the auxiliary thread is located under the knitting needle, wrapping around the loops.
To knit the first row, consider the initial chain of loops: the loops alternate in location in front of the auxiliary thread and behind it. We begin to knit the first row: with knit stitches we knit the loops located in front of the additional thread, and remove the loops behind the auxiliary thread as purl loops, passing the working thread in front of the loop. In the next two rows, knit the knit stitches and remove the purl stitches.
Then switch to larger knitting needles and knit with a 1 x 1 rib stitch, knitting the knit stitches with the knit stitches and the purl stitches with the purl stitches. After completing several rows, carefully pull the auxiliary thread from the initial row.
Italian set of stitches with knitting needles. https://ladies.by/dom/vyazanie/yroki_spicami/italyanskij_nabor/
The correct choice of the method of casting on loops is not only a beautiful appearance of the product, but also a durable, elastic edge that will not lose its original shape when wearing and washing a knitted product. The inlaid edge can be hard, elastic or decorative. There are many ways to cast on loops (depending on the further purpose of the cast-on edge). The Italian cast-on stitches are done with knitting needles using an auxiliary (contrast) thread, which is then removed. The auxiliary thread must be strong, because it must be tightened, aligning the loops from the main (working) thread. Instead of an auxiliary thread, you can use a thin rubber vein. It is left in the initial row, and the ends are secured. When using a rubber vein, the inlaid edge becomes more elastic. In Italian cast-on, the stitches are cast on with needles one-half number smaller than the needles that are then used to knit the main patterns. It should be borne in mind that in the descriptions, when referring to an Italian set, the first three rows are automatically considered an Italian set and are not included in the row count. The Italian set of loops can be done in three ways: 1st method
Step 1. The initial loop is formed as with a regular cast-on. Subsequently, this loop unravels and is not included in the calculated number of loops. Place the working (light) thread around the index finger of your left hand. Loop an auxiliary (dark) thread, the length of which is equal to twice the width of the finished knitted piece, around the thumb of your left hand. Hold the ends of the threads with the fingers of your right hand. Place a knitting needle under the auxiliary thread and, grabbing the working thread in the direction of the arrow, form the 1st loop: make a movement around the auxiliary thread, like around a knitting needle, and pull the loop towards you.
Step 2. Place the working (light) thread in front of the knitting needle. Bring the knitting needle under the auxiliary (dark) thread and grab the working thread in the direction of the arrow - a pair of loops is formed. Each time this technique is repeated, 2 loops are formed. Cast on the last stitch as usual. Attention! The auxiliary thread should not be used to form loops.
Step 3. Knit the cast-on loops of the 1st row with a double (hollow) elastic band: knit the loop in front of the auxiliary thread; remove the loop behind the auxiliary thread, as in purl knitting (working thread before work). Attention! Purl the penultimate stitch, and slip the last (and starting) stitch off the needle and unravel.
Step 4. In the next rows (their number is indicated in the description), knit the front loops, and remove the purl loops, as described above. After this, you can switch to larger needles and continue knitting with any pattern. Attention! Having finished the part, remove the auxiliary (contrast) thread.
2nd method (double elastic band)
With an elastic cast-on edge for a 1x1 elastic band, on smaller needles, use an auxiliary (contrast) thread to cast on half the required number of loops + 1 stitch and then knit with a working (main) thread: 1 row: 1 edge; * 1 person; 1 yarn over **; repeat from * to **; 1 chrome When knitting in the round, knit in the same way. 2nd row: 1 edge; * knit 1 yarn over; remove 1 purl. (thread before work)**; repeat from * to **; 1 chrome When knitting in the round - * purl 1 yarn over; remove 1 person (thread at work)**. 3rd row: 1 edge; * 1 person; remove 1 purl. (thread before work)**; repeat from * to **; 1 chrome When knitting in the round, knit in the same way. 4th row: 1 edge; *Knit 1, remove 1 purl. (thread before work)**; repeat from * to **, 1 chrome. When knitting in the round - * 1 purl; remove 1 person (thread at work)**. Remove the auxiliary (contrast) thread. At this stage we have a neat, one-piece edge of the double (hollow) elastic band. Next, knit a regular 1x1 rib.
This is what a double (hollow) elastic band looks like when you remove the stitches from the knitting needle.
For 2x2 elastic, perform the first 4 rows as described above, and then continue: 5th row: 1 edge; * 1 person; remove 1 purl. on aux. knitting needle (thread at work); 1 person; 1 purl. with aux. knitting needles; 1 purl**; repeat from * to **; 1 chrome So, line up the loops in pairs in a 2x2 elastic band and then continue working with a regular 2x2 elastic band. Note. Crossed loops in the 5th row can be made without an auxiliary needle. To do this, knit the second loop, inserting the right knitting needle into the loop in front of the first and leaving a loop on the left knitting needle, then purl the first loop and remove both knitted loops from the left knitting needle (i.e., swap the loops so that they lie in pairs: 2 faces., 2 p.). Little secret. For the elastic to be beautiful and symmetrical, the number of loops must be a multiple of 4+2.
3rd method
The elastic cast-on edge for 1x1 and 2x2 elastic bands is made on an auxiliary chain of air loops, crocheted with a contrasting thread. Then loops are pulled out of it from the beginning of the chain using the working (main) thread. The chain of air loops is subsequently removed (dissolved): Attention! With this set of loops, initially 2 times fewer loops are cast on, since the second part is taken from the jumpers between the loops being cast on.
Making an elastic cast-on edge for 1x1 elastic
Step 1. Crochet a chain of air loops with an auxiliary (contrasting) thread, then cast on loops from the knots of the chain with a knitting needle (Fig. 1).
Step 2. Knit the 1st row with knit stitches, the 2nd row with purl stitches, the 3rd row with knit stitches, and knit the edge loops. On the wrong side, insert the knitting needle into the edge loop and into the bottom jumper and knit them with a purl loop, as shown by the arrow (Fig. 2).
Step 3. Using the right knitting needle, pick up the jumper between the loops of the 1st row, moving away from you (from the front of the fabric back) and knit a knit stitch into the jumper, as shown by the arrow (Fig. 3).
Step 4. Then knit a loop from the left knitting needle purlwise (shown by the arrow), and a knitting stitch from the jumper between the loops of the lower first row (Fig. 4).
Step 5. Finish the row with a knit stitch from the jumper knitted together with the edge loop (Fig. 5).
Step 6. Continue knitting with 1x1 rib (Fig. 6). Remove (weave) the auxiliary (contrast) thread. We get a beautiful elastic cast-on edge.
Making an elastic cast-on edge for 2x2 elastic
This method is also suitable for 3x3 elastic, only when casting on loops from an air chain with a knitting needle, you need to skip three loops (for other elastic bands, skip the required number of loops in the cast-on chain).
Step 1. Using the main (working) thread, use a hook to knit a chain of air loops. Using a separate contrasting thread from the knotted edge of the air chain, cast on loops in the following order: * pick up 2 loops, skip 2 loops**, repeat from * to** (Fig. 1a).
Step 2. Using the main (working) thread on the cast-on loops, knit 3 rows (purl, knit, purl), knitting the edge loops. Next knit: 1 edge; 1 front; from the first jumper between the loops of the first row, knit 1 purl; from the second jumper - also 1 purl (shown by arrows in Fig. 2a).
Step 3. Knit similarly to the end of the row: knit 2 knit stitches from the left knitting needle, and knit 2 purl stitches from the jumpers (Fig. 3a).
Step 4. In subsequent rows, knit the last loop of the row and the edge loop together (Fig. 4a).
Step 5. Don’t forget to remove (weave) the auxiliary contrast thread (Fig. 5a).
Elastic band 2x2.
Manufacturing method 1. For men's pullovers, you may need a 2x2 elastic band . Nothing could be easier! It is a derivative of the 1x1 elastic band. So, we knit 3 rows of 1x1 elastic: 2.1 row: edge, * purl, yarn over * to the end of the row, we finish depending on whether we need an even or odd number of loops, in the first case we knit a yarn over, edge, in the second - yarn over, purl , edge We turn the work around. 3.2 row: those loops that were knitted in the previous row are knitted with knit stitches, the yarn overs are removed as purls, the thread is in front of the loop. We turn the work around. 4.Next we repeat only the second row, making 4 more rows (two in one direction, two in the other). The number of rows can be more, but less is undesirable: the edge will not hold well. 5. Now the fun part: from a 1x1 elastic band you magically get a 2x2 elastic band! 6.7 row: edge, * purl, knit stitch on additional needle before work, purl, knit stitch from additional needle, knit stitch * to the end of the row. We turn the work around. 7.8 row: edge, *2 purl, 2 knit* to the end of the row. Turn over and knit the required number of rows. 8.After the 7th row, you can transfer the knitting to stocking needles and knit the fabric in the round (cuffs, neckline, bottom of the product).
https://vk.com/love_vjazanie?w=wall-82895734_20689
Elastic 1x1 with a rounded edge. Neat 1x1 ribbing is great for sleeve cuffs and sweater neck trim. Such an elastic band will not tuck, and its inlaid edge is much less susceptible to stretching while wearing the product.
For knitting you will need yarn of the main color and an auxiliary thread of a contrasting color. Cast on half the required number of stitches on the knitting needles - this is a contrasting thread. This thread will no longer be needed and can be cut so that it does not interfere with further work. Next, knit with a thread of the main color. Knit the first row with knit stitches. Also knit the edge loop; there is no need to remove it. This applies exclusively to the first row. Subsequently, the edge loops are removed as usual - without knitting.
Second row - purl stitches.
Third row - knit stitches. Turn the knitting to work on the fourth row. Remove the edge. The next stitch is a purl stitch. Then pick up a loop from the 1st row, put it on the left needle and knit. The next stitch is a purl stitch again (it’s already on the needle). Raise the stitch again from the 1st row and knit it. And so on. Thus, you need to alternate: knit purl loops from purl stitches, and knit stitches from broaches. It is convenient to lift the loops using a hook or an additional knitting needle. The number of loops will double and reach the required calculated number
This is what knitting looks like at the end of the fourth row :
the fifth row as the stitches lie, i.e. knit purls with purls, and knits with knits. A 1x1 elastic band is formed. Knit the following rows with 1x1 rib until you reach the desired height. Unravel the auxiliary thread and pull it out of the knitting. She is no longer needed. The elastic band with a rounded edge is ready. Next, you can knit the product with the selected pattern.
Italian set of loops for circular knitting. Published by Lanna_08 in the Knitting group https://www.stranamam.ru/post/8710981/ Good evening everyone! Girls! There is a lot of information about Italian cast-on stitches using knitting needles with an elastic edge. I tried casting with and without waste thread. I liked the second option better. I just had to suffer... I started, got angry at myself that I was such a clueless person, quit, started again. The result was worth it! Of all the videos on the Internet, I like this one the most. I am very grateful to the author.
and this is for a set with a tight edge
First I mastered casting on rotary rows, and then in circular knitting. Through trial and error, I chose the best options for myself and created a reminder for the teapot so as not to search on the Internet every time. It's easier for me to knit this way. Cast on the loops in the Italian way and then: 1. Loose edge turning rows 1st row: knit ones are knitted behind the back wall, purls are removed unknitted (thread before work) Row 2: knitted ones are knitted behind the front wall, purls are removed not knitted (thread before work) 2. Tight edge turning rows 1st row: knit ones are knitted behind the back wall, purl ones are removed not knitted (thread before work) 2nd row: knitted ones are knitted behind the front wall, purl ones are removed not knitted (thread before work) 3rd row: knitted ones are knitted behind the front wall, purl ones are removed not knitted ( thread before work) 4th row: knits are knitted behind the front wall, purls are removed not knitted (thread before work) 3. Loose edge circular knitting 1st row: knitted ones are knitted behind the back wall, purls are removed not knitted (thread before work) 2nd row: we knit purls, knitted remove unknitted (thread at work) 4. Tight edge circular knitting Row 1: knits are knitted behind the back wall, purls are removed not knitted (thread before work) Row 2: purls are knitted, knits are removed not knitted (thread at work) Row 3: knitted are knitted behind front wall, purl ones are removed unknitted (thread before work) 4th row: purl ones are knitted, knitted ones are removed not knitted (thread at work)
Elastic set of loops for English elastic
The English elastic band is considered a fairly popular knitting technique, so there are a lot of variations in its implementation! We offer only one of them.
So, we cast on an elastic edge without using additional thread (the description is a little higher, almost at the very beginning of the lesson), we need an odd number of loops.
Next we knit like this: knit one, straight yarn over, slip off the next stitch. without knitting.
Keep the thread behind the knitting! Repeat the pattern until the end of the row.
New row: straight yarn over, slip off stitches. without knitting, holding the thread behind the knitting, yarn over the previous row and knit a knit stitch. We repeat this pattern until the end of the row.
New row: pet. and knit the yarn over of the previous row together, perform a straight yarn over, slip off a stitch. without knitting. Repeat until the end of the row.
From a new row: alternate the second and third row. Don't forget that the first and last loops of each row are edge stitches and are not taken into account during the knitting process!
Closing 1x1 ribbed loops with knitting needles
Many people are interested in the method of elastically closing the loops of a 1 by 1 elastic band. This is an absolutely justified requirement, because the edge of the product should not only be beautiful in appearance, but also comfortable to wear. We invite you to watch a video on how to beautifully and efficiently close loops when knitting 1x1 elastic. It gives valuable advice that will come in handy sooner or later, because this type of elastic band is used literally everywhere.
Method without a needle
This video shows how to close a 1x1 elastic band directly on the knitting needles. No needle required. The loops are closed using a special pattern. The edge is elastic.
Elastic loop set for double hollow elastic
In this case, we will need to cast on the required number of loops without additional thread.
It is important to ensure that the number of pet. at the same time it remained even. Since the elastic band will be double-sided, you can insert an additional elastic band into it for extra elasticity.
So, in the first row we knit 1 person. pet., remove the next pet. As a purl, we keep the working thread in front of the work. We continue in the same way until the end of the row.
In the second, we remove all the wear. p., hold the thread before work. We knit all the faces. P.
Next, we continue to knit an even number of rows, repeating 1-2 pp.
We invite you to watch a small master class on specific knitting:
A set of loops in the circle for an elastic edge
This option is ideal for cuffs, hats or stand-up collars. Here we will no longer need ordinary knitting needles, but for knitting in the round with fishing line between them.
Let's get to work! First, we need to cast on any number of stitches (needed for the sample or for the finished item). plus one extra.
Now we distribute all the pets. for circles. sp. or on 4 simple joints. We connect the work using an additional pet. We stretch 1 stitch through the removed stitch, which is left without knitting, and we get the number of stitches we need.
Let's turn the work around.
We knit the first stitch, then make a purl stitch. p., thread before work. We repeat this until the end of the river.
In the new district all persons We leave the item without knitting (remove it), keep the thread behind the work. Out. p. knit purl. p. Having made several rows, we begin to knit the main elastic band.
Watch the video tutorial:
How to knit a super stretch edge
To begin with, we form one st. We place the working thread on top of the index finger, and place its end on the left side of the hand, on the thumb. We hold the knitting needle with the loop in the center.
We bring the knitting needle under the thread on the thumb, grab the second thread from the index finger under it and pull it towards ourselves. As a result, a loop is formed that will be similar to the front one.
Now we move the knitting needle in a downward direction away from us, place it under the thread on the index finger, grab the yarn coming from the thumb, and get a loop similar to the purl one.
We alternate these two stitches throughout the entire row. Important! The penultimate one should be “purl”.
Next we knit an elastic band. We suggest trying to knit a Polish one. To do this, it is necessary that the number of stitches cast on be a multiple of 4 + 2 edge stitches. Odd r. knitted this way: 2 l. p., 2 i. n. Even r. we knit differently: 1 and. p., 2 l. p., 2 i. p... The last one should be the front one!
Watch the video master class: