Who is the cap suitable for?
Cap hats are suitable for many women. It is only important to choose the right model and version of its execution. The image created by the headdress largely depends on the color and texture of the chosen threads, as well as on the shape of the hat itself.
For girls with a narrower face shape, it is better to choose a medium-length hat with a small pattern. For those with a wide chin, it is recommended to knit a cap with a voluminous pattern.
To determine the length of the cap, a person’s height plays an important role. Tall people are more suited to long caps, while for others it is better to choose a slightly shorter headdress.
Brighter and more saturated shades are suitable for very young girls, giving them a mischievous and funny look. Girls a little older can opt for classic styles and natural colors. Pure natural colors will allow you to fit such a headdress into any look.
Cap models can be sporty or romantic
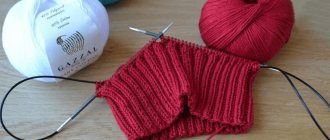
Crocheted New Year's hat
A cap made using a crochet hook is an incredibly delicate and unusual accessory. To make it you will need:
- yarn of 2 colors (red/burgundy and white);
- crochet hook;
- scissors.
For crocheting, you can use different types of yarn, but preferably cotton, wool or synthetic.
Important! The yarn label always indicates its length, composition and what it is best used for.
Naturally, it is better not to use synthetic fibers to crochet our New Year's hat. To make the cap voluminous, merino, camel wool or mohair yarn is perfect. You should not choose a very dense thread, as the pattern will not look good on it.
Algorithm for knitting a New Year's headdress:
- We will start knitting with an elastic band, which means using a white thread. Based on the volume of the head, we cast on the required number of loops. If you don’t have anything to measure the exact size with, you can try it on to your head by casting on loops. For greater convenience, when reducing the number of loops, string an even number into the elastic.
- We knit one column in each loop.
- Next, it is very important not to get confused! We knit 3 lifting stitches, the next stitch of the previous row we knit 1 slip stitch.
- We knit a new stitch with a relief stitch, then with a double stitch again. We alternate 6 embossed stitches with a cap stitch - this will be the elastic band.
- Having mastered the white elastic band, change the thread to a dark one. The rest of the cap is knitted with regular double stitches. Starting from the fourth row of dark thread, the number of loops is reduced. In order to reduce the loops evenly, you need to count their number and divide them into several parts.
For example, if you have 80 loops, then you divide by 8 and decrease every 10 loops. When you reach the edge of the cap, stop decreasing the stitches so that the edge is even.
When you're done with the cap, don't forget to make a pompom. In our case we use white thread. The following algorithm will tell you how to make a pompom.
- Cut out a square from cardboard.
- We wind the thread tightly around the square.
- We take out the cardboard and tie a thread in the middle of the skein.
- Align the ends with scissors and shape into a ball.
The paired New Year's hats look very cute. You can also knit hats for each family member.
Types of caps
A women's knitted cap can be made in a variety of knitting patterns. But some patterns for such hats are used more often than others:
- elastic band (1x1 or 2x2);
- pearl pattern;
- braids and plaits;
- garter stitch.
Headdress models can be made with different types of yarn. An elongated cap that can be rolled around the neck instead of a scarf looks interesting. At the end you can attach a lush pom-pom or tassel.
A knitted cap can be complemented with a scarf or snood
How to start work correctly?
When the model and color of the yarn have already been determined, you can start knitting. Typically, the first step is to knit the pattern and calculate the proportions. You need to count how many loops you get in the finished sample and measure its size. The volume of your head is known. Now you can calculate the number of loops needed for the hat, taking into account the number required for pattern repeat (when necessary).
So, our plans include a knitted cap. How to do it? You can choose one of two options: work either on two knitting needles or on circular ones. The latter method is more convenient, because in this case you will not need to make a seam at the back of the product. If you are not used to working with circular knitting needles, you can knit using five regular straight ones.
If this is the solution to the problem, then the entire number of loops must be divided equally into 4 knitting needles. If the pattern is not elastic, then first you need to tie at least two or three centimeters with an elastic band, so that later the finished product does not dangle on your head, gradually stretching.
Now you can knit a hat with the main pattern. Its length can be about a quarter of a meter. But if you really want a longer hat, then you need to knit about 35 cm straight, and then make decreases. They are quite easy to do: knit two loops together. Reductions should be distributed moderately. When there are only four loops left on the knitting needles, you need to pull the thread through them and tighten it, then carefully hide it inside the hat.
How and with what to wear
There are many ways to wear a beanie. Here are a few options on how you can incorporate this headdress into your look:
- You can put on the cap with your hair down so that the end lies freely.
- Hide your hair under a hat, leaving a few curls on the sides of your face. This method will not only add femininity to the image, but will also protect your hair from winter frosts and wind.
- By pulling the hat low on the forehead, you can emphasize the beautiful shape of the eyebrows.
- Move the headdress to the top of the head, emphasizing the styling and bangs.
- Make an imitation of a beret by moving the long edge to the side.
- Wrap the long end around your neck, replacing it with a scarf.
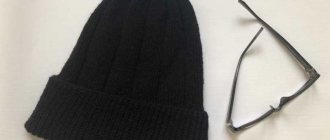
The headdress looks great with sporty jackets or oversized coats. Plain dark models of a shortened style fit well into a classic wardrobe. The combination with gloves or mitts knitted with the same yarn will look advantageous.
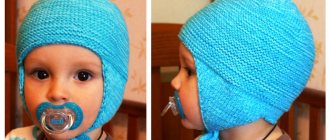
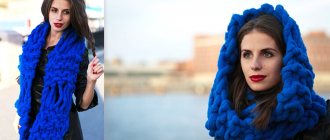
The headdress suits young girls very well
Tools and materials
For the hat you will need circular or double knitting needles, although you can also use straight ones. In the first case, the product will be seamless, in the second there will be only 1 seam at the back.
Yarn should be selected according to the season and in accordance with the chosen pattern. Fluffy threads of natural colors usually do not require the use of complex patterns - satin stitch is more suitable for them. From straighter threads you can make a cap with an intricate pattern.
For decoration, you may need buttons or threads in contrasting colors. The cap can also be decorated with various rhinestones and beads.
Hats made from yarn in natural shades look great
Measurements and calculation of loops
In order for a knitted cap to fit well on your head, you need to take the measurements correctly. For this headdress, it is enough to know only the circumference of the head; the length of the product depends on the craftswoman’s own wishes.
Before you start knitting a hat, you should make a test sample of the selected knitting size 10x10. When the fragment is ready, it is measured in width and height with a centimeter tape. This helps to understand how many loops are included in 1 cm and calculate the cast-on row.
Head circumference is measured just above the eyebrow line
An easy way for beginners
The easiest way to create such hats is knitting in stockinette stitch without any patterns. The headdress is created according to the following steps:
- Cast on the required number of loops according to the calculations.
- Knit 2-3 cm with an elastic band 1x1 or 2x2.
- Knit a long knitted tube using the stocking principle to the desired length using regular stockinette stitch.
- Cut the thread, thread it through all the loops at once and pull the product together.
The finished cap can be decorated using your own imagination.
The model made with fancy yarn looks very unusual
Second option
Cast on 50 loops and knit 4 rows with a 2 by 2 rib. Row 5 - purl 3 loops, purl 2 loops together and knit this pattern to the end of the row.
Next, knit in stockinette stitch to an approximate height of 25 cm and finish with a stockinette row. Next we knit the crown: 1 knit stitch (2 knit loops together, 4 knit stitches), knit 7 times, you should have 36 loops left. Knit the next row straight. Next row - 1 knit stitch (2 knit stitches together, 3 knit stitches), knit 7 times, you will have 29 loops left. Knit the row straight. Next row - 1 knit stitch (2 knit stitches together, 2 knit stitches) and then 7 times, 22 loops left. Knit a straight row again. Next, 1 knit stitch (2 knit stitches together, 1 knit stitch) and so on 7 times, leaving 15 stitches remaining. Another straight row. Then 1 knit stitch (2 knit stitches together), repeat 7 times and 8 stitches remain. Knit 2 rows straight. Break the yarn and pull it through the remaining loops, tighten and knot.
Related article: Coat fabric - choosing material for a coat
Striped model
To create this cap you do not need a special pattern - the product, with the exception of the elastic, is made with stockinette stitch. Its difference from the first option presented in the article is the alternation of threads of several colors and the gradual narrowing of the cap in the direction from the elastic to the tip. Here is a step-by-step description of how to knit such a cap:
- Cast on the required number of loops.
- Knit 3 cm of 2x2 elastic bands (knit 2, purl 2) with thread of the same color.
- Next, knit approximately 20-25 cm, alternating yarn of different colors every 4 rows. The exact length depends on the wishes of the craftswoman herself.
Thanks to the alternation of threads, the hat will turn out striped
- Continue working, decreasing 2 stitches in every second row at an equal distance from each other. Also alternate the threads every 4 rows.
- When only 8 stitches remain from the decreases, knit them all together and pull them together.
- Cut the thread, fasten it and tuck it into the product.
Sew a pompom or tassel onto the tip of the cap - a knitted Pinocchio hat for a girl is ready.
Openwork pattern
The main advantage of this pattern is its simplicity, but at the same time it will not lose its attractiveness. The component part of the pattern consists of 27 loops (don’t forget 1 loop at the end of the cast-on row + 2 edge stitches).
1st row - knit 1 knit stitch, yarn over, repeat 4 times and knit 2 more knit stitches. Make 2 loops with a slant to the left (repeat 4 times), 2 loops with a slant to the right (repeat 4 times), 2 knit stitches. Yarn over, knit (repeat 4 times). 2nd row - the entire front row. 3rd row - knit 1 purl loop, yarn over, repeat 4 times and purl 2. Make 2 loops tilting to the left (repeat 4 times), 2 loops tilting to the right (repeat 4 times), 2 purl loops. Yarn over, purl (repeat 4 times). Row 4 - purl.
Related article: DIY solar system model for school: master class with photos
The pattern is ready!
Cap made in jacquard technique
Jacquard is usually called a knitting method with alternating yarn of several colors. All work is done in stockinette stitch.
The color can be any desired
Work on this cap is carried out in accordance with the description of the previous model. However, creating it requires more patience and knitting skills. The craftswoman can use the proposed diagram or any other design she likes. It is important not to tighten the thread too much when working, otherwise the product will turn out too dense.
Jacquard models give a lot of scope for creative ideas
Hat with openwork elastic band
The highlight of this option is that the elastic is made with simple twisted flagella. Knit it in the following sequence:
- Cast on 96 stitches on stocking or circular needles and close in a circle.
- Knit approximately 8 cm of elastic according to the proposed pattern.
The knitting pattern does not contain complex elements
- Next, the work is done with stockinette stitch.
- When the desired length of the product is reached and the work is completed, all loops are closed.
- The tip of the hat is decorated with a pompom or tassel.
The finished product with small flagella looks charming
Bright hat cap with a convex pattern
At first glance at the photo, one might assume that knitting such a cap is quite difficult, but in reality this is not the case. Even a novice needlewoman can cope with this task. After all, it is necessary to knit a straight fabric with a convex pattern diagonally.
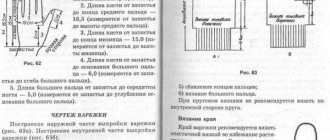
The size of this product is fifty-six centimeters. To knit this model, prepare: yarn (FILATURCI DI Crosa): two hundred and twenty grams of bright shade ZARA PLUS from merino wool (seventy meters per fifty grams). You should also use different knitting needles in your work: number five, six, seven and circular knitting needles number six.
The knitting pattern for the main pattern is as follows: in the first row, three knit stitches (KL) with three purl loops (IP) alternate. In the second, four stitches are crossed to the left (three stitches remain on the additional needle before work, 1 IP, after which the loops are knitted from the additional knitting needle), two IP. In the third row: 1 IP, the knitting needle is inserted between the second and third stitches and the stitch is knitted as a knit, yarn over, knitting three stitches together as a knit, 2 IP. In the fourth row: 1 IP, four stitches cross to the left, 1 IP. After this, repeats should be done from the third row, and in even rows. move the crossed buttonholes one stitch to the left.
Density of knitting a cap with an elastic band one on one with the loops removed: twenty-five sts by twenty-four r. = ten by ten cm; main pattern: twenty-four p. by nineteen r. = ten by ten cm.
At the first stage, take knitting needles number five and cast on ten sts. Next, you should knit ten centimeters of elastic one by one with the removed sts. Having knitted fifty centimeters, from the beginning of work, you can close the buttonholes. Now the strip is closed in a circle, after which ninety-six stitches are picked up on one side with circular knitting needles and knitting circular rows in a diagonal pattern continues. After thirty-five centimeters from the strip, you need to make a uniform decrease in all second rows. 3 X 16 p. and 2 X 16 persons. The remaining links are pulled together with working thread.
The following video will show you how to knit a cap with knitting needles in practice. This master class will help all novice knitters examine the work in detail and move on to knitting the chosen pattern on their own.