Good day everyone! It’s already the month of December, there’s very little left until the New Year 2021. It's time to think about how to decorate your home for this holiday. You can hang garlands, make snowflakes, postcards with children.
Of course, you can’t do without a Christmas tree. Some will install a real forest beauty, others will install an artificial one. But besides the big hero of the occasion, you can also make several small Christmas trees and place them in the rooms. Let the holiday be felt throughout the house!
You can make a Christmas tree at home from any material, from sweets to books. Today we will talk about how to make a New Year's symbol from paper. Simply put, take scissors, glue, paints... and get started.
DIY colored paper Christmas tree - master class
Using colored paper, you can make a Christmas tree of various modifications, from flat to voluminous. Yes, even a whole forest of spruce!)
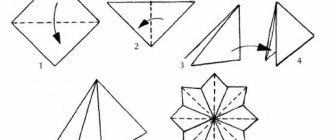
This beauty is very easy to make! We will need a sheet of colored paper or cardboard and scissors. Cut out a square and bend it as shown in the picture.
Next in the photo is a visual step-by-step diagram of creating a craft:
And the final stage:
New Year's decor is ready!
And the simplest option is to cut out two identical blanks from colored paper. After that, we bend them lengthwise and glue them together. The result is a tree like this. Decorate it to your liking.
Another easy option. We make a cone out of colored paper, decorate it and get a stylized Christmas tree.
Another simple option for making a stylized Christmas tree. Cut out a triangle from paper. We take a suitable wooden stick, it will be a tree trunk.
We attach a base to the trunk so that the future tree stands vertically, for example, a cork or a piece of plasticine. Now we string the paper onto a stick, like a sail on a ship. And here is the result.
And another option that may not be entirely made of paper, but it is so original that I really want to share it. This Christmas tree is made from empty egg boxes. We pre-paint them and glue them together.
Is it truly original and wonderful?
Crafts based on templates
Ready-made templates will help you prepare a lot of New Year’s beauties as mini-gifts without spending a lot of time. It is enough to print the suitable material on paper, and then cut and glue the figures according to the instructions on the diagrams.
Making a Christmas tree from corrugated paper with your own hands step by step
For this craft you will need corrugated paper and cardboard. You can choose paper of any color to make your New Year's decor unusual and match your interior.
Watch in this video a master class of 5 step-by-step options for making Christmas trees from corrugated paper for the New Year 2021:
Now let’s describe the manufacturing process in a few words and photographs.
We cut out a sector from cardboard - two quarters of a circle and glue it into a cone.
The cone will serve as the trunk of the future Christmas tree.
Now let's start creating an analogue of branches and needles. There are several ways you can go here. You can make Christmas tree branches in the form of a belt around a cone. To do this, cut a strip of paper about five centimeters wide and long enough to completely go around the cone. We thread a thread along the inner edge of the strip that will be adjacent to the cone, stepping back half a centimeter from the edge. After this, roll the strip into a circle.
We make several such circles, and they should all be different in size - one smaller than the other. After all, they will fit on a cone like rings on a pyramid: first a large ring, then a smaller one, etc. So we put them on the cone. It turns out something like a “skirt”.
To prevent the rings from falling off, glue them to the cone. As a result, we get such a beautiful Christmas tree.
Instead of a cone, you can use a wooden rod on which we string circles made of paper.
We make the circles ourselves as follows. Take a strip of paper and fold it into an accordion shape. We fix it in the middle with a thread.
After that, we fan it out.
Now take the two halves and glue them together to make a circle. We also make circles of different sizes.
We string them onto the rod, starting with the largest and ending with the smallest. The result is a Christmas tree.
The process is more labor-intensive than previous options, but the result is wonderful.
COLORFUL ENVIRONMENT
For a simple and interesting craft, you will need several circles of different sizes and colors. Each circle needs to be folded in the same way as paper is folded to cut out a snowflake. Afterwards, the circles can be slightly straightened and strung onto a vertically mounted skewer (bamboo stick), fixed at the base for stability.
How to make a Christmas tree from paper napkins
A Christmas tree made from paper napkins looks very beautiful. Here, just as in the version described above, a cone is used as a base. However, roses made from napkins are glued onto it. As a result we get:
So, let's make a cone. Next, take napkins. The color may be the same or different. Accordingly, the tree will be either colored or plain.
We take the napkins, put them in a pile and fasten them in the center with a stapler. After that, cut out a circle from them.
The first layer is crumpled towards the middle. Then we do the same with the next layer.
And in this way we make all the layers so that the result is a rose.
You will need to make a lot of these roses. How much is difficult to say. It all depends on the size of the base - the cone.
Now we glue the finished roses to the cone, starting from the base to the top. We decorate with beads and as a result we get a beautiful Christmas tree.
Elki-vytynanka
Perhaps there is nothing more elegant than a neatly cut out paper Christmas tree. It seems to be woven from thin lace, filled with air and fragility. It is easy to make using a stencil. Such a tree will certainly become a source of admiration and pride.
Here are some of the templates. You can download other stencils here.
Christmas tree made of paper - options for making a paper tree
Here is an option for making a paper Christmas tree that is suitable for small children. The fact is that the Christmas tree is made from the contours of a child’s palm.
Roll a cone out of cardboard. Next, take a green sheet of paper and a child. He applies his palm, outlines it and cuts it out. You will need a lot of such palms. Now we take the cut out palms and glue them to the cone. It turned out to be a wonderful Christmas tree.
Continuing with the cone options:
As you can see, the cone is good in any form).
You can use wrapping paper.
How do you like this stylish little thing from old glossy magazines?
It is made easier than steamed turnips).
Another very simple applique style option that can be easily made by a child. Take a sheet of colored paper as a background. Next, we will need several sheets of different colors. We cut strips of paper from them about half a centimeter wide. Their lengths are different: the first one is long, each subsequent one is slightly shorter than the previous one. We cut them, now we glue them onto the background sheet. Glue a star on top. The craft is ready.
Below is a video that shows how to make Christmas trees out of paper.
Lesson for literati
Even in the era of electronic “readers” and audio books, most people are sensitive to books made of paper. However, not all books are worthy of taking up space in family libraries. And, if not everyone raises their hand to throw them away, then everyone can have a hand in transforming them into a holiday craft.
Christmas tree made from newspaper tubes
The Christmas tree can be made from any material. One of the simplest is a newspaper (although they are already disappearing from our lives). Tubes are rolled from it and then intertwined with each other. As a result, we get the following craft.
You can’t immediately tell that it was made from newspaper. The tubes can be painted in any color and the Christmas tree will be colored.
It all starts with making a large number of tubes. To do this, take a wooden stick and use it to twist a sheet of newspaper. Lubricate the edge with glue so that the tube does not unravel. We make a cone out of cardboard. We put it on a sheet of paper and start weaving. We glue the first row in the form of a pentagon.
Now we take the bottom tube and place it on top of the other. We take the next bottom one and put it on top again, and so on.
Thus, intertwining the tubes, we raise the “braid” to the very top.
We cut off the remaining long tubes at the end and attach a separately made star top.
The Christmas tree is ready. You can leave it white, or you can paint it.
There is another way of weaving:
And another model of the Christmas tree:
Made from cardboard doesn’t mean ugly
Rare and special materials are not always required to create a beautiful craft. Packaging cardboard will be a wonderful base for colorful creations. A simple Christmas tree made of cardboard with candies pasted on can pleasantly surprise you with its beauty!
Cardboard crafts, decorated by children to their taste, will be a wonderful New Year's gift that can be prepared together in kindergarten.
The symbol of the New Year 2022, made from ordinary packaging cardboard, will look very stylish if you make holes in it using New Year-themed shaped hole punches.
Making a Christmas tree from origami modules according to the diagram
One of the options for making a Christmas tree is to make it using the origami technique. Of course, this option is somewhat more complicated than all those described earlier, but the result is very impressive.
First you need to make modules. To do this, use the following diagram.
Approximately 650 such modules need to be made for a Christmas tree 20 cm high. Done. Now we collect the branches of the Christmas tree. We fasten the modules as follows: In the first row - 2 modules, in the second - 1 module.
We assemble the third row by attaching two more modules to the corners of the second row module. We insert it into the pockets located nearby, as a result the outer corners will stick out to the sides.
We assemble the twig, alternating first one, then two modules in each row.
We make either five or ten such branches. The splendor of the Christmas tree depends on their number. Now we glue the branches together, forming a circle.
You need to make several such circles. Depends on the height of the tree. For the trunk we use a wooden skewer or stick. We stick it into an eraser, plasticine, polystyrene foam - whatever is at hand.
Now we put the finished Christmas tree circles on a skewer. Glue the first row to the base. Then each subsequent row is glued to the previous one.
Having collected the entire Christmas tree, we make decorations for it. Below is a diagram of the assembly of another version of the Christmas tree from ready-made modules.
New Year's quilling
Masters of creating paper masterpieces using the quilling technique will also be able to delight others with festive crafts. Even when creating gifts for a large family, you can be smart and present everyone with an original surprise, never repeating it. Using the quilling technique you can create a variety of crafts:
- large volumetric panels made of many elements;
- small decorative figures that will perfectly complement gift wrapping or become a serving element;
- unusual New Year's pendants;
- tabletop 3d figurines;
- Christmas decorations;
- Greeting Cards.
How to make a voluminous Christmas tree out of paper at home
Below are some rather interesting options for making a three-dimensional Christmas tree. The first option is that the Christmas tree is made from paper strips folded with ribbon and placed on a stick-trunk. We collect according to this scheme.
In the second option, take a blank sheet of paper: white or colored - green. We bend it in half and draw the contours of the Christmas tree. You can use these stencils.
Or like this.
For one Christmas tree - three stencils. Cut along the lines. After which all three blanks are glued together and we get Christmas trees like this.
You can put small lanterns in them and get a chic decoration.
Step-by-step instructions for this beautiful openwork Christmas tree in the video below:
And, finally, an original version of a large Christmas tree that glows from the inside. To make it, you need cardboard boxes from which we make pyramids. We dress each other. We put a lamp inside. As a result, we get such an original design.
Below is a pattern diagram for Christmas tree pyramid modules.
Having a minimum of materials, but a maximum of desire to decorate your house for the New Year, you can make something like this:
Here is also a worthy decor option:
Here are very laconic and stylish Christmas trees:
Watch the video for more details:
These are some interesting crafts that I think will decorate your home during the New Year holidays. Good luck and Happy New Year everyone!
PS Don't forget to share this page with your friends - let there be a festive mood in your friends' house!
Author of the publication
offline 12 months
Paper New Year 2022
Don’t have the opportunity to install at least some kind of Christmas tree, but at the same time you need to create a place for gifts? This unusual option will suit you.
Ideas as a basis for creativity
Ideas for creating crafts in the form of Christmas trees can be implemented in completely different ways: make an applique, create a Christmas tree from crepe paper, come up with an unusual garland... Try it, and you will definitely succeed!
Volumetric Christmas tree step by step
The New Year's tree turns out to be voluminous if you make a lot of branches:
How to make a three-dimensional Christmas tree step by step? Look at the photo:
DIY Santa Claus - read here.


