Types of folds and features of their processing
Folds are one of the types of darts. With their help, they create the required size along the waistline, and the diverging parts ensure a comfortable fit of the product in the hip area.
Pleated skirts, the tailoring of which differs depending on the style, have several varieties:
- For example, bow folds are tucks of varying depths, symmetrically located along the front side of the product in directions opposite to each other. Their number varies from one to several, depending on the chosen model.
- Counter folds are similar to bow folds, but made in the opposite direction. That is, the direction of the middle lines of tucks is not from the middle of the product to the side seams, but vice versa. Moreover, the two central folds should converge exactly on the vertical line of the middle front of the skirt.
- The next type of folds is circular . They are located along the entire waistline, following each other in the same direction. Their implementation is more difficult than the previous ones. This consists of an accurate and error-free calculation of the depths of the folds, the total number of which should coincide with the waist circumference measurement. This will be discussed in more detail below. Also, depending on the style and fabric used when sewing this type of folds, they can be small (in the form of pleats), medium and large.
- Quite often, asymmetrical folds are found in women's business suits . They are mainly represented by one, two or three tucks directed to the left or right side. This is influenced by the location of the set of folds, which can be located on the right or left side of the front panel of the skirt.
Models and styles
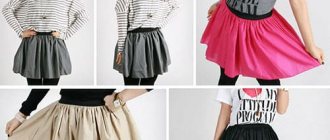
Pleated skirts, the tailoring of which largely depends on the material chosen, have many variations.
All types of folds are applicable to artificial light fabrics of a single color, with an asymmetrical, abstract floral or other pattern. But at the same time, their clear shape to the bottom of the product will not be preserved due to the structure of the material.
Fastened at the waist with a belt, they fall in soft folds and create a slight fluffiness to the product. If the model involves giving some clear shape to the style, then this can be done by partially securing the folds with finishing stitches to a certain length.
A more complex process for making skirts is sewing them from tartan material.
All types of folds are also acceptable for it, but several factors should be taken into account when distributing and calculating them:
1. Firstly , if the model provides for a certain number of tucks, then they must be positioned so that the integral pattern of the fabric is not disturbed. That is, the inner part of the folds must be “hidden” in such a way that on the front side the tissue cells clearly fit together without disturbing their size and color scheme.
2. Secondly, if the model includes circular folds, then there are several variations in their implementation:
- The depth of the tuck is equal to the width of the fabric pattern cell. In this case, the original pattern of the canvas is not disturbed.
- When making folds, the depth of which is equal to two cells, it also does not lead to distortion of the main pattern.
- The width of the tuck is equal to half the original cell. As a result, the original fabric pattern is halved.
When making calculations, you should ensure that the total size of the finished folds corresponds exactly to the waist circumference measurement.
Unlike lightweight synthetic fabrics, checkered fabric contains a larger amount of natural fibers and is quite dense and heavy.
Thanks to this, it well retains the shape of the folds along the entire length after they are fixed by wet-heat treatment of the product.
Circular pleated skirt
Despite its simplicity, patterning a skirt with tucks will require calculations, care and understanding of the process. Let's try to figure it out together ;)
Terminology
First, a little terminology.
The pleats can start from the waist, or be partially folded or ironed along the entire length, or not ironed at all.
Each fold has its own depth and width. If the fold is full, its depth is twice as wide as its width. To save material, the depth of the tuck can be reduced. This type of tuck is called incomplete.
To prevent the folds from diverging at the bottom, they have braces
, which are lined up due to the depth of the tuck. Upwards they gradually decrease until they disappear completely. The size of the braces depends on the height of the offsets.
Folds are the unstitched, freely falling part of the fold. Less flight means less slanting along the bottom edge of the skirt.
On patterns, folds are indicated by arrows on the front side, that is, they need to be laid in the direction of the arrow on the “face” of the fabric. The marking of the folds is applied to the underside of the fabric with thin lines.
Below we will look at the simplest construction of a skirt pattern with a circular pleat.
In the vast majority of cases, the pattern of this skirt is not built on tracing paper; calculations and markings are made directly on the canvas from the inside out.
The outer edge of the fold is laid along the brace and combined with the next brace on the pattern (marked in blue). The inner edge of the fold is marked with a dotted line.
Taking measurements
To create a pattern, we take three main measurements: OT, OB and Di.
The increase in freedom of fit is 2-4 centimeters.
In our case, waist circumference = 76, hip circumference = 104, product length = 70 centimeters.
The increase in loose fit is 3 centimeters.
For the product we will need three girths around the hips + an increase in freedom of fit; 3 x OB + 3 = 3 x 10⁴ + 3 = 321 centimeters.
How to calculate folds
Find the amount of fabric: 321 – (hip circumference + 3) = 321 – (104 + 3) = 214 centimeters.
Number of folds: hip circumference + increase in freedom of fit = 104 + 3 = 107 centimeters. We divide the resulting number by the number of folds (usually from 2 to 6 centimeters, we have 4). 107 / 4 = 26.75 = 26 folds.
Divide the remaining 3 centimeters into 26 folds (1 millimeter each) = 4.1 centimeters per fold.
To check the amount of matter at the depths of all folds, we divide it by the number of folds, we get the depth of one fold: 214 / 26 = 8.2, that is, twice as much, that’s right!
As a result, width = 4.1, depth = 8.2, total number = 26.
The difference ABOUT - FROM = 104 - 76 = 28 is distributed into all folds along the waist: 28 / 26 = 1.07 cm. To the depth of each fold we add 5 mm on both sides.
Consumption and markings on fabric
Pattern of a women's skirt with a circular pleat:
Stage one
Before we begin marking the folds on the fabric, we draw your attention to the fact that it will not be possible to purchase a piece 321 centimeters wide, so we will join the material along the width from fabrics 90, 110 or 140–150 centimeters wide. At this stage, it is extremely important to ensure that the joining seams are located in the deepening of the folds.
We sweep the bottom edge of all three fabrics to the size of the hem and iron them. We apply the markings from the inside of the fabric.
Next, we retreat 1.5-2 centimeters from the upper edge of the fabric and draw a horizontal line across the entire width of the fabric - we have just outlined the waist line. Having stepped back 18-20 centimeters from the waist, we draw another horizontal line - this is the line of the hips.
Remembering that the three fabrics are joined in width at the inner edge of the fold, we begin and end the marking from the edge of the cut with a seam allowance of 1 centimeter. After this, set aside ½ the depth of the fold and draw a vertical line exactly along the grain thread. From it we need to set aside: *the width of the fold, the depth of the fold*, from * to * to the edge.
Stage two
Having placed all the folds, at the bottom of each we mark the size of the slope, and along the waist line the narrowing by the difference ABOUT - FROM = 0.5 centimeters on both sides of the deepening of the fold. Next, the points are connected as shown on the pattern (blue lines).
In our case, a cut width of 140 centimeters will fit 11 pleats, and for the skirt as a whole we need 26, so we will need three sheets, a little more will be left from the last piece, this is more than enough for a belt.
We calculate the length of the fabric for the entire product, taking into account the hem and seam allowances: 3 x (product length + 2 + 4) = 3 x (70 + 2 + 4) = 228 centimeters.
Lay and iron.
How to sew a skirt with circular pleats with your own hands
First, we sweep away the folds along the markings, aligning the outer edge with the line of the next fold.
Sew up the tuck by hand using basting stitches from top to bottom. Along the basting seams, we sew each fold down from the waist to the selected amount. Be sure to tack at the end of the seam or continue it, going further across the fold to the inner edge. We don’t remove the basting yet.
Next, we need to lay each fold in the direction of the arrow and iron it on the front and back sides - this way they will last longer.
To prevent the lines of the internal ribs from being reprinted on the front side of the skirt, place a strip of cardboard under the fabric fold - this will smooth out the difference.
Partially stitched folds
As we said earlier, the fold can be partially stitched to a certain length, but not more than ¾. It is impractical to spend lower, and there is no point in it. As a rule, tucks are sewn up to the hips.
In the pattern, using the example of one fold, we showed you the relationship between the combination of values of the brace and the departure: the lower the fold is stitched, the smaller the value of the brace. The lilac dotted line shows the finishing stitch - up to the end mark of the sewn section of the fold.
Length options
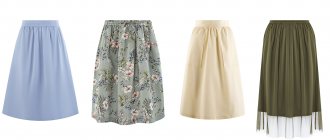
When making pleated skirts of a certain model, special attention is paid to the length.
Depending on the purpose of the product, frequency of use, fabric, it can range from mini to maxi. Thus, varieties of bow and counter tucks are perfect for both short and long versions of skirts. When shortened, they will emphasize the slenderness of the legs and the elegance of the figure, and if they are floor-length, they will hide some possible defects and create a fullness that visually reduces the waist circumference.
Such folds located on the yoke are very suitable for women with a pear-shaped figure . For these types of skirts, the best length would be just above or below the knees.
Experts recommend paying attention to the fact that soft vertical folds are great for thin women, visually making their shape more curvy.
But representatives of luxurious figures should give preference to long, rigid vertical tucks, which visually increase height and reduce volume.
For everyday use, fashion designers recommend using waistbands of medium length, that is, midi. They may contain circular folds of varying depths, as well as asymmetrical and counter folds.
Made from half-woolen or woolen fabric, they hold their shape perfectly and create a strict business style, both for an individual element and for the entire suit as a whole.
Modeling a skirt pattern with a yoke
A yoke corresponding to the parameters of the figure is the basis of any product of this type. But the bottom of such a skirt can be anything .
Straight, with cutouts, asymmetrical or symmetrical pleats, half sun and so on.
In addition to the hem, this element of clothing often has components such as a belt and pockets. These details are optional, but they usually make the skirt look more interesting and more comfortable to wear.
Note! Fashion designers have an interesting technique in use: the use of different materials for each component element of the product.
For example, the yoke can be made from denser fabric, and the bottom can be made from thin synthetic that gathers in aesthetic folds.
Don't be afraid to experiment with color, style, decor!
Taking measurements
Standard measurements for the subsequent production of a skirt pattern are:
| Short designation | Full name of the measure | Method of change and purpose |
| Dst | Back length to waist | Measured along the spine from the seventh cervical vertebra to the waist line. This measurement is necessary to determine the location of the hip line. |
| Di | Length of the product | Determined from the waistline to the desired length. Indicates the length of the skirt according to the model. |
| Sweat | Half waist | The measurement is half the waist measurement, which is measured by placing a measuring tape horizontally around the waist. It is necessary to determine the length of the belt and the width of the product at waist level. |
| Pob | Half hip circumference | The measurement is taken through the most protruding points of the hips, buttocks and abdomen in order to take them into account when constructing the correct pattern. For the drawing, half the measurement value is used. |
Also, the Pot and Pob measurements are necessary for calculating dart solutions if they are present in the model . To do this, the difference between these measurements is determined and, according to the requirements, distributed among all darts.
Pleated skirt with waistband
This product can be sewn by a beginner who does not have much experience. This can be done even without a pattern.
The main thing is to correctly make the necessary calculations:
- The total size of the folds must be equal to the waist circumference measurement. Based on this, you can calculate the possible number of circular tucks with a certain depth. To do this, measure your waist circumference and divide the resulting value by the estimated depth of the fold, which will result in a whole number (without a remainder).
- For example, the measurement From (waist circumference) is 68 cm, then when divided by 4 cm, you get 17 folds, each 4 cm deep.
- If the measurement is an odd number (77 cm), then the depth of the tuck may have a fractional value (3.5 cm).
- When dividing these values, you get 22 folds 3.5 cm deep.
- After determining the number of tucks on the skirt, you can begin to calculate the required fabric. To do this, you need to take into account the following factor. When making circular folds, double their depth is taken. Therefore, based on the first example, each fold will take 8 cm of fabric (4x2).
- Multiplying the result by their number, the result is 136 cm (17x8). This value is only for making folds.
- Next, you need to add the full waist circumference (68 cm) to this value. The result is 204 cm.
- We should not forget about the presence of allowances for seams and loose fitting, determined by GOSTs or technical conditions for certain categories of clothing. Their number and size depend on the number of seams in the product, as well as the material used.
- Having decided on the fabric consumption, you can start cutting. To do this, first of all, you need to apply the immediate dimensions of the product to the wrong side of the canvas (with a sharp soap, chalk or graphite pencil), and then use a second line to indicate the contours of the allowances. Cut the resulting piece of fabric along them.
- Next you should mark the folds. Each of them is defined by three serifs, the middle of which defines the middle, and the other two the beginning and end of the tuck.
- After the work has been completed, you can begin sewing the product. First, the skirt panel is connected (if there is one seam) or two side seams if the product consists of two parts.
- Then folds are drawn along the marked notches so that their inner fold is on the wrong side and directed to the left.
- It is recommended to start this type of work from the side or back seam and carry out the first pinch so that the seam coincides with the middle line of the fold and is hidden inside it.
- Then continue the process until it is completely completed. When finished, sew on the belt with the clasp. This can be done with a hidden seam, followed by securing the reverse part with a finishing stitch, or by simultaneously connecting both parts of the belt to the main product and finishing the cuts with an overlocker.
- The final stage of production is hemming the bottom edge of the skirt.
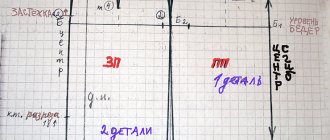
SKIRT CUT DETAILS
The pattern is given without seam allowances. When you cut, do not forget to give allowances: for sewing seams 1.5 cm is enough, for hemming the bottom, depending on the type of fabric and processing method, 2-4 cm.
- Skirt front panel yoke 1 piece
- Yoke of the back panel of the skirt 1 piece
- Lower part of the front panel of the skirt 1 piece
- Lower part of the back panel of the skirt 1 piece
- Facing the front panel of the skirt 1 piece
- Facing the back panel of the skirt 1 piece
The yoke lining is cut according to the main details.
The yoke of the skirt can be cut on the bias, especially if you have chosen a checkered or striped fabric.
The location of the cut is indicated on the front panel of the skirt on the left side. Take it into account only when you decide to sew a skirt with a slit. And in this case, do not forget to give allowances for processing the cut.
Such a skirt will look original if you insert a zipper along the entire length of the cut - this will allow you to adjust the depth of the cut. If you decide to sew a skirt with a slit, then the front panel will consist of two parts: the right (larger part) and the left (smaller part).
How to get a pattern without downloading, see here >>>
With bow pleats
Pleated skirts, the tailoring of which includes bows, are even simpler than the previous one:
- In this case, to calculate the fabric consumption, it is enough to add 4 crease depth values, if 2 are provided.
- With a larger number, the number of values increases proportionally. For example, according to the model, there are 4 tucks on the skirt with a depth of 5 cm. Then 40 cm should be added to the waist volume (4x2=8; 8x5=40).
- Having marked the middle of the front on the canvas when cutting, make notches for creases in different directions from it. Moreover, the middle of the depth of the left and right of them should subsequently come into contact with each other on the wrong side of the product.
- Connect the side seams with the design of the zipper.
- Next, fix the fabric along the notches in the required direction, namely from the center to the sides along the front side.
- Sew the waistband and finish the bottom edge of the product.
- Carry out wet-heat treatment of the finished skirt.
With counter folds
To sew a product with counter symmetrical creases on the front panel, you need to carry out similar operations as for making a skirt with bow tucks.
The only difference in the work performed is that the direction of its location changes to the opposite. That is, the contact of the middle lines of the depth of the central folds occurs on the front side.
The calculation of the fabric, as well as its cutting, is carried out in exactly the same order.
Shoes and accessories
We have found out what to wear with a yoke skirt, now we will select shoes and accessories. By and large, there is no difference between whether a skirt has a yoke or not when choosing shoes. Flared skirts are in perfect harmony with pumps, ankle boots with stable heels, and classic sandals. In the summer, you can safely wear a flared skirt made of flowing fabric with bright clogs and even sandals. Fluffy skirts with sports-style shoes look good, but when putting together an ensemble that includes a skirt with a yoke, you should be careful . A yoke gives a certain rigor to the style, and excessive use of sporty accessories can ruin the look.
A yoke skirt can be complemented with platform sandals, stylish ballet flats, patent leather stilettos, high boots and even over the knee boots. The choice of shoes is determined by the length and color of the skirt. As for the bag, the general rule applies here: the shorter the skirt, the larger and more spacious the bag can be. A maxi skirt should be complemented with a small clutch or envelope bag. The mid-length skirt goes well with both oversized bags and elegant handbags. A laconic design cross-body bag adds variety to your everyday look.
In a decorative one-sided fold
This method of placing creases, as mentioned above, is used in women's business suits , which are sewn from wool blend or woolen fabric.
Due to the straight cut of the skirts, the presence of such pintucks provides freedom of movement and gives the ensemble some zest.
Products made on the left or right side of the front panel in the amount of 2-3 pieces, partially decorated with finishing stitches and, thanks to the properties of the material to retain a given shape, are perfectly fixed.
Cutting and sewing:
- To calculate the required amount of fabric to create such creases, it is enough to know their number and depth. So, if the product is designed with 2 pintucks of 5 cm each, then 20 cm will need to be added to the waist circumference (2x2=4; 4x5=20).
- To make this cut of a skirt you will already need a pattern. Having completed the base of the straight silhouette of the product, you should determine the middle on ½ of the front part and draw a vertical line through it. It will serve as a demarcation between the two creases.
- Then cut the pattern along the drawn trajectory. When transferring the pattern onto the fabric, you must retreat 20 cm at the cut site and continue transferring its second part. These 20 cm will subsequently be turned into tucks. It is also recommended to mark the middle of this area.
- Once the cutting details are ready, you should begin assembling them. First of all, the darts are sewn together, then the creases are marked. On the front side they should be directed from the center to the side seam. Moreover, the first of them is laid before the intended middle line, and the second - after it.
- Next, the side seams are connected, the zipper is sewn in, the waistband is sewn in, and the bottom of the product is finished with a hidden seam.
- After finishing the work, wet-heat treatment of the finished item is carried out.
On the yoke
Pleated skirts, the tailoring of which involves the presence of a yoke, require certain skills in cutting and sewing. But, having carefully studied the methodology for constructing the basic basis of the pattern, further manipulations with its changes will not present any difficulties.
To transform a regular straight skirt pattern into a product with a figured yoke and two opposing creases on the left and right sides, you need to carry out the manipulations described below.
Manufacturing sequence:
- On the front of the pattern, at the level of the hip line, from the side seam towards the middle, draw a slightly inclined line. The top part will be a yoke. Before placing it on the canvas, the pattern must be cut along the line.
- On the bottom part, determine the middle and draw a vertical line. The pattern should be cut according to it. This will be the center of the counter tucks.
- When transferring pattern details onto fabric, you should remember that for the most part, the yokes are made double to create density and give the product a given shape. Therefore there should be 2 of them.
- When transferring the lower part of the pattern, in the place of the cut you need to make an indent equal to four depths of the creases. For example, if the depth is 3 cm, then you should retreat 12 cm (3x2=6; 6x2=12).
- When transferring the pattern onto the fabric, it should be folded in half. And its fold should coincide with the middle of the back and front parts of the patterns.
- After preparing the cut parts, you should start connecting them in a certain sequence.
- First of all, the front part of the skirt is prepared. To do this, lay and fix both opposing folds on the bottom of the part. The yoke details cover the darts.
- Then (if skill allows) a simultaneous connection is made between the front and back parts of the yoke with the lower part along a figured cut. If such an action is not yet possible, then it can be performed one by one, that is, first sew one part of the yoke, and then unfold the work and repeat the same with the second part.
- Then machine stitch at the basting site and remove the auxiliary threads.
- Turn the yoke parts right side out, straighten the cape in its center, sweep out the joint and perform a finishing stitch. Remove the basting. This completes the preparation of the front part of the skirt.
- Next, close the darts on the back panel of the skirt.
- Connect the side seams with the zipper insertion.
- Sew on the belt.
- Process the bottom of the product.
- Carry out wet-heat treatment of the finished skirt.
LiveInternetLiveInternet
Friday, March 29, 2013 16:15 + in the quotation book pattern base https://wesew.ru//page/vykrojka-jubki-na-ljubuju-figuru-poshagovoe-postroenie The height of the yoke can be different - from a few centimeters to 18 cm or more. The yoke can be with darts, with or without reliefs, it can be figured, asymmetrical, consist of one or more parts, etc. The lower part of the skirt can also be varied. This is the “sun”, and the “bell”, and the “balloon”. Also, the lower part of the skirt can consist of wedges, can be folded, gathered into gathers or consist of several tiers of frills, etc. Let's start with something simple. Let's create a pattern for a classic skirt with a yoke, in which the line connecting the yoke to the bottom of the skirt runs parallel to the waist line. I note that on the basis of this pattern you can model a large number of styles, which will be limited only by your imagination. If you haven't created a straight skirt pattern yet, we recommend using our step-by-step instructions to do so. In the future, you will need this pattern when modeling various styles of skirts. You should start modeling only after you have checked this pattern, made adjustments (if necessary) and made sure that the skirt fits perfectly on your figure. Let's copy the proven straight skirt pattern onto a blank sheet of paper.
For ease of construction, we will shift (move) the darts to the middle of the back and front panels of the skirt. I would like to point out right away that this is not necessary. It all depends on WHAT you intend to do with the bottom of the skirt.
Determine the height of the yoke. In our example, the height of the yoke is 12 cm, and you are guided by your tasks - the wishes of the client or your ideas. Depending on who you will sew this skirt for. We set aside the height of the yoke from the waist line along the middle and side lines. If you use our basic drawing, then from points T and B9 on the back panel of the skirt and from points B11 and T1 on the front panel of the skirt we set aside 12 cm and put points K, K1 and K2, K3 respectively. (See Fig. 3)
Since in our example the bottom line of the yoke runs parallel to the waist line, in order to make this line more accurate and easier to draw, you can mark another additional point along the line of the middle of the dart, at the same distance - 12 cm from the waist line. We set aside 12 cm from points T4 on the rear panel and from point T3 on the front panel and designate these points with the letters K4 and K5. I draw your attention to the fact that in our example, the height of the yoke on the front panel of the skirt is equal to the length of the dart, so point K5 coincides with point B.
The next stage of construction is connecting all the obtained points, BUT! ATTENTION! Connect the dots with the darts closed! To do this, draw a vertical line down from the top of the dart, along which we cut the skirt panel and close the dart. See fig. 5 and Fig 6.
back panel of the skirt. front panel of skirt
And only after this, we connect the designated points K, K4 and K1 on the back panel and K2, K5 and K3 on the front panel of the skirt with a smooth curve and draw up the yoke line. In this classic model, the yoke line should approach the midline of the skirt at a right angle.
We cut along the intended line and get the yoke and the lower panel of the skirt.
We return the lower panel of the skirt to its original position.
Now let's work on the bottom of the skirt. Here, as they say, options are possible. Let's look at a few of them. 1. Leave the bottom part unchanged. If the fabric is easy to iron, the small dart on the back panel in this case can be left unstitched, but the part can be placed at the location of the dart and ironed. If the fabric is tough and does not lend itself well to wet-heat treatment, there are other ways to get out of the situation without sewing up the darts. As one option, you can draw the cutting line of the yoke through the tops of the darts. In this case, the problem is solved by itself. Other examples are discussed below. 2. This could be a skirt with reliefs. We cut the lower part of the skirt along vertical lines coming from the tops of the darts. We get 3 parts on each panel. A middle piece with a fold and two side pieces.
Note: Reliefs can have different configurations and be located in any other place on the panel. Moreover, their number may also be different. 3. Skirt, widened along the bottom line. In this version, we divide the bottom line and the top line of the lower part of the skirt into several identical segments. In our case - by four.
We cut the skirt panel along these lines and spread it along the bottom line by an amount that you determine yourself. In our examples it is 6 cm (See Fig. 12) and in the second option 12 cm (See Fig. 13). Moving the skirt along the bottom line, close the remaining dart opening on the back panel. We correct the line of stitching to the yoke and the line of the bottom of the skirt with smooth curved lines. 1.
2.
4. If the skirt has gathers at the yoke, the upper part of the lower panel should also be moved apart by the amount of gathers.
5. The lower panel of the skirt can be cut using the technology of a flared “sun” or “half-sun” skirt, or a conical “bell” skirt. To do this, instead of waist circumference, you need to measure the length of the line where the yoke is sewn to the bottom panel and correctly calculate the radius when constructing the pattern. We will discuss this topic in more detail in one of the following articles. As an example, we looked at only a few options for yoke skirts. The number of styles that can be modeled based on this pattern will be limited only by your imagination. At this point, the construction of a skirt pattern with a yoke can be considered complete. IMPORTANT. Before you start cutting, check the length of the stitching lines for the yoke and the bottom panel of the skirt.
| Categories: | sewing |
Tags:
sewing
Cited 23 times Liked by: 5 users
Like share
0
Like
- 5
I liked the post - Quoted
- 0
Saved
- Add to quote book
- 0
Save to links
Liked5
0
With elastic band
This variation of the skirt is very simple to make. It can be sewn by a person who has no sewing skills. But in order not to make mistakes during the work process and not to spoil modern expensive fabric, it is advisable to carefully follow the recommendations of specialists.
Sewing a pleated skirt with an elastic waistband is easy. It is quite capable even for a beginner.
- Before you start sewing this model, you need to decide in what quantity and how small pintucks will be located (large ones will be inappropriate) on the product. There is no point in placing them close to each other, since when placing material with frequent creases on the elastic band, they will stick out and create an unsightly appearance. But at a distance of 2-4 cm and with a depth of no more than 2 cm, the product will look better.
- Since a skirt with an elastic band must have a certain margin for ease of putting on, at least 10 cm must be added to the hip circumference measurement. According to the chosen model, this allowance can be much larger.
- After the final value has been determined, you should calculate the number of tucks and at what distance they will be located from each other. For example, the waist circumference is 68 cm, and the hip circumference is 78 cm. This means that the minimum width of the fabric, taking into account only the allowance for freedom of movement, is 88 cm (78+10=88).
- When placing creases with a depth of 2 cm and a distance between them of 2 cm, you get 22 pieces. After calculation, it turns out that making small tucks will take an additional 88 cm of material (2x2=4; 4x22=88). When summing up the calculations obtained, the material consumption is equal to the width of 176 cm (88+88=176). In length, the consumption is equal to the measurement of the length of the product plus allowances for connecting to the belt and processing the bottom.
- After preparing the fabric, you can start sewing the product. First, the side (or side) seam is connected.
- Then the tucks are marked. They can be located either in one direction or symmetrically with respect to the middle of the front of the skirt.
- Next you need to make a belt with an elastic band. To do this, prepare a strip of fabric 8-10 cm wide and 88 cm long plus 2 cm seam allowance.
- Having stitched this strip into a ring, fold it in half and place an elastic band 3-4 cm wide and about 60 cm long inside. The open cut is swept away.
- Next, it is connected to the upper cut of the main fabric and sewn with machine stitching. The final processing of the edge is carried out with an overlocker.
- Next, the bottom of the product is decorated and wet-heat treatment is carried out.
In order to look great and have a large, beautiful wardrobe, you do not always need to spend a lot of money and time hunting for fashionable new items.
It is enough to look for a material that is suitable in color and structure, calculate its quantity and, following the recommendations given in this article, independently sew original and exclusive pleated skirts.
Pattern modeling
You must select:
- how much to lower the waistline compared to the base pattern (usually 3-4 cm);
- finished length of the skirt from the desired waist line;
- The height of the yoke is on average 7-10 cm.
On the basic straight skirt pattern, lower the waist line by 3-4 cm. Set the desired length of the skirt down and draw a new hem line.
Then, from the new waist line, retreat the desired length of the yoke (7-10 cm) and draw a line parallel to the upper cut (as in the diagram). Cut the yoke along the marked line, then cut along the lines of the darts. Glue the yokes together, closing the darts. Trace the glued parts on a new sheet of paper, then smooth the top and bottom lines (as in the diagram).
Close the remaining ends of the darts on the main parts of the skirt, transferring them to the side seams.