Every year, handmade gifts become more and more popular. This is not surprising, because special energy and love are invested in them. Moreover, it is not at all necessary to use any unusual materials to create them. Even plain paper is suitable for this. We have selected interesting master classes with which you will definitely be able to make cute gifts with your own hands.
Beautiful card
Of course, first of all you should try to make a postcard with your own hands. It can be absolutely anything, depending on your preferences and the theme of the upcoming event. First, we suggest trying to make an interesting option for the New Year.
For work we will need:
- blank postcard or thick cardboard;
- needle;
- a thread;
- scissors.
First, fold a sheet of cardboard in half to form a postcard. We pierce the top point of the pattern with a needle and thread. After this, we designate the left point of the tree. The length of the stitches depends on your preference.
In the same way we thread the needle through the right extreme point. Please note that the triangle should be as symmetrical as possible.
We repeat the same until we fill the entire inner part of the triangle with such stitches. This must be done very carefully so as not to tear the cardboard.
Let's start making the next tier of the tree. To do this, pierce the paper strictly under the center of the first triangle and repeat all the previous steps.
The third tier is made according to the same principle.
The result is a cute, simple card that everyone is sure to love.
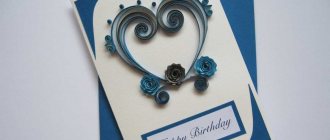
For the birthday of a close friend or relative, it’s worth making a slightly more original version. Therefore, we suggest trying to make a three-dimensional postcard.
Necessary materials:
- colored paper;
- cardboard;
- threads;
- scissors;
- pencil;
- scotch;
- glue.
First, fold a sheet of cardboard in half - this will be the base of our postcard. On colored paper we draw balls and small triangles, and then cut them out. Glue the parts together as shown in the photo and add thread. We repeat the same with each workpiece.
We write a congratulatory inscription on the triangles and glue them to the thread. We fix the blank on the postcard.
We cut out small strips of paper and fold them into an accordion shape. We glue them to several balls one by one.
Only after this we glue the balls to the postcard.
We collect all the threads from the balls and tie a knot. A beautiful, bright card is ready!
What hand-made gifts will your friends like?
A gift for your best friend or friend is also important. Such a fake can easily be made from thick paper. A cardboard craft for a birthday can be made in the form of a figurine of a car or a jewelry box.
The box can be decorated with different materials, depending on taste preferences and the type of products that will be stored there.
All of the options listed are just a small part of the creative gifts you can give to your loved ones.
Decorative birdhouse
If you are planning to give a gift to your loved ones, then you probably know all the preferences. Therefore, you can safely make not only useful, but also decorative gifts. This is exactly what a birdhouse is, which will look great in a child’s room.
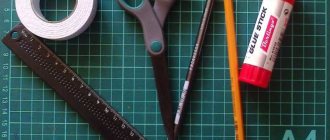
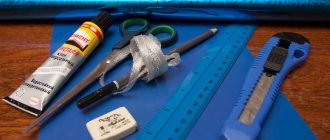
Let's prepare the following:
- decorative cardboard and wrapping paper that matches the style;
- glue stick;
- ruler;
- scissors;
- compass;
- dry twig;
- decorative bird.
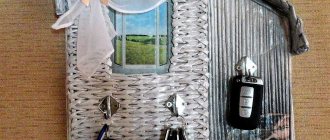
Draw a birdhouse on a sheet of decorative cardboard. It can be of any shape and height. It all depends on your imagination. But remember that the back and front walls must be the same. The same applies to the side ones. It is better to make the roof in a different color so that it stands out visually against the background of the birdhouse itself.
We bend the edges of all parts using a ruler. Due to this they will be clearer. This is necessary so that the parts can be well fixed to each other.
On the facade of the birdhouse we draw a circle, which will be the entrance. Carefully cut it out using scissors.
We connect all the parts together using glue. Leave it for at least an hour to dry.
Make a small hole in the birdhouse and insert a twig. If necessary, we fix it and place a decorative bird. The original present is ready!
How to do it?
The main thing here is the base of the dumbbell, which is made by twisting black cardboard into a double tube and fixing it with glue and tape. Next, you need to trace two disks on cardboard and cut them out, providing holes for the base. To make the dumbbell stable, you should cut the disk from the bottom by 1 cm. Now it’s the turn of corrugated paper: we will paste it over the disks, and the base is ready.
At the design stage, each Snickers is tightly attached to a dumbbell using double-sided tape. You need to glue in two rows to “increase” the required volume of disks. The delicious craft is completed with a decoration, for which a thin satin ribbon is set on fire at the edges and glued to the medal, which then simply needs to be hung on a dumbbell. An original gift for my brother on his birthday is ready. You can also think about additional packaging or a stand - let your imagination run wild. And Snickers can easily replace any chocolate bars.
Minimalistic mobile for a child
If you are visiting friends who have just become parents, a mobile phone would be an excellent gift option. It can be hung not only above the crib, but also simply on the wall as decoration.
Necessary materials:
- hoop;
- colored paper;
- glue;
- marker;
- scissors;
- white threads;
- ruler;
- multi-colored beads;
- hook.
Fold a sheet of paper in half, forming a triangle.
Fold the sheet again into a triangle and unfold it back.
We bend the top of the triangle as shown in the photo.
We also bend the lower corners, as in the photo.
We fix these corners with glue.
Turn the blank over and draw the cat’s face with a marker.
Take a second sheet of paper and fold it in half to form a triangle.
Fold it in half again.
Unbend it back and bend the top of the triangle.
We fold the lower corners of the workpiece at an angle, as in the photo.
We fix them with glue.
On the same side we draw the dog’s face with a marker.
Cut the white thread and thread it through the hole in the first piece.
We put several beads on the thread. This is necessary not only for decoration, but also to ensure that the workpiece hangs straight.
Using the same principle, we make several more blanks in the form of animals. After this, we attach them one by one to a small hoop.
The result is a beautiful, delicate product that is perfect for decorating a child's room.
A gift for daddy
To give a gift to dad for his birthday, you will have to use your maximum imagination.
For example: a card with a festive shirt and tie.
To do this you need:
- Fold a sheet of cardboard in half, in the shape of a postcard.
- A sheet of colored paper of a similar format should also be folded in half, making cuts on the sides and bending the corners - this is the collar of our shirt.
- Take paper of a different color and form a tie, then glue it under the collar.
- The shirt is attached to the main side of the cardboard postcard using PVA glue.
Wishes for the holiday are written inside the finished gift, and you can even glue daddy’s postcards or your own photo as a souvenir inside.
You always look forward to your favorite holiday with anticipation and a miracle.
And DIY birthday crafts allow you to preserve warm, joyful memories!
Stylish advent calendar
On the eve of Christmas, it is customary in Western countries to give advent calendars. Be sure that every child will receive such a present once.
To create it you will need:
- thick cardboard;
- sheets of paper;
- scissors;
- glue;
- decorative elements;
- sweets to fill the cells.
Fold the sheets of paper in half, then unfold and cut.
Take one sheet, fold it in half and glue the edges.
Fold the edge as shown in the photo.
We open the lower part of the workpiece and fold it.
We fix the lower part with glue and repeat the same with the rest of the blanks.
We fill the resulting bags with various sweets, decorate them at our own discretion and number them.
We attach all the bags to thick cardboard. A beautiful DIY advent calendar is ready!
Homemade fan
Photo source: ilovehobby.club
Are you looking for DIY crafts that will not only be beautiful, but also useful? Pay attention to this option. Use:
- two identical wooden ice cream sticks;
- fairly thick paper with an interesting pattern or plain paper;
- glue;
- beautiful satin ribbon.
Photo source: nyaskory.ru
Many in childhood folded original fans from notebook leaves. The technique for creating this craft is no more complicated:
- Bend the paper to imitate an accordion.
- Carefully glue the sticks along the edges. Also glue the folds of the lower part of the future fan together.
- Glue the tape to the sticks as shown in the photo. It will become a mount for the product.
Paper gifts: ideas in photos
Paper gifts can be really beautiful and original. But for this you need to try and avoid mistakes during the creation process.
Original handmade gift ideas in a hurry
Imagination and skillful hands work wonders. Today there are a huge number of options that will allow you to quickly make an exclusive gift.
The most popular way to express your wishes is the “Happy Birthday Card” craft. This is the simplest option, which will require paper, scissors, glue and various decorative elements.
You can make such a card using your imagination or use ready-made ideas and templates.
Even those who do not have creative imagination will always be able to make an easy fake birthday party according to the instructions. One such option is a matte candlestick decorated with salt. Such a thing will become a wonderful decorative element, and the beneficial properties of salt will make its use healing, because sea salt, when heated, has the property of purifying the air from harmful microorganisms.
To complete this you will need:
- baby food jar
- container with sea salt
- PVA glue
The creation process is quite simple:
- Cover the jar with PVA glue
- Roll it thoroughly in a container with salt.
- After this, let it dry for 24 hours.
- This will make a very beautiful craft for a birthday.
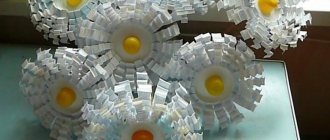
You can please a birthday boy with a sweet tooth with a craft made from sweets. This could be a bouquet, a cake or a symbolic figurine. It all depends on the number of sweets that are planned to be used, and the imagination of the author.
Very often, foil, paper, ribbons and other florist attributes are used to decorate bouquets.
To make a souvenir figure, you will need a frame, which can be made of paper, cardboard or foam.
A very popular gift is a kinder chocolate cake - it is not that difficult to make, and the result will exceed all expectations. And it will please the birthday boy regardless of his age.
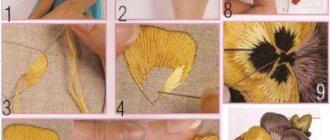
Paper crafts for birthdays are very popular. Paper is a universal material from which you can make both a postcard and a beautiful holiday bouquet. There are a huge number of methods for making flowers. Here is the simplest and very beautiful option.
Next, four such elements are connected with PVA glue into a bud. And such a miracle turns out!
This paper craft will be a wonderful birthday gift for mom and grandma.
Another beautiful and very original gift will be a panel decorated with paper flowers and other elements.