The ability to carefully decorate the edge of a product speaks of the professionalism of the craftswoman. And at the same time, it is absolutely not necessary to knit some complex pattern. It is quite enough to tie the edge with a pattern that matches the overall style of the product. This can be an openwork border, a dense zigzag, or a twisted dense edge. In this article we will look at how to tie the edge of a product with knitting patterns.
Decorative binding can be done in two ways. In the first case, the border is knitted separately and then carefully sewn to the product. With the second, a set of loops for the border is made directly along the edge of the product. If we are not talking about decorating the edge, but just need to make, for example, a strong edge, then in this case the initial rows of knitted fabric are used to solve this problem. We will look at different strapping options.
Twisted edge
We cast on the required number of loops using the classic method and knit 4 rows. persons iron.
Next r. We begin to form a twisted edge. We knit 4 l. p. and turn over the left side of the knitting, making a turn towards yourself.
Having repeated the steps on all stitches of the row, we continue knitting with stockinette stitch.
By persons On the side the edge looks like a twisted lace, and on the wrong side it turns out to be a wavy edge.
Selection of tools and materials
Spokes
For knitting a blanket, closed knitting needles are suitable - long, with stops at one end; they will not allow loops to slip off from the back side, they are convenient for small-width blankets or making individual fragments.
Short circular knitting needles connected with fishing line are preferred for making wide, solid knitted fabric. The knitting needles also differ in thickness: optimal from 2.5-3 to 5.
Yarn
When using low-quality threads, there is a high risk that the product will quickly lose its decorative appearance, stretch or fade after washing.
Thinner yarn will display a complex openwork pattern in more relief; a thicker thread will produce a more voluminous product. The thinner the yarn for the blanket, the longer the knitting will take.
The composition depends mainly on the purpose of the future blanket. Natural threads, for example, from merino wool, are suitable - soft, warm, very pleasant to the touch. Cotton works well for a lightweight blanket. Mohair will help novice craftswomen hide possible mistakes. Angora and acrylic threads have proven themselves well.
The quantity is primarily determined by the size of the planned product, but also depends on the thickness of the yarn and the chosen pattern. Braids and other relief patterns significantly increase material consumption.
Read: TV series “Phantom”
- A small blanket for a newborn, about 0.8 by 1 m in size, will require about 800 grams of yarn.
- Size 1.3 by 1.7 - an average blanket for a chair, consumption is about 1 kg of yarn.
- The standard size of a blanket is 1.5 by 2 m, optimal for a single bed; the approximate consumption is from 1.5 to 2 kg of thread.
- A blanket made from super yarn will require from 3 to 7 kg of material.
It can be difficult for beginning needlewomen to determine the required number of loops of the selected yarn for the desired width. In this case, you can knit a test sample, for example, 20 by 20 loops, using the pattern chosen for the blanket; then, measuring in centimeters, calculate the required width in loops. To get an idea of how much a given yarn shrinks when washed, you can wash and dry a sample before measuring.
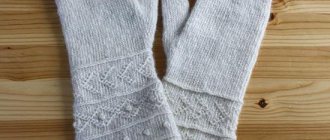
An important detail is the edges of the future blanket; they give the product a neat, finished look. There are many design options - you can knit them right away, tie them around a finished blanket, or trim them with ribbon, lace, or the like.
Scalloped edge
For such a binding, in addition to knitting needles, you will need a hook. We start with a set of 8 loops. We perform it in the usual way, replacing one of the knitting needles with a crochet needle - see photo.
We put on the 9th loop only on the hook.
We pull this stitch through all 8 stitches and lower them from the knitting needle.
Then we transfer the pin from the hook to the knitting needle and lift the outermost pin of the scallop onto it.
We repeat the previous stage and recruit new points.
We drag the stitch on the hook through 8 sts. We transplant new 2 sts onto the knitting needle.
Repeat this to the desired length. When moving on to further knitting with the main pattern, between the two loops of the scallop you need to add 1 stitch or 2 stitches in yarn overs (depending on the width of the scallop). That is, when calculating the number of festoons to knit, you need to take into account that each of them will later turn into 3p. or 4 p.
History of knitting
Knitting with knitting needles has its roots in ancient times. Archaeological excavations of Ancient Rome showed that even then people, although simply, but very skillfully handled knitting needles. They knew how to create simple items of clothing, mostly knitted with linen without patterns. Much later this art found a place in the East. Moreover, handicrafts were the prerogative of the male part of the population. Women were given only a supporting role.
With the advent of the Crusaders and the emergence of sea trade routes, the secrets of oriental needlework penetrated into Europe. Here knitting has become a women's hobby. It transformed and changed, new patterns and patterns appeared. However, prices for handmade work were prohibitively high. The reason for this was the large investment of time. To knit a voluminous item required considerable perseverance and free time. Therefore, only secular ladies were engaged in needlework. And the material was quite expensive.
With the advent of the industrial revolution, the first knitting machine was invented, which was later introduced into factories. The process of making threads was also mechanized, which significantly reduced its cost and made it accessible to the public. This hit knitting hard as a form of creativity. With the development of technology, knitting machine models have improved so much that they do not even require human participation in the process. Needlewomen try to instill a love of knitting in their children in order to preserve their skills and pass on knowledge to the next generation, as our ancestors did.
Related article: Crochet rose: video tutorial and photo diagram on how to crochet beautiful flowers with your own hands
Waves
The initial number of sts is 21 sts (= rapport) + 3 sts + 2 chrome. Edge loops are not shown in the description.
Repeated sections are marked with asterisks *-*.
Knitting sequence:
- 1st, 3rd: persons/p;
- 2p.: i/p;
- 4p.: 1 k/p, *1n., 21 k/p*, 2 k/p;
- 5p.: 2 i/p, *1 i/p, 3 k/p – 5 times, 2 i.*, 1 i.;
- 6p.: 1 k/p, *1 k/p, 1 n., 1 k/p, 3 i/p, 1 k/p – 5 times, 1 n.*, 2 k/p;
- 7p.: 2 i/p, *2 i/p, 3 persons/p, 1 i/p – 5 times, 2 i/p*, 1 i/p;
- 8p.: 1 k/p, *1 k/p, 1 n. – 2 times, 1 l. p. and 1 and. we knit stitches in 1 l. p. for the lower bow, 2 i/p – 5 times, 1 k/p, 1 n. – 2 times*, 2 k/p;
- 9p.: 2 i/p, *4 i/p, 2 k/p, 1 i. – 5 times, 4 i., 1 p;
- 10 rubles: 1 person/p, *1 person/p, 1 n. – 4 times, 1 l. p. and 1 and. we knit stitches in 1 l. p. for the lower bow, 1 p/p – 5 times, 1 k/p, 1 n. – 4 times*, 2 k/p;
- 11r.: 2 p/p, *8 p/p, 1 k/p, 1 p/p – 5 times, 8 p/p*, 1 p;
- 12p.: 1 k/p, *8 k/p, 1 l. p. and 1 and. we knit stitches in 1 l. p. for the lower bow - 5 times, 8 p/p *, 2 k/p;
- 13r.: 2 p/p, *8 p/p, knit 4 p/p, transfer them to aux. knitting needles, make three turns around them with the working thread counterclockwise, transfer them to the right sp., 9 p/p*, 1 p/p;
- 14 rubles: persons/p.
Next we repeat from the 1st to the 14th row.
Simple border
A simple border with knitting needles for finishing any products, made with front or back stitch. Border repeat can be created individually by moving the assembly loop closer or further away.
Border with knitting needles for finishing - MK:
Knitting pattern for a border made of beige yarn:
Border repeat: 9 loops; 9 rows.
The number of loops is cast on, a multiple of 9 - 1 (edge loops are included in this number). The loops are cast on one needle.
- ROWS 1, 2, 3, 4: knit all stitches.
- ROWS 5 and 7: purl all stitches.
- ROWS 6 and 8: all stitches are knit.
- ROW 9: knit 8; We pick up the loop from the left knitting needle with the right knitting needle from under the bottom, twist it and knit it with the front one.
Knitting pattern for a border made of yellow yarn:
Border repeat: 7 loops; 7 rows.
The number of loops is cast, a multiple of 7 - 1 (edge loops are included in this number). The loops are cast on one needle.
- 1, 2, 3 ROWS: all stitches are knit.
- ROWS 4 and 6: purl all stitches.
- ROW 5: knit all stitches.
- ROW 7: knit 6; We pick up the loop from the left knitting needle with the right knitting needle from under the bottom, twist it and knit it with the front one.
Embossed zigzag binding
Let's consider how to tie the edge of a product with knitting needles according to the proposed pattern and description.
On сх. Only facial expressions are shown. In purl r. We knit according to the pattern, we knit the yarn overs purlwise. The repeat pattern of the pattern is 18 stitches. We knit once from the 1st to the 12th row. Next we repeat from the 5th p. on the 12th r. We complete the knitting by completing the pattern from the 1st row. on the 4th r.
Description:
- from 1st r. on the 4th row: elastic band 1 l./1 i.;
- 5 rub. and 7r.: 2 l. p. in 1 l. n. with a tilt to the left, 6 l. p., 1 n., 2 l. p., 1 n., 6 l. p., 2 l. n. with a slant to the right;
- 6r. and all even ones: according to the pattern, yarn overs - and. P.;
- 9r. and 11p.: 2 and. p. in 1 and. p. with a tilt to the left, 6 i. p., 1 n., 2 i. p., 1 n., 6 i. p., 2 i. p. in 1 and. n. with a slant to the right;
- from 13th p.m. on the 16th row: elastic band 1 l./1i.
Now let’s look at how you can tie the vertical edge of the fabric.
Border in the form of flowers for finishing the bottom and top
Knit borders in the shape of delicate flowers to finish any edge. The floral edge can be used to start the product, or it can also be used to close the knitting. The pattern looks appropriate and beautiful in the canvas itself, decoratively complementing the edge.
Border in the form of flowers - video:
Border knitting pattern at the beginning, at the end, in the middle of the product:
Border repeat: 6 loops; 4 rows.
The number of loops is a multiple of 6 + 1 for symmetry + 2 edge loops.
Beginning of the product with a border:
- ROW 1 (knit): all stitches are knit.
- ROW 2 (purl): *knit 1; 1 person with triple wrap – repeat 5 times on 5 loops*; 1 person
- ROW 3 (front): P1; * remove the wrap from 5 loops and wrap them with thread twice; 1 purl*
- ROW 4 (purl): knit all stitches.
Closing the product with a border:
- ROW 1 (knit): all stitches are knit.
- ROW 2 (purl): *knit 1; 1 person with triple wrap – repeat 5 times on 5 loops*; 1 person
- ROW 3 (front): P1; * remove the wrap from 5 loops and wrap them with thread twice; 1 purl*
- ROW 4: all loops are closed in the classic way - the first loop is removed, the second is knitted and the first is pulled through it.
Border in the middle of the knitted product:
- ROW 1 (knit): all stitches are knit or in pattern.
- ROW 2 (purl): *knit 1; 1 person with triple wrap – repeat 5 times on 5 loops*; 1 person
- ROW 3 (front): P1; * remove the wrap from 5 loops and wrap them with thread twice; 1 purl*
- ROW 4 (purl): knit all stitches or follow the pattern.
Pearl edge
Produces a smooth and flat edge
On faces side 1 and the final stitch we knit. crossed, working thread behind the fabric. According to remove the 1st and final side as before. p. without knitting.
Advice
Smooth edges and chain edges are best used for items sewn on the inside. side. We use knotted edges and pearl edges for the front sides of the product.
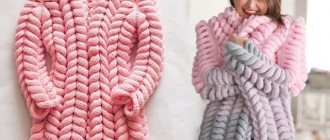
tying the edges of the product with pompoms
Hello Dear knitters, this is my first MK, so I’m, as they say, “excited,” well, away with the excitement - let’s get started!! :)))
Today I want to share one very interesting method of tying the edge of a product, or rather tying the edge with pompoms. This tying option looks very original and is perfect for tying the edge of a blanket
(as in my case), I also saw a similar binding around the edge of triangular neck scarves (bacti), perhaps there are a lot more things that can be decorated in a similar way! And we will knit such a miracle border...
I would like to immediately apologize for the quality of the photo of the MK itself, I hope it will not prevent you from understanding the principle of knitting this binding!
I will show all the steps in as much detail as possible, for experienced knitters this may seem stupid, but I really want MK to be accessible to beginner knitters who find it difficult to delve into superficial master classes!
So we have this inconspicuous edge of the product (in my case it is a blanket, the edge of which has already been previously crocheted with single crochets), the appropriate yarn and a hook.
Step 1 - make the initial loop
Step 2 - find the corner of the product or the place where your binding will begin and pull the initial loop into the loop of the base of the product
Step 3 - knit a chain of 6 loops
Step 4 - yarn over the hook
Step 5 - we knit a double crochet into the third loop of the chain, but with an open top, that is, we do not tie the last loop of this column, there should be 2 loops on the hook.
Step 6 - in the same loop of the chain (in which you just knitted a double crochet), we knit 2 more double crochets, with the same open ends (without finishing the loop).
In total we have: the first false stitch formed by 3 chain loops and 3 double crochet stitches with open ends, a total of 4 loops on the hook.
Step 7 - grab the working thread and pull it through all 4 loops
Here we have the first half of our pompom, and it will consist of 2 halves, so then we knit the second half.
Step 8 - knit 3 air loops
Step 9 - in the third loop from the hook we knit 3 double crochets in the same way as the first time, leaving open ends, as I have already described.
Step 10 - again there are 4 loops on the hook, we pull the working thread through all the loops at once.
Here is our other half of the pompom, and logically now we need to connect them (like in a kinder surprise there are 2 halves of an egg :), this is so, for associations)
Step 11 - look for the loop from which we knitted the first half of the pompom and insert the hook into it by the two halves of the loop.
Here she is
Step 12 - then we connect the halves of the pompom, grab the working thread, pulling it through both loops (the one into which the hook was inserted and the one that was already on the hook). There is nothing complicated about this, the main thing is to try to do it yourself, and you will understand that everything is not as scary as described here 
Step 13 - we knit 3 air loops, this is our kind of chain on which the pompom hangs. In my work I make this chain of 3 loops, but you can lengthen it as you want, then your pompoms will hang lower, and as an option you can alternate the length of the chain, then you will get multi-level pompoms, in general it’s a matter of taste and your imagination .
Step 14 - we need to attach the chain to the base of the fabric, I did this through 3 loops of the base, but then I realized that it was too thick for my product and 4-5 loops began to recede, so this is also at your discretion. We attach with a regular connecting post.
Then the algorithm of actions is repeated!
Well, here’s the result, my product, the edge of which is tied using such an interesting technique.
I hope that this MK will be useful to you! With UV. Vesta K.