Cutwork embroidery is openwork embroidery with slits that can be done by hand or machine. It is used to decorate products made from various types of fabrics, with the exception of highly stretchable ones. This embroidery looks very beautiful on the back of products; it can be done on individual elements of the outfit: collars, cuffs, pockets. To create a pattern, adhesive interlining is used as an additional material. It is located on the wrong side, then is not noticeable on the front side. When using cutwork embroidery, you can get unique products if you create your own sketch.
Necessary tools for embroidery
The operating principle of this technique is simple; all you need is a sewing machine. Cutwork embroidery for beginners does not require expensive equipment. It is enough to have a machine that can do zigzag. Not all designs can be embroidered with zigzags, but you can try to create some easy and quick options using them. To create an ornament in machine and hand cutwork embroidery, you will need to understand the technique of creating a satin stitch. This is a fairly simple way to sew items using straight stitches and mixing.
For hand embroidery, a hoop, a needle, scissors with curved ends and a piece of fabric with a printed pattern will be enough. We'll look at how to transfer a sketch onto fabric later. Examples of cutwork embroidery and photos of finished products can be viewed on websites for needlewomen. Scissors should be chosen with sharp tips so that they cut through the fabric well and cut it easily and evenly the first time. Additionally, Avalon water-soluble film is sometimes used, with which the sketch is transferred to the fabric using a regular pen. Designs for cutwork embroidery can be found on the Internet and made yourself. There are special programs for creating ornaments. In them you can make a diagram using a template or your own sketch, adding various patterns, and also edit the finished version.
What is the Richelieu embroidery technique?
"Richelieu" is the finest exquisite embroidery. It looks very elegant and impressive, and is done both manually and using sewing equipment. The pattern here is stylized flowers and leaves, cut along the contour and interconnected by bridges (brides).
Historical information
Embroidery is a technique for decorating fabrics using various threads, pearls, stones, beads, bugles and other materials. This type of applied art and women's handicraft was widespread among many peoples of the world and was widely known in ancient Babylon and Egypt.
There are a great many options and varieties of embroidery, but the Richelieu technique is considered one of the most popular. It first appeared in Italy during the Renaissance, XIV century. At that time, the “Venetian smooth surface” was very popular - convex due to the preliminary covering of the pattern with darning threads. This is where similar in technique but flat forms arose - “Richelieu” and “Broderie”.
The fashion trend was quickly picked up in Europe, especially its central and western parts. Of course, we got acquainted with embroidery here much earlier, since the fashion for it came from the East, but traditional patterns have undergone numerous changes.
Lace openwork embroidery became the privilege of the court nobility; it was highly valued at the court of Lorenzo de Medici. Beautiful canvas and its production were inaccessible to commoners: this craft was not for the poor, although schools and workshops were opened everywhere.
Openwork embroidery was named after Cardinal Richelieu, who contributed to the development of this type of needlework in his country by limiting the import of expensive luxurious Italian lace. However, history experts claim that His Eminence had great respect for openwork patterns, wore embroidered clothes, and sometimes even took up embroidery hoops himself.
Advantages of technology
Lace embroidery is beautiful and simple to do, although at first it seems too complicated. It does not require special training or expensive materials, and can be done manually or using a sewing machine.
Main advantages:
- lace looks elegant and solemn, both on clothing and home textiles;
- the simplest techniques are used to complete the work;
- the templates are quite simple, the ornament is easy to come up with on your own;
- You can master the skill in a short period of time without outside help.
Execution Features
The Richelieu design is mainly a floral design: flowers, leaves. If desired, you can also make a third-party pattern, but such deviations are not always harmonious.
To perform the famous embroidery, you need to master the basic techniques:
- roller with thread insertion (narrow satin stitch);
- convex satin stitch with flooring (wide satin stitch);
- breeds (simple and perestroika);
- spiders;
- decorating seams;
- cutout mesh.
When starting work, the fabric is well ironed and the desired pattern is applied to it. Then the fabric is secured in a hoop, while avoiding distortions of the longitudinal and transverse threads. The details of the pattern must be sewn with small stitches along the contour.
Where to start
First, you need to apply a design to the fabric for cutwork embroidery. You can do this in several ways:
- use a water-soluble marker;
- apply a design to the Avalon film;
- transfer the diagram onto tracing paper, and from it onto the fabric using carbon paper;
- use a special erasable pencil.
When using water-soluble film, it is simply applied on top, stretched over the fabric and stitched to it. Then, when the product is washed, the excess will dissolve. If the material that you have chosen to create embroidery is not dense enough or is prone to fraying at the edges, you need to make a special non-woven or cotton circle before stretching it onto the hoop. Otherwise, the threads on the material are easily damaged. The loose fabric will begin to stretch and deform the design. Embroidery hoop marks may also be visible. Non-woven fabric is not very durable, so for long-term use it is better to make a circle made of cotton. When working with the thinnest fabrics, it is advisable to cover the upper part of the hoop with some material to make it softer.
Decoration of clothes and accessories
Most often, cutwork embroidery is used to decorate handmade napkins and tablecloths, but other options are also possible. For example, you can decorate children's clothes in this way. In pre-revolutionary Russia, this technique was traditionally used to decorate bed linen. Curtains decorated with cutwork will look great in a kitchen decorated in the Provence style (the so-called rustic style).
The complexity of embroidery largely depends on the size of the fabric. The larger the space, the easier it is to make a mistake and the more difficult it is to adhere to the chosen compositional solution. And, conversely, embroidering on a small “square” of fabric is not at all difficult. Therefore, novice needlewomen can start by decorating handkerchiefs of bed linen for newborn children. Experienced needlewomen can take on decorating bedspreads for armchairs and sofas, as well as curtains and curtains.
If a needlewoman likes cutwork embroidery, it is best to choose ornamental patterns for beginners. Experienced embroiderers can also handle large narrative paintings. This could be a drawing on a floral or holiday (Christmas, Easter) theme or a beautiful personalized monogram on a product intended as a gift to a specific person.
Currently, due to the revival of the cutwork embroidery technique, a large number of master classes on this type of needlework are being held. At these master classes you can not only learn the secrets of experienced craftswomen, but also receive original designs for free. Attending such an event is a great way to master complex techniques. If this is not possible, a training video will help. The main thing is patience and continuous practice, and then you can achieve excellent results. Products decorated with openwork patterns will be the best proof of a high level of craftsmanship.
How to make a circle from non-woven fabric
A slot is made in the center of the non-woven circle according to the size of the work. To do this, you need to place the hoop in the central area of the workpiece, outline it with a pencil and cut out a circle of smaller diameter, not cutting about 1 cm to its edge. The finished circle is placed on the fabric, which makes the working process more comfortable. This is quite simple to do - on the larger part of the hoop, the fabric with the pattern is placed so that it is located in the center and not on the edge. Then a non-woven circle and the second part of the hoop are placed on top. The material must be well stretched, so the edges will have to be tightened, moving both the fabric and the interlining at the same time.
What you need for work
The beauty of openwork fabric depends not only on the quality of the craftswoman’s work and her skills. The final result is largely determined by preliminary preparation, namely the choice of the necessary materials.
Textile
Fabric for fine work should not be sparse or too crumbly. You will need thin but dense fabrics, preferably linen, wool, silk or cotton.
Kinds:
- calico;
- chintz;
- batiste;
- awning;
- madapolam;
- muslin;
- poplin;
- satin;
- gabardine;
- reps;
- crepe;
- linen;
- semi-len;
- natural or blended silk.
These fabrics are more suitable for openwork techniques. Based on their quality and density, you can select other fabrics. If the material is unfamiliar, you first need to take a small piece from it, try to do embroidery on it and see if it turns out well.
Threads
Embroidery that requires bridging and buttonhole stitching requires soft, pliable threads.
The most suitable of them:
- iris;
- silk garus;
- floss (one or two threads);
- paper garus.
For dense fabrics and calico you will need thread No. 80, and for thin materials such as voile, cambric, madapolam - silk No. 65 or for needlework No. 100. In tone, they should match the color of the fabric as much as possible. This is important because such embroidery looks especially noble.
Needles
Needles for needlework are selected according to the thickness of the fabric: the thinner the fabric, the lower the number of the tool should be. For work, you may need several varieties at once, so it is better to purchase a set of darning and sewing tools.
Needles are determined by numbers - from 1 to 12. For thin fabrics, No. 1-3 are suitable; on linen, embroidery is carried out No. 3-5; denser ones require the use of No. 6-12.
The working thread should be chosen thinner than the needle, then it will pass freely through the hole after the puncture.
Adhesive materials
To operate a sewing machine you will need more than just thread and needles. To ensure that the pattern turns out well and the fabric does not “dance” under the needle, it is duplicated with non-woven adhesive fabric. Therefore, before work, you should stock up on such material and a water-soluble stabilizer (this is the same non-woven fabric).
Hoop
When embroidering (hand or machine), fabric with a pattern must be secured in a hoop that provides the necessary tension and fixation of the fabric in a certain area. The diameter of the auxiliary tool depends on the area of the pattern - the pattern must fit completely inside the ring.
The simplest hoops consist of 2 hoops. Moreover, one of them is slightly larger than the other; its diameter is usually adjusted using a special screw. For small jobs, round hoops are most convenient.
How to prepare a sewing machine for use
For cutwork embroidery by machine, the technique should also be prepared in advance. Silk threads are suitable, No. 65, of any color that goes well with the material. For a foot-operated machine, before starting work, you need to lower the teeth or cover them with a plate. We remove the foot - you won’t need it for cutwork embroidery. The needle should be at the zero position. Then we put it in the highest position and place the hoop at the bottom. Then we lower the foot, pull the thread out of the bobbin, fix the hoop in one position and make several strokes with the needle to secure the thread.
A little history
The history of richelie embroidery goes back several centuries. Its homeland is Italy, and the technique originated during the reign of the Medici dynasty. Initially, this handicraft was the privilege of representatives of the upper classes. The reason was the high cost of fabrics and embroidery tools.
For your information! The cutwork technique was popular among the ladies of the court. They decorated it not only with their outfits, but also with scarves, tablecloths, and napkins. Due to the great demand for this needlework, schools began to be opened in Italy, where girls were taught the intricacies of embroidery. Then this skill spread beyond Italy and, in particular, Florence. This technique has become especially popular in France.
Researchers have still not come to a common opinion about the origin of the name of embroidery. But she was actually named after the real political figure Cardinal Richelieu (from whom one of the main characters of the novel by A. Dumas was based).
Some believe that the cardinal was a fan of this embroidery and often wore clothes embroidered with openwork patterns. There is an opinion that Richelieu himself was excellent at this skill.
You may be interested in this: Patterns for embroidering three angels to get pregnant
Cardinal Richelieu
According to another version, the politician believed that all foreign goods should be produced in Europe. Heavy duties were introduced on imported goods. Therefore, French schools began to appear, where French women learned the art of embroidery under the guidance of Italian needlewomen.
This is how the cutwork technique began to spread throughout all European countries. In Russia, girls also learned the intricacies of creating lace ornaments. Products decorated with openwork embroidery were used as a dowry. From a young age, girls were taught how to embroider using the cutwork technique - this was a sign of a good housewife.
Now handicrafts have ceased to be of a mass nature, but their subtleties continue to be passed on to other craftswomen. And products decorated with lace embroidery are still highly valued.
Beautiful eggs for Easter
Important! You can create an imitation of cutwork using acrylic paint on glass. To do this, you will need a thin brush to make neat lines.
A piece of fabric with a lace pattern can be used to decorate an egg. This souvenir will be a wonderful gift for Easter. In addition, cutwork patterns are repeated by confectioners, for example, on gingerbread cookies. This unusual treat will appeal not only to children, but also to adults.
Contour Formation
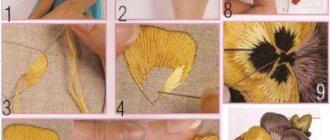
Cutwork embroidery for beginners step by step is as follows:
- First, we pass the needle twice along the contour of the pattern.
- Then we move to the center of each element, creating jumpers so that they extend beyond the edge of the stitched outline on both sides.
- Each of them must be secured so that the threads extend beyond the edge of the stitched outline. To do this, carefully move the needle to the side, make several strokes, and then follow the outline and stitch 3-4 times.
Video with master class lessons on cutwork embroidery for beginners
History of needlework. Cutwork embroidery
A fascinating video about the history of cutwork, the technique of execution, and ideas for application. Beautiful, informative and very inspiring.
Cutwork embroidery on a sewing machine
A simple and clear example of cross-cutwork embroidery using basic stitches - roller, beaded stitch, holes. How simple and at the same time elegant this embroidery looks.
Cutting out the design
Now you can remove the hoop from the machine and start cutting out the design. You will need sharp scissors, the tips of which can easily pick up the material without tearing it. Leave approximately 1-2 mm of material along the edges of the seam. If you cut too close, the thread may come out and the outline of the cutwork embroidery will be damaged. When the details of the elements are cut out, the hoop needs to be threaded under the needle again. First, we pass it along the jumper with a satin stitch, so that the needle strikes are sequentially directed along its edges.
Machine embroidery Richelieu
If you prefer labor-intensive hand embroidery to machine embroidery, then the following plan is for you:
- Choose a design for machine embroidery, or create your own in a special program.
- In addition to the fabric and threads, it is necessary to purchase such additional materials in advance. This is fabric glue with the required density, water-soluble interlining, special film, and a thin embroidery needle.
- Glue the fabric with film and interlining.
- Tightly pull the glued fabrics into a hoop, with the fabric on top and interlining on the bottom.
- Attach the hoop to the sewing machine and load the prepared stencil.
- Perform preliminary stitching using the outlining color of the outline.
- A zigzag stitch is used to sew the next element, and all subsequent ones.
- The hoop is removed and the required details are cut out using a seam ripper, embroidery scissors or cutwork scissors.
- The water-soluble film is applied, pinned to the fabric, and the hoop is placed back into the sewing machine.
- When this stage of embroidering is completed, they move on to the final dense line embroidery with a satin roller. It will hide the cut and strengthen the hair.
- The finished work is removed from the hoop, all unnecessary layers (film, interlining, glue residues) are removed. The embroidered fabric is rinsed in warm water, dried and ironed.
Satin stitch processing
Move the hoop quickly, but if that doesn’t work, then you can turn on the zigzag mode on the machine. We fix it and move on to the outline of the hole. We work in exactly the same way, quickly moving the hoop up and down, sewing the line. You should try to make stitches of the same size so that the embroidery looks neat. In modern sewing machines, zigzag stitch settings can be changed to increase or decrease the stitch size. If you have modern technology, try changing the settings as you go to create a more interesting stitch and finish the fabric better.
It is more convenient to sew small fragments of the product with a small zigzag, and large parts with the maximum stitch size. For clothes with cutwork embroidery, covering is often used, when part of the design is covered with stitches in different directions, and then sewn on top with satin stitch. That is, the sequence of actions is usually the same: a simple stitch along the contour, flooring, if necessary, on top - zigzag stitching, and then final stitching along the edges with a regular stitch. When expanding the contour, the width of the zigzag must be increased.
Embroidery ideas and patterns
Patterns for “Richelieu” are floral and foliage compositions, images of animals or birds. Schemes come in varying degrees of complexity. Simple patterns help beginners quickly master the technique, complex patterns help them hone their skills and improve their level.
At first, you need to choose simple, large drawings; they are much easier to work with. If a suitable scheme is not found, then you can make it yourself, focusing on ready-made templates.
Experienced needlewomen often embroider using their own patterns, which sometimes resemble entire paintings. But this is a very delicate and painstaking work that requires serious skill.
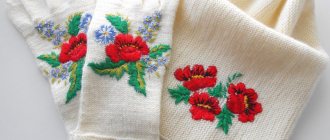
Shawls, scarves, various kinds of capes, tablecloths and bedspreads are decorated with embroidery along the edges and in the center. Openwork patterns are applied to clothes locally: on the collar, cuffs, bottom of the product, and inserts are also made along the design lines.
Final embroidery design
In order to increase the thickness of the edge, you need to go back and make as many vertical lines in succession as necessary. We process the entire hole in this way. You can also use a zigzag at this stage. In places where there will be peeking threads, you will need to go through the scissors again and adjust the edges. After the embroidery of the ornament is completed, it is recommended to make a finishing stitch along the contour using a regular seam. It will help to secure the design more thoroughly and make it even, as well as protect the edges from falling apart.
Types of embroidery
There are 3 types of cutwork:
- Simple or non-breeding. It is usually used to decorate napkins, tablecloths and other textile home decor items. There are practically no gaps in the drawing. And when some parts are cut out, the spaces are not filled with other seams, and the parts are in close contact. This type is suitable for beginner craftswomen.
- With simple brids. The bridge is like a bridge connecting parts of the ornament. The connecting thread is sewn in several ways: it can be a thread wrap, a buttonhole stitch or a darning stitch. With brids, the pattern already becomes similar to an openwork one, which is used to decorate not only home textiles, but also clothing.
- With breeds and spiders. This is the most difficult variety, which only real craftswomen can master. This technique is often used to create lace with a large pattern. “Spiders” are additional loops that are created during cross stitch embroidery.
You might be interested in this All about Turkish tulle with embroidery on mesh
Any type of cutwork technique looks beautiful and elegant.
Openwork pattern
Second version of embroidery creations
With the right choice of threads, the product will look neat and beautiful, and small errors will not be noticeable. This completes the embroidery design. There is another, simpler option for creating machine or hand cutwork embroidery. First, the entire product needs to be processed with a zigzag or satin roller on the outline and jumpers, and only after that start cutting out the holes. This method is suitable for beginners as it is easier and faster than the first one. But when creating embroidery, you need to choose threads very carefully so that they match the color of the fabric. After processing the entire pattern, you can make a mound along the contour using a simple seam. Then we cut out the excess, being careful not to touch the threads. The first option allows you to hide all the shortcomings of the product due to dense firmware. And in the second case, small ends of the threads will stick out from the seams, which will make the appearance of the product not so neat, since it will be difficult not to damage the seams when cutting. It is easier to cut out pieces of fabric if you remove the hoop.
Every time you do embroidery, after finishing the work you need to steam it thoroughly or iron it at medium temperature. Then the product will smooth out and take on a finished look. An accessory or dress with cutwork embroidery looks very stylish and is suitable for going out.
Materials for cutwork embroidery
If you want to make your work easier and get a result that will exceed your wildest expectations, then the right materials will help you.
Cutwork embroidery involves filling the contours of the design with satin stitch. The openwork is created by removing the intermediate tissue. Then the empty spaces are connected by bridges. The fabric for such work is selected according to its type and composition, since it should not be deformed. It is advisable to use fabric made from natural fibers, such as:
- Linen
- Cotton
- Silk
- Satin
Tip: The thinner the fabric, the harder it is to work with. If you are new to the cutwork embroidery technique, then you should choose linen or cotton of medium thickness.
The threads must be of high quality and durable, and also not lose color when washed and not stain the base fabric. It is best to use silk or cotton types from well-known, trusted manufacturers. Color options are selected according to the taste of the master. However, it is believed that embroidery made with threads that do not differ in color from the fabric of the canvas looks more refined and richer.
When choosing scissors, it is advisable to give preference to high-quality, expensive tools. Those that will not damage the product during the embroidery process. To easily cut through the fabric at the final stage of work, the small blades of the scissors must be very sharp.
For hand embroidery you will additionally need high-quality needles and a pattern stencil. You also need to purchase a special marker for transferring the design onto the fabric, preferably a water-soluble one.
For machine embroidery, you can buy water-soluble and regular interlining. If you plan to work with a sewing machine, it's worth making sure that the machine has an "embroidery" option. After this, practice making this seam.
White embroidery and cutwork: master class for beginners
Main rules
- All double lines of patterns are embroidered with a series of forward stitches or a chain stitch.
- The more plastic the embroidery should look, the higher the flooring should be*. The flooring is done with 2-fold floss or Coton a broder (Vierfachgarn) No. 25.
*Boarding refers to “forward needle” stitches laid over the area that will be embroidered, which are then covered with embroidery.
Simple brida
Brides are the main element of cutwork embroidery.
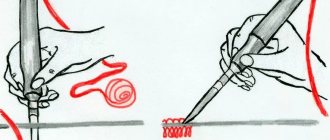
These are bridges that fill the space where the cut fabric was and form an embroidery pattern. They do it like this:
1. First, sew several straight stitches “forward with the needle.” In this case, the needle is inserted into the fabric and brought back to the front side, in order to then again pass the thread between the rows of stitches. This step is repeated 2 times. The thread is pulled exclusively along the front side of the fabric!
2. Then the brida is embroidered with a langet** (loop) stitch.
Important! When processing brids, only the drawn brid threads are captured, and the fabric threads are not captured.
3. Only after all the brids have been completely embroidered with langet (loop) stitch, the edges around individual embroidery motifs (also with langet stitches) are processed. In this case, it is necessary to ensure that the edge with the knots is directed in the direction where the fabric will then be cut.
Important! When processing motifs, threads of fabric are caught!
**Langet stitch is one of the types of loop stitch. When performing it, the stitches are placed very close to each other, forming a dense row.
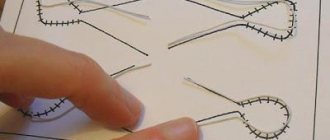
Triple brida
Between the edges of the brid motif, instead of sewing with forward stitches, you can stretch 3 threads and cover them with langet stitches.
Between the edges of the motif and between the brids, you can stretch and embroider any number of brids and in any direction. For a triple bridy, you first need to stretch 3 threads (without pulling them at all), as for a single bridy, and then embroider with langent stitches to the middle of the bridy. From here, 3 threads are again pulled to the next bridge. This brid is embroidered with langet stitches from the middle and then the embroidery is completed on the first brid.
After all the brids have been embroidered, the fabric between them is carefully cut out.
White eye embroidery
White eye embroidery consists of circles and ovals, in the middle of which fabric is cut out, thereby creating an openwork effect. It is best to use the same fabrics and threads as for cutwork. This embroidery is simpler to perform, but its eyes are often decorated with cutwork.
All circles and ovals are first embroidered in dense rows of “forward needle” stitches, and then a hole is cut in the center crosswise (you can also punch a hole with a hole punch).
Then the inner edge of the “eye” is processed: using Coton a broder thread (Vierfachgarn) No. 16 or floss in 3 folds, decorative stitches are made over the “forward needle” seam.
The stitches are made like this: from the outer edge of the “forward needle” stitch, you need to draw the thread to the center of the hole and reinsert the needle into the fabric from below. Place the stitches very close to each other. You can sew the “eye” with a buttonhole stitch.
More eyes can be made with the flooring in several rows, and finally embroidered with langet stitches with a knotted edge directed outward from the hole.
Photo: BurdaStyle, PR Material prepared by Elena Karpova