Needlework
05/29/2018 Anastasia Prozheva
The beret is a unique headdress; it is universal: suitable for girls, adult ladies, and very little girls. But a beret that mom made herself, with love and care, will be much more pleasant to wear. And you will see for yourself, your daughter will not want to take it off. This wardrobe item will suit any clothes and weather, depending on what yarn you make it from. This article will present master classes on how to knit a beret for a girl.
We will offer you several ways to create this headdress, and you can choose for yourself what is more interesting to you, which option you want to bring to life.
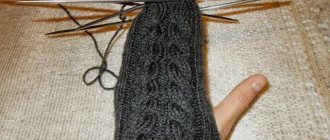
Pigtail pattern
This model is knitted with regular stocking needles and is designed for a 2-year-old girl (that is, with a head circumference of approximately 48-50 centimeters).
This product is designed for cool weather (for example, spring or autumn), so it is better to use thicker threads, but not to overdo it.
First cast on 104 stitches for the headband. We distribute it among 4 knitting needles and knit it with a height of approximately 4 centimeters. Then the beret is knitted in stockinette stitch, adding 64 stitches to create the main part. After adding stitches, there should be 42 stitches on each needle.
When the height of your product reaches six centimeters, you need to start decreasing. For each stitch, count the twenty-eighth stitch and highlight it with a special marker or thread of a different color. Now make a decreasing stitch on the remaining 27 rows. To do this, knit the selected stitch with the previous one as one knit stitch.
When you are done decreasing, there should be 6 stitches on all needles, which need to be knitted over a length of two centimeters. Finish the work by tightening the loops that remain. Pull them all to one side and secure with working thread.
Related article: 12 ways to humidify the air without a humidifier
How to crochet a children's summer openwork beret for a girl: diagram with description
Both girls and young women love to wear an openwork beret. This headdress adds femininity and tenderness to the image.
So, we crochet a children's summer openwork beret for a girl.
How to crochet a children's summer openwork beret for a girl: diagram with description
Diagram with description:
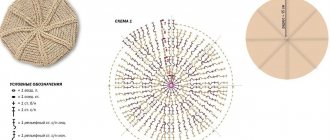
How to crochet a children's summer openwork beret for a girl: diagram
How to crochet a children's summer openwork beret for a girl: description
Important: Along the edge of the beret there are picots and cloves. They are knitted like this: 3 air loops are knitted in a half-stitch at the place where the chain begins.
Tip: You can make picots as frequent or as rare as you like. All openwork items are usually tied in this way.
Crocheted openwork berets need to be starched and steamed with an iron. Warm berets should be wetted and pulled onto a plate or jar. This will give them a beautiful and neat shape. Create berets with your own hands for yourself and your daughter to make the look original and stylish!
Pink headdress
Pink is, as they say, the most girly color. But it’s not without reason that girls love it so much, the pink color is associated with tenderness and lightness, so we will offer you a master class on creating a pink beret. It is quite warm, so the yarn should be thicker.
In the lesson, the sizes will be given taking into account what the beret fits for a 3-year-old child (head circumference 50-52 cm), depending on your measurements, you can calculate it yourself.
You will need:
- Pink yarn – 60 grams;
- Knitting needles No. 2.5;
- Knitting needles number 4.
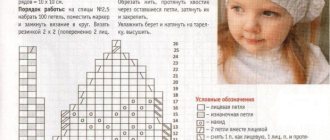
The openwork pattern is made according to the pattern shown in the photo:
Next, instructions will be given describing the work process.
We cast on 152 loops with knitting needles number 2.5 and knit an elastic band three centimeters wide. We switch to knitting needles number 4 and begin to make an openwork pattern. We knit five repeats in the round. In the 55th row, we halve the number of stitches; for this we knit 2 stitches, 1 knit stitch. There should be 71 stitches left. In the next row we repeat the decrease, knitting 2 loops on the wrong side. Now we break the thread, leaving a long tip, thread it through the remaining loops and tighten it. Finally, we tighten the beret with the same thread.
Now your daughter can boast to her friends about such a wonderful beret that her mother knitted for her with her own hands.
How to crochet a beret for a boy: diagram with description
If you love crocheting, then create a beautiful headdress for your son. For the summer, you can knit a “paratrooper’s beret” or a “captain’s cap” for a boy. For the fall, using the same patterns, but from denser threads, it’s easy to create a stylish cap that will serve as an excellent addition to a boy’s look.
So, we crochet a beret for a boy.
How to crochet a beret for a boy: diagram with description
Diagram with description:
How to crochet a beret for a boy: diagram
- While knitting, move from the center to the edges , adding the number of loops as in the diagram. To do this, cast on 8 air loops, close the knitting, and continue according to the schematic drawing of the pattern.
- In each row, add 2 air loops and one half-column with one base. The result will be a bottom of 8 parts.
- After that, turn it down . In each row, the last loop should consist of 2 half-columns with one base. Details in the diagram below.
How to crochet a beret for a boy: finishing the pattern
Important: Knit the leg of the beret from the remaining stitches after decreasing. Using a dark thread, knit 4 rows in half-columns.
Tip: The visor is knitted tightly so that it does not bend. Soak the finished visor in a solution with starch and steam it with an iron through a damp cotton cloth.
Visor knitting pattern:
How to crochet a beret for a boy with a visor: diagram with description
How to crochet a beret for a boy and a girl: diagram with description
If you want to knit a captain's cap for a girl, then choose bright yarn and knit a visor with peaks along the edges:
Sew the visor to the beret, as well as an anchor patch or other decorative elements.
Simple option
Let's try to knit a simple beret; this option is ideal for beginner needlewomen.
To knit it, you don’t need to be very clever; it’s enough to know how to knit knit and purl stitches. It is sized for a 4 year old girl.
You will need:
- Yarn (preferably warm) – 100 grams;
- Knitting needles No. 3.
Stages of work:
- Cast on 88 stitches on the knitting needles, knit a 1×1 elastic band about 8 centimeters wide, then knit one row with full knit stitches, after that, another row with purl stitches. Next, we knit another 4 centimeters with an elastic band (we have a cuff).
- We knit 40 rows of even elastic. After this, we begin to reduce through one row.
- We knit 10 facial loops, knit 2 together - repeat this until the end of the row.
- We make the following decrease: 9 knit stitches, 2 together to the end of the row.
- Now we knit 8 facial loops, 2 together - the whole row.
- We decrease the loops in this way until there are 12 of them, after which we tighten all the loops at once with a thread and sew the seam with the same thread.
Related article: DIY cardboard chest of drawers: master class with drawings and diagrams
As you can see, the process is really simple, and the headdress turned out very good. If you think it looks rustic, you can decorate it with a brooch, patch, applique, embroidery, beads, beads, in general, whatever your heart desires, the main thing is to apply fantasy.
Trying to knit a bright beret for every day with our own hands
A cute beret for a girl made of bright yarn with a detailed description. Any needlewoman can knit. Let's prepare 100 g of yarn. (wool/acrylic, 250m/100g) and knitting needles No. 3. Size for a 3-year-old girl.
Sample density: 28p?32p = 10x10 cm.
- We cast on 98 stitches + 2 edge loops (the number of loops should be a multiple of 7 + 2 edge loops). We knit 6 cm with an elastic band 1:1.
- We knit the next row with alternating “3 persons. p, 9 p. p" knit like this until the end of the row. On the wrong row we knit the loops according to the pattern.
- Again a front row of 3 faces. p. knit 5 by alternating the crossed yarn over and the front loop.
- Next we knit 9 cm in accordance with the pattern and begin to make decreases.
- Decrease by knitting strips of knit stitches in the center of the purl row, 2 together. Repeat only in purl rows until 1 loop remains in these strips.
- After this decrease, we will make stripes in the center, removing 3 loops at a time from the front side, until 1 loop remains in these strips.
- We knit the remaining loops several more times according to the pattern, then we tighten them with thread and sew the seam. We steam the product.
A beautiful beret for spring with a description for a 2 year old girl. The model is knitted with an openwork pattern with a decorative element of a flower with a bead. Even the most demanding little fashionista will love this bright, beautiful hat.
For knitting you need to prepare: 50 gr. thread (cotton/viscose), knitting needles and crochet hook No. 2 and a bead for the center of the flower.
The flower is crocheted like this: 20 chain stitches; 1 row of double crochet stitches, then we gather with a thread and pull the flower together, forming a bud, and sew a bead into the center.
Knitting a double elastic band 1?1: in the knit and purl rows you need to knit only the knit stitches and just put them on the knitting needle (do not knit).
- We will cast on 152 loops on the knitting needles and tie them with an elastic band of 3-5 cm.
- After this, in the first front row we will increase the number of stitches to 211, thus: 3 knits. n, 1 yarn over – alternate until the end of the row.
- We continue knitting according to the pattern straight to a height of 4 repeats. And we begin to make decreases like this: in each front row we knit 2 loops together.
- Thus, we decrease until there are 13 loops left on the knitting needles. We tighten the remaining loops and sew the seam on the beret. Sew a flower to the product.
An interesting quadrangular model with pom-poms at the corners will cheer up a child and make an adult smile. Calculation made for size 48-52. To knit a beret you will need: 100 g. yarn (125m/50g), knitting needles No. 3-4. The photo clearly shows the location of the pompoms and where increases and decreases are made on the canvas.
- We cast on 104 stitches on the knitting needles and distribute them equally across 4 knitting needles, making 26 on each.
- We knit 4 cm with a 2:2 elastic band, after which we continue knitting with facial loops.
- We increase at the corners 9 times with 8 loops in every second row. It turned out to be 176 p.
- After all the increases have been made, we begin to decrease. We remove in the same places where we added 8 loops per row. We will repeat the decreases 20 times until there are 8 loops left on the knitting needles, we will tighten them with thread and hide it inside the hat.
- Let's make 4 pom-poms and sew them to the corners. Beretik is ready.
Cap size chart:
Knitting an angora beret for a little fashionista
A beret for a girl is knitted according to this pattern for the age of three years. By adding buttonholes, you can knit the product for an older girl. To work you will need angora yarn, double needles size 4 and 5, and a marker. As always, stockinette stitch in a circle. rows are performed by persons. p., and a simple elastic band is knitted alternating faces. and out. p. Knitted density is 3 cm per person. iron.
Read
We select and knit beautiful models of women's dresses
Using size 4 needles, cast on sixty stitches and place a marker immediately. Next you need to go to the circle. knitting, completing seven rows with an elastic band. After this, use number 5 knitting needles and knit stockinette stitch. After two r. you can start making decreases:
- 1 rub. – six persons. p. and one p. from the broach. Repeat these steps on all links three more times;
- 2 r. – seven persons. p. and 1 p. from broach;
- 3 r. - three persons. p., knit two p. into one, repeating the pattern on three p.;
- 4 rub. – 2 persons. p., 2 p. knit in one, also repeating on three p.;
- 5 rub. – 1 person p. and again knitting two p. into one;
- 6 r. - two sts in one, repeating for 2 x. ranks
Knit the product to a small tail, and then break the thread and secure its edge to the remaining links. You can try on a children's beret.