A small basket is simply an indispensable item in a modern home. Small, cute pieces look great as decor in a hallway or bedroom. Larger baskets are ideal for storing items and organizing space. That is why we offer you several step-by-step master classes, following which you will definitely be able to make an original product with your own hands.
DIY thread basket
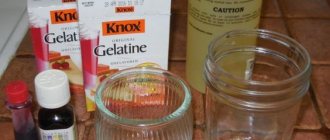
This cute basket is ideal for storing various small items and looks great as decoration.
Necessary materials:
- wooden skewers;
- clothesline;
- cardboard box;
- glue gun;
- wire cutters;
- paper;
- Double-sided tape;
- ruler;
- scissors;
- pencil;
- ribbon.
We glue double-sided tape to the side walls of the box.
Gradually glue wooden skewers to the tape. If necessary, they can be shortened to the same size. The height of the basket depends on this.
When one wall is ready, glue another piece of tape over the skewers.
Repeat the same for each side of the box.
Glue a sheet of white paper to the bottom of the workpiece.
We fix the end of the thread with hot glue and begin weaving, as shown in the photo.
The last few rows are best secured with hot glue.
Carefully remove the excess part of the sticks using wire cutters. Glue a thread on top to decorate the edge of the basket.
If necessary, fix the ends of the rope from the inside.
Let's start decorating the base of the basket. We cut off the corners of the cardboard box a little. This is necessary so that they are rounded.
We wrap the basket with thread around the perimeter and, for reliability, periodically fix it with hot glue.
We decorate the basket with a beautiful ribbon or lace. It all depends on your desire. In this case, a ribbon in a blue tint is used.
Work algorithm
How to weave baskets from wicker? First, you need to divide the work into several stages; they will help you quickly understand the algorithm of actions and master the technique:
1. Weaving the bottom begins with the fact that you need to take 8 twigs. Half of them have a hole. Each of them is 3 centimeters. The second half of the branches is threaded into these slots. As a result, a cross is formed.
Making a cross for the bottom
2. The next step is braiding the base. You need to take two branches and circle them around four rods. So you should weave two circles. Upon completion of this action, they begin to braid each of the rods. Two more rows are created. The elements must be evenly distributed. The result of weaving is a circle.
3. Another rod is added. It is placed in the outer row and bent. It is worth noting that the previous base is cut off (due to lack of length). In the same way, all the rods are replaced and two rows are woven. The vine should bend around the rod from the inside and outside. This principle continues until the bottom is completed. There are 16 main rods. At the end of weaving you need to add another one. It is placed between the other branches in the last circle.
Making the base
4. Having weaved the base of the intended size, you need to start creating the walls. You should choose medium-sized rods. They are attached to the bottom of the basket - into the weaving itself. The bases of the walls are bent to a right angle, and the tops are tied. The bent ends are inserted into the bottom of the basket and begin to braid them. You should take three twigs. With the thin side they are inserted into the holes next to the main rods - one per rack.
Related article: Floor vase - spectacular DIY decor (+50 photos)
5. You should weave a “braid” and repeat the pattern of the base. It should be shaped like a diamond, and it will go around each vertical rod. In this technique, 2-3 rows are performed. Such actions allow you to create the basis of the form.
Making a frame for the walls
6. It’s time to start weaving a common “fabric”. In this case, the method of inserting the vine behind one stand and bringing it out in front of the other is used. When the desired height of the basket is reached, the vertical branches are cut and their ends are hidden in the weaving.
We weave the walls
The wicker basket is ready. All that remains is to make the handle. First, you should measure the length for the handle and choose a thick branch. It is bent and given the shape that will suit the basket. The ends of the rod are sharpened and inserted into the walls of the product. 6 thinner rods should be placed next to the handle. They bend around the main branch, which allows it to be firmly secured in the weaving. To prevent small branches from moving, they are secured with tape. The “tails” of the rods should be hidden in the walls of the basket.
Making a handle
To start using the basket to its full potential, you need to let it dry. This will take several days. This simple method is used by most beginning craftsmen. In the future, it is recommended to develop your weaving skills and create more complex designs. Not only baskets are in demand, but also furniture and decorative elements made from wicker.
Weaving instructions (2 videos)
Options for ready-made baskets (38 photos)
The best posts
- DIY winter headband
- Carpet for a classic style bedroom: shape, texture, color - how to choose?
- Classic Blue: Pantone Color of the Year 2021 in the Modern Kitchen
- Applications for children made from paper and autumn leaves: photos and videos
- Crafts from polystyrene foam for the dacha: we make figures from polystyrene foam with our own hands (30 photos)
- Knitted women's sleeveless vests: patterns and description of work for obese women with photos and videos
- Application for the little ones: templates and pictures with photos and videos
- Which warm floor is better for tiles: reviews from experts
Related article: How to make a decorative cage with your own hands (2 master classes)
Wicker paper basket
If you are into photography or just love beautiful home decor, then we suggest making a stylish basket with handles right now.
We will need:
- kraft paper;
- scissors;
- thick cardboard;
- wooden skewer;
- nuts, screws and washers;
- paper glue;
- leather belt;
- acrylic lacquer;
- marker;
- drill or awl.
We cut the paper into several identical parts and begin to twist the tubes, as shown in the photo.
Place a piece of cardboard on the work surface and glue the tubes to it, as in the photo. For greater reliability, we fix them with tape.
Glue another piece of cardboard of the same size on top.
We bend one tube in half and wrap it around the vertical tube. Cross the ends and wrap the next tube. We continue to weave until the horizontal tubes run out.
We cut the tubes, tuck the ends and fix them with glue.
Cover the basket with acrylic varnish and leave it to dry for several hours.
Cut off the part with the holes and the buckle from the belt. After this, cut the belt section in half.
On the wrong side we make marks for the screws.
We make holes according to the marks using an awl or drill.
Place a washer on top and screw in the screws with a screwdriver.
We attach handles on both sides to the outside of the basket.
A beautiful, stylish basket is ready!
Fabric basket: step-by-step master class
An attractive laundry basket or toy storage basket can be hard to find. They are often shapeless or plastic. And this, you see, does not look very nice in a modern room. Therefore, we suggest making a simple, but at the same time original version with your own hands.
We will prepare the following materials:
- linen;
- metal grid;
- cardboard;
- pencil;
- sewing machine;
- needles;
- wire cutters;
- pliers;
- a thread;
- wire;
- scissors.
We prepare a metal mesh of the required size and cut off the excess with wire cutters. This will be the basis for the basket. We connect the edges of the mesh, as in the photo.
Cut the linen to the required size and fold it right side inward. We sew the workpiece on a sewing machine.
Cut out a circle of linen that will be used as the bottom of the basket.
We fold the blanks with their front sides facing each other and sew them together using a typewriter.
We put the cover on the mesh and bend the top edge.
We cut linen of a different color, sew the edges together and put it on the basket, as shown in the photo. If desired, you can use additional decor in the form of braid or lace. The original, modern storage basket is ready.
DIY paper basket
During the work you will need the following:
- wrapping;
- sewing machine;
- paper clips;
- paper glue;
- scissors;
- glue gun;
- threads
We cut the paper into eight equal parts. We alternately fold each of them two or three times and stitch it on both sides using a sewing machine.
We weave the strips together, as shown in the photo. This will be the bottom of the future basket.
For reliability, we fix them with a glue gun.
We begin to form the walls of the basket. To do this, we weave a new strip of paper and secure it with paper clips.
Gradually weave other strips and continue until the basket is of sufficient height.
Carefully bend the strips at the same level.
A rather unusual, beautiful basket for storing necessary things is ready.
In fact, such a product can even be used in the kitchen. For example, store fruits or berries in a basket. It looks very beautiful.
Paper basket
Necessary materials:
- lots of wrapping paper
- glue
- paper clips
- sewing machine.
Fold the sheet of paper several times if it is thin enough. We cut off the remaining part, which can be used for other parts. We form eight stripes 5-7 cm wide.
We sew each strip on both sides.
We weave the bottom of the basket in the shape of a square. As a result, it should look like in the photo.
We fix the corners with glue.
We form the walls of the basket and weave a new strip. We fasten them with paper clips so that the product holds its shape.
When the first circle of strips is closed, fasten the ends with glue. We weave new strips and continue to form the walls.
We bend the strips when the desired height is reached.
DIY basket in the interior
Despite the popularity of baskets, many still have no idea how they can be used in a modern interior. Nevertheless, it looks really beautiful, so we made a small selection of photos.
The process of creating a basket is very labor-intensive and therefore takes a lot of time. However, the result is worth it, because this is the only way to make products that are ideal in shape and size with your own hands.
Have you tried making baskets or do you prefer to buy them in specialized stores?
Holiday basket
Very soon Orthodox Christians all over the world will celebrate the holiday of Easter and you can make a basket from straws or any material as a gift.
Cardboard is excellent as the main material, but the choice may fall on any other material with which it will be convenient and interesting for you to work.
Note!
- How to make a photo album using scrapbooking technique? Unconventional DIY album design ideas. 80 Photos of Original Photo Album Ideas to Capture Life
How to make a hat - original models, advice from craftsmen, instructions and examples of making hats (105 photos)
How to make a chest - a step-by-step master class on how to build various types of chests with your own hands (120 photos)
Thanks to various video tutorials that are available on the Internet and step-by-step instructions with photographs, everyone has the opportunity to create a real masterpiece with their own hands.
With a little time and effort, your loved ones will thank you for the attention you paid to them for a long time, receiving a basket as a gift.