Selection of yarn and hook
The stores offer a huge range of different yarns.
Without a clear plan, it is simply impossible to buy your own option. Before you rush to the store for the next portion of balls, you should contact the chosen model. What thickness of thread is needed for a hat? It is possible that the name of the threads with which the work should be done was also indicated for the model. If you are going to knit a hat for the winter, then it is better to look at yarn with a high wool content.
The thread should be thick, despite the fact that the fabric crocheted will be much thicker than with knitting. But for those who find it difficult to choose suitable colors and make, for example, color transitions in fashion, a small cheat sheet will be useful. A special color combination scheme for any knitted product.
Color combination table
The last thing to choose is the hook - a wonderful tool that once made knitting much faster. Now all that remains is to choose its number for the yarn. As for the handle, color and other subtleties, this is rather a matter of taste, and, perhaps, the whim of the master.
How to find out your hat size?
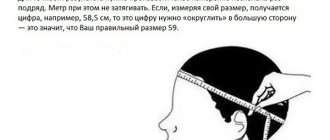
Measuring your head is easy, but just in which direction should you measure in order to knit the hat. In fact, only two measurements are required - head circumference and depth. We simply measure with a centimeter tape, as babies’ heads are measured in childhood (along the forehead and along the line of the back of the head, but strictly parallel to the floor). The first size is ready.
The second is from the right earlobe to the left earlobe or vice versa. This measurement is needed in order to know what length the hat should be.
The Kubanka model does not require much addition, since it is barrel-shaped and fits snugly to the head. You can check how correctly you measured using the table.
For example, if you have measured the circumference but are unsure about the depth, there is a table to help.
Hat Size Chart
We measure the child
Children's sizes are taken in the same way as adults:
- Height We ask the child to take off his shoes and lean his back against the wall. We make a mark at the highest point of the head. We measure the distance from the floor to the mark.
- Chest, waist and hips. We use a measuring tape to wrap around our model along lines 2, 3 and 4, marked in the figure below.
- The length of the sleeve. From the top of the shoulder to the first knuckle of the thumb. The arm should be slightly bent at the elbow, as in the figure.
- Inseam length. This is the distance from the ankle to the middle seam of the trousers.
Additionally: A detailed grid of the child’s height and age is here.
The sizes of children's clothing are recorded in centimeters; we have given the correspondence tables for them above.
Important! When taking measurements around the circumference of the waist, hips and chest, do not tighten the measuring tape too tightly or allow it to sag. We only achieve a tight fit and horizontal position relative to the floor
Step-by-step instructions for crocheting a kubanka
Beginners always make their first models according to the instructions. Materials and descriptions are collected very clearly and accurately for each model. The shape of the kubanka is very similar to a barrel.
It has practically two parts:
- The first is an elastic band and a base (equal in diameter).
- The second flat cap is the crown of the cap. This shape is obtained due to the sharp decrease in loops along the top of the head. A flat crown and a very sharp transition from the base make this model stand out from numerous hats.
- The most interesting thing is that you can knit it from the top to the top. You can even knit two elements separately (top crown and base) and simply sew them together.
Important! The sharp transition and border between the crown and the base of the hat makes single crochets knitted behind the back wall or the last row of the bottom to make a “crawfish step” .
How to make the first loops on a hook? For newbies:
Set of crochet loops
How to crochet?
First crochet chain
Popcorn pattern
This Kubanka can compete for the title of the best model of this category on the social network. The highlight of the lovely raised pattern is the popcorn pattern.
Very common for blankets and scarves with sweaters . Due to the height of each grain of the pattern, knitting is quick.
To work you will need:
- yarn 150 m/100 g thick;
- hook No. 5.
Scheme 1 for Kubanka
The model consists of a bottom and a crown; work begins from the crown . Let's look at the stages of work step by step. A flat bottom is made according to the diagram. Everything is very simple, the rows with additions are visible.
The whole pattern consists of circles of double crochets. Each row is lifted using three air loops. The seam turns out to be invisible. For a size of 58 cm, you need to knit 18 cm in diameter of such a bottom. It turned out to be approximately 6 rows.
After completing the bottom, you need to knit one row with the “crawfish step ” pattern. This way the hat will have a nice and noticeable border.
Scheme "crawfish step"
Now move on to the crown. The crown is knitted with a popcorn pattern. The diagram below corresponds to the pattern.
Popcorn pattern diagram
The height of the crown according to the popcorn pattern should be about 12 cm. Next, there is a border again and it will help create the “crawfish step” pattern.
The model is ready. You can try it on. If desired, you can decorate the product with a spectacular brooch.
Volumetric pattern
A lovely model with a pattern across the canvas makes the model more feminine, and delicate colors add to its charm. This model is suitable for both girls and fashionistas.
To work you will need:
- pink yarn 200 g;
- hook number 4.
The pattern for knitting the top circle can be taken from the previous model or knitted a little more difficult (pattern below).
Scheme for the “bottom” of the Kubanka
The fabric of the cap is made almost entirely with single crochets. Knitting them is simple and you can quickly get a new hat. First you need to knit the bottom of the hat. We knit according to the given pattern from the center.
For a size of 58 cm, you need to knit a diameter of 18 cm according to the pattern. Then switch to rows without additions or decreases - this is the crown of the hat. It accounts for approximately 12 cm, but you can add it at your discretion. In order for the product to be closer to the head, you need to make two rows in the lower third of the crown with decreases of 8 loops.
Designations: sbn (single crochet), 2 ch. (2 air loops).
For the finished product, you need to make three rows with cones on top using the following technology:
- two air loops for lifting;
- half double crochet over the next stitch of the bottom row;
- *two air loops;
- tie a lush column of 7 loops into the gap between the lifting loops and the half double crochet;
- half double crochet through two loops (into the third). Repeat from * (with a slight difference, the lush columns will now not be in the gap, but around the half double crochet).
Star pattern
An elegant hat for more mature women. It looks very neat and it is very difficult to distinguish it from a factory product. Unless there is a label. The combination of dark gray and white yarn emphasizes the important elements of the Kubanka hat - its sides and lovely “stars”.
Gray and white kubanka with a star pattern
To work you will need:
- white and gray yarn;
- hook number 6.
Scheme 3 for Kubanka
The hat is knitted according to the patterns from the top of the head. First you need to knit the beginning of the center of the pattern. Then gradually expand. The entire fabric consists of single crochets. Knit and measure with a ruler. You should get a circle with a diameter of 18 cm.
The bottom is connected and then we move on to the crown or base of the cap. To do this, whatever circle the pattern stops on, knit without decreasing or increasing. You need to knit 14 cm. Finish the fabric. For a tighter fit, you can decrease 6 stitches twice in the last rows.
The base of the hat is ready and then you can move on to the decorations. Everything that is white on top is decoration and the “stars” are knitted separately. Then they are sewn on. The strips of white yarn are simply single crochets that go behind the stitches of the fabric.
“Stars”: knit a strip according to the pattern from the diagram; it contains lush columns, from which such attractive elements are made.
Just like the single crochets used to make the border, you need to create a pattern with lush columns along the top border of the cap. Clinging to the loops of the fabric, you need to make an even row in lush columns. The hat is ready and you can admire the finished product.
Crochet hats.
Crochet hats. Part 1 Crochet | Category: patterns and diagrams
Knitting hats
crochet, we'll tell you the general principles. With this material you can knit a hat of any shape yourself. The easiest way to start crocheting hats is from the top of the head. To determine your hat size, measure your head circumference. To do this, run the measuring tape horizontally along the forehead above the forehead and the back of the head. Pull the tape tight. We start knitting a hat from the top of the head. First we knit a circle.
Ways to knit a flat circle:
1. Circle of single crochets (SC). If the circle is knitted with RLS, then knitting begins with 3 VPs. Then 6 sc are knitted into the last loop from the hook. Next, knitting goes in a circle in a spiral with the addition of 6 sc in each row. Sehma 1.
2. Circle with strong columns. How to knit strong columns, see the section “Pattern and patterns“. Knitting begins with 4 VPs, which are closed in a circle with a half-column. Make 2 VP for lifting and knit, attaching 7 more strong columns inside the VP ring - together with the lifting loops you get 8 strong columns. Close the row with a half-column and make lifting loops again. Next they knit, adding 8 strong stitches in each row.
3. Circle of double crochets (C1H). Knitting begins with 5 VPs, which are closed in a circle with a half-column. Make 3 VP for lifting and knit, attaching another 11 C1H inside the VP ring - together with the lifting loops you get 12 C1H. Close the row with a half-column and make lifting loops again. Next, knit, adding 12 C1H in each row. Scheme 2.
Methods for making increases when crocheting hats.
Knitting can be mentally divided into wedges according to the number of columns of the first row. That is, for RLS it is 6 wedges, for strong posts it is 8 wedges, and for C1H it is 12 wedges. Increases can be made in several ways, which will give different shapes to the bottom. If we perform increments on top of each other, then a visible angle will be formed in this place and instead of a circle we will get a polygon. But for the cap, this will sometimes provide additional opportunities.
1. The increase is always performed on the last column of the wedge. In this case, you will get symmetrical wedges with a noticeable line of increases between them.
2. The increase is always performed on the first column of the wedge. The result will be symmetrical wedges, slightly curved to the right, with a noticeable line of increases between them.
3. Increases are made in each wedge so that they are not located on top of each other. The easiest way to move increases is to knit 2 stitches per stitch immediately after the increase in the previous row. In this case, you will get a flat circle without visible corners.
We have many hat knitting patterns on our website:
For example, Knitting a hat for a girl or all these articles are combined under the tag Knitting hats
Crochet hats. Part 2 Crochet | Category: patterns and diagrams
There are several fairly common forms of hats: a beret, a cap like a fez or skullcap, a round cap, and an elongated cap.
How to knit a beret.
From the point of view of creating a form, this is the simplest job. First, a circle is knitted, the diameter of which is approximately 27-35 cm. This value depends on what shape you want to give the beret, as well as on fashion. After this, the straight part of the beret is knitted with a height from the 1st row to 5 cm. The shape of the beret also greatly depends on the height of the straight part. When the beret is placed on the head, the flat part will create folds and volume along the fold. The larger the flat part of the beret, the greater its volume. After the flat part, the lower part is knitted, on which decreases are knitted instead of increases. The end of the work is determined by fitting. The beret should fit tightly on the head.
A cap like a fez or skullcap.
For such a hat, a circle is knitted with the traditional number of increases. Unlike a beret, the diameter of this circle is determined by the size of the cap. First of all, having taken a measurement of the head circumference, find the radius of this circle, remembering the formula: circumference = 2/Pi*R. Then, with a cap size of 56, the diameter of the circle can be 16-17 cm, taking into account the stretching of the knitwear. That is, when knitting the simplest hat such as a fez or skullcap, you need to knit an initial circle with a diameter of 17 cm. Then move on to knitting the even part of the hat without increases. The height of this part is usually determined by fitting, on average about 12-14 cm.
Round cap hat.
To obtain a rounded bottom, the diameter of the initial circle is taken smaller, that is, 10-12 cm. Then, in order to get a cap of the desired size, you will have to knit several rows that will round the bottom. When knitting a circle, add 6 sc in each row (when knitting C1H - 12 C1H), and when knitting the transition part, you can either evenly add 3 sc in each row (6 C1H), or alternate rows without additions and rows with 6 additions (for C1H 12 additions). By knitting several such rows, you can see that the cap begins to take the desired shape. If you fold the knitting in half and measure the edge of the cap, you can get the size of the cap. Along the edge, the length of such a folded form should be approximately 27 cm (2 cm should be left for stretching the knitwear). Next, knitting will go in a circle without increments exactly to the height needed for this model (12-14 cm).
The cap is an elongated cap.
This cap shape can be obtained in two ways. You can associate the circle with the traditional number of increases in each row: for RLS it is 6 increases, for C1H it is 12 increases. The diameter of this circle needs to be taken smaller, that is, 6-9 cm. Then, to obtain the desired size of the cap, you will have to knit a larger number of rows for rounding. To do this, you can alternate rows with and without increases, or take half the number of increases in each row.
With the second knitting method, you can knit in a circle, making fewer increments in each row from the very beginning of knitting. For RLS this is 5 increases, and for C1H - 10 increases in each row. So, making increases in each row, knit the hat to the desired size. In this case, the shape of the bottom appears to be predetermined from the very beginning and, unlike the previous method, it is difficult to change it.
Source: Fashion magazine.
Techniques for crocheting hats Crochet | Category: patterns and diagrams
Knowing the basic techniques of knitting hats, you can create your own model, unlike others.
For crocheting hats, the circle knitting pattern is often used. For sc (single crochet) - pattern 1, for dc (dc) - pattern 2.
Knitting a hat is divided into 3 stages: the bottom, the rounded part, the straight part (Fig. 1). The bottom is knitted with increases in each row: for sc - 6 increases, for dc - 12 increases. Transitional part - alternating a row without increases, a row with increases. The straight part is knitted evenly, its height is easier to determine by fitting. The larger the diameter of the bottom, the more rounded the shape of the cap. For a hat - kubanka, the largest diameter of the bottom is 18-19 cm, the transition part does not fit. The bottom of the cap can be tied in a “crawfish step” to make it more rigid.
Ways to perform the “crawfish step.”
1. Finishing and working threads are of the same thickness. Single crochets are performed on each stitch of the previous row. 2. Finishing and working threads of the same thickness. Single crochet stitches are performed on every second stitch of the previous row with an intermediate chain stitch. 3. The finishing thread is twice as thick as the working thread. Single crochets are performed on every second stitch of the previous row. According to the technique of execution, “crawfish step”, “crawfish move”, “crawfish loop”, “crawfish” is a single crochet stitch made in the opposite direction, i.e. not from right to left, but from left to right. Before performing any type of binding, it is advisable to perform a preparatory row to align the edge of the product. To level the edge, use yarn of the same thickness as the main yarn or thicker. Knit a chain of half-loops as close to the edge as possible (as if making a braid through the fabric). At the end of the row, close it into a ring. Make one chain stitch for lifting and knit the next row of any pattern or “crawfish step”, inserting the hook into the middle of the half-loop of the previous row.
Source: Fashion magazine.
Interesting schemes for Kubanka
Kubanka with flowers
Kubanka with braids
White kubanka with double braids
The Kubanka cap is not such a rare item. Both women and girls wear it with pleasure. Lovely models with descriptions will definitely not leave any master indifferent. We gain useful experience, schemes and try to make the models we like before the cold weather sets in. Charming ideas that will decorate and warm a lady.
Simple knitting pattern for a hat
This is the most optimal option for crocheting a Kubanka hat, as it is simple and can be learned very quickly. For this headdress you need approximately 100 grams of yarn and a hook number 4. The main size range for such hats is from 55 to 58.
Before looking at diagrams on how to crochet a kubanka, you need to remember that such a hat is created from a bottom and a crown. A good kubanka requires a large pattern and the use of not very thick yarn.
Why count yarn consumption?
It’s very good if you knit a pattern from some source - from a magazine, for example. There is practically nothing to calculate. Everything has already been indicated: the number of yarn, the number of knitting needles or hook, and the number of threads, and what size the sample should be. However, standard sizes for women are almost never found in nature: some have longer or shorter arms, some have higher chests, some have a long waist. Just as seamstresses adjust patterns, knitters sometimes have to adjust the yarn consumption when knitting and crocheting.
This is without mentioning those cases when you knit something “out of your head”. Here you really can’t do without calculation.
Kubanka using a hook
Craftsmen can use both knitting needles and crochet hooks. A rather interesting and high-quality method of knitting a kubanka is implemented using the following steps:
- Three air loops are knitted through a hook, eight columns without casting;
- The bottom is knitted in the round with increases. Each row has two columns, resulting in a diameter of 18 centimeters;
- Next comes knitting without increasing downwards by 14 centimeters;
- After which the cones are knitted. Here a half double crochet and two chain stitches are knitted. They should be thrown into the previous row and secured. After which a lush column is made, and the third loop is knitted with a half double crochet. Everything is repeated until the desired pattern is obtained;
- The final stage is the creation of single crochets with loops crossing into previous rows. Next, rows without a crochet and a cone are created again.
This is a standard crochet pattern. At the same time, adjustments and making your own edits are allowed to improve the knitting process. However, for those who are knitting a kubanka for the first time, these instructions are thorough. On its basis, in the future we create our own versions of hats according to certain patterns.
Diamond pattern model
A hat with a diamond pattern looks attractive. It is ideal for late autumn or winter when choosing thick yarn. You can crochet a men's hat by combining several common techniques:
- Single crochet stitch.
- Half double crochet.
- Convex column.
In this case, 100% polyacrylic threads are used, to which hook No. 5 is suitable. For the hat, you will need a skein weighing 150 grams. Instructions for knitting a men's hat with a diamond pattern are as follows:
You can avoid an unsightly gap in the first row by creating a magic ring. After this, two air loops are created that replace the first column.- Each row begins with two air loops. It is recommended to knit them under the columns of the previous row, which eliminates the possibility of distortion of the created pattern.
- 7 double crochets are knitted. After this, the magic ring is tightened, and the knitting ends with a connecting loop.
- The second row is represented by two convex columns, the third is created according to the same pattern.
- After creating the third row, knitting is carried out by creating two and one convex column.
- Knitting is carried out to the desired diameter, after which the work is carried out without increments.
- The last rows of the product are knitted with an elastic band. Due to this, it retains its shape for a long period.
Quick knitting of a headdress
Sometimes you need to quickly create a header. Then instructions for quickly knitting a hat will help. Here you will need 250 m of yarn and a hook number 4.5. It is recommended to knit with a thread that is folded in half . The quick crochet pattern is as follows:
- 10 single crochet columns are made, a lush column needs to be knitted into each one;
- Columns without a cape are knitted into an aerial plan loop;
- Columns with overlays and increases;
- Lush columnar created in the bottom row;
- The ring accommodates an air loop and is knitted without a cape;
- Next comes a combination of various combinations involving columns and braids;
- The final stage will be knitting with a lobster step.
The resulting headdress must be moistened and dried. The result is a beautiful and stylish kubanka, which will be warm even in the coldest winter. Those around you will appreciate the Kubanka you created with your own hands.
We looked at the main points related to knitting a Kubanka winter hat.
Despite the fact that initially such a headdress seems difficult to create, it can be created relatively quickly .
The most important point is the selection of yarn and tools in the form of hooks and knitting needles. If you are knitting such a hat for the first time, then it is best to follow the existing instructions. This results in a high-quality and reliable headdress that can be worn with any clothing and stored in the most convenient place without any problems. You should choose knitting courses that describe in detail and step by step the process of creating a Kubanka hat for the winter season. Working with master classes makes it possible to create your own versions of hats in the future!
Crochet kubanka hat: description with diagrams and video
This model of hat will serve as an excellent attribute for your winter look. She is very feminine and extraordinary. In this lesson we will tell you how to crochet a kubanka hat (the description will be below) using a minimum of materials.
Fast and easy
To make a quality product, you only need a hook and wool yarn.
Let's start our headdress by knitting the bottom using double crochets. In this lesson, all calculations are indicated taking into account the guideline for size 56.
1st to 6th row - knit double crochets. 7th row - knit with single crochets. Row 8 - make one puffy stitch and 1 double crochet, repeat until the end of the row. Row 9 - knit the entire row with single crochets. Row 10 - make one puffy stitch and 1 double crochet, repeat until the end of the row. 11th row - knit single crochets. Row 12 - make 1 puffy stitch and 1 double crochet, repeat until the end.
13th row - knit a row with single crochets. Row 14 - make 2 double crochets, 1 double crochet and repeat until the end of the row. Row 15 - knit single crochets. Row 16 - make 5 double crochets, 1 double crochet and repeat until the end of the row. Rows 17 and 18 - make 2 single crochets and 1 raised stitch. Row 19 - repeat the pattern.
For lovers of the classics
For this master class we will need: soft blue wool yarn, a pattern and a hook. To make the product dense and warmer, fold the thread in half.
1st row - knit 10 single crochets and connect them into a ring. 2nd row - knit into the column of the bottom row using a fluffy column consisting of three loops (do not forget to make 1 air loop between them, in total you should get 10 columns). 3rd row - knit one single crochet into the top of the fluffy stitch, then 2 single crochets into the arch of 1 chain stitch, 2nd row. Row 4: Increase every two stitches, double crochet. 5th row - in the columns of the bottom row, knit a lush column consisting of three yarn overs and 1 loop in the middle.
6th row - knit into an arch from one air loop, 1 single crochet. Row 7: Double crochet and increase every 4 stitches. Row 8 - knit. Rows 9-10 - knit the finished single crochets and increase every fifth stitch. The bottom of the product is ready. Row 11 - knit two single crochets into an arch of 2 chain stitches. Row 12: Work 1 double crochet and 1 knit double crochet. Rows 13 to 19 - repeat the pattern in a checkerboard pattern. Row 20: Single crochet. Row 21 - knit two single crochets into an arch of 2 chain stitches. Row 22 - knit with single crochets and 2 single crochets in an arch of two chain stitches. 23rd row - knit single crochets. Row 24 - at this stage the hat is ready, all that remains is to make the piping with the “crawfish step” pattern.
The peculiarity of this pattern is that it is knitted from left to right. Insert the hook away from you under both loops of the previous row. Grab the working thread with your hook and pull it out, so you have two loops on your hook. Yarn over the hook and knit all the loops in one step. Repeat this five times.
Crochet women's hat in 3 hours
A master class on knitting a simple hat was prepared by Elizaveta Dranichnikova.
Necessary materials:
1. Yarn (acrylic or wool) – 1 skein (100g/150m). 2. Hook No. 3. 3. Pompom (can be taken from any old hat).
Loops used for the pattern: - air loop; - single crochet; - half double crochet; - connecting loop.
So, take some yarn. If your yarn is too thin (such as acrylic), then it is better to knit in two threads. It all depends on what season you will wear the hat: spring or winter. Now we will knit an elastic band. Crochet a chain of 12 chain stitches.
Now we make one air loop for lifting and knit a row with single crochets behind the back wall. Having knitted a row, we turn the product over and again pick up one air loop for lifting and also knit with single crochets behind the back wall.
We continue knitting until the length of the elastic is exactly the same as the circumference of your head. I got about 62 rows.
Next, fold the elastic in half and connect the edges of the elastic. We knit them together with connecting loops.
After the edges of the elastic are connected, we knit 1 row along the entire length of the circumference with single crochets. It turns out one loop in one row. When the row is completed, we begin the next one by making one air loop for lifting. We begin to knit the main pattern. In the second loop of the previous row we knit a single crochet, then two air loops and again a single crochet in the same loop. Next, we skip one stitch of the previous row and knit into the next loop in exactly the same way: single crochet, two chain loops, single crochet….. In the second row we continue knitting according to the main pattern, only now we knit double stitches under two chain loops of the previous row.
• DO NOT FORGET TO DO 2 CHAIN LOOPES AT THE BEGINNING OF THE ROW FOR LIFTING.
Using this pattern we knit the main height of the hat (this is approximately 15 rows of the main pattern).
In the 16th row we begin to decrease: to do this, again cast on two air loops for lifting at the beginning of the row. Then we continue knitting in the same way as the previous rows, only now we make one air loop between the stitches instead of two. That is: we skip one loop, in the next 1 single crochet, 1 air loop, 1 single crochet. We knit the 17th row exactly like 16th.
In the 18th and 19th rows we continue decreasing. Exactly the same pattern, only without any air loops between the columns.
Row 20: knit with single crochets through one loop: single crochet, skip a loop and again single crochet in the next one. Row 21: same as row 20. Row 22: decrease in every 6 stitches. We knit 5 single crochet stitches, from the sixth stitch we simply pull out a loop without knitting. We knit it in the seventh column. Row 23: similar to row 22, only decrease through 4 stitches. Row 24: Decrease through 3 stitches. Row 25: Decrease through 2 stitches.
Tighten the crown with a connecting loop.
Sew on the pompom. Unscrew the rubber band.
Our women's hat is ready!
Summer option
This headdress model is best knitted with cotton thread. Cast on five air loops and connect them into a ring. Work 10 single crochets in a circle and distribute evenly. To achieve the spiral effect, you need to make a smooth transition, this is achieved by evenly increasing the loops. Knit the next rows using an increase in loops, knit 2 loops in the first column of the previous row. Now knit 5 stitches and make another increase.
The most important thing is to remember that the further you move away from the center of the product, the larger the gaps should be between them, watch the edges of the product.
If you can’t get an even line along the edges, it means that you are adding stitches too sharply. When the diameter reaches 10 centimeters, we begin to reduce the number of loops. Reduce each subsequent row by 4 loops; to do this, knit two stitches together (in one loop). Be sure to keep in mind that you should have no more than five rows with decreases. In order to knit the crown, make the fabric without adding or subtracting in a circle. Our hat is ready!
There are a lot of variations of these hats. Try experimenting with color. For example, you can knit one row in one color, the next in another, then in a third. As a result, you will get a colorful hat that will acquire texture and expressiveness. You can also use color to frame patterns on the hat or get creative with stripes.
Length of the product
In this case, we will do without complex numbers. Mathematics for third grade. The head circumference just needs to be divided by three. If we have a skull cap that barely reaches our ears, we don’t make any increases at all. If the hat reaches the middle of the ear, add 1.5-2 cm; if the ears need to be completely covered, then the increase will be 3 cm.
This is practical mathematics. Experience has shown that the calculation turned out to be correct. At least my customers were satisfied. I hope the advice will help you too. Happy winterizing!
Tags: clothing, useful tips, size, knitting, needlework
Knitting pattern
Kubanka hats consist of a flat bottom and a main part, which when unfolded is a flat rectangular canvas.
They can be knitted either in the round or in reverse rows. Most often, work starts from the bottom, although you can also move from the center of the top part. The bottom does not have to be in the shape of a flat disk; you can make it somewhat convex.
As for the main part of the hat, it is knitted either in the usual way, longitudinally, or in the form of a transverse strip, which is then sewn at the back, closed into a ring, and the loops for the bottom are taken from its side edge. This variability allows you to create completely different hats using the same knitting.
For work, wool or combined yarn is used. It can be plain, melange, with a gradient, smooth, fluffy, imitating fur or creating relief. The knitting needles are selected to match the thickness of the selected threads. They will be stocking or circular - it depends on the personal preferences of the craftswoman.
Cross stitch patterns
To knit the main part of the kubanka, as a rule, patterns with all kinds of strands are used. But you can also knit using satin stitch, garter stitch or a small flat pattern. This approach is used when the yarn itself creates a relief or it is obtained through subsequent finishing, as well as when knitting the bottom of a hat.
Braids, braids, broaches and other elements of the pattern can be arranged in parallel columns. This is what happens when knitting a product from the bottom. Or they are knitted crosswise, then they go around the hat in a circle. This is achieved by side knitting, when a strip is knitted equal in length to the circumference of the head. In this case, the height of the main part of the cap is the width of the working blade.
You can often find kubankas made with the “Rhombus” pattern, in which the relief is created by crossing the loops. It is knitted according to this pattern:
- 1st r. - purl 5, transfer 3 loops to a spare needle and leave them behind the work, knit 2, knit 3 loops from a spare needle, purl 5;
- 2nd row, like every odd row - according to the drawing;
- 3rd r. - 4 purl, cross stitches to the right, which is performed like this: leave 1 stitch at work, knit the next 2 stitches, knit the loop left unknitted, then knit 1 knit stitch and cross to the left (2 stitches, remove to a spare needle and leave before work, knit 1, knit 2 stitches from an additional needle), purl 4;
- 5th r. - purl 3, cross stitches to the right, knit, purl, knit, cross stitches to the left, purl 3;
- 7th r. - 2 purl, cross to the right, 1 knit, purl, 1 knit, 1 purl, 1 knit, cross to the left, 2 purl;
- 9th r. - purl, crossing to the right, 7 loops, alternating knit and purl one at a time (start and end with a knit stitch), crossing to the left, 1 purl;
- 11th r. - 1 purl, cross to the left, knit 1 purl and 1 knit three times, alternating them, then make 1 purl, cross to the right, 1 purl;
- 13th r. - 2 nights, crossing to the left, knit 1 purl twice. and knit 1, and then purl 1, crossing to the right, purl 2;
- 15th r. - purl 3, cross to the left, purl 1, knit 1, purl 1, cross to the right, purl 3;
- 17th r. - purl 4, cross stitches to the left, purl, cross right, purl 4;
- 19th r. - repeats the first one.
For the height of the kubanka, one such diamond will not be enough, so it is better to start knitting from the thirteenth or fifteenth row. Having reached the 18th, you need to knit the pattern completely from the first to the 20th rows, and then repeat from the third to the fifth or seventh row. To accurately determine repetitions, you need to knit a sample to the height of one diamond and compare it with the required height of the cap. The missing rows can be knitted with some other knitting stitch. It can only go on top or be repeated in rows before and after the diamond.
The Diagonal Stripes pattern also uses crisscrossing patterns. Each such element involves 6 loops, the first 3 of which must be removed and left before work, knitting the next 3 stitches with knit stitches, and then knitting the previously removed 3 stitches . Pattern diagram:
- 1st r. — 36 facial;
- 2nd r., like all other even ones - purl;
- 3rd r. - 6 loops with a cross, as described above, 6 knit;
- 5th r. - knit 3 at the beginning, the rest of the row is knitted, alternating a cross of 6 loops and knit 6, the last 3 stitches are knitted;
- 7th r. — 6 knits, 6 knits with crossing;
- 9th r. - 9 knits, the remaining stitches are worked out, sequentially performing 6 stitches with a cross and 6 simple knit stitches, 9 stitches are knitted at the end;
- 11th r. - repeats the third row, etc.
This motif is more suitable for side knitting of a hat. The 36 loops indicated in the diagram are not enough in height. The missing part is compensated by knitting the rim. It can be done in garter stitch or in a small pattern like rice.
Elastic band with entwined loops
The fabric can be quite textured even without crisscrossing if you use thick yarn and a pattern with entwined loops. Its basis is a simple 1 by 1 elastic band. You need to wrap the working thread around a group of 3 loops twice. The entwined elements are arranged in a checkerboard pattern.
To complete the entwining, you must first knit the loops according to the pattern and transfer the working thread to the front side of the fabric. After this, you should throw 3 knitted loops onto the left knitting needle, stretch the working thread in front of them and place it behind the work. Now the same 3 loops are again transferred to the right knitting needle, and the thread is again placed before knitting. It turned out to be one turn. In the same way, these 3 loops need to be wrapped with thread again, but left behind the work.
This knitting is very simple, you just need to master the entwining technique. The pattern is made according to this principle:
- 1st r. - 1 knit, 1 purl;
- 2nd r. and each even number - according to the drawing;
- 3rd r. - k1, purl 1, the next 3 stitches are knitted according to the pattern, then wrapped twice with thread, purl 1, the twisted element is performed again;
- 5th r. - entwined element, purl;
- 7th r. - repeats the third row.
Step-by-step instruction
A knitted hat for women with the description given below is designed for size 56. For knitting you will need 100 g of wool in two threads. Work order:
- We knit two samples - one with an elastic band, the second with a main knitting stitch. We calculate the number of loops for casting on according to the first of them. We also determine the difference in the density of the patterns.
- On circular needles No. 4 we cast on 105 stitches plus one additional stitch, which we extend into the first stitch, closing the circle.
- We knit 6 rows of simple elastic, alternating purls with knits.
- Let's move on to the main pattern. If it tightens the knitting, we select the required number of loops, focusing on the knitted sample. We knit the fabric to a height of 14 cm (including elastic).
- Now you need to make a roller that will fix the shape of the kubanka. To do this, we knit 8 rows of stitch stitches and bend this section in half lengthwise. The wrong side should be inside. Our goal is to connect the first and last rows of satin stitch. To do this, from the lowest row of the future roller, pick up a longitudinal broach, forming a purl loop, and put it on the left knitting needle. Now you need to knit this raised stitch and the first stitch from the current row together. Then we lift the next loop from the bottom and again perform knit 2 together and so on for the entire row.
- If this method of obtaining a roller turns out to be too problematic, you can knit 2 more rows with knit stitches, and hem the roller with a needle, stepping back from the open stitches 2 rows down, so that later it will be convenient to continue knitting. It is not recommended to leave this work for later to avoid tightening the fabric.
- If the roller was made with knitting needles, after it you should knit 2 rows with facial stitches. Then you can move on to forming the bottom.
- We will make cuts through the row. We divide all the loops into 7 identical parts, 15 stitches in each. At the beginning of each part we knit two knit stitches together. We knit the remaining 13 stitches in stockinette stitch. Then we perform the reduction again, etc. For 1 round, the number of loops will decrease by 7 pcs. and 98 stitches will remain in work. The new round is performed without decreases. In the next one, we again cut one loop at the beginning of each of the 7 parts. We do this until there are only 14 loops left.
- We cut off the working thread and thread its edge into the needle. We transfer the open loops to the needle, stretch the thread, fasten it tightly and hide the tail.
Crochet Cuban hat
It won’t be difficult to crochet a “kubanka” hat. The work flow is extremely simple:
- From thick yarn with crochet number 5 we make 3 air ones and close them into a ring.
- To move to a new row, each time we do 2 air moves. We knit the bottom with columns. In the first row we knit two of them in each loop.
- We make further additions incrementally. First, we knit two stitches in every second loop, in the next round - in every third, etc. If you want to make the crown part more rounded, then the additions should be made every other row. When the diameter of the bottom is 18 cm, we make no more additions.
- We knit the main part of the hat, alternating a row of single crochets with a row in which 1 fluffy half-column and 1 simple half-column are knitted alternately.
- This knitting allows you to get a pattern with cones. It is done like this: we secure 2 air stitches at the beginning of the row with a half-column. We make a yarn over and insert the hook into the resulting air bridge, pulling out the elongated loop, yarn over again and pull out a new long loop from the same place. We repeat this up to 5-7 times. Now in one motion we knit all the loops that are on the hook. After 2 stitches of the previous row we skip, and in the third we knit a half-column. Again we make a lush column, inserting the hook into the gap between the half-column and the previously made lush element.
- We knit in this pattern until we get the desired height (14 cm). Cut and fasten the thread. The hat is ready.
It may turn out that the kubanka does not fit tightly enough on the bottom. To avoid this, the last 6 rows are knitted with cuts. To do this, in the first row, 1 column is passed 6-8 times at equal intervals. The next two rows are knitted without decreases, and in the fourth row the same reductions are made. There are no decreases needed in the last two rows.
Selection of caps
The sizes of children's hats are determined by age and head circumference in centimeters. However, the grids may differ: some have a step of 1 cm, as in the table below, others have 2 (40, 42, 44, etc.) or even 4 cm (40, 44, 48, etc.). This depends, first of all, on the type of headgear: for elastic products, knitted or knitted, the step is larger, for non-stretchy products, the step is smaller. Age is not always indicated.
We mentioned above that children, especially newborns, grow very quickly, and it is better to take extra clothes for them. But this advice does not apply to hats: they should be selected as accurately as possible. A hat that is too large will cause inconvenience, and in the case of very small children, if it moves onto the face (during sleep), it can interfere with normal breathing. More complete information on how to choose the size of a hat for a newborn, as well as a table with the necessary parameters, can be found in a separate article.
| Size | Age |
| 35 | 0-2 m. |
| 40 | 3m. |
| 44 | 6 m. |
| 46 | 9 m. |
| 47 | 12 m. |
| 48 | 18 m. |
| 49 | 2 years |
| 50 | 3 years |
| 51 | 4 years |
| 52 | 5 years |
| 53 | 6 years |
| 54 | 7 years |
| 55 | 8 years |
| 56 | 9 years |
| 56 | 10 years |
| 56-57 | 11 years |
| 56-58 | 12 years |
The size of children's socks usually comes in fairly large increments, which is explained by the high elasticity of modern products: they easily stretch by 3-4 cm. This can be clearly seen from the following table. But this is not a rule: some manufacturers have a more detailed grid, in increments of 1 cm and 1 month, separate for babies up to 12 months. and from 1 year to 12 years.
How to decorate the finished product
A simple hat knitted can be turned into a real masterpiece. To decorate kubankas, craftswomen use beads, stones, ribbons, and crocheted flowers. Often, finished hats are covered with embroidery using various techniques. Models with false braids look interesting. To make them, long ribbons up to ten loops wide are knitted with knitting needles, which are then intertwined in groups of three or five. Another finishing option is to use cords crocheted from air loops. They are laid out in intricate patterns and sewn onto a knitted fabric - simple and very beautiful.