- 70431
- 13-10-2020
- Author: Mysekret Team
- 1
Crocheted slippers add coziness and neatness to the home, and give its inhabitants warmth and maintain health. In addition, these indoor shoes not only save you from the cold floor, but can also perfectly lift your mood. In addition, products like crocheted slippers will be a wonderful gift for a variety of holidays, including New Year’s. Therefore, you should definitely learn how to crochet slippers.
For the little ones
Let's start with, perhaps, the most popular slippers today - baby booties. Today, on handicraft sites you can find hundreds of unique models of these cute shoes for babies. Skilled craftswomen from all over the world compete in the design and decoration of these items. And, I must say, very successfully - you leaf through the gallery of photographs and are breathtaking from the beauty.
Knitting booties is not difficult. They usually start with the sole, and only then form the toe and boot. Based on the thickness of the yarn, you can adjust the number of air loops in the initial chain, thereby adjusting the item to the desired size. Therefore, booties are relevant for both newborns and one-year-old toddlers.
Depending on the composition of the threads, handmade children's shoes can be either openwork - made of light cotton, or warm, warming little feet in the winter cold. It is often ordered from knitters as a gift - such a bright detail will perfectly complement a baptismal set or a holiday suit for a tiny person.
And how much space for the designer’s imagination is given by knitting tiny “topotushkas”! Booties in the shape of berries, fruits, bunnies, teddy bears, birds, decorated with satin ribbons, beads, bows, pom-poms! They can be held on the leg by strings, fasteners, buttons or elastic - it all depends on the vision of the creator.
There are even sneakers for little ones - they look very stylish, just right for little fashionistas. If you buy mercerized cotton, there will be a summer option. Or take special acrylic with the addition of merino or bamboo if frost is coming. It is not recommended to use natural wool in making clothes for babies - it can provoke an allergic reaction.
In a word, the choice of children's models is truly huge, and on the Internet you can always find detailed master classes, descriptions and diagrams, and get a lot of ideas on how to decorate a product in an unusual and interesting way.
Master class on making slippers from knitted yarn step by step
Step 1. Knitting the toe of slippers
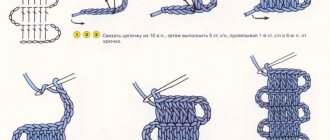
The toe is usually knitted in circular rows. The work uses single crochets. The work begins with a set of air loops, then the loops are closed into a ring using a connecting post.
Fig 1: Knitting a connecting post
Depending on the size of the shoe, the loops in the toe are added according to a certain pattern of additions (see Table 1). When you have reached the required number of loops, you need to knit an additional 4 rows without further additions.
Table 1: Data on the increase in the toe of slippers
Step 2. Slipper foot
The foot is knitted in circular rows with double crochets. There are 2 options for knitting the length of the foot - smooth or convex fabric (see Fig. 2)
Rice. 2: Smooth and convex fabric for foot length knitting
The number of loops depends on the shoe size (see table 2)
Table 2: Table of slipper sizes with the condition of using hook No. 4
Table 3: Foot length data
Video master class: Knitting a chair (cushion) slipper for any size
Step 3. Knitting the heel of the footwear
The heel is knitted in circular rows with single crochets. And they constantly add loops until the required number of loops is obtained for the desired shoe size. For the first row, 1 chain lifting loop is knitted, then one loop is skipped, 1 tbsp is knitted. single crochet and 1 connecting stitch as shown in Figure 3
Fig 3. Beginning of the row
For the 2nd row, you still need to knit one chain stitch, turn the product and knit 2 single crochets into the loop of the previous row. Then fix 1 connection again. column into the next free loop of the last row of the foot.
After these manipulations, the work progresses as follows:
1st century lifting loop, conn. skip the stitch of the previous row, add 1 loop, knit single crochets to the penultimate single crochet of the previous row, add 1 loop, then fasten with 1 connecting stitch into the next free loop of the last row of the foot.
Fig 4. Adding heel loops
The increase occurs like this - in the first and last single crochet of the previous row.
As soon as you have knitted the required number of loops according to the table of shoe sizes, then knit without increments until a certain number of unknitted foot loops remain (see Table 2: table of slipper sizes).
Next, you need to turn the work without knitting the instep air loop and knit loose connecting posts on half of the heel loops as shown in Fig. 5.
Rice. 5 Finishing heel knitting
In this case, the work came to the middle of the back of the toe. At the very end, it is important to ensure that the connecting posts on the finished slipper are not visible.
Tip: If you decide to knit the upper part of the slipper with yarn of a different color, then there is no point in knitting the connecting posts. Yarn of a different color is added to the work in the middle of the last row of the heel
Step 5. Knitting the upper part of the slippers
The upper part is knitted along the heel loops in circular rows and along the free loops of the foot, starting with half double crochets.
When making the top, you can experiment with different patterns and lengths. In the process of performing the first row, it is important that 1 half double crochet is knitted into the last connecting stitch of the heel and into the foot loop lying underneath it, into which the connecting stitch is knitted (see Fig. 6). At the end, you need to knit 3 rows with half double crochets without adding anything.
Figure 6: Instep wedge
Tip: When knitting children's and women's slippers, you can decrease 2 loops in the next 2 rows. Thanks to this, the upper part will be slightly narrower and the product will fit well to the legs.
Where to start crocheting slippers?
Older children and adults can also be pampered with an original new thing. For example, knitting comfortable slips. They look like an unknitted sock, they keep you wonderfully warm and don’t fall off your feet—an ideal solution for teenagers who tend to forget to put on indoor shoes and run barefoot on the cold floor, driving their mothers worried about their health crazy.
It’s not difficult to make the footprints yourself; even a novice needlewoman can do this task. You can start from the toe, gradually moving towards the instep and foot, or you can use the “booties” method - first knit the bottom, and only then proceed to forming the top.
Which approach to choose - decide for yourself, based on your own skills and knowledge. In the first case, it is easier to knit according to a text description or video , the second is convenient for those who are familiar with patterns. But, of course, the main thing in this matter is your indefatigable imagination and desire to create. Play with bright colors, decorate as you wish, because “simplicity” does not mean “boring”. Even a few large buttons can transform a product.
If you know Tunisian crochet, you have unprecedented scope for creativity. The traces knitted using this interesting technique are dense and do not deform from long-term use, and if you combine threads of different colors and embroidery elements in your work, you can create a stunning jacquard pattern. Of course, you will have to tinker, but the result will definitely pleasantly surprise you.
But if you've never heard of the magic double-sided hook, it doesn't matter. The World Wide Web will provide a lot of educational information and useful tips that will certainly help you master the original technique that came from the East and won an army of fans all over the world.
By the way, the sole of the shoe is the “weakest” point, the first to deteriorate, so it is advisable to “reinforce” it. How? Ordinary women's tights have worked well. Durable nylon will serve you well - just cut the stockings in a spiral into a 1.5 cm strip, pull out the nylon tape, and roll it into a ball. The resulting “yarn” can be combined with woolen thread, or knitted into a separate piece, and then simply sew it to the base.
The footprints do not require special care - they can be machine washed. But in a delicate mode, otherwise they will soon acquire a fairly shabby appearance. Agree, it’s incredibly disappointing if all your efforts go to waste.
How to crochet socks: patterns with pictures
To quickly learn how to knit socks, it is important to start with light models. You should not immediately take on seamless options made with 4-5 knitting needles. Take a hook, thick threads and start with coarse knitting. This is a simple and correct approach. Having mastered elementary patterns, you can begin more complex work.
Homemade woolen slippers
See also...
✅ How to crochet booties for newborns: patterns and description
✅ Knitting double-sided patterns with knitting needles: examples, patterns, features
✅ How to knit a women's sleeveless vest with knitting needles?
✅ Knitting socks: diagrams with descriptions
Knitting this model will take a minimum of time, and if you follow all the recommendations correctly, in the future you will be able to move on to more complex products.
Yarn - “Village” from Troitsk, natural color (1508), 100% wool, 170 m / 100 g.,
Yarn consumption 100 g, hook number 3.5. Main knitting density (single crochet).
- Pg = 1.54 loops in 1 cm,
- Pv = 1.8 rows in 1 cm.
- Leg girth (He) 23 cm.
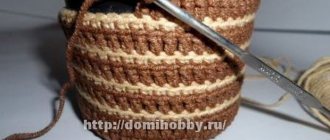
Description of work: We begin to knit slippers from the toe. We make a sliding loop, knit 6 single crochets into it, including 1 chain stitch, then knit a circle, obeying the main rule of knitting a circle: the number of stitches added in each row should be equal to the number of stitches in the first row, in our case - 6. We turn the work at the beginning of a new row.
If you knit without turning the work, the pattern on the toe and the rest of the slippers will differ in appearance. We knit until the circumference becomes equal to the circumference of the leg. Let's calculate the number of columns. It will be equal to the measurement of the leg circumference, multiplied by the horizontal knitting density: He x Pg = 23 x 1.54 = 35.42.
Let's round, we get 36 columns. That is, you need to knit in the round with increases until you get 36 loops (stitches). Considering the rule of the circle, to get 36 columns you need to knit 6 rows. It is quite possible that, according to your calculations, you will need to make fewer increases in the last row - there is nothing wrong with that, just distribute the required number of increases evenly around the circle.
Next, we continue to knit in a spiral without any increments. We knit the desired length of the toe, in this case just below the bone of the big toe, which was 7 cm or 14 rows. We knit the middle part of the slipper with straight fabric. The middle part will account for 2/3 of 36 columns, i.e. 24 columns. We continue to knit the middle part.
We will make the slipper shorter than the foot by about 2 cm so that it fits more tightly on the foot. At this stage, you can iron the middle part of the slipper, since the fabric knitted with single crochets tends to curl. This way the finished product will look neater. However, you don’t have to do this: the slipper will fit well on your foot without it. Now we begin to form the heel. To do this, divide the loops into three parts. The number of loops in the middle part is equal to 1/3 of 24 loops - 8 loops (columns) are obtained. If you have 1 loop left, add it to the middle part, if you have 2 loops, add one to the side parts. We will form the heel using shortened rows. We begin to knit the heel from the wrong side. We knit 8 single crochets in the first part, then 7 single crochets in the middle part, skip the 8th stitch in the middle part, and knit a connecting stitch in the first loop of the third part. The heel turns out neater if you knit the last connecting stitch on the front side as usual, inserting the hook into the loop from the front, and on the wrong side, inserting the hook into the loop from the back. We turn the work to the front side.
We knit the first stitch in the shortened row without a lifting loop into the first loop from the hook. Again we knit 7 loops of the middle part with single crochets, and in the first loop of the side part we knit a connecting post, while inserting the hook into the loop in front. We continue to correctly knit the heel in the same way, attaching loops from the side parts. We finish knitting the heel with the front row. The result will be such a neat heel. Now we tie the edge of the slipper (except for the heel) with single crochets, slightly pulling the edge for a better fit of the slipper on the foot. Then we knit a series of connecting posts along the edge, already including the heel. We cut the thread and hide its end. The slipper is ready. We knit the second one in exactly the same way. In our example, the trim is made of patchwork style motifs, and at the end the edge is additionally tied with two rows of connecting posts with blue yarn. The motifs are attached to the slipper in the process of tying the edge.
Men's striped socks
We knit socks for foot size 42
Materials:
- Regular thin wool yarn for socks (two folds);
- Hook 2.5 mm;
- 3 hours per sock.
We will knit the sock from the toe. The sock is knitted with half-stitches! Dial 4 v. etc., close it in a ring... further according to the diagram.
Last row of toe = 52 stitches. Next, we continue to knit in circles in half-stitches, adding 2 loops in the first row after the toe = 54 loops. 20 rows of 54 loops in each circular row. The seam is located on the sole.
For the heel, divide the stitches in half. We knit on 27 loops of the sole. To do this, move 13 loops back from the seam using connecting posts.
The bottom of the heel is a triangle. We continue to work in half-columns. Knit a triangle on 27 loops, decreasing one loop on both sides in each row (knit 2 half-stitches together), until 1 loop remains on the hook.
Now we will do the instep wedge and the back of the heel together. To do this, cast on 21 loops along the edge of the triangle on each side; on the front part, which we did not touch, you should get 28 loops = a total of 70 loops for the first circular row (I made it with beige threads).
Side view. Note that the triangle is the bottom of the heel, not the entire heel. To create an instep wedge, apply a decrease on both sides of the top of the toe. Decrease = 3 half stitches knitted together.
Decrease until there are 46 stitches left in the row. There are 10 circular rows in total.
Now the elastic band. Knit according to the pattern:
- 1st row: double crochets in each loop
- 2nd row: 2 in. p. rise, *front embossed double crochet, 1 simple double crochet*, repeat from * to * to the end of the row.
- Rows 3-16: 2 in. p. rise, *front embossed column in the relief column of the previous row, double crochet in the double crochet of the previous row*, repeat from * to * to the end of the row.
Simple booties for baby
Yarn: “Souffle”, Semenovskaya yarn, acrylic 100%, 292 m / 100 g. Yarn consumption 25 g.
Tools: hook No. 2.5.
Size: sole length 12 cm.
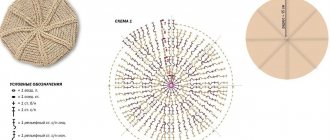
Booties-slippers are knitted with single crochets. The sole is oval shaped. Watch a detailed master class on knitting soles and you will be able to knit a sole of the size you need from your yarn. The length of the sole is 12 cm. The width is 6 cm. At the beginning we knit a chain of air loops 7 cm long or 13 loops, plus 1 air loop for lifting. Having knitted the sole according to the pattern, we get 56 loops around the perimeter of the sole.
Side part. We knit the top of the booties with single crochets in rotating rows. We knit the 1st row purlwise (behind the work) with embossed single crochet stitches to form a welt. To lift, we knit one air loop. We close the row with a connecting stitch, turn the work and knit the next row. Next, we continue to knit 7 more rows with single crochets.
In total, the side part consists of 8 rows . The height of the side part can be from 2 to 3 cm. In our case, 3 cm.
We knit the toe in short rows. Find the center of the sole in the front: 13 loops in the middle part, plus 7 loops in the front - the 21st loop from the beginning of the row will be the middle of the bootie in the front. You can simply bend the bootie in the middle. From the center we mark 5 loops to the left and to the right. Determine the number of loops required to knit a toe.
The width of the toe is equal to the width of the sole or slightly less . In our case, these are 11 loops (columns). In the photo, the center of the toe is indicated with a pink marker, and the outer loops of the toe are indicated with blue markers.
9th row: 15 side loops and 10 toe loops are knitted with single crochets, skip a loop, 1 connecting stitch; Row 10: We knit 10 toe loops with single crochets, skip a loop, and a connecting stitch. Attention! The first stitch in the row is tight, don't skip it.
Next we knit another 8 rows in the same way as the 10th row. There are 10 rows in total. The toe takes up approximately half the length of the bootie. In the 19th row we continue to knit the bootie in the round and close the row. We do not decrease the loops in this row. We tie the top of the bootie with a crayfish step. We knit the second bootie in the same way as the first. We decorated the booties with a crocheted bow. You can decorate the booties to your liking.
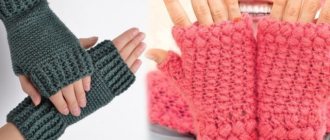
Openwork socks - master class
Openwork products look especially beautiful, but require more patience. Starting from the elastic band, you can tie them with the thinnest thread, creating the finest lace (short and tall styles look good).
Motif slipper boots
Stylish house boots can be knitted from motifs by choosing a thick thread. This is a more complex pattern, for those who have already learned the features of knitting simple socks.
Socks and sneakers
To please your husband, try knitting him stylish homemade sneakers. These shoes are warm and comfortable, and most importantly, no one has a second pair like them.
Watermelon socks
Stylish socks reminiscent of a watermelon will delight you all winter, so try knitting just such a model for yourself.
Socks for newborns
A newborn's feet need to be warm, so we offer universal, cool models for the little ones.
Crocodile boots for kids (step by step)
Beautiful home boots for a baby can be crocheted. The boot is reminiscent of scales, so your feet will definitely not freeze.
Children's sneakers-slippers for boys
Homemade version with felt sole
Interesting minion slippers
Share with your friends!
- 4
- 7
- 6
- 17
Shared
Subscribe to our Yandex.Zen channel or Yandex.Messenger
For men
The holiday is approaching, but you don’t know what to give your husband, son or male friend? You are not alone - most women face this problem. Razor and shampoo are too hackneyed, and with the rest you can simply not please. And I really want the gift to sincerely please! The solution is to knit slippers in the shape of tanks, for example, for a representative of the stronger half of humanity!
Decorations for the New Year: decor ideas and options for decorating a house and apartment for New Year's celebrations (135 photos)- Window decoration - simple ideas and step-by-step descriptions of do-it-yourself window decoration (110 photos and videos)
Diaper cake - a step-by-step description of creating a diaper cake. 115 photos and videos of creating a gift
These homemade khaki slippers, with embroidered stars and military symbols, with a turret and barrel, have been very popular lately. They will be a truly appropriate present for Defender of the Fatherland Day.
If you don’t know where to start, take a look at the forums, where there are many recommendations and lessons on the topic of tank slippers. You will definitely find a suitable step-by-step master class with a list of materials necessary for the work.
Save time
Simple and beautiful slippers can be knitted using a ready-made sole - felt, for example. This will significantly save your time and guarantee that the new thing will fit. And it will last much longer - the felt wears out more slowly. But this material does not tolerate machine washing, shrinking and deforming, so be prepared to wash it by hand.
First, you need to make markings on the insole - mark points along the entire perimeter at a distance of 2-3 mm from the edge, with an interval of 0.5 cm. Make holes with an awl, and then tie the edge, sticking the tool into each hole. Afterwards you can continue knitting without any problems. Fast and convenient, right?
Using this technique, you can easily make elegant ballet shoes. They hold their shape well due to their rigid base. The top can be decorated with ribbon embroidery - a delicate detail that will fit well into the sophisticated look of the shoes. A chic alternative to the old trampled galoshes.
Patchwork - technique and master class for sewing stylish and beautiful sewing with your own hands (80 photos)- Tilda doll - a master class in sewing toys with your own hands. 125 photos of the best toy models
- How to make a car out of paper: step-by-step description of how to quickly and easily build a high-quality car (75 photos + video)
For a girl, ballet shoes in the shape of bunnies will be a wonderful surprise. Just add a pair of ears to white shoes, embroider the eyes and nose with a few stitches, and sew a fluffy pom-pom tail on the heel. The young fashionista will be delighted!
By the way, when creating slippers for the home, you can use not only felt insoles. A rigid base – rubber or polyurethane – will also provide strength and durability. You can buy one at the market or order it from an online store. All that remains for you is to glue it to the bottom of the knitted product! Moment waterproof glue is also suitable for this purpose, but remember that it has a very strong odor, so you need to work with it in a thoroughly ventilated area.
By the way, a durable outsole is a salvation for lovers of homemade flip-flops and flip-flops, because without a solid platform they cannot be worn due to the lack of a backdrop.
Manufacturing stages based on the model
Many models of slippers with felt soles can make a beautiful gift. If you are interested in decorating them, they will not only warm your feet, but also evoke pleasant emotions. Flip-flops are considered the easiest to make. Having filled your hand a little, you can knit Czech shoes, both for a child and an adult, as well as closed slippers (with or without lace).
Getting started on each type of house shoe is the same, be it flip-flops or another product. Take an insole that needs to be tied. The holes are first pierced with an awl: the distance between the edge and each hole is 0.5 cm. To securely fasten the felt sole, the single crochet technique is used. Next, we think about how to design the top.
Craftswomen who love openwork knitting will need to use any hexagon pattern. A detail is knitted for each slipper. The openwork elements are simply stitched together at the end.
Indoor slippers
There is nothing difficult in making house shoes if you have detailed instructions with tips. To do this, we knit flip-flops step by step, following the recommendations presented below. You will need:
- threads of different colors so that indoor slippers are bright and positive;
- two hooks: No. 4.5 and No. 2/2.25;
- decor of any kind.
First of all, you need to tie the base using diagrams and descriptions. Tool No. 2 and the single crochet (SC) method are used. In all holes, except the first, two entries are made. When the entire insole is tied, the last post enters the first hole, thereby completing and securing the process. It is recommended to make another row along the insole using the same method. It turns out more reliable and durable.
The next step is to create two crocheted marks that will cover the felt base. If you take the average foot size, 38, then 27 air loops are cast. According to the classical pattern, the upper and lower rounded bases, as well as the first and second rows, are knitted. The third is created in six columns and half-columns with an overlap, another sixteen - without a crochet. All anatomical curves are repeated by row 4, and row 5 is knitted according to the standard. This way the foot is made on both sides. When the parts are ready, you need to connect everything together and the base.
A felt trace is tied in a circle with a single crochet. Next, the top element is created. For an open crossbar, the threads are not fastened to the very edge of the sole. You should step back to the side and make 8 chain stitches. You can connect the chain using a single crochet. This is done on the opposite side. Connecting loops are attached to the columns in the last row. It is important to knit two sc at the end of each stitch.
The next step is to knit the previous element in the entire first row of the top of the slipper. To add, you will have to pass the first post into the second loop. When the row ends, be sure to do two single crochets again, turn the piece over and knit the next one. The steps are repeated until the desired length of the top of the product is reached. 6-8 strips are enough. Next, the first stitch is knitted into the third loop.
Having created fifteen rows, you can move on to making the side panels. It is necessary to follow simple recommendations: work begins according to the usual pattern, but the row is not completely knitted. Five single crochets are made, the workpiece is turned over, and the first loop is “stepped over” to reduce their number by one. Next, 4 single crochets and 2 connecting stitches are created.
This method is used to carry out actions with subsequent stripes. Each odd stitch is decreased by a stitch until one stitch remains. You need to make two connecting loops on it and cut the thread. Crocheted slippers are almost ready. It remains to secure the second side panel in a similar way.
Tie the insoles with single crochets
Create two footprints for the sole. Connect knitted footprints to the sole.
Knit the top element of the flip-flops
Make sidewalls Sew the upper part to the sole
Tie the slippers in a circle Add decoration
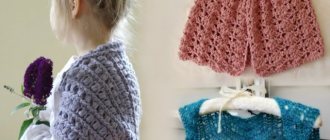
Children's Czech shoes
Any mother will be pleased to make slippers with her own hands for her daughter or son. Using colored yarn, you can create beautiful and bright children's shoes. Shoes can be completely knitted or have a tight base. For production you will need tools and materials: a 3.5 mm hook, a needle with a wide eye or an awl, felt insoles and yarn.
Crochet shoes with soles are created according to the following general pattern:
- First, the sides are knitted in 2-3 rows with a single crochet;
- then the upper part is made;
- all parts are connected to each other;
- The product is decorated to your liking.
Each master class on creating shoes begins with making holes in the felt insoles with an awl or a needle. Then the edges are tied with a double crochet stitch. For leg size 22, make 20 loops. Next, the first and second rows are made with a half-column, the third and subsequent rows are made with RLS with the addition of loops one at a time.
After making children's shoes, adult models can be knitted using the same pattern. It will look interesting if the whole family walks around the house in slippers made in the same color scheme. For some, such a hobby can easily become not just a pleasant and useful pastime, but also a good source of income.
Tie the sole, make sides Make the upper part, add decor
Closed slippers with lace
Closed slippers with a lace are a simple and, one might say, universal model of house shoes, suitable for men, women, and children. The only differences are in the quantity and color of yarn, as well as in the decoration. The crochet pattern for beginner needlewomen will be easy to master.
You need to knit in two threads. To do this, use a 2.5 mm hook. It starts with the sock. 8 chain stitches are cast on. Three loops are knitted from one along the edges to widen the nose. When you get a “boat”, the first fitting is done on the foot. If all fingers are closed, then there is no need to increase the pressure. The height of the product should be 3.5 cm. Another 7 cm is knitted in a circle without adding loops to get a kind of bag.
The upper part of the sneaker is divided into three. The right segment is knitted and an air loop is created. The product is unfolded so that the knitted side goes to the foot. Working using the “back and forth” method, the protruding parts are knitted from the sides. In this way you need to reach the heel. Then the fitting is done.
The finished canvas is visually divided into three parts, the right side is taken to work. This is where the heel flap will be created. Its height should correspond to 1/3 of the length of the middle of the canvas. The finished backdrop is tied to the left side with an overcast stitch. You should raise the working thread to the neck to stitch the top. When finishing is completed, the yarn will return to the beginning of its journey.
To complete the creation of closed slippers, laces are made. The yarn is not broken, but knitted to the place where the strap will be located. The laces are created from simple air loops (30 pieces). This is done with a single crochet. Having reached the side part, you should run an overlock stitch to the opposite side to begin knitting the second lace. When two ties are ready, the work can be considered completed.
Tie the sole
Start knitting a “boat” from the toe Try it on the foot Knit the upper part of the slipper Make a trim for the lace Thread the laces into the prepared holes Add decor Try the product on
A little bit of Africa
The motives deserve a separate discussion. Not only is knitting them a truly exciting process, but you can also save a lot of money by using small multi-colored skeins left over from other knitting projects. The main thing is that the color scheme is harmonious, and the residues used are approximately the same in thickness and composition.
High boots made of hexagons are a great success among handmade connoisseurs. They are also called "African flower". This is a successful motif, a real find for lovers of ethnic style. It is not difficult to knit; patterns are freely available on many websites. And you can use such an element not only when creating cozy slippers-boots, but also blankets, pillows, clothes and toys for every taste.
The only negative is that connecting motives takes a lot of time. You will have to work hard to put all the elements together. For these purposes, you can use a needle or crochet hook. In the first case, the seams are more invisible, but in the second, on the contrary, they turn out to be voluminous and embossed. Whichever one you like best, choose the one.
- Paper toys - diagrams, ideas and options for making various toys with your own hands (110 photos)
- Dymkovo toy - modern collections, their creation and features of making Dymkovo toys (115 photos and videos)
- Knitting openwork patterns - diagrams and step-by-step master class on how to knit an openwork pattern quickly and easily (95 photos + video)
Create
Now are you convinced that knitted slippers are not a primitive thing at all? This is a beautiful, stylish and functional wardrobe item that carries the warmth of the creator’s hands and is a reflection of his creative spirit. Delight your loved ones with cute little things, improve your skills, and don’t be afraid to experiment. You can easily find a colossal selection of ideas, hundreds of instructions, video lessons and advice from experienced knitters on social networks.
All you need is to type “crocheted slippers patterns and description” into a search engine, select the appropriate option, arm yourself with threads and tools and start creating a masterpiece.
Master class for beginners on crocheting slippers
If you have only recently picked up a hook and thread for the first time, if you have just learned how to knit the basic types of loops, then this step-by-step master class is just for you. Look at the photo below - you can knit this beauty too! But first, we advise you to repeat the basics of knitting using the article CROCHETING WITH DIAGRAMS AND DESCRIPTIONS FOR BEGINNERS (TIPS AND SECRETS IN PRACTICE)
While knitting, carefully read the description and focus on the diagram shown in the next photo.
Scheme:
Sequence of work in stages
Slippers size – 38.
Bottom part
Knit a chain of 33 vp. + 1 v.p. rise.
1 lap. Art. 31 b/n., 4 tbsp. b/n. in the last air loop (sock), 31 st. b/n., 4 tbsp. b/n. in the last loop (heel)
2nd circle 15th century b/n., 3 half-st. s/n., 13 tbsp. s/n., 2 tbsp. s/n. in one loop* 4 times (sock 8 tbsp. s/n.), 13 tbsp. s/n., 3 half-st. s/n., 15 tbsp. b/n., 2 tbsp. b/n. in one loop* 4 times (heel 8 tbsp).
3 circle. 15th century b/n., 3 half-st. s/n., 13 tbsp. s/n., 2 tbsp. s/n. in 1 loop * 8 times (sock 16 tbsp. s/n.), 13 tbsp. s/n., 3 half-st. s/n., 15 tbsp. b/n., 2 tbsp. b/n. in 1 loop * 8 times (heel 16 st. b/n.)
4 circle. Art. b/n. replace with half a century. s/n.
18 half. s/n., 13 tbsp. s/n., (2 tbsp. s/n. in 1 p., 1 tbsp. s/n.) * 8 times (sock 24 tbsp. s/n.), 13 tbsp. s/n., 18 semist. s/n., 16 semist. s/n. (heel).
5 lap. 31 half-st. s/n., 24 semist. s/n. (sock) 31 half st. s/n., 8 half-st. s/n. (half heel).
6th circle 103 art. b/n.
Top part
1 row. Start knitting from the middle of the heel, purl relief stitches. b/n., row knit loosely, so as not to pull the sole.
2nd row. 103 art. b/n.
3rd row. 25 Art. b/n., 3 half-st. s/n., 47 art. s/n., 3 half-st. s/n., 25 tbsp. b\n.
4 row. 25 Art. b/n., 3 half-st. s/n., 1 tbsp. s/n., (2 tbsp. s/n. with one top, 1 tbsp. s/n.) * 15 times, 1 tbsp. s/n., 3 half-st. s/n., 25 tbsp. b/n.
5 row. 25 Art. b/n., 3 half-st. s/n., 1 tbsp. s/n., (2 tbsp. s/n. with one top, 1 tbsp. s/n.) * 10 times, 1 tbsp. s/n., 3 half-st. s/n., 25 tbsp. b/n.
6th row. 25 Art. b/n., 3 half-st. s/n., 1 tbsp. s/n., (2 st. s/n. with one top, 1 st. s/n.) * 7 times, 3 half-st. s/n., 25 tbsp. b/n.
7th row. 25 Art. b/n., 3 half-st. s/n., (2 st. s/n. with one top, 1 st. s/n.) * 5 times, 3 half-st. s/n., 25 tbsp. b/n.
8 row. 25 Art. b/n., 3 half-st. s/n., 1 tbsp. s/n., (2 tbsp. s/n. with one top, 1 tbsp. s/n.) * 3 times, 3 half-st. s/n., 25 tbsp. b/n.
Row 9 and subsequent knit stitches. b/n. to the desired height. If necessary, make reductions evenly.
Tie the edge of the sole and the last row with a “crawfish step”, tie flowers or bows for decoration.
Warm and cozy crocheted slippers with patterns and descriptions are ready. Let your feet be happy.
Be sure to watch the training video:
You can also knit slippers with knitting needles if you prefer this type of needlework.