DIY tools
How to make a beautiful birthday card? To do this you will need an ordinary school set of tools:
- colored paper;
- scissors;
- glue;
- ruler;
- markers and felt-tip pens of different colors;
- various ribbons and laces for decorating cards;
- beads and seed beads for decoration.
What kind of birthday card should you make for your loved ones and loved ones? There are an incredible number of options for such crafts.
Instructions for their manufacture can be easily found on the Internet. Today we offer the most popular and beautiful options for crafts for mom and dad.
Postcard using the vytynanka technique
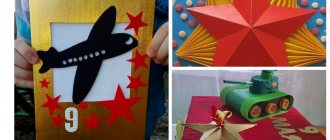
You can make a birthday card for your grandfather with your own hands using a very unusual technique called vytynanka. This fairly common technique was known in ancient times, but is now rarely used. You can make a very beautiful gift in the form of a cut out boat on a postcard. A grandfather will be very pleased to receive such a gift from his grandson.
Necessary materials:
blue cardboard - 2 sheets;- pencil;
- stationery knife;
- scissors;
- modeling board;
- a sheet of white paper;
- glue;
- brush;
- gel pen;
- stickers in nautical style.
Having prepared all the materials, let's get to work:
- Let's draw a model of the ship on a sheet of cardboard. If possible, you can print it on a printer.
- Place the cardboard on a modeling board and carefully cut out the ship using a knife. Please note that you need to cut out all the small parts very carefully.
- Take the second cardboard sheet and bend it in half.
- Let's draw an anchor on the front side of the postcard and running waves on top. Let's take a knife and carefully cut through all the parts again.
- We unfold the card and paste a white sheet of paper inside it; you can write on it in advance all your wishes for your grandfather or maybe uncle - depending on who you are giving the gift to.
- We bend it and iron it.
- From above, using glue, we attach the ship to the postcard.
Photos of birthday cards
Paper cake with wishes
This unusual craft is perfect for presenting at an anniversary. It will become a worthy decoration at any holiday and no one will remain indifferent to it.
Materials:
- colored paper - 13 sheets;
- satin ribbons;
- ribbon lace;
- beads;
- rhinestones;
- scissors;
- ruler;
- PVA glue;
- wishes written on small notes;
- brush.
It is worth noting that you can put not only wishes, but also various miniature gifts inside the cake pieces. Before you begin, you will need a template. It’s quite easy to make it yourself, but you can print it on a printer if you have the opportunity.
Step-by-step instruction:
- Each short side will be 5 cm, and the long side will be 10 cm - draw a template according to the presented sample and cut it out.
- Using the template, we outline its borders on each sheet of colored paper. Using a ruler, we iron out all the folds, this is why all the pieces of the cake will look neat.
- Using glue, we glue the edges of the cake, connecting the sharp corners and the side ones.
- We put congratulatory wishes and gifts inside.
- After this, we close each of the resulting pieces of cake, using a tongue and a slot under it. Or glue it with glue.
- Each piece of the craft needs to be decorated; to do this, we make 13 small bows from satin ribbon.
- We glue them on top of each piece: it is worth noting that you can take ribbons of different colors.
- On top, in a chaotic order, we glue beads and rhinestones or lay out some pattern of them that will fit together when the cake is assembled.
- After the cake is completely decorated, you can tie it in a circle with a ribbon so that it does not fall apart and the pieces do not move apart.
This craft can be given not only for a birthday, but also for another significant date.